by Scott Muniz | Jun 25, 2020 | Uncategorized
This article is contributed. See the original author and article here.
With the latest Microsoft Intune updates, we’ve opened up key new capabilities for Windows Autopilot thanks to your feedback and the requirements you’ve expressed.
User-driven Hybrid Azure AD Join now supports VPN
Many organizations want to leverage Windows Autopilot to provision new devices into their existing Active Directory environments. This capability has been available beginning with Windows 10, version 1809, but with an important restriction: devices needed to have connectivity to the organization’s network in order to complete the provisioning process.
Now, this restriction has been removed. By leveraging VPN clients (Win32 apps) delivered by Intune during device enrollment, devices can instead be sent directly to the end user, even when they are only connected to the internet, and they can still provision the device.
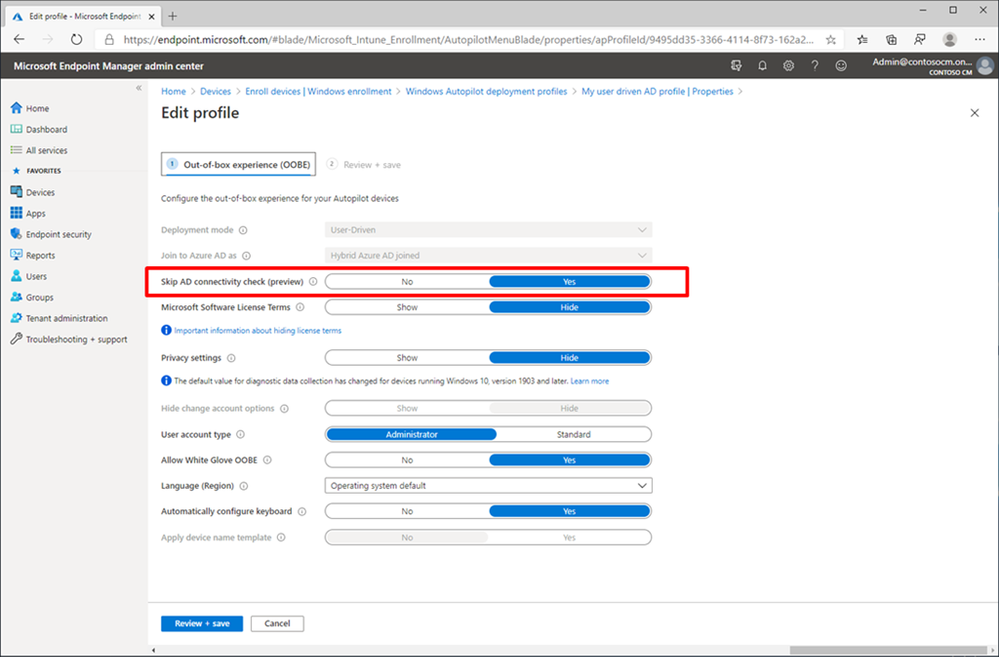
To implement this, a new “Skip AD connectivity check” option has been added to the Windows Autopilot Hybrid Azure AD Join profile. When enabled, the device will go through the entire provisioning process, up to the point where the user needs to sign into Windows for the first time, without needing any corporate network connectivity.

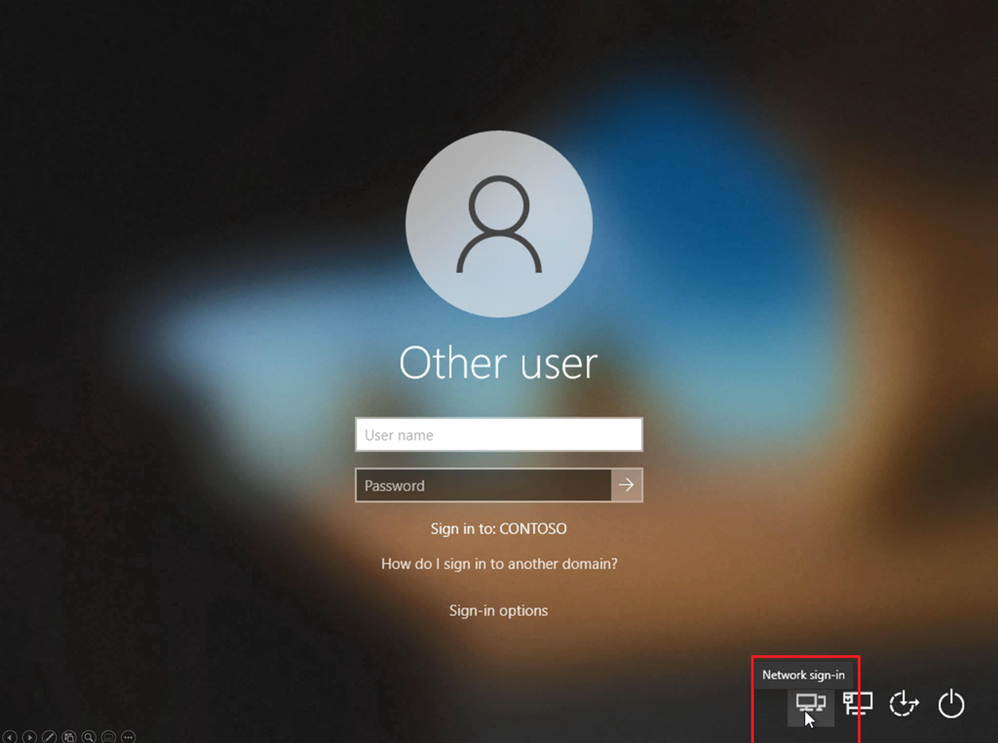
As part of device enrollment status page (ESP) tracking, Windows Autopilot and Intune can ensure that the needed VPN configuration is put in place before the user needs to sign in. Depending on the VPN client’s capabilities, this could be automatic or it might take an additional action by the end user to initiate the connection before logging on directly from the Windows logon screen, as shown below:
For specifics on how to enable this new VPN scenario, consult the updated Windows Autopilot documentation.
Enrollment status page device targeting
The ESP is a key part of the Windows Autopilot provisioning process, enabling organizations to block access to the device until it has been sufficiently configured and secured.
For those that are familiar with the targeting of ESP profile settings, you will recall that there were two options: targeting a group of users or targeting a special “default” ESP profile to all users and groups. This was challenging as some scenarios (self-deploying and white glove, for example) do not have users, and, even when there are users (e.g. user-driven scenarios), it can be difficult to ensure that the settings are only used as part of the Windows Autopilot provisioning process (since you can use ESP without Windows Autopilot too).
With this month’s new Intune functionality, you can now target ESP profiles to groups containing devices. Intune will first look at device membership, then user membership, before using the “default” ESP profile in any other case. There are no visible changes in the Intune portal, just a change in the targeting behavior. The Intune documentation for ESP has been updated to reflect this change.
Try out the new Windows Autopilot capabilities
Every enhancement we make in Windows Autopilot is in response to feedback from our customers and partners that are using this as a key part of their Windows provisioning process. We encourage you to try out these new enhancements and provide feedback on not only these features, but any other challenges that you encounter. You can leverage the Microsoft Endpoint Manager UserVoice site, Tech Community, or your favorite social media service.
For additional assistance with implementing Windows Autopilot, Intune, or any other component of Microsoft Endpoint Manager, contact your Microsoft account team or https://fasttrack.microsoft.com.
by Scott Muniz | Jun 25, 2020 | Uncategorized
This article is contributed. See the original author and article here.
Endpoint analytics, helps you understand how your end-users’ productivity can be impacted by performance and health issues with your endpoint hardware and software.
With this initial release of Endpoint analytics, we provide insights to help you understand your devices’ reboot and sign-in times so you can optimize your users’ journey from power on to productivity. .It also helps you proactively remediate common support issues before your users become aware of them which can help reduce the number of calls your helpdesk gets. Endpoint analytics even allows you to track the progress of enabling your devices to get corporate configuration data from the cloud, making it easier for employees to work from home.
To give you the visibility, insights, and actions you need to tackle these productivity killers, we are excited to announce that Endpoint analytics is now available in public preview for Microsoft Endpoint Manager managed devices!
Endpoint Analytics currently focuses on three areas to help you address endpoint related user experience problems:
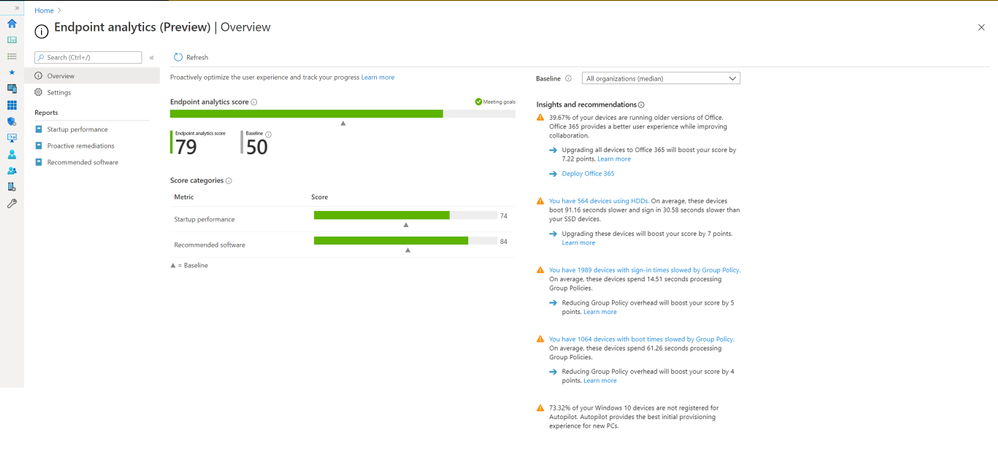
Start up performance: Get end-users from power-on to productivity quickly by identifying and eliminating lengthy boot and sign in delays. Leverage the startup performance score and a benchmark to quickly see how you compare to other organizations, along with recommended actions to improve startup times.
Recommended software: Recommendations for providing the best user experience by optimizing OS and Microsoft software versions. This includes insights across management and deployment services such as Configuration Manager, Intune, and Autopilot, as well as Azure Active Directory and Windows 10.
Proactive remediation scripting: Fix common support issues on your endpoints before end-users realize there is a problem. Use built-in scripts for common issues or author your own based on the top reported issues in your environment.
These insights and actions empower you to improve end-user experience, lower helpdesk costs, demonstrate business impact, and make informed device procurement decisions.
 Endpoint Analytics Startup Performance
To enable Endpoint analytics, navigate to https://aka.ms/endpointanalytics and click the start button. To learn more, visit the public preview page at https://aka.ms/uea.
Endpoint analytics is also integrated into Microsoft Productivity Score. If you are ready to help your organization be more productive and get the most from Microsoft 365, sign up for the Productivity Score preview at https://aka.ms/productivityscorepreview.
by Scott Muniz | Jun 25, 2020 | Uncategorized
This article is contributed. See the original author and article here.
Background
To scale the database tier efficiently, database clusters are often separated into a writeable primary and read replicas. This requires the application to route queries to the appropriate database instance. However, you need to be mindful of technical requirements:
- To implement read/write split requires expensive application code changes. This can take months of development resources when you have better things to do with your time.
- Writing to one node and reading from another can result in inconsistent data due to replication lag.
Solution
The Heimdall Proxy intelligently routes queries to the most optimal data source resulting in SQL offload and improved response times. This includes 1) Routing queries to the read/write instance while keeping data updated, and 2) Automatically caching SQL results.
In this blog, we will show you how to configure the Heimdall Proxy to transparently scale-out your write-master and read replicas for improved application response times. Let’s walk you through each feature.
How Read/Write Split Works

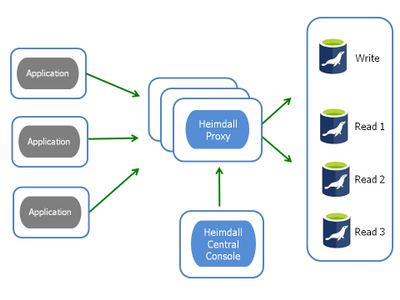
Figure 1: Read/Write Architecture
The Heimdall proxy routes queries to the appropriate write-master and read replica while accounting for replication lag and transactional state. The proxy determines whether to retrieve the SQL results from cache or the backend database. If read query is not deemed cachable, Heimdall knows which read node should be accessed, query-by-query, based on what tables were being read.
To ensure data retrieved from the replicas is fresh, our proxy calculates the replication lag. There are a variety of approaches to read/write splitting, but they are not replication lag aware. That is, how do you know when the WRITE has been updated across all database. instances? Could you be reading stale data? Other solutions may track lag but are not intelligent enough to determine WHEN it is safe for a particular query to be routed to the read-replica. They are not designed to fully offload the developer from implementing read/write split.
Also, you may have read/write spit implemented today. But our proxy makes better utilization of your replicas by evenly distributing the load so that particular instances are not overwhelmed.
In Azure, Heimdall has an option to enable username pre-processing, to adjust the username based on the desired target server. This option is the “azureDbHost” setting in the connection settings of the data source. When enabled, the application uses a simple username as normal, but when the connection is made to the server, the server hostname is extracted and appended as @hostname. This allows Azure managed databases to properly function with query routing, even if the application is not aware of this behavior.
Note: Heimdall does not support data replication; that is the job of the database. Our proxy detects when data has completed replication and routes queries to the appropriate database instance.
Replication Lag Detection
Each query is parsed to determine what tables are associated with it. The last write time to the table is tracked and is synchronized across proxies. This provides the first piece of information (i.e. when was the last time a particular table was written to). Next, we calculate how long it takes for the writes to appear on the read instance. With this information, the proxy intelligent decides on which node is “safe” to read from–either the read nodes, or only the write node. Our proxy ensures ACID compliance when eventual consistency is not acceptable.
Azure Installation and Configuration:
Start the Heimdall proxy VM instance from the Azure Marketplace. The installation will include both the proxy and Central Console. For more information, visit our technical documentation.
On the Heimdall Central Console, our configuration wizard takes you step-by-step to successfully connect the Heimdall proxy to your Azure services (i.e. application, database, cache), and configure features (e.g. Read/Write split, Caching, Load balancing). Once installed, on the Heimdall Data Central, click “Wizard”, and then click “Manual Configuration” shown in Figure 2 below.
 Figure 2. Configuration Wizard
Configuring on Heimdall Central Console:
After completing the Wizard, the configurations should be pre-populated. The “Data Sources” tab should appear like below, with one read/write instance configured along with at least one read-only instance:
- Ensure that a read/write master is configured along with at least one read-only instance:
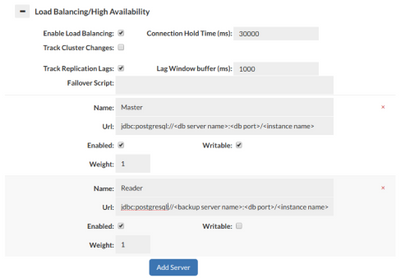
Figure 3. Read/Write Split Configuration in “Data Sources” tab
In Figure 3, since the replication lag was set to be 1000ms, and a table was last written two seconds (2000ms) ago would be deemed safe to use the read replica. If however, the last write was 500ms, then Heimdall would route the query to the write master node to complete the read operation, guaranteeing that a stale response was not received. The value of the detected replication lag is found on the status screen (if any):
 Figure 4. “Status” tab
For further protection, Heimdall adds a fixed lag window value, which is configured in a static manner. This allows the replication lag window to spike on the short-term without impacting the freshness of the data being returned. Further control over the read/write split is applied at a rule level based on matching regular expressions, including bypassing the replication lag logic for particular queries, and always using the read server.
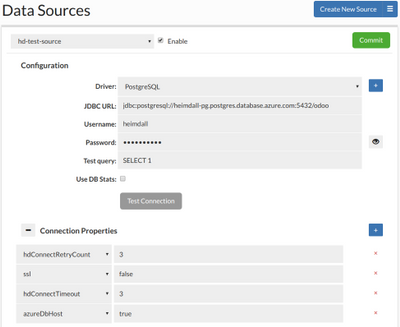
Figure 5. “Data Sources” tab
4. In the Rules tab, a Reader Eligible rule should be configured for read queries to be routed to the read server shown in Figure 6.

Figure 6. “Rules” tab
In cases where the replication lag is not a concern, the user can create a read/write split rule for particular queries that should unconditionally be read from the read/write server. This may be due to a particular user connecting to the database as well, i.e. to prevent a reporting job from putting load on the write master.
Real-time analytic charts on the Analytics tab shows read and write queries now splitting:
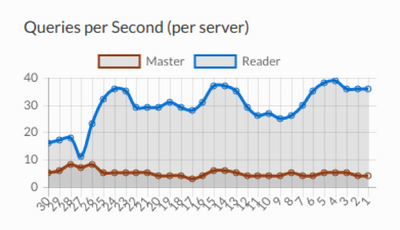
Figure 7. “Dashboard” tab
Specific query source is found in the Log tab:

Figure 8. “Log” tab
Query caching: The second-way the Heimdall proxy is used for improving database scale is to offload SQL traffic with a look-aside, results cache. Our proxy intelligently determines which queries to cache and automatically invalidates when the proxy detects an update to the database. We provide the cache logic and you choose storage (e.g. local heap, Redis). Unique to other caching solutions, Heimdall can cache SQL results in the application tier removing unwanted network latency between the application and database as shown in Figure 9 below.
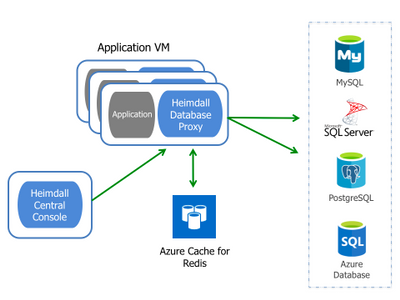
Figure 9: Heimdall Distributed Auto-caching Architecture
The best part of our caching solution is its transparency, not requiring any code changes. Caching and invalidation are automated and fully user-configurable. For more information on how to configure Heimdall for auto-caching, check our automated caching blog.
Customer Benefit
By improving scale through read/write splitting and SQL caching, queries will be traffic routed for maximum performance. Additionally, our proxy provides a bridge between a normal username and the hostname variation expected by Azure managed databases. Your application will operate seamlessly with Azure managed databases and gain the benefit of read/write query separation. Customers will save on operation costs and accelerate their applications into production.
Resources and links:
Heimdall Data, a Microsoft Technology partner, offers a database proxy to improve write-master / read replica scale for SQL databases (e.g. MySQL, Postgres, SQL Server, Azure SQL Database) without application changes.
by Scott Muniz | Jun 25, 2020 | Uncategorized
This article is contributed. See the original author and article here.
Overview
Endpoint Configuration Manager (Current Branch), supports high availability configurations through various options, which include but are not limited to the following:
- Any standalone primary site can now have an additional passive mode.* site server
- Remote content library*
- SQL Server Always On
- Multiple instances of critical site system roles such as Management Points.
- Regular site DB backups
- Clients automatically remediating typical issues w/o administrative intervention
*NOTE: Feature is only available in 1806 and newer releases.
Remote Content Library
Overview
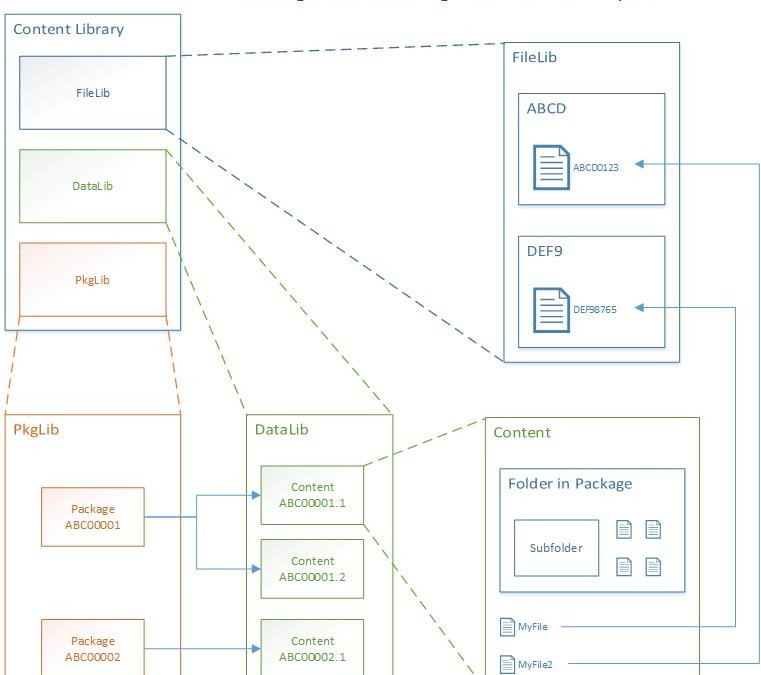
The content library is a single-instance store of content in Configuration Manager, which is used by the site to reduce the overall size of the combined body of content that is distributed distribute.
The library stores all content files for deployments (software updates, applications, and OS deployments), and copies of the library are automatically created and maintained on each site server and each distribution point.

Use the Content Library Explorer tool from the Configuration Manager tools to browse the contents of the library.
Starting in version 1806, the content library on the site server can be moved to one of the following locations:
- Another drive on the site server (use the Content Library Transfer tool)
- A separate server
- Fault-tolerant disks in a storage area network (SAN).
- A SAN is the recommended configuration due to its high availability, and it also provides elastic storage that grows or shrinks over time to meet your changing content requirements.
NOTE: This action only moves the content library on the site server. Distribution points are not impacted.
Prerequisites
- Read and write permissions to the network path the remote content library will be located must be given to the site servers’ computer accounts.
- No components are installed on remote system.
- The site server can’t have the distribution point role because distribution points don’t support a remote content library.
- After moving the content library, the distribution point role can’t be added to the site server.
IMPORTANT: A shared location, between multiple sites, should not be used because it has the potential to corrupt the content library, and require a rebuild.
Managing the Content Library (step-by-step)
The site actually copies the content library files to the remote location, and does not delete the content library files at the original location on the site server. To free up space, an administrator must manually delete these original files.
|
Step
|
Description
|
|
1.
|
Create a folder in a network share as the target for the content library (serversharefolder).
WARNING: Do NOT reuse an existing folder with content. For example, don’t use the same folder as your package sources because Configuration Manager removes any existing content from the location prior to copying the library.
|
|
2.
|
In the Configuration Manager console”
· Switch to the Administration workspace.
· Expand Site Configuration, select the Sites node, and select the site.
On the Summary tab at the bottom of the details pane, notice a new column for the Content Library.
|
|
3.
|
Click Manage Content Library on the ribbon
|
|
4.
|
The Current Location field should show the local drive and path.
Enter the UNC path to the network location created in Step 1 and click OK.
|
|
5.
|
Note the Status value in the Content Library column on the Summary tab of the details pane, which updates to show the site’s progress in moving the content library.
· The Move Progress (%) value displays the percentage complete.
· If there’s an error state, the status displays the error.
· Common errors include access denied or disk full.
· When complete it displays Complete.
See the distmgr.log for details.
|
Table 1 – Managing the Content Library
If the content library needs to be moved back to the site server, repeat this process, but enter a local drive and path for the New Location (Example – D:SCCMContentLib), and it must be a folder name that already exists on the drive. When the original content still exists, the process quickly moves the configuration to the location local to the site server.
Troubleshooting
The following items may help troubleshoot content library issues:
- Review distmgr.log and PkgXferMgr.log on the site server, and the smsdpprov.log on the distribution point for possible indicators of the failures.
- The Content Library Explorer tool.
- Check for file locks by other processes (antivirus software, etc.).
- Exclude the content library on all drives from automatic antivirus scans, as well as the temporary staging directory, SMS_DP$, on each drive.
- Validate the package from the Configuration Manager console in case of hash mismatches.
- As a last option, redistribute the content, which should resolve most issues.
Site Server High Availability
Overview
Introduced in the 1806 release of Configuration Manager, high availability for the site server role is achievable by installing a second passive mode site server. This passive site server is in addition to the existing (active mode) site server, and it remains available for immediate use, when needed.
While in passive mode, a site server:
- Uses the same site DB as the active server.
- Only reads from the site database.
- It will begin writing to the database if promoted to active.
- Uses the same content library as the active mode server.
Manually promoting the passive server will make it the active server; thereby, switching the active server to passive mode. Since the site server role is the only role that is switched, the other site system roles on the original active mode server remain available so long as that computer is accessible.
NOTE: This feature is not enabled by default.
Prerequisites
- Passive mode site servers can be on-premises or cloud-based in Azure.
- Both site servers must be joined to the same Active Directory domain.
- The site is a standalone primary site.
- Both site servers must use the same site database, which must be remote to each site server.
- Both site servers need sysadmin permissions on the SQL Server instance for the DB.
- The SQL Server that hosts the site database can use a default instance, named instance, SQL Server cluster, or a SQL Server Always On availability group.
- The content library must be on a remote network share, and both site servers need Full Control permissions to the share and its contents.
- The site server can’t have the distribution point role.
- The site server in passive mode:
- Must meet all prerequisites for installing a primary site.
- Must have its computer account in the local admins group on the active site server.
- Installs using source files that match the version of the site server in active mode.
- Can’t have a site system role from any site prior to installing the site server in passive mode role.
- Both site servers can run different OS versions, as long as both are supported by Configuration Manager.
Limitations
- Only one passive mode server at each primary site.
- Passive mode servers are not supported in a hierarchy (CAS with a child primary site(s)).
- It must be a standalone primary site.
- Secondary sites do not support passive mode site servers.
- Promotion of the passive mode server to active mode is manual.
- Roles can’t be installed on the new server until it is added as a passive site server.
- NOTE: After the passive mode server is installed, additional roles can be installed as necessary (SMS Provider, management point, etc.).
- Databases for roles like the reporting point, should be hosted on a server that’s remote from both site servers.
- The passive mode server does NOT receive the SMS Provider. Since a connection to a provider is required to manually promote the passive site server, install at least one additional instance of the SMS Provider on server that is NOT the active site server.
- The Configuration Manager console doesn’t automatically install on the passive server.
Add Passive Mode Server (step-by-step)
|
Step
|
Description
|
|
1.
|
In the Configuration Manager console:
· Click the Administration workspace
· Expand Site Configuration
· Select the Sites node
· Click Create Site System Server in the ribbon.
|
|
2.
|
On the General page of the Create Site System Server Wizard:
· Specify the server to host the site server in passive mode.
NOTE: The server you specify can’t host any site system roles before installing a site server in passive mode.
|
|
3.
|
On the System Role Selection page, select only Site server in passive mode.
The following prerequisite checks are performed at this stage:
· Selected server isn’t a secondary site server
· Selected server isn’t already a site server in passive mode
· Content library is in a remote location
If these initial prerequisite checks fails, you can’t continue past this page of the wizard.
|
|
4.
|
On the Site Server In Passive Mode page, provide the following information:
· Choose one of the following options:
· Copy installation source files over the network from the site server in active mode:
· This option creates a compressed package and sends it to the new site server.
· Use the source files at the following location on the site server in passive mode:
· This is a local path that already contains a copy of the source files. Make sure this content is the same version as the site server in active mode.
· (Recommended) Use the source files at the following network location:
· Specify the path directly to the contents of the CD.Latest folder from the site server in active mode. (Example: ServerSMS_ABCCD.Latest)
· Specify the local path to install Configuration Manager on the new site server.(C:Program FilesConfiguration Manager)
|
|
5.
|
Complete the wizard.
Navigate to the Monitoring workspace, and select the Site Server Status node in the ConfigMgr console for detailed installation status. The state for the passive site server should display as Installing.
· For more detail, select the server and click Show Status. This action opens the Site Server Installation Status window, and the state will OK for both servers when the process completes.
For more information on the setup process, see the flowchart in the appendix
NOTE: All Configuration Manager site server components are in standby on the site server in passive mode.
|
Table 2 – Adding a Passive Mode Server
Site server promotion
Overview
As with any backup/recovery plan, practice the process to change site servers, and consider the following:
- Practice a planned promotion, where both site servers are online as well as an unplanned failover, by forcibly disconnecting or shutting down the site server in active mode.
- Before a planned promotion:
- Check the overall status of the site and site components, making sure everything is healthy.
- Check content status for any packages actively replicating between sites.
- Do not start any new content distribution jobs.
NOTE: If file replication between sites is in progress during failover, the new site server may not receive the replicated file. If this happens, redistribute the software content after the new site server is active.
Process to promote the site server in passive mode to active mode
In order to access the site and promote a server from passive to active mode, access to an instance of the SMS Provider is absolutely necessary.
IMPORTANT: By default, only the original site server has the SMS Provider role. If this server is offline, no provider is available, and access to the site is not possible. When a passive site server is added, the SMS Provider is NOT automatically installed, so ensure that at least one additional SMS Provider role is added to the site for a highly available service.
If the console is unable to connect to the site because the current site server (SMS Provider) is offline, specify the other site server (additional SMS Provider) in the Site Connection window.
|
Step
|
Description
|
|
1.
|
In the Configuration Manager console:
· Navigate to the Administration workspace
· Expand Site Configuration
· Select the Sites node
· Select the site, and then switch to the Nodes tab.
· Select the site server in passive mode, and then click Promote to active in the ribbon.
· Click Yes to confirm and continue.
|
|
2.
|
Refresh the console node, and the Status column for the server being promoted should display in the Nodes tab as Promoting.
|
|
3.
|
After the promotion is complete, the Status column should show OK for both the new (active) site server, and the new passive site server.
· The Server Name column for the site should now display the name of the new site server in active mode.
For detailed status, navigate to the Monitoring workspace, and select the Site Server Status node. The Mode column will identify which server is active/passive.
When promoting a server from passive to active mode, select the site server to be promoted, and then choose Show Status from the ribbon, which opens the Site Server Promotion Status window for additional detail.
|
Table 3 – Promoting a Passive Mode Site Server
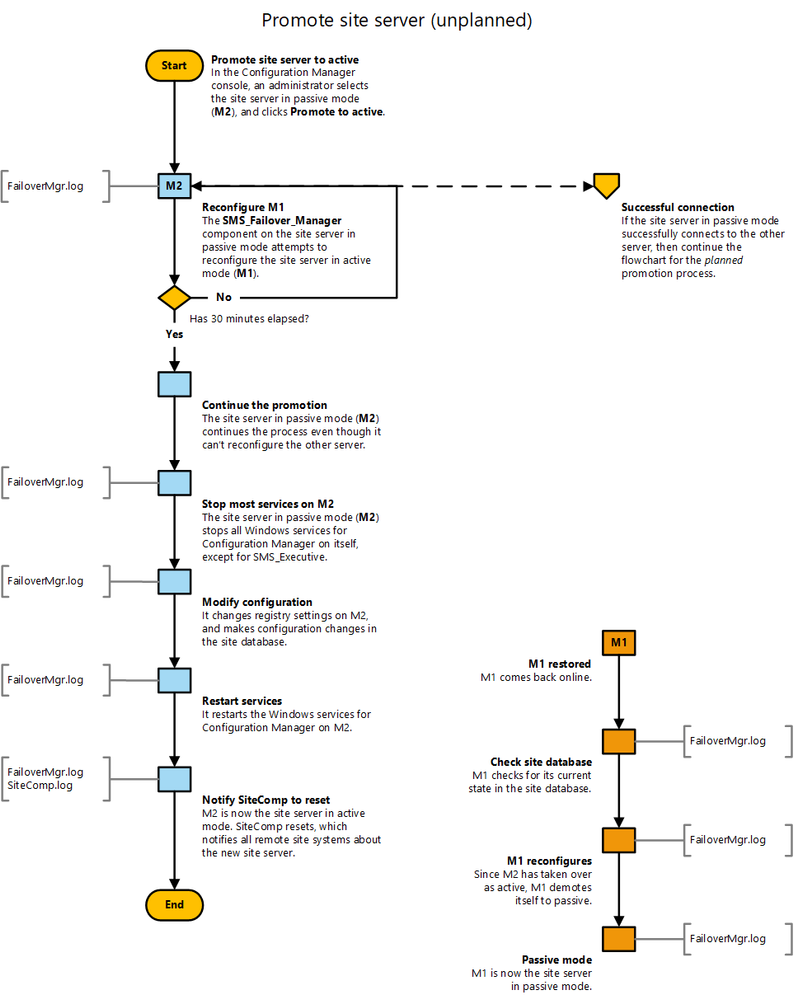
Unplanned failover
If the active site server goes offline, the following process begins:
- The passive site server will try to contact the active site server for 30 minutes.
- If the offline server comes back before this 30 minute timeframe, it’s successfully notified, and the change proceeds gracefully.
- Otherwise the passive site server forcibly updates the site configuration for it to become active.
- If the offline server comes back after this time, it first checks the current state in the site database, and then proceeds with demoting itself to the passive site server.
NOTE: During this 30 minute waiting period, there is no active site server. However, clients will still communicate with client-facing roles such as management points, software update points, and distribution points.
Users can also continue to install software that’s already deployed, but site administration is NOT possible in this time period.
If the offline server is damaged such that it can’t return, delete this site server from the console. Then create a new site server in passive mode to restore a highly available service.
Daily monitoring
Passive site servers should be monitored daily to ensure its Status remains OK and ready for use. This is done in the Monitoring workspace of the ConfigMgr console by selecting the Site Server Status node.
- View both site servers and their current status.
- Also view status in the Administration workspace.
- Expand Site Configuration, and select the Sites node. Select the site, and then switch to the Nodes tab.
SQL Server Always On
Overview
SQL Server Always On provides a high availability and disaster recovery solution for the site database.
An Always On availability group supports a replicated environment for a discrete set of user databases, known as availability databases. When created for high availability the availability group’s of databases fail over together.
- An availability group supports one set of primary databases and one to eight sets of corresponding secondary databases.
- Secondary databases are not backups, so continue to back up your databases and their transaction logs on a regular basis.
Each set of availability databases is hosted by an availability replica. Two types of availability replicas exist:
- Single primary replica that hosts the primary databases
- One to eight secondary replicas, which hosts a set of secondary databases and serve as a potential failover targets for the availability group.
The primary replica makes the primary databases available for read-write connections from clients, and sends transaction log records of each primary database to every secondary database.
- Known as data synchronization and occurs at the database level.
- Every secondary replica caches the transaction log records (hardens the log) and then applies them to its corresponding secondary database.
- Data synchronization occurs between the primary database and each connected secondary database, independently of the other databases.
Supported Scenarios for Configuration Manager
The following situations are supported when using SQL Server Always On availability groups in Configuration Manager.
- Creating an availability group
- Configuring a site to use an availability group
- Add or remove synchronous replica members from an availability group hosting the site database
- Configuring asynchronous commit replicas
- Recovering a site from an asynchronous commit replica
- Moving a site database out of an availability group to a standalone (default or named instance) of SQL Server
NOTE: The step-by-step details for performing each of these scenarios are described in the following documentation:
Configure SQL Server Always On availability groups for Configuration Manager
https://docs.microsoft.com/en-us/sccm/core/servers/deploy/configure/configure-aoag#create-and-configure-an-availability-group
Prerequisites for all Scenarios
Configuration Manager accounts and permissions
Site server to replica member access
The site server’s computer account must be a member of the Local Administrators group on each member of the availability group.
SQL Server
Version
Each replica in the availability group must run a version of SQL Server that’s supported by the environment’s version of Configuration Manager.
- When supported by SQL Server, different nodes of an availability group can run different versions of SQL Server.
NOTE: SQL Server Enteprise Edition must be used
Account
A domain user (service) account a non-domain account can be used and each replica in a group can have a different configuration.
- Use lowest possible permissions.
- Certificates must be used for non-domain accounts.
Availability group configurations
Replica members
- Group must have one primary replica.
- Use the same number/type of replicas that’s supported by the version of SQL Server in use.
- An asynchronous commit replica can be used to recover a synchronous replica.
WARNING: Configuration Manager doesn’t support failover to use the asynchronous commit replica as the site database because Configuration Manager doesn’t validate the state of the asynchronous commit replica to confirm it’s current. This can put the integrity of the site and data at risk because (by design) such a replica can be out of sync.
Each replica member must have the following configuration:
- Use default or a named instance
- The Connections in Primary Role setting is Yes
- The Readable Secondary setting is Yes
- Enabled for Manual Failover
NOTE: Configuration Manager supports using the availability group synchronous replicas when set to Automatic Failover. Set Manual Failover when:
- Configuration Manager Setup specifies the use of the site database in the availability group.
- Any update to Configuration Manager is installed. (Not just updates that apply to the site database).
Replica member location
All replicas in an availability group must be either on-premises, or all hosted on Microsoft Azure.
- Combinations within a group that include both on-premises and Azure isn’t supported.
Configuration Manager Setup must be able to connect to each replica, so ensure the following ports are open:
- RCP Endpoint Mapper: TCP 135
- SQL Server Service Broker: TCP 4022
- Must stay open following setup
- SQL over TCP: TCP 1433
- Must stay open following setup
NOTE: Custom ports for these configurations are supported so long as they are the same custom ports on the endpoint and on all replicas in the availability group.
Listener
The must be at least one listener in an availability group.
- Configuration Manager uses the virtual name of the listener when configured to use the site database in the availability group.
- Although an availability group can contain multiple listeners.
File paths
Each secondary replica in the availability group must have a SQL Server file path that’s identical to the file path for the site database files on the current primary replica. Otherwise, setup will fail to add the instance for the group as the new location of the site DB.
NOTE: The local SQL Server service account must have Full Control permission to this folder.
This path is only required when ConfigMgr setup is used to specify the database instance in the availability group. Upon completion, the path can be deleted from the secondary replica servers.
Example scenario:
- Primary replica server is a new installation of SQL Server 2014, which (by default) stores the .MDF and .LDF files in C:Program FilesMicrosoft SQL ServerMSSQL12.MSSQLSERVERMSSQLDATA.
- Secondary replica servers are upgraded to SQL Server 2014 from previous versions, but the servers keep the original file path as: C:Program FilesMicrosoft SQL ServerMSSQL10.MSSQLSERVERMSSQLDATA.
- Before the site database can be moved to this availability group, each secondary replica server must have the path used by the primary, even if the secondaries won’t use the location
- As a result C:Program FilesMicrosoft SQL ServerMSSQL12.MSSQLSERVERMSSQLDATA must be created on each secondary.
- Grant the SQL Server service account on each secondary replica full control access to the newly created location, and then run Setup to move the site database.
Configure the database on a new replica
The database of each replica should be configured with the following settings:
- Enable CLR Integration.
- Set Max text repl size to 2147483647
- Set the database owner to the SA account
- Turn ON the TRUSTWORTY setting.
- Enable the Service Broker
NOTE: Only make these configurations on a primary replica. The primary must be failed-over to a secondary replica in order to configure that secondary, which also makes the secondary the new primary replica.
Verification Script
Run the following SQL script to verify database configurations for both primary and secondary replicas. Before you can fix an issue on a secondary replica, change that secondary replica to be the primary replica.
    SET NOCOUNT ON

    DECLARE @dbname NVARCHAR(128)

    SELECT @dbname = sd.name FROM sys.sysdatabases sd WHERE sd.dbid = DB_ID()

    IF (@dbname = N'master' OR @dbname = N'model' OR @dbname = N'msdb' OR @dbname = N'tempdb' OR @dbname = N'distribution' ) BEGIN
    RAISERROR(N'ERROR: Script is targetting a system database.  It should be targeting the DB you created instead.', 0, 1)
    GOTO Branch_Exit;
    END ELSE
    PRINT N'INFO: Targetted database is ' + @dbname + N'.'

    PRINT N'INFO: Running verifications....'

    IF NOT EXISTS (SELECT * FROM sys.configurations c WHERE c.name = 'clr enabled' AND c.value_in_use = 1)
    PRINT N'ERROR: CLR is not enabled!'
    ELSE
    PRINT N'PASS: CLR is enabled.'

    DECLARE @repltable TABLE (
    name nvarchar(max),
    minimum int,
    maximum int,
    config_value int,
    run_value int )

    INSERT INTO @repltable
    EXEC sp_configure 'max text repl size (B)'

    IF NOT EXISTS(SELECT * from @repltable where config_value = 2147483647 and run_value = 2147483647 )
    PRINT N'ERROR: Max text repl size is not correct!'
    ELSE
    PRINT N'PASS: Max text repl size is correct.'

    IF NOT EXISTS (SELECT db.owner_sid FROM sys.databases db WHERE db.database_id = DB_ID() AND db.owner_sid = 0x01)
    PRINT N'ERROR: Database owner is not sa account!'
    ELSE
    PRINT N'PASS: Database owner is sa account.'

    IF NOT EXISTS( SELECT * FROM sys.databases db WHERE db.database_id = DB_ID() AND db.is_trustworthy_on = 1 )
    PRINT N'ERROR: Trustworthy bit is not on!'
    ELSE
    PRINT N'PASS: Trustworthy bit is on.'

    IF NOT EXISTS( SELECT * FROM sys.databases db WHERE db.database_id = DB_ID() AND db.is_broker_enabled = 1 )
    PRINT N'ERROR: Service broker is not enabled!'
    ELSE
    PRINT N'PASS: Service broker is enabled.'

    IF NOT EXISTS( SELECT * FROM sys.databases db WHERE db.database_id = DB_ID() AND db.is_honor_broker_priority_on = 1 )
    PRINT N'ERROR: Service broker priority is not set!'
    ELSE
    PRINT N'PASS: Service broker priority is set.'

    PRINT N'Done!'

    Branch_Exit:
Limitations
Unsupported SQL Server Configurations
- Basic availability groups: (SQL Server 2016 Standard). These groups don’t support read access to secondary replicas that is required by ConfigMgr
- Failover cluster instances (pre 1810 releases)
- 1810 and newer releases allows for a highly available site with fewer servers by using a SQL cluster and a site server in passive mode
- MultiSubnetFailover (pre 1906 releases)
- Starting with the 1906 release of ConfigMgr, MultiSubnetFailover is now supported for HA configurations.
SQL Servers Hosting Additional Availability Groups
SQL Servers hosting more than one availability group require specific settings at the time of Configuration Manager Setup and when installing updates for Configuration Manager. Each replica in each availability group must have the following configurations:
- Manual Failover
- Allow any read-only connection
Unsupported Database Usage
- Configuration Manager supports only the site database in an availability group. The Reporting and WSUS databases used by Configuration Manager are NOT supported in a SQL Server Always On availability group:
- Pre-existing database: When configuring an availability group, restore a copy of an existing Configuration Manager database to the primary replica.
Setup Errors
When moving a site database to an availability group, Setup tries to process database roles on the secondary replicas, and the ConfigMgrSetup.log file shows the following error, which is safe to ignore:
ERROR: SQL Server error: [25000][3906][Microsoft][SQL Server Native Client 11.0][SQL Server]Failed to update database “CM_AAA” because the database is read-only. Configuration Manager Setup 1/21/2016 4:54:59 PM 7344 (0x1CB0)
Site Expansion
To expand a standalone primary site to include a CAS, the primary site’s database must first be temporarily removed from the availability group.
Changes for site backup
Run the built-in Backup Site server maintenance task to back up common Configuration Manager settings and files.
- Do NOT use the .MDF or .LDF files created by that backup.
- Make direct backups of these database files by using SQL Server.
- Set the recovery model of the site database to Full, which is required for Configuration Manager use in an availability group.
- Monitor and maintain the size of the transaction log because the transactions aren’t hardened until a full backup of the database or transaction log occur.
Changes for site recovery
If at least one node of the availability group is still functional, use the site recovery option to Skip database recovery (Use this option if the site database was unaffected).
If all nodes of an availability group are lost, the group must be recreated before site recover is attempted.
- Recreate the group
- Restore the backup
- Reconfigure SQL.
- Use the site recovery option to Skip database recovery (Use this option if the site database was unaffected).
Changes for reporting
Install the reporting service point
The RSP doesn’t support using the listener virtual name of the availability group, or hosting its database in a SQL Server Always On availability group.
- RSP installation sets the Site database server name to the virtual name that’s specified as the listener.
- Change this setting to a computer name and instance of a replica in the availability group.
- Installing addition RSPs on each replica node increases availability when a replica node is offline
- Each RSP should be configured to use its own computer name.
- The active RSP can be changed in the ConfigMgr console (Monitoring > Reporting > Reports > Report Options)
Appendix
Content Library Explorer
Content Library Explorer be used for the following:
- Explore the content library on a specific distribution point
- Troubleshoot issues with the content library
- Copy packages, contents, folders, and files out of the content library
- Redistribute packages to the distribution point
- Validate packages on remote distribution points
Requirements
- Run the tool using an account that has administrative access to:
- The target distribution point
- The WMI provider on the site server
- The Configuration Manager (SMS) provider
- Only the Full Administrator and Read-Only Analyst roles have sufficient rights to view the tool’s info.
- Other roles can view partial information.
- The Read-Only Analyst can’t redistribute packages from this tool.
- Run the tool from any computer, as long as it can connect to:
- The target distribution point
- The primary site server
- The Configuration Manager provider
- If the distribution point is co-located with the site server, administrative access to the site server is still required.
Usage
When you start the tool (ContentLibraryExplorer.exe),
- Enter the FQDN of the target distribution point.
- If the distribution point is part of a secondary site, it prompts for the FQDN of the primary site server, and the primary site code.
- In the left pane, view the packages that are distributed to this distribution point, and explore their folder structure. This structure matches the folder structure from which the package was created.
- When a folder is selected, its files are displayed in the right pane. This view includes the following information:
- File name
- File size
- Which drive it’s on
- Other packages that use the same file on the drive
- When the file was last changed on the distribution point
The tool also connects to the Configuration Manager provider to determine which packages are distributed to the distribution point, and whether they’re actually in the distribution point’s content library or in a “pending” status. Pending packages will not have any available actions.
Disabled packages
Some packages are present on the distribution point, but not visible in the Configuration Manager console, and are marked with an asterisk (*). Most (if not all) actions will not be available for these packages.
There are three primary reasons for disabled packages:
- The package is the ConfigMgr client upgrade.
- The user account can’t access the package, likely due to role-based administration.
- The package is orphaned on the distribution point.
Validate packages
Validate packages by using Package > Validate on the toolbar.
- First select a package node in the left pane (don’t select a content or a folder).
- The tool connects to the WMI provider on the distribution point for this action.
- When the tool starts, packages that are missing one or more contents are marked invalid. Validating the package reveals which content is missing. If all content is present but the data is corrupted, validation detects the corruption.
Redistribute packages
Redistribute packages using Package > Redistribute on the toolbar.
- First select a package node in the left pane.
- This action requires permissions to redistribute packages.
Other actions
Use Edit > Copy to copy packages, contents, folders, and files out of the content library to a specified folder.
- You can’t copy the content library itself. Select more than one file, but you can’t select multiple folders.
Search for packages using Edit > Find Package.
- This use the query to search in the package name and package ID.
Limitations
- Cannot be used to manipulate the content library directly, which may result in malfunctions.
- Can redistribute packages, but only to the target distribution point.
- When the distribution point is co-located with the site server, package data can NOT be validated. Use the Configuration Manager console instead.
- The tool still inspects the package to make sure that all the content is present, though not necessarily intact.
- Content can NOT be deleted.
Flowcharts
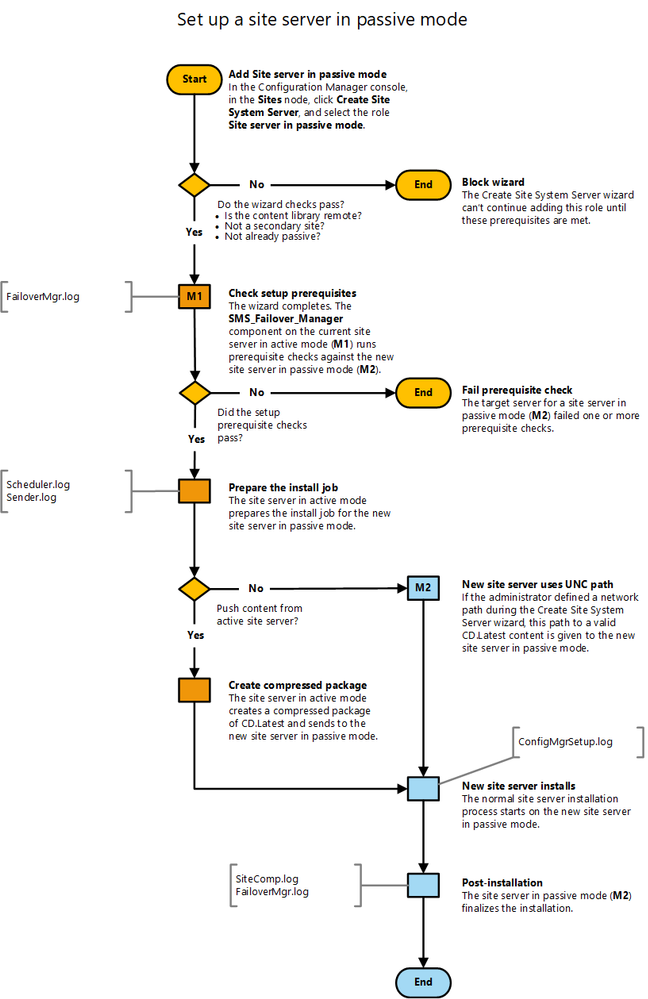
Passive Site Server Setup
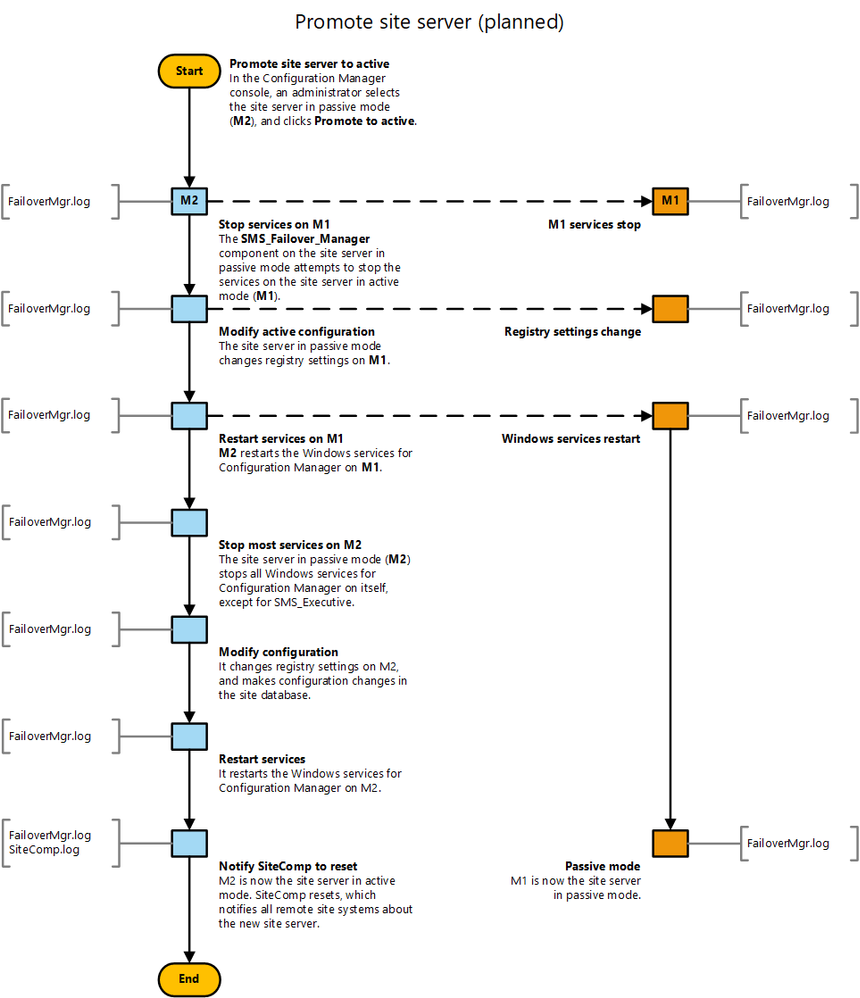
Promote Site Server (planned)
Promote Site Server (unplanned)
References
- High Availability Options for Configuration Manager
- The Content Library in Configuration Manager
- Site Server High Availability
- Content Library Explorer
- Prerequisites for Installing a Primary Site
- Supported OS Configurations for Configuration Manager
- Plan for the SMS Provider
- Configuration Manager Tools
- Overview of Always On Availability Groups
- SQL Server Always On for Configuration Manager
- Supported SQL Server Versions for Configuration Manager
by Scott Muniz | Jun 25, 2020 | Uncategorized
This article is contributed. See the original author and article here.
Virtual Desktop Infrastructure (VDI) brings an interesting dynamic when tuning the platform. The delicate balance of performance and usability are key to the user experience and can require fine tuning of all sorts of items in Windows. Antivirus can also benefit from VDI specific configurations and tuning. Among all other settings, it’s crucial to ensure antivirus protection on the device is configured optimally.
Microsoft Defender Antivirus is a critical and built-in component in the Microsoft endpoint protection platform. this article includes guidance and recommendations for Microsoft Defender Antivirus on non-persistent VDI machines. This article covers optimizations, best practices, and recommended settings for configuring Microsoft Defender AV in a non-persistent VDI environment.
In my first VDI post I described how the non-persistent VDI deployment type works and interacts in a VDI master/child relationship. When non-persistent VDI machines are onboarded to Microsoft Defender ATP at first boot, you also want to provide Microsoft Defender AV protection for non-persistent VDI machines at first boot.
To ensure you have protection for VDI machines at first boot, follow these recommendations:
- Make sure that Microsoft Defender Antivirus security intelligence updates (which contain the Microsoft Defender Antivirus updates) are available for the VDI machines to consume
- Configure bare minimum settings that tell the VDI machines where to go to get the updates
- Apply any optimizations and other settings to the VDI machines at first boot. Some security policy settings can be set via the local security policy editor
Part 1: Security intelligence updates download and availability
As described in the first VDI post, non-persistent VDI machines generally don’t use a configuration management solution like Microsoft Endpoint Manager because they don’t persist their state (all changes to the VDI machine are lost at logoff, reboot, or shutdown). This means the usual recommended delivery mechanism for security intelligence updates can’t be used. Fortunately, you have options to configure how the updates are delivered to Windows. The settings can be accessed in the local group policy editor at the following path:
Computer ConfigurationAdministrative TemplatesWindows ComponentsMicrosoft Defender Antivirus
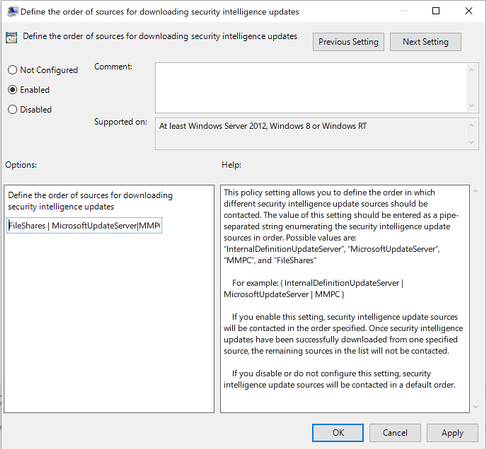
Note: Depending on the release of Windows the ADMX template can vary and the path will either be “Windows Defender Antivirus” or “Microsoft Defender Antivirus” in the latest templates. The Define the order of sources for downloading security intelligence updates setting is what you should configure first. There are four ways the update can be delivered to the VDI machine:
- InternalDefinitionUpdateServer
- MicrosoftUpdateServer
- Security intelligence updates (formerly known as the Microsoft Malware Protection Center (MMPC) security intelligence)
- FileShares
These are the only possible values for the setting. You can configure the order that VDI machines will check these locations by listing them in the preferred order and delimiting them the pipe (|) character. Guidance on configuring this setting is documented here.
For VDI, the most optimal choice is to have the non-persistent machines fetch the security intelligence update from a file share on the LAN. The recommended setting would look like this:
- FilesShares
- MicrosoftUpdateServer
- Security intelligence updates (formerly known as the Microsoft Malware Protection Center (MMPC) security intelligence)
- InternalDefinitionUpdateServer
Steps 3 and 4 can be swapped if you have a Windows Server Update Service (WSUS) server that hosts the updates. As noted in the guidance, security intelligence updates (formerly MMPC) should be a last resort, due to the increased size of the updates. In a case where there is no WSUS server in the environment, in the local group policy editor, the setting will look like this:
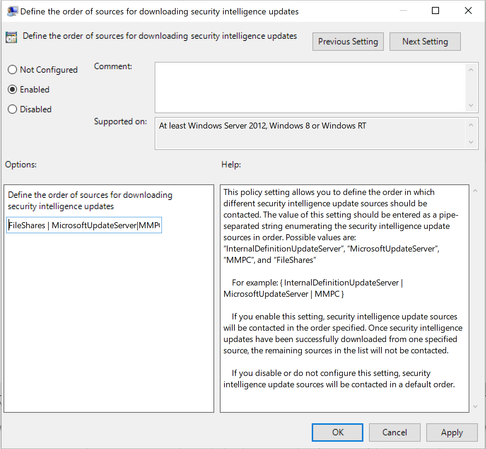
When a preference order is set for the VDI machines, it’s important to understand how to get the security intelligence packages to the file share in question. This means that a single server or machine must fetch the updates on behalf of the VMs at an interval and place them in the file share for consumption.
First, create an SMB/CIFS file share. In the following example, a file share is created with the following share permissions, and an NTFS permission is added for Authenticated Users:Read:

For this example, the file share is:
fileserver.fqdnmdatp$wdav-update
Ensure that the server or machine that is fetching the updates has read/write access to it so that it can write the security intelligence updates into the wdav-update folder. General guidance on how to download and unpack the updates with a PowerShell script and run it as a scheduled task are here.
In addition, there are some other things to consider for this operation and tie them all together. I’ve written a sample PowerShell script (based on the guidance) that can be run at an interval as a scheduled task. The script takes the following steps:
- Fetch x64 security intelligence update and download to local folder that is named as a unique GUID, such as the following:
C:Windowswdav-update{00000000-0000-0000-0000-yMMddHHmmss}mpam-fe.exe
- Extract the x64 security intelligence update:
mpam-fe.exe /X
- The contents of the folder are now the compressed package (mpam-fe.exe) and the contents of the package (this is important later)

- Copy the entire C:Windowswdav-update{00000000-0000-0000-0000-yMMddHHmmss} folder to the file share at the following path:
fileserver.fqdnmdatp$wdav-update
- Copy the file C:Windowswdav-update{00000000-0000-0000-0000-yMMddHHmmss}mpam-fe.exe to the following path:
fileserver.fqdnmdatp$wdav-updatex64
Note: The x64 directory MUST be present or clients will fail to find the security intelligence
package update.
- Remove folders older than 7 days (configurable) in the following paths:
C:Windowswdav-update
fileserver.fqdnmdatp$wdav-update
- Log all actions to the Application event log on the system
That’s a quick breakdown of what the sample does and it’s available here. It takes care of fetching the security intelligence updates, unpacking them, and copying them to the file share that the VDI machines will grab them from. To recap, at this point, the VDI machines are configured to go to the file share for the updates, and a single machine gets the updates to the file share.
Part 2: First boot Microsoft Defender Antivirus settings
When the file share is all set up and populated with the updates, you can configure a few things on the VDI master. Remember to configure these settings in the VDI master so that the child VDI machines will have the settings at first boot. The settings can be viewed in the local security policy editor here:
Computer ConfigurationAdministrative TemplatesWindows ComponentsMicrosoft Defender Antivirus
Note: Depending on the release of Windows the ADMX template can vary and the path will either include “Windows Defender Antivirus” or “Microsoft Defender Antivirus” in the latest templates.
In this tree of the editor there are a couple of settings to configure and they are listed below.
“Define file shares for downloading security intelligence updates” This setting tells the VDI machines what the UNC path to the file share that holds the updates is. In this example we set it to:
fileserver.fqdnmdatp$wdav-update
Note: This setting requires a reboot of the VDI machine for it to take effect. This is why it is critical to include it as a first boot policy. Here is a snip from the MPLog (located in C:ProgramDataMicrosoftWindows DefenderSupport) after enabling the setting:

All VDI machines (that will use a file share) must have this setting enabled, even if they are using the shared security intelligence feature below Define security intelligence location for VDI clients.
- Initiate Security Intelligence on startup This setting tells the VDI machines to update security intelligence on startup when there is no antimalware engine present. In our example, we set it to Enabled or Not Configured.
- Check for the latest virus and spyware security intelligence on startup This setting tells the VDI machines to check for the latest AV and spyware updates at startup. In our example we set it to Enabled.
- Define security intelligence location for VDI clients This setting offloads the extraction of the security intelligence update onto a host machine (the server that is running the PowerShell job to fetch the updates and place them in the share in this case), which saves CPU, disk, and memory resources on the non-persistent VDI machines.
Note: Defining a security intelligence location only works in Windows 10, version 1903 and above. If you are running 1903 or later, then you can enable this setting, but be aware that the VDI machines expect the extracted security intelligence update to be available at the following location:
fileserver.fqdnmdatp$wdav-update{GUID}
This is why in the PowerShell sample, not only do we copy the compressed security intelligence package (mpam-fe.exe) to the share, but we also copy the extracted contents of it as well. Since we copy both the package and the contents, we can point any version of Windows 10 to the same share for the security intelligence updates.
When a VDI machine is using , in the MPLog (located in C:ProgramDataMicrosoftWindows DefenderSupport) you’ll see it parse the GUID folder in the file share looking for the security intelligence update:

Note: This setting will NOT work without the Define file shares for downloading security intelligence updates setting also enabled. If you do not enable this other setting, you will see the following error in the operational log:
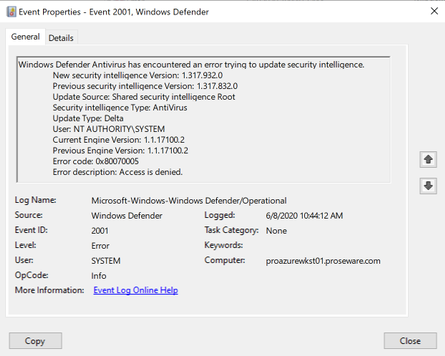
The biggest thing to remember is what folders machines will go to for the security intelligence update depending on whether or not the Define security intelligence location for VDI clients setting is enabled.
For VDI systems with the Define security intelligence location for VDI clients setting enabled, they will look at the following path for updates:
fileserver.fqdnmdatp$wdav-update{00000000-0000-0000-0000-yMMddHHmmss}
For VDI systems (or physical machines that will use a file share) that DO NOT have the Define security intelligence location for VDI clients setting enabled, they will look at the following path for updates:
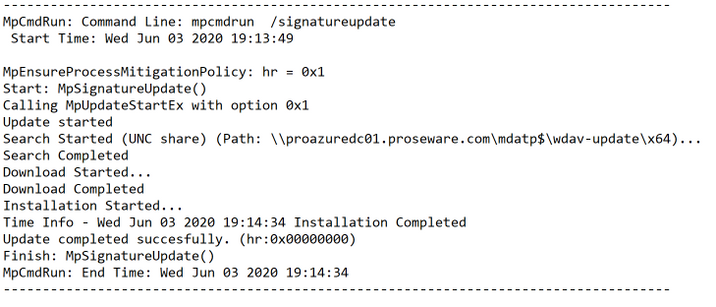
fileserver.fqdnmdatp$wdav-updatex64
This is why the x64 directory is required. This is detailed in the MPLog (located in C:ProgramDataMicrosoftWindows DefenderSupport):
Part 3: Microsoft Defender Antivirus settings
One of the most important settings to consider is the Turn off Microsoft Defender Antivirus setting. We strongly recommend that you do NOT change this setting to Enabled as doing so will disable Microsoft Defender Antivirus. Even if you are using a third-party antivirus solution, Microsoft still recommends leaving this setting at its default setting of Not Configured.
The reason for this is that when a third-party antivirus registers itself with the Microsoft Defender Security Center in Windows Microsoft Defender Antivirus will automatically go into passive mode. When Microsoft Defender Antivirus is in passive mode, Microsoft Defender ATP still uses the AV engine to perform certain functions, some of which are in the Microsoft Defender Security Center portal (https://securitycenter.windows.com). A few examples are:
- Trigger an antivirus scan
- Detection information
- Security intelligence updates
- Endpoint detection and response (EDR) in block mode
More information on Microsoft Defender Antivirus in passive mode can be found here. The rest of the settings are pulled from the Microsoft Defender Antivirus VDI guidance, but let’s go over them here as well for our example scenario.
- Specify the scan type to use for a scheduled scan This setting allows you to specify the type of scan to be used, and for VDI machines the Quick Scan (default) value is recommended.
- Randomize scheduled task times This setting ensures that scheduled scans are randomized at a four-hour interval and for VDI machines the Enabled or Not Configured (Default) value is recommended.
- Specify the day of the week to check for security intelligence updates This setting allows you to specify the day of the week that you want the VDI machines to check for updates. Since VDI machines are non-persistent and are in some cases short lived the recommended setting for this is Every Day or Not Configured (Default Setting).
- Specify the interval to check for security intelligence updates This setting sets the interval (in hours) at which the VDI machines will check the file share for security intelligence updates. Tune this based on the interval that your scheduled task (on the server) is downloading the security intelligence packages, and other environmental factors. For our example, my server machine is fetching security intelligence packages every 4 hours, and I’ve set this to every 2 hours on the VDI machines.
Note: Microsoft releases security intelligence updates up to every four hours.
- Define the number of days before Antivirus security intelligence is considered out of date This setting does just that. You need to pick the number of days after which you consider an endpoint’s antivirus to be out of date. If a client surpasses the number of days, certain actions, such as failing back to an alternate source and displaying warning icons in the user interface are triggered. This is another one you need to tune for your environment. Plan on tuning this in accordance with the number of days of security intelligence packages that you are keeping on the file share.
For this example, I’m removing security intelligence package downloads (via the PowerShell sample script) from the file share that are older than 7 days, so I’ve also set this setting to 7 (since I only keep 7 days’ worth anyway).
- Define the number of days before virus security intelligence is considered out of date This is the same setting as above, treat it and tune the same way. Typically, this will be the same setting as the setting above and in this example, I’ve also set this to “7.”
Tying it all together
In summary, we’ve configured a scheduled task on a designated machine to fetch, extract, and place the compressed and uncompressed security intelligence packages in a file share. Non-persistent VDI machines are pointed to this share in order to fetch the updates. We also went over a few of the bare minimum settings to provide first boot protection for non-persistent VDI machines, as well as a few other settings that should be optimized for them. Automation is definitely the glue here that keeps all of this together.
From the VDI master perspective, fold all of these settings together either in the registry or by using a local group policy object.
Tools like the Microsoft Deployment Toolkit (MDT) allow for automation of applying these settings to the VDI master, and as mentioned in my last post I’ve also integrated these first boot Microsoft Defender Antivirus settings into a sample script that’s used to stage the Microsoft Defender ATP onboarding script on your VDI master during an MDT task sequence.
Hopefully, this helps you test, optimize, and deploy Microsoft Defender Antivirus on your non-persistent VDI pools! Let us know what you think by leaving a comment below.
Jesse Esquivel, Program Manager
Microsoft Defender ATP


Recent Comments