by Scott Muniz | Jun 30, 2020 | Uncategorized
This article is contributed. See the original author and article here.
With Azure Lab Services, you can easily provide your students with access to high-performing GPUs.
Azure Lab Services provides several different GPU sizes that you can choose from when you create a lab:
- Small GPU (Compute) – 6 Cores, 56 GB RAM
- Small GPU (Visualization) – 6 Cores, 56 GB RAM
- Medium GPU (Visualization) – 12 Cores, 112 GB RAM
The compute GPU size is intended for compute-intensive applications such as artificial intelligence (AI) and deep learning. To see an example of a real-world class that uses the Small GPU (Compute) size, we added the Deep Learning in Natural Language Processing class type. The compute GPU is suitable for this type of class because students use deep learning frameworks and tools that are provided by the Data Science Virtual Machine image to train deep learning models with large sets of data.
The visualization GPU sizes are intended for graphics-intensive applications that involve remote visualization, streaming, gaming, and encoding with frameworks such as OpenGL and DirectX. As an example, we recently added a new class type that shows using the Small GPU (Visualization) size for engineering classes that use SolidWorks. The visualization GPU is suitable for this type of class because students interact with SolidWorks 3D computer-aided design (CAD) environment for modeling and visualizing solid objects.
For more information, read the article on how to set up a lab with GPU VMs.
by Scott Muniz | Jun 29, 2020 | Uncategorized
This article is contributed. See the original author and article here.
Guest blog by the Computer Vision Recipe Creators – Patrick Buehler (Principal Data Scientist at Microsoft. PhD in Computer Vision / Machine Learning with Prof. Andrew Zisserman at Oxford.) JS (Software Engineer at Microsoft) and Young Park (Software Engineer at Microsoft),
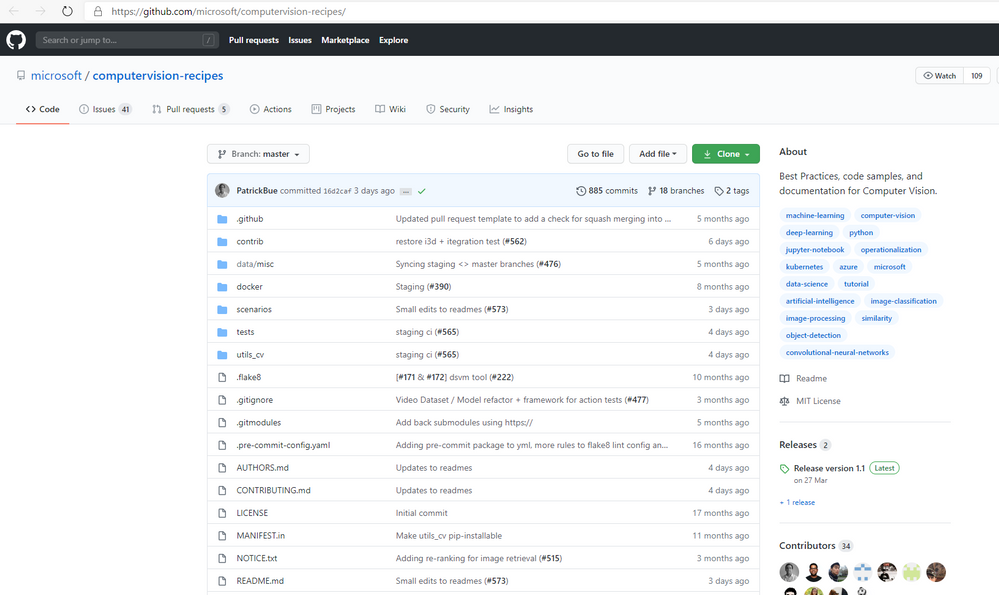
The open-source Computer Vision Recipes repository.

The repository supports various scenarios, including classification, retrieval, segmentation, detection, tracking, and action recognition as shown in the figure below.
Introducing Computer Vision Recipes repository
Creating a computer vision model can be daunting and time-consuming for beginners and experts alike. Popular libraries such as Torchvision or OpenCV provide implementations for various models and can be great resources for seasoned researchers. However, for software engineers or data scientists who are less experienced in computer vision, building a high performing model can still be extremely challenging even with these libraries.

To help jumpstart people on their computer vision tasks, we’ve created the Computer Vision Recipes repository.
Our goal for the project.
Is to provide ‘recipes’ for different scenarios based on popular libraries or research implementations so that high-performing models can be trained and evaluated with just a few lines of code. In addition, we guide users to avoid common pitfalls when training their models, propose tried-and-tested parameters that we found to work well for many datasets, and help users train, improve, visualize, and deploy their own custom models.
Using this repository, expert users can quickly build high-performing baseline models for a wide variety of computer vision solutions.
Computer vision novices will be able to build state-of-the-art models on their own datasets without getting bogged down by implementation details.
The library builds on top of PyTorch, is easy to install, uses a single conda environment for all scenarios, daily unit/integration tested, and includes code examples with documentation in the form of Jupyter notebooks.
The repository currently supports following scenarios:
- Object detection
- Image classification
- Image similarity
- Image segmentation
- Object tracking
- Action recognition
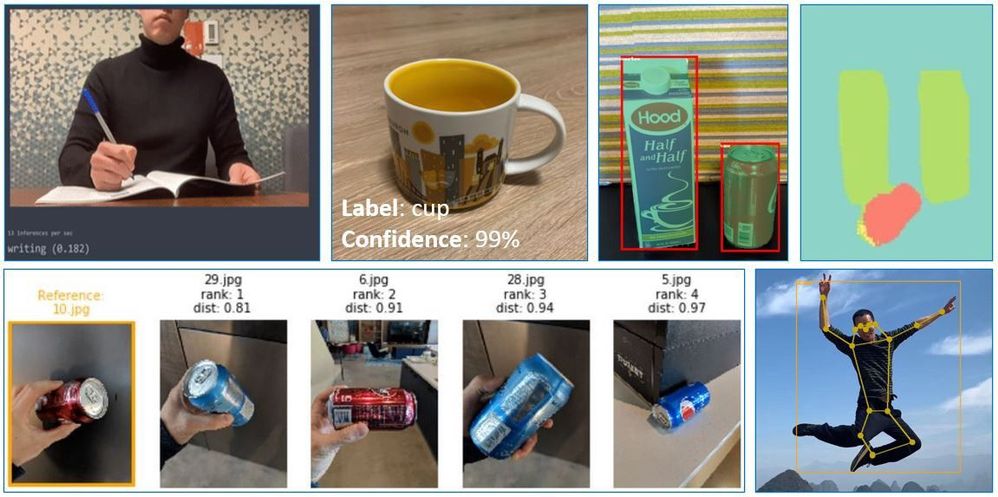 Supported Scenarios of the Computer Vision Recipes Respository
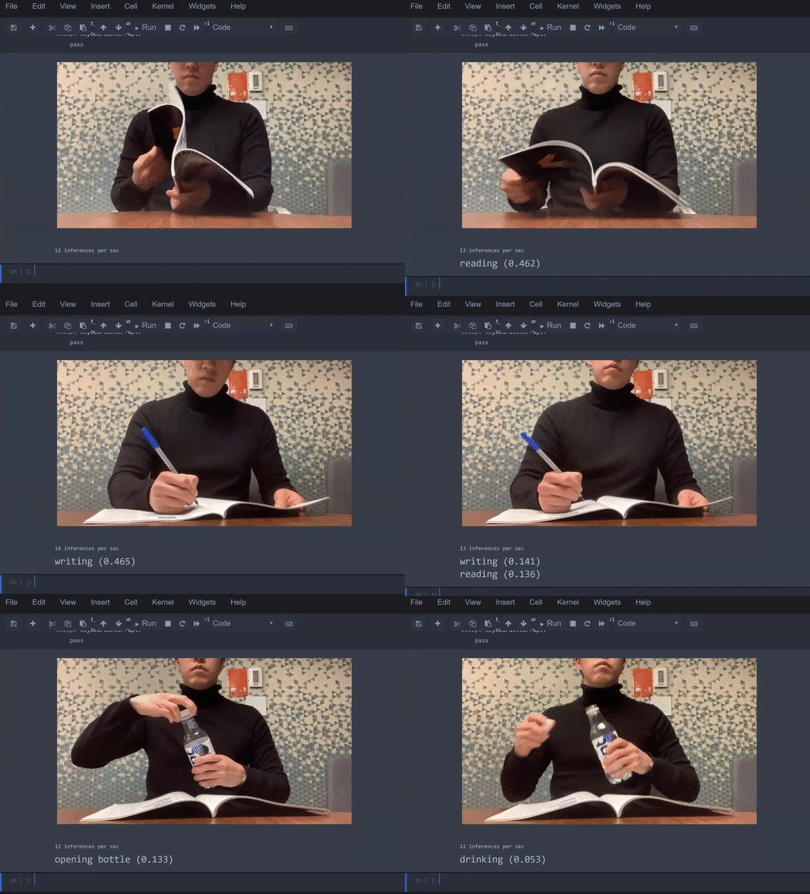
Recognizing actions in video example
Step by step tutorial on Object detection
We will now walk through how to build, train, and evaluate an object detection model in just a few lines of code using the open-source Computer Vision Recipes repository.
All supported scenarios in the repository follow similar implementation steps as this example. Under the hood, the object detection model uses Torchvision’s excellent implementation of the Mask R-CNN model. All code examples are taken from the 01_training_introduction.ipynb notebook which introduces model training and evaluation. Other notebooks which cover more advanced topics such model deployment or hard-negative mining can be found here.
Step 0. Installing the repository
Installation is as easy as downloading the repository and creating a new conda environment using the commands below. For more information see the setup instructions.
git clone https://github.com/Microsoft/computervision-recipes
conda env create -f environment.yml
python -m ipykernel install --user --name cv --display-name "cv"
Step 1. Loading images
For object detection, CV recipes comes with a DetectionDataset class which accepts any data in the PASCAL VOC format, i.e. each image has an associated XML annotation file following this format:
# Images and annotation XML files in separate folders:/data
+-- images
|   +-- image1.jpg
|   +-- image2.jpg
|   +-- ...
+-- annotations
|   +-- image1.xml
|   +-- image2.xml
|   +-- ...
We create an instance of the DetectionDataset class by passing it the path to our data and annotations.
from utils_cv.detection.dataset import DetectionDataset
my_datapath = Path("path/to/my/images")
data = DetectionDataset(my_datapath, train_pct=0.75)
Once it’s loaded, we can simply call show_ims()to inspect that we correctly loaded our dataset.
data.show_ims()
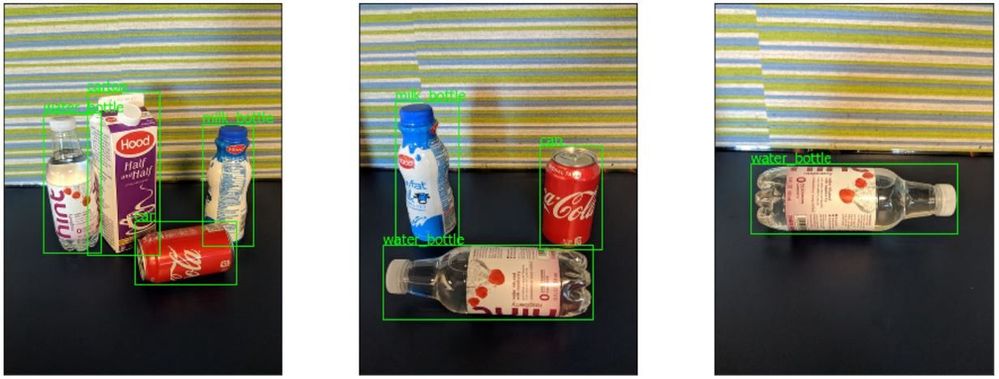
In addition, we can inspect how many ground truth annotations the dataset contains, and what their sizes are using the command
data.plot_boxes_stats()

Step 2. Training your model
Training a new model can be done using the fit()function of the DetectionLearnerclass. Because finding good parameters to train a deep neural network can be a challenge, we’ve provided good default parameters which we found by testing our implementation on multiple datasets. Below we’ll show you how you can specify the image size, the number of epochs to train for, and the learning rate.
from utils_cv.detection.model import DetectionLearner
detector = DetectionLearner(data, im_size=500)
detector.fit(10, lr=0.001)
As you can see above, the loss will reduce with each epoch while the accurate increases.

Step 3. Evaluating your model
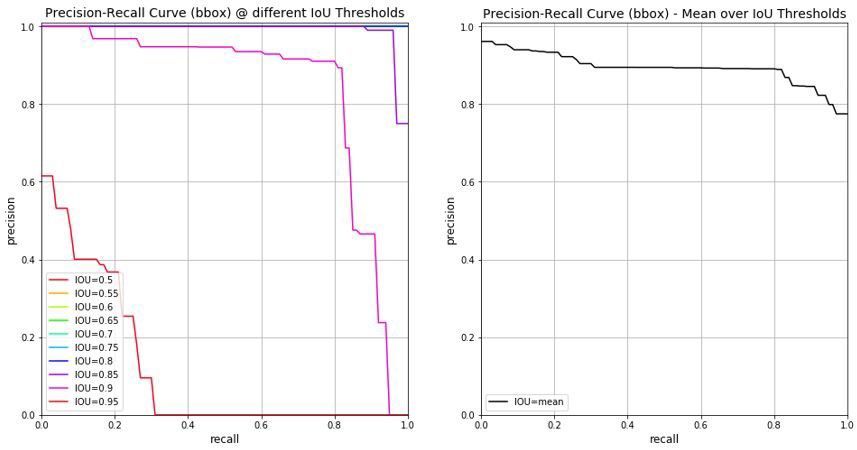
Next, we’ll want to evaluate the model we just fine-tuned to see how it performs on our test dataset. We do this using a precision recall curve, and (not shown) also compute the average precision.
e = detector.evaluate()
plot_pr_curves(e)
Step 4. Predicting using your model
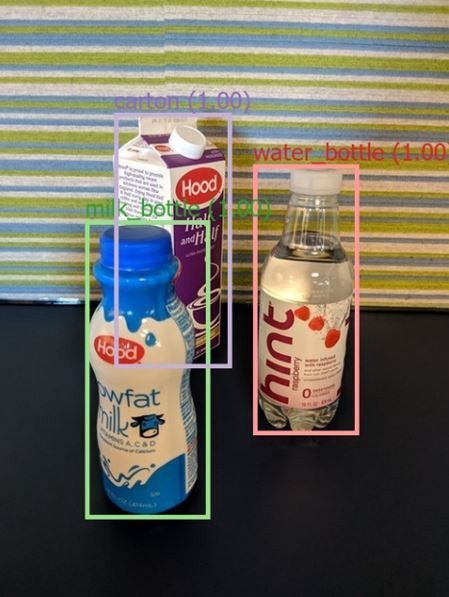
The last step is to make a prediction on a new image. Using the DetectionDetector, that’s as simple a calling predict().
detections = detector.predict("new/image/to/predict.jpg")
plot_detections(detections)
Step 5. Saving your model
Once you’re happy with the results, you can save and load your models to a .pth file:
detector.save("my_drink_detector")
Conclusion
In this article, we have introduced the Computer Vision Recipes repository and showed how easy it is to use. Using an object detection model tutorial, we demonstrated how a wide variety of Computer Vision solutions can be built. Feel free to visit our repository where we provide plenty of Jupyter notebooks to walk you through each of the scenarios.

by Scott Muniz | Jun 29, 2020 | Uncategorized
This article is contributed. See the original author and article here.
Have you ever wanted to help the community but then started to think: “It won’t make a difference anyway“, or “everyone knows that already…“. In this blog post, I’ll explain why your contribution is of great value, and how contributing to projects will make a difference!
But first … why should I contribute?
Because you have some knowledge that others don’t. Yes, you do. And sharing this knowledge will help someone “out there”. Never assume that people know what YOU know.
I find being part of the community very satisfying personally. The feeling of helping someone who’s stuck on a problem for days, or simply directing them to a resource that will help solving their issue is a good feeling.
Maybe you know a little bit about Networking? Are you passionate about programming but not an expert? Maybe you were reading some documentation and you’ve seen a typo or something that was incorrect?
Well, whatever it is, by contributing, the next 1000 people reading that documentation will have the correct information. That’s a big impact isn’t it?
How can I contribute?
First, identify which topic(s) are likely to motivate you. There are thousands of open source projects on GitHub. There’s a high probability maintainers will appreciate your help!
Let me give you an example. I have a favorite topic which is SharePoint PowerShell PnP. This module was created by a member of the community, and is also community driven. I wanted to contribute somehow because it helped me in the past and still is today, but the primary scripting language used is C#, and I am no C# developer!
That’s OK, I found another way. Sometimes I go look at the issues on the GitHub repository, and see if I can help somebody. Maybe I’ve seen this error before, and found a fix or a workaround? That will help not only the person who opened the issue, but also the maintainers when the issue is closed.
I also contribute to the Microsoft 365 Community Docs. This repository is entirely written BY the community FOR the community. Anyone can create an issue for a specific topic related to Microsoft 365 they’d like to know more about, and someone will eventually pick it up. It might be YOU!
Simple Ways to contribute
Sarah Lean from Microsoft has a great blog post on how to get you start with a Github account, clone a repository, and push your changes to a remote repository: A Guide to Contributing to Microsoft Docs . Check it out!
Here, I’d like to give you a few simple steps if you think contributing is too daunting.
Example 1
In the example below, I simply went through the documentation for a PowerShell cmdlet I needed to use, and noticed that a parameter didn’t exist anymore.
I opened an issue directly in the GitHub repository by clicking on “New Issue” (green button on the right hand side), and entered a description for the problem. Sometimes, repositories have templates to guide you in being as descriptive as possible.
The good thing in GitHub is that we can have a conversation which is linked to the issue itself. You can insert screenshots, emojis, links, and format text for a better impact.
Upon verification, the documentation has been updated to reflect the changes, and the issue was closed. It can be as simple as that!
Example 2
Looking through issues on a repository of your choice. Here I simply helped a user by providing a link to the official documentation, and I kept corresponding with examples until the issue was resolved.
Click on the issue, go to the bottom of the page where the commenting area is, and to make sure you get the user’s attention, use the ‘@mention‘ anywhere in your comment(s).
Example 3
Writing articles for the Microsoft 365 Community Docs. The only thing to do is to create an issue to propose your idea, and once it’s validated, start writing!
You can also “Create a new file” directly from the Github interface!
Conclusion
Remember, contributions can be fixing a typo on documentation, creating a open source tool, help solve issues on repositories, and the list goes on… Above I showed you 3 different ways to contribute, that maintainers will appreciate.
Don’t be disappointed if your changes to a repo are not merged straight away, or looked at the day after. It happens.
Now, only one thing left to do… Go find YOUR topic, it will make a difference!

by Scott Muniz | Jun 29, 2020 | Azure, Microsoft, Technology, Uncategorized
This article is contributed. See the original author and article here.
Introduction
In this article, we’re going to talk about enabling MFA for applications that are accessed over the internet. This will force users accessing the application from the internet to authenticate with their primary credentials as well as a secondary using Azure MFA.
Enabling App Service Authentication for a Web App
In this guide step by step, I’m going to show you how to enable MFA for an Azure App Service web app so authentication is taken care of by Azure Active Directory, and users accessing the app are forced to perform multifactor authentication using conditional access policy that Azure AD will enforce. To set up the environment, We will assume there is an Azure web app that is deployed to Azure Portal

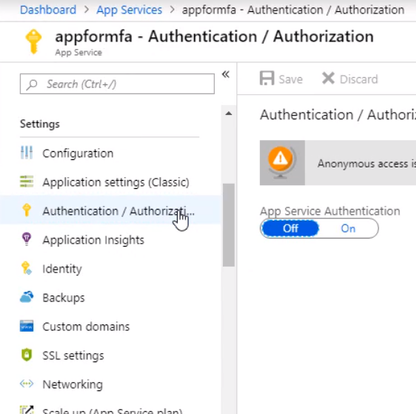
Open up the management blade for this app service, and let’s scroll down to Authentication/Authorization. This allows us to add authentication for users accessing the app
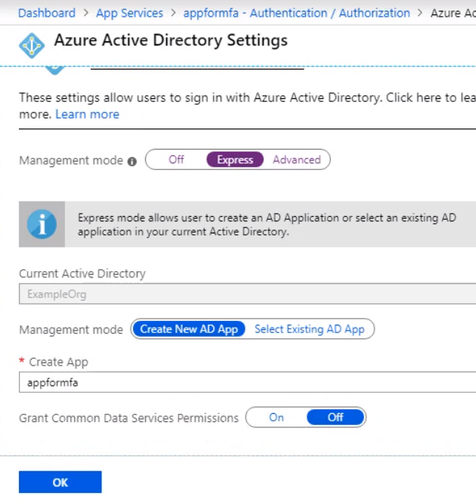
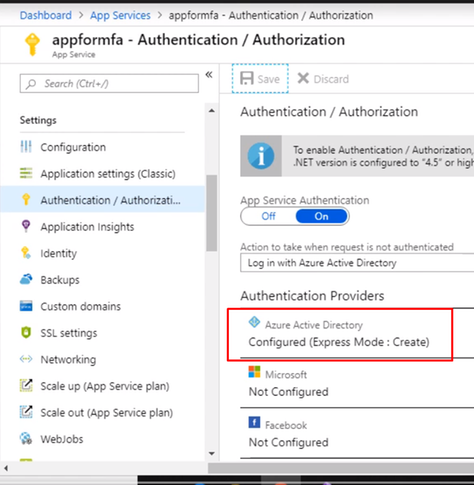
Enable the App Service Authentication and Action to login with Active directory and then click Activity Directory option to configure
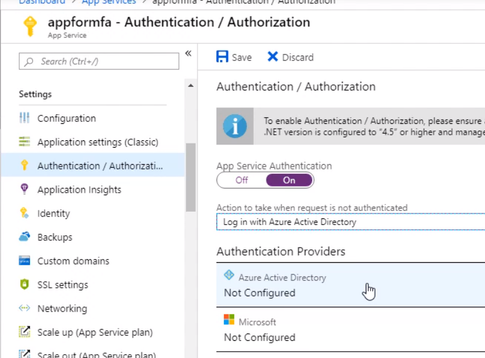
Select the express settings, and this will create an app registration in Azure Active Directory. The registration creates a service principle that represent the application and enables the functionality to grant it access to other Azure resources this will be using the app registration later when we create a conditional access policy to enforce Azure MFA. Click OK to enable this and save the changes.
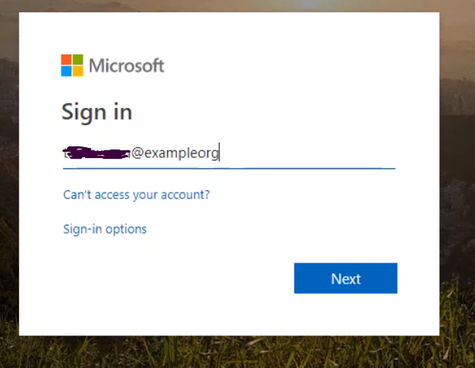
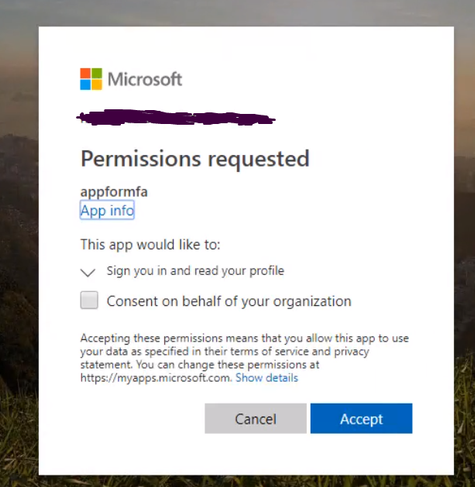
Testing the app. Open a new browser and browse to the application address. You should be redirected to the Azure AD Login page to sign-in using your Azure AD credentials due enabling App Service Authentication.
Configuring MFA for an App Service Web App
We’ve got a working App Service web app with authentication set to redirect the user to log in with their Azure Active Directory credentials. Now let’s create a conditional access policy that forces the user to use Azure MFA for this particular app.
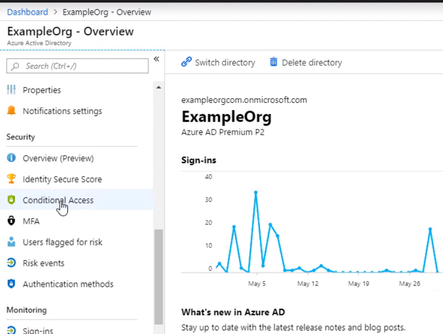
From the Active Directory blade, Scroll down to the Conditional Access menu
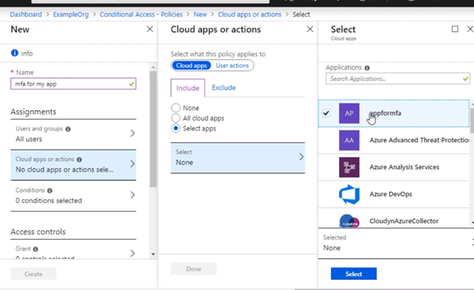
Give the policy a name for the interface and select Users and groups, and I want this policy to apply to anyone accessing the application, but you could scope it to a particular Azure AD group, user, or a directory role.
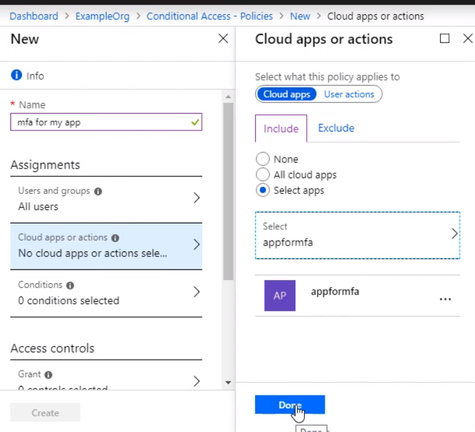
Select the app that this policy will apply to, and we want to choose the app registration that was created for our App Service web app when we enabled authentication and authorization. So that’s called appformfa. Click Done.
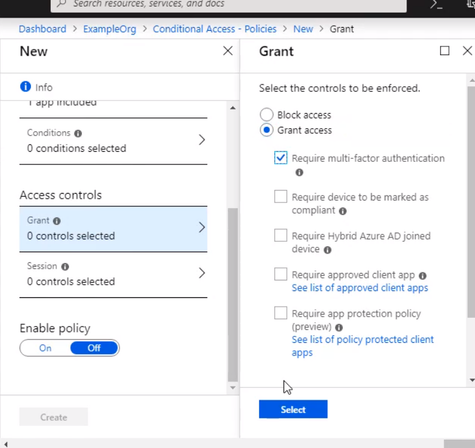
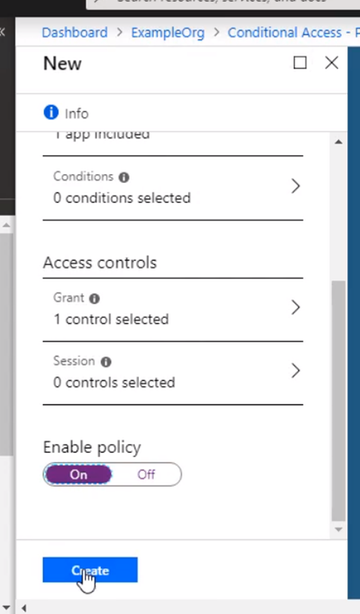
Go to Access controls, and it’s set to grand access. Select require multifactor authentication, that. And don’t forget to enable the policy and click Create. The policy is now enabled for the App Service.
Open up a new browser window, and navigate to the App Service web app URL, Log in with the same user as before.

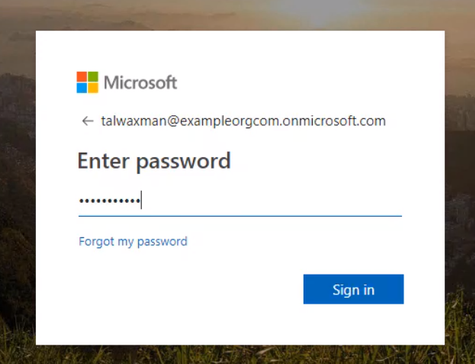
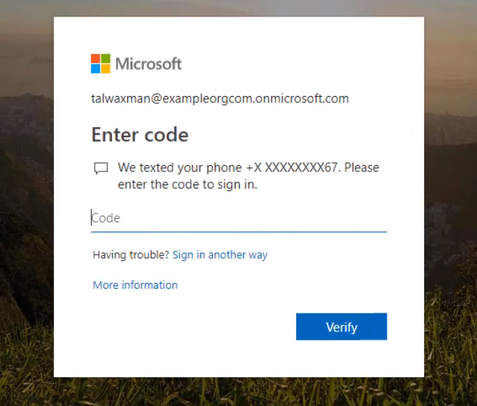
If this user wasn’t set up, they’d be prompted to set up MFA. The conditional access policy for the app is now requiring that the user log in with Azure MFA.
Enter the one-time passcode into the browser, and you will be brought into the app.
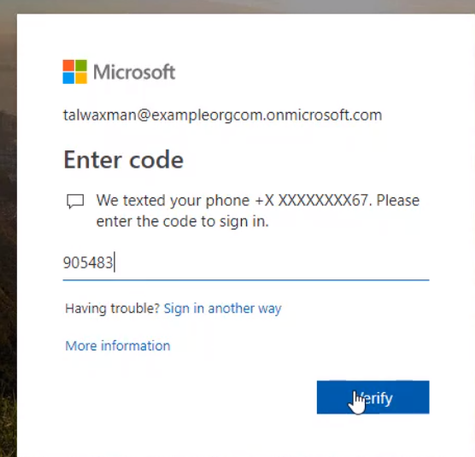
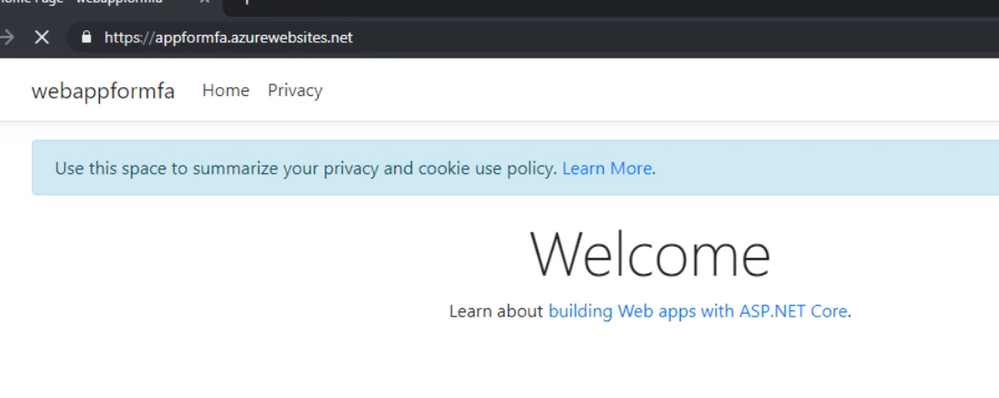
That is, we successfully enabled MFA for Azure web app.
Thank you
Magdy Salem
Credit: The blog was inspired by Pluralsight course Azure MFA Implementation

by Scott Muniz | Jun 29, 2020 | Azure, Microsoft, Technology, Uncategorized
This article is contributed. See the original author and article here.
Introduction
In this article, we’re going to talk about enabling MFA for applications that are accessed over the internet. This will force users accessing the application from the internet to authenticate with their primary credentials as well as a secondary using Azure MFA.
Enabling App Service Authentication for a Web App
In this guide step by step, I’m going to show you how to enable MFA for an Azure App Service web app so authentication is taken care of by Azure Active Directory, and users accessing the app are forced to perform multifactor authentication using conditional access policy that Azure AD will enforce. To set up the environment, We will assume there is an Azure web app that is deployed to Azure Portal

Open up the management blade for this app service, and let’s scroll down to Authentication/Authorization. This allows us to add authentication for users accessing the app

Enable the App Service Authentication and Action to login with Active directory and then click Activity Directory option to configure

Select the express settings, and this will create an app registration in Azure Active Directory. The registration creates a service principle that represent the application and enables the functionality to grant it access to other Azure resources this will be using the app registration later when we create a conditional access policy to enforce Azure MFA. Click OK to enable this and save the changes.


Testing the app. Open a new browser and browse to the application address. You should be redirected to the Azure AD Login page to sign-in using your Azure AD credentials due enabling App Service Authentication.


Configuring MFA for an App Service Web App
We’ve got a working App Service web app with authentication set to redirect the user to log in with their Azure Active Directory credentials. Now let’s create a conditional access policy that forces the user to use Azure MFA for this particular app.
From the Active Directory blade, Scroll down to the Conditional Access menu

Give the policy a name for the interface and select Users and groups, and I want this policy to apply to anyone accessing the application, but you could scope it to a particular Azure AD group, user, or a directory role.
Select the app that this policy will apply to, and we want to choose the app registration that was created for our App Service web app when we enabled authentication and authorization. So that’s called appformfa. Click Done.


Go to Access controls, and it’s set to grand access. Select require multifactor authentication, that. And don’t forget to enable the policy and click Create. The policy is now enabled for the App Service.


Open up a new browser window, and navigate to the App Service web app URL, Log in with the same user as before.


If this user wasn’t set up, they’d be prompted to set up MFA. The conditional access policy for the app is now requiring that the user log in with Azure MFA.
Enter the one-time passcode into the browser, and you will be brought into the app.


That is, we successfully enabled MFA for Azure web app.
Thank you
Magdy Salem
Credit: The blog was inspired by Pluralsight course Azure MFA Implementation


Recent Comments