by Scott Muniz | Jun 29, 2020 | Uncategorized
This article is contributed. See the original author and article here.
Background
In using databases as a key component of internet infrastructure, IT departments are finding unexpected problems in particular when using DBaaS (Database-as-a-Service). One of these challenges is in connection management. There are three areas where connection management can be a problem:
- CPU overhead when an application “thrashes” connections rapidly by opening, closing and authenticating connections;
- Memory overhead when applications hold open long-lived connections that are often idle, which would be better used as block cache or may require a larger instance size than CPU requirements dictate
- Noisy neighbor congestion for a multi-tenant database. Limiting the number of active connections on a per-customer basis ensures fairness.
Solution
The Heimdall Proxy was designed for any SQL database including Azure Database for MariaDB, MySQL, and Azure SQL Data Warehouse (SQL DW) for connection pooling:
- General connection reuse: New connections leverage already established connections to the database to avoid connection thrashing. This results in lower CPU utilization;
- Connection multiplexing: Disconnects idle connections from the client to the database, freeing those connections for reuse for other clients. This dramatically reduces connection counts to the database, and frees memory to allow the database to operate more effectively;
- Tenant Connection Management: The combination of 1) Per-user and per database connection limiting and 2) Connection Multiplexing control the number of active queries a particular tenant can use at a time. This protects database resources and helps ensure the customer SLA (Service-level Agreement) is met and not disrupted by a busy neighbor using the same database.

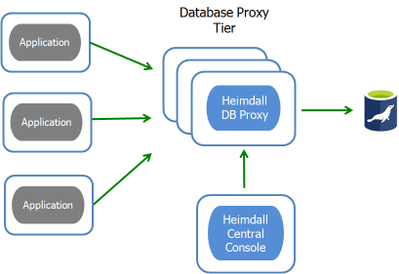
Figure 1: Heimdall Proxy Architecture Diagram
The Heimdall Proxy provides better control over database resources, providing more efficient and consistent behavior. As a result, users will reduce their database instance size and/or support higher customer density on the same database. In this blog, we explain how these functions work and are configured.
Basic Connection Pooling
A basic connection pooler opens a number of connections upfront (the pool), then as an application needs a connection, instead of opening a new connection, it simply borrows a connection from the pool and returns it as soon as it is not needed. For most pools to be effective:
- The application is aware pooling will be used, and does not leave connections idle, but instead opens and closes them as needed;
- All connections leverage the same properties, such as the database user and catalog (database instance);
- State is not changed on the connection.
For a typical application server environment (e.g. J2EE), basic pooling is supported. In other environments, where pooling was not part of the initial design, simply inserting a connection pooler can cause more overhead than expected:
- When multiple users are connecting, and each user rarely uses more than a few connections (e.g. Data Analytics): This may open a set of connections per user or close connections that are retrieved from the pool that do not match the desired properties and open new ones. This results in a large amount of connection thrashing (e.g. Apache Tomcat pooling and most other poolers).
- When many catalogs are used: In order to avoid changing the connection state, a discrete pool per catalog is created allowing an appropriate connection to be reused. This avoids triggering a USE statement before each new request.
- When attempting to constrain total connections to the database and on a per-user basis
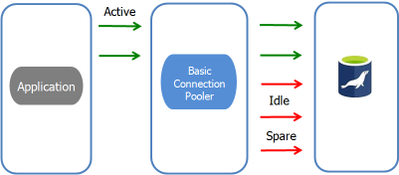
Figure 2: Basic Connection Pooling
For basic connection pooling, an active (green) front-side connection is paired with a back-side connection as shown in Figure 2 above. Additionally, you may have idle (red), unassigned connections in the backend for new connections. As such, you are NOT reducing the total number of connections, but are reducing the thrashing that occurs as the connections are opened and closed. The main benefit of basic pooling is lower CPU load.
To configure connection pooling on Heimdall Central Console, select the Data Source tab. Click on the check box to turn on Connection Pooling shown below:

Connection Multiplexing
Beyond basic pooling, there is connection multiplexing, which does not associate a client connection with a fixed database connection. Instead, active queries or transactions are assigned to an existing idle database connection or else a new connection will be established. If a client connection is idle, no resources are used on the database, reducing connection load and freeing memory. Shown in Figure 3 below, only active connections (green) are connected to the database via the connection pool. Idle connections (red) are ignored.
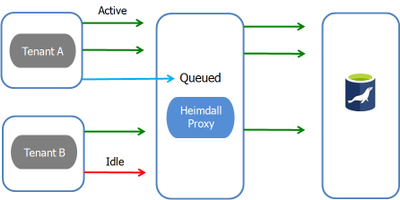
Figure 3: Connection Multiplexing
Multiplexing is a much more complicated technology than basic pooling. Therefore, many factors need to be accounted for. In the following situations, multiplexing will halt, and a connection will remain pinned, including:
- If a transaction starts, then the connection mapping will remain until the transaction completes with a commit, rollback, or the client connection is terminated;
- If a prepared statement occurs on a connection, this makes the connection stateful, and will remain pinned to the database until the connection is terminated;
- If a temporary table is created, the connection will remain pinned until the table is deleted.
To configure multiplexing on the Heimdall Central Console, go to the VirtualDB tab. Under Proxy Configuration, click “Multiplex” option shown below:
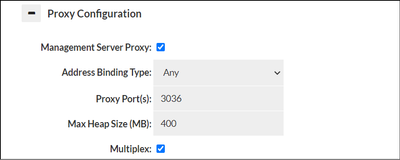
In the event that special queries break multiplexing logic, and multiplexing needs to be disabled on the connection, go to the Rules tab for more granular control (along with other pool behaviors). For example, you can add the below rules:

Tenant Connection Management
The third use-case helps ensure SLAs by enforcing per-tenant limits on connections and when combined with multiplexing, total active queries. This prevents one user from saturating the database, ensuring fairness of resources for others. A second tier of pool management is activated, that of “user pools”.
In the Data Sources tab, the pool can be managed at two tiers: the user level and the database. Each user can be limited to a number of total connections and idle connections using the  icon to add limits as demonstrated below:
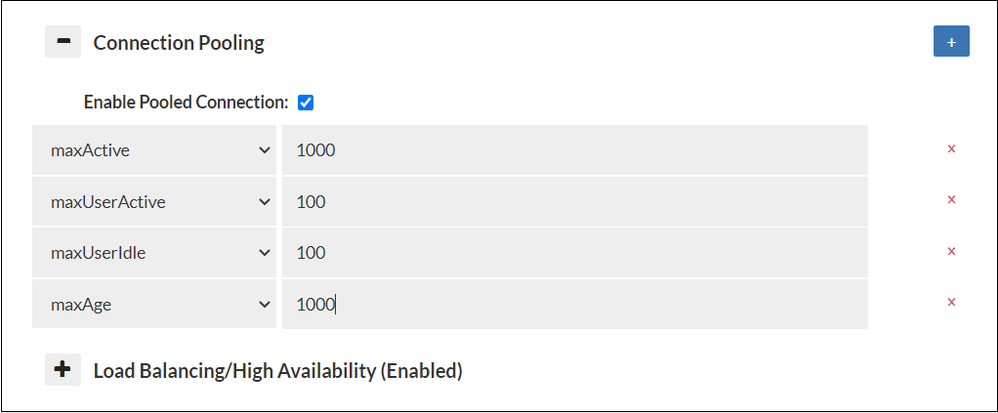
Shown above, the total connections allowed to the database across all users is 1000, but each user is only allowed 100, and of those, only 10 can be idle. Excess idle connections will be disposed of. Each time a connection is returned from the pool, there is a chance the connection will be closed: A value of 1000 means that there is a 1/1000 chance that the connection will be closed. This behavior is different from most connection poolers that set an absolute connection age which for large deployments can result in a stampede of many connections closing and reopening at once.
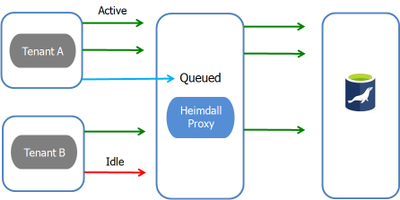
Figure 4: Multi-tenancy with Pooling, Multiplexing and Per-tenant connection limits
Figure 4 shows two tenants (with unique usernames or catalogs), allowing only active connections (green) to the database when multiplexing is enabled. If Tenant A attempts to perform a third query (blue) while two are active, it will be queued until one of the current active queries completes.
The net result of the combination of 1) Pooling and 2) Multiplexing, and 3) Per-tenant limits is that no single tenant can saturate database capacity, resulting in the SLAs of other customers failing. Further, as beyond a certain point, adding execution threads to the database will result in negative performance. This control can improve overall performance in many cases, allowing more capacity during peak load.
Use Cases
Magento
Magento is an e-commerce package written in PHP. Since PHP doesn’t support efficient connection pooling due to its processing model, each page-view opens a connection to the database, requests all the data it needs, then closes the connection. For every page-view, it results in a very high amount of connection thrashing against the database and can consume a large percentage of the database CPU. With the Heimdall proxy, basic connection pooling alone can reduce the load on the database by up to 15% percent.
Slatwall Commerce
Slatwall is an eCommerce platform written in Java, and is natively designed to use pooling. Although, under heavy load, it can result in the saturation of the allowed connections on MySQL (at most 7000). In order to support larger user-loads, the Heimdall proxy can reduce the connection load by an order of magnitude, resolving connection limits on the database, and allowing the CPU load to be the limiting factor in larger deployments. Per the developer of Slatwall, connection offload with multiplexing and pooling resulted in a 10x reduction in connections to the database.
Complementary Features
While Heimdall proxy provides connection management for databases, there are other features provided that further improve SQL scale, performance and security:
- Query Caching: The best way to lower database CPU is to never issue a query against the database in the first place. The Heimdall proxy provides the caching and invalidation logic for Amazon ElastiCache as a look-aside results cache. It is simple way to improve RDS scale and improve response times without application changes;
- Automated Read/Write split: When a single database becomes too expensive to upgrade, or there is already a standby reader that is sitting idle, separating read and write queries can be used to offload write queries to an alternate server, improving resource utilization. Moreover, replication lag detection is supported to ensure ACID compliance.
- Active Directory/LDAP integration: By authenticating against LDAP, the Heimdall proxy manages connections for a large number of users, and synchronizes the authentication credentials into the database. In environments that require database resources to be accessible to many users in the enterprise, while providing data security, this feature is easy to administer, while preventing individual users from over-taxing resources.
Next Steps
Deployment of our proxy requires no application changes, saving months of deployment and maintenance. To get started, you can download a free trial on the Azure Marketplace, or contact Heimdall Data at info@heimdalldata.com.
Resources
Heimdall Data, a Microsoft technology partner, offers a database proxy that intelligently manages connections for SQL databases. With the Heimdall’s connection pooling and multiplexing feature, users can get optimal scale and performance from their database without application changes.
by Scott Muniz | Jun 29, 2020 | Uncategorized
This article is contributed. See the original author and article here.
This is the second article in our Zero to Hero with App Service series. This article assumes you have completed Part 1. In the last article you created an App Service Plan, a web app, and forked one of the sample applications. In this article, you will set up a Continuous Integration and Delivery (CI/CD) pipeline using GitHub Actions.
What is CI/CD?
Continuous Integration and Delivery is not specific to App Service or Azure. It is a modern software development best-practice to automate the testing and deployment of your application. App Service integrates directly with GitHub Actions and Azure Pipelines, so setting up CI/CD with App Service is easy.
Continuous Integration
Continuous Integration is the first step of a CI/CD pipeline. In this phase, the pipeline builds and tests the application. This is usually run for any new pull requests targeting the main tracking branch (formerly known as the master branch). You can also enforce coding style guides or lint the Pull Request during this phase.
Continuous Delivery
Assuming the application builds correctly and passes the tests, the new build will be automatically deployed (or delivered) to a staging or production server. Advanced development teams may deploy directly to production, but that requires considerable investment in development operations and automated testing. Teams that are just starting with CI/CD can deploy their builds to a staging environment that mirrors production, then manually release the new build once they feel confident.
In the next article, you will learn how to route a percentage of your production traffic to a staging environment to test your new build with “real” traffic.
Create a Staging Environment
App Service allows you to create and delete independent staging environments, known as slots. You can deploy code or containers to a slot, validate your new build, then swap the staging slot with your production slot. The swap will effectively release the new build to your users. Using the CLI command below, create a staging slot. You will need to replace the <name> parameter with the web app’s name from the previous article.
az webapp deployment slot create --slot staging -n <name> -g zero_to_hero
Staging slots also get their own default domain names. The domain name follows a similar pattern as the production slot, http://mycoolapp.azurewebsites.net except the slot name is appended to the app’s name: http://mycoolapp-staging.azurewebsites.net.
Learn more about best practices for App Service staging slots.
Create a CI/CD Pipeline
Next, you will create a CI/CD pipeline to connect your GitHub repository to the staging slot. App Service has built-in integration with GitHub Actions and Azure Pipelines. Since the sample apps are hosted in GitHub repos, we will use GitHub Actions for our pipeline.
About GitHub Actions
GitHub Actions is an automation framework that has CI/CD built in. You can run automation tasks whenever there is a new commit in the repo, a comment on a pull request, when a pull request is merged, or on a CRON schedule. Your automation tasks are organized into workflow files, which are YAML files in the repository’s .github/workflows/ directory. This keeps your automation tasks tracked in source control along with your application code.
The workflow file defines when the automation is executed. Workflows consist of one or more jobs , and jobs consist of one or more steps. The jobs define the operating system that the steps are executed on. If you are publishing a library and want to test it on multiple operating systems, you can use multiple jobs. The steps are the individual automation tasks, you can write your own or import actions created by the GitHub community.
An example “Hello World” workflow file is shown below. It runs any time there is a push to the repository and prints “Hello Keanu Reeves” with the current time. If you read the YAML carefully, you can see how the last step references the output from the earlier “Hello world” command using the dotted syntax.
name: Greet Everyone
on: [push]  # This workflow is triggered on pushes to the repository.

jobs:
  build:
    name: Greeting  # Job name is Greeting
    runs-on: ubuntu-latest  # This job runs on Linux
    steps:
      # This step uses GitHub's hello-world-javascript-action: https://github.com/actions/hello-world-javascript-action
      - name: Hello world
        uses: actions/hello-world-javascript-action@v1
        with:
          who-to-greet: 'Keanu Reeves'
        id: hello
      # This step prints an output (time) from the previous step's action.
      - name: Echo the greeting's time
        run: echo 'The time was $.'
Learn more about the GitHub Actions terms and concepts.
Create the Pipeline
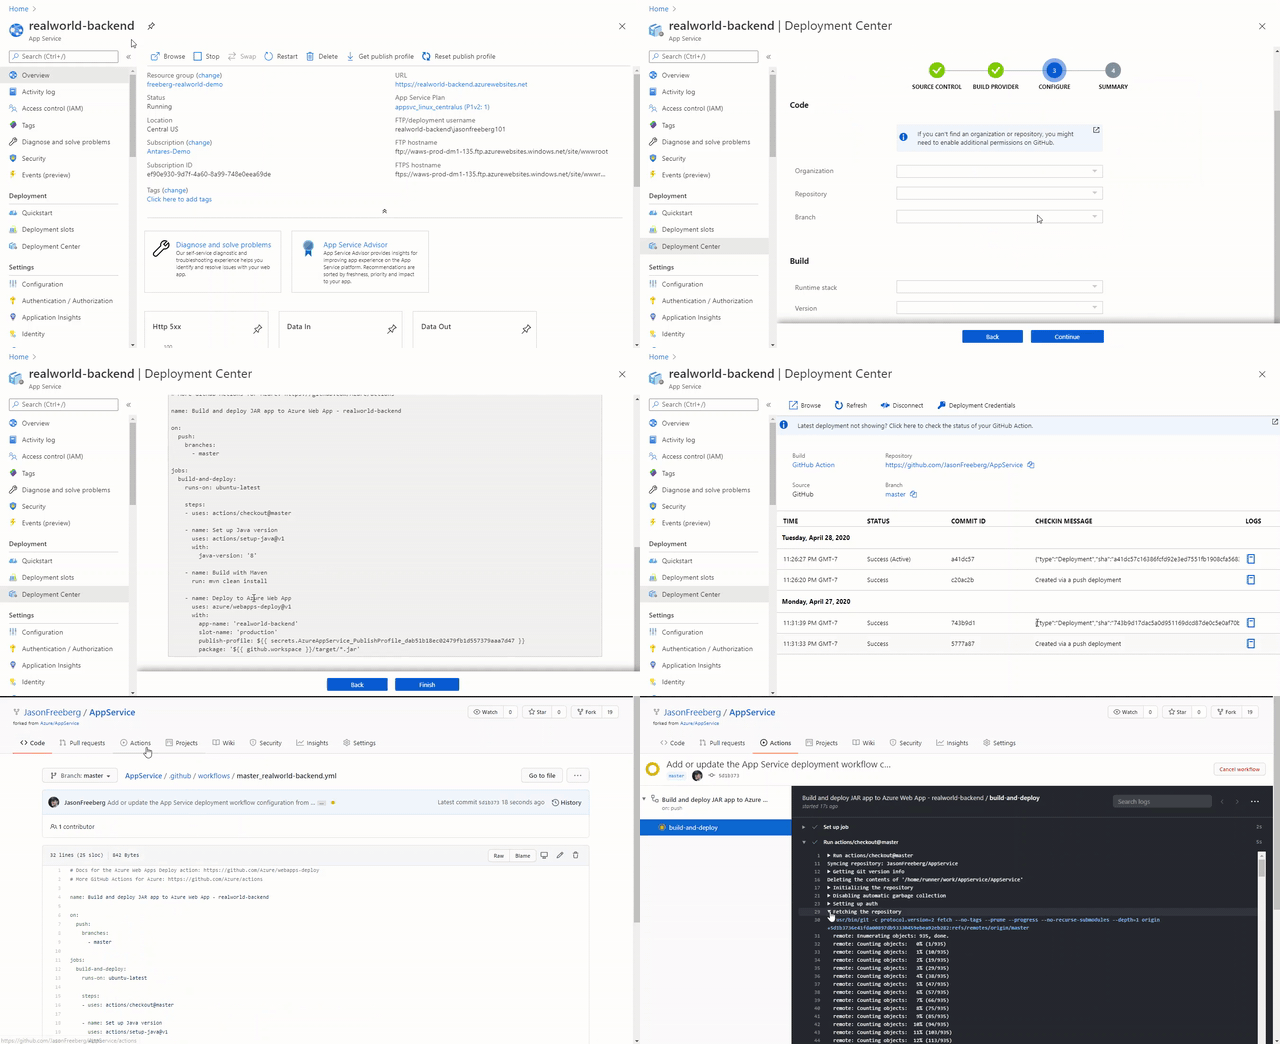
In the Azure Portal, find and click the App Service you created in the previous article. Once you have the App Service open in the portal, select Deployment Center on the left side under the Deployment header. This will open the App Service Deployment Center. The deployment center will guide you through the CI/CD setup process.
Next, select GitHub and click Continue at the bottom. In the following page, select GitHub Actions (Preview) and click Continue at the bottom. In the next screen, select your repository using the dropdowns. (You do not need to edit the language and language version dropdowns.)

On the final page you will see a preview of the GitHub Actions workflow file that will be committed into your repository. Click Complete to commit the workflow file to the repository. This commit will also trigger the workflow.
Learn more about GitHub Actions and Azure Pipelines integration with App Service.
Check the Pipeline’s Progress
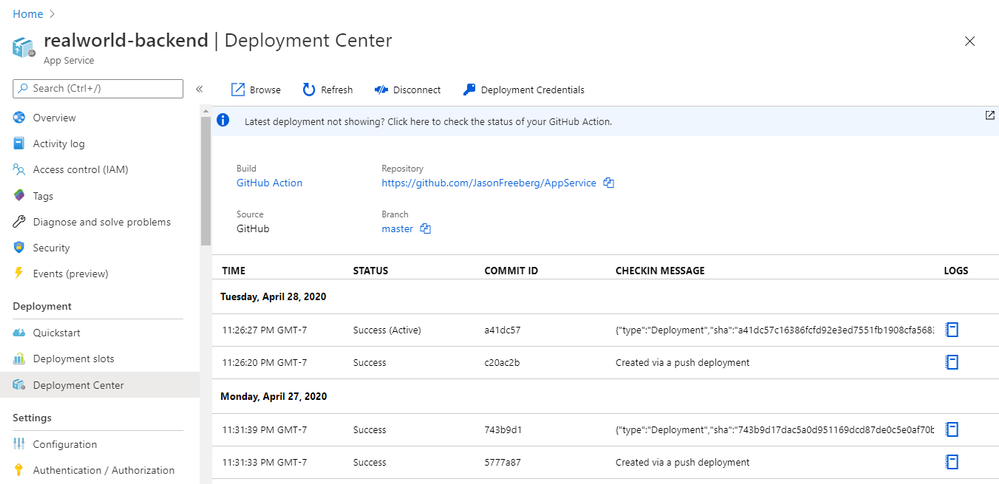
If you go to your GitHub repository you will see a new file in the .github/workflows/ directory on the master branch. Click on the Actions tab in the GitHub repository to see a historical view of all previous GitHub Actions runs. Once the workflow run completes, browse to your staging slot to confirm that the deployment was successful.
Summary
Congratulations! You now have a CI/CD pipeline to continuously build and deploy your app to your staging environment. In the next article you will learn how to swap the staging and production slots to release new builds to your production users. The next article will also explain how to route a small percentage of your users to a staging slot so you can validate new builds against production traffic or do A/B testing.
Helpful resources
- Using GitHub Actions to deploy a Windows Container to App Service
- GitHub Workflows to create and delete a slot for Pull Requests
by Scott Muniz | Jun 29, 2020 | Uncategorized
This article is contributed. See the original author and article here.
With the rollout of Windows 10, version 1903, we gave customers control over when to take feature updates. As noted in Mike Fortin’s April 2019 blog on Improving the Windows 10 update experience with control, quality and transparency, feature updates are no longer offered automatically unless a device is nearing its end of service and therefore must update to stay secure. The purpose of this post is to discuss how Windows 10, version 2004 simplifies Windows Update settings further and to clarify how you can control when to take feature updates.
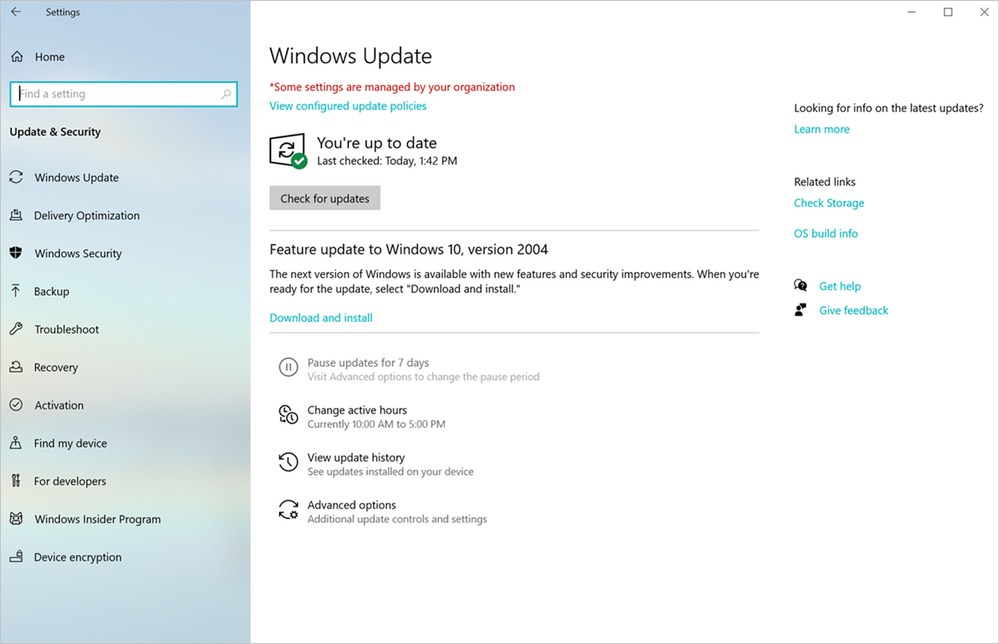
First, until you approach end of service, you no longer need to configure any settings in order to stay on your current version of Windows 10. This change enables you to remain on any given release for a longer duration, taking a feature update approximately once a year or less depending on which edition of Windows 10 your device is running. Additionally, prior to approaching end of service, you have complete control over when to download and install the latest Windows 10 feature update from the Windows Update Settings page, as shown below:
 How a Windows 10 feature update is offered
The ability to remain on your current version until you choose to download and install the latest feature update or until approaching end of service is only possible when deferrals are not set for the device. To date, some of you have leveraged, and continue to leverage, deferrals to delay feature updates. While deferrals can be a great way to roll out updates in waves to a set of devices across an organization, setting deferrals as an end user might now have some unintended consequences. Deferrals work by allowing you to specify how many days after an update is released before it is offered to your device. For example, if you configure a feature update deferral of 365 days, you will be offered every feature update 365 days after it has been released. However, given that we release Windows10 feature updates semi-annually, if you configure a feature update deferral of 365 days, your device will install a new feature update every six months, twice as often as an end user who has not configured any settings.
To try and prevent these unintended consequences and enable you to stay with a given release of Windows 10 for the longest duration, beginning with Windows 10, version 2004, we no longer display deferral options on the Windows Update Settings page under Advanced options. This ensures that you have control over, and visibility into, exactly when to install the latest Windows 10 feature update until you near end of service. The ability to set deferrals has not been taken away, it is just no longer being displayed on the Settings page.
If you want to leverage deferrals to install a feature update semi-annually a given number of days after its release, you can continue to do so by leveraging Local Group Policy. Deferral settings can be found in the Windows Update for Business folder in Local Group Policy Editor. To access this folder, navigate to Computer Configuration > Administrative Templates > Windows Components > Windows Update > Windows Update for Business. Within the Windows Update for Business folder, you will see options for “Select when Preview builds and Feature Updates are received” and “Select when Quality Updates are received”, which enable you to defer feature updates, monthly quality updates, or both.
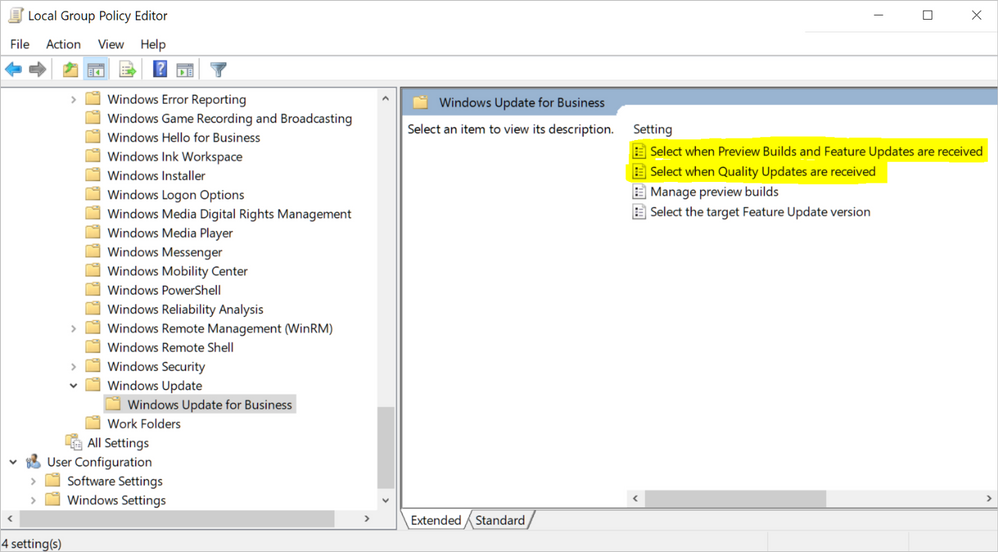 Windows Update for Business settings in the Local Group Policy Editor
Finally, it is important to note that this change does not impact IT administrators who utilize mobile device management (MDM) tools or Group Policy management tools to set deferrals in order to do validation and roll out feature updates in planned waves across their organization.
I hope this post clears up any questions you may have about this change in Windows 10, version 2004. If you are an IT admin and looking for detailed information on using Windows Update for Business to keep the Windows 10 devices in your organization always up to date with the latest security defenses and Windows features, see our Windows Update for Business documentation.

by Scott Muniz | Jun 29, 2020 | Uncategorized
This article is contributed. See the original author and article here.

For more than 50 years, Godshall Recruiting in Greenville, South Carolina has successfully paired job candidates with employers using a proven process of phone screening and in-person interviews. Just a day after a statewide quarantine order in 2020, however, all 30 employees suddenly had to pivot to a new way of working: from home, with company-owned devices, and with all their documents and communication in Microsoft Teams.
“We had already been using Microsoft 365 for business for a number of years, mostly for email,” explains Karen Truesdale, Vice President of Administration at Godshall. “But we never dreamed how easily it would allow us to move everyone to a remote work environment that was also pretty secure. Within 24 hours of the quarantine order impacting our area, we were up and running remotely.”
Remote productivity
The managers and admins at Godshall had been using Microsoft Teams for months, but now everyone—including the bulk of its employees who are in frontline recruiting roles—relies on it daily.
For example, managers and admins disseminate information in Teams via chat, and they join up for staff video calls of up to 18 people at a time every week. Recruiters conduct interviews and stay in contact with candidates, employers, and each other using video calls, chat channels, and file sharing.
“With Teams, we can send information to employees quickly, and keep everyone connected and on the same page,” says Truesdale. “We’ve even used it to set up interviews between candidates and our clients.”
Virtual face-to-face recruiting
Although Godshall’s many recruiters were new to Teams, they quickly discovered the advantages of virtual interviews for their work.
“We can capture a candidate’s communication style and professionalism much better using virtual interviews in Teams than by phone,” says Truesdale. “Video calls also let us replicate almost every benefit we see from in-person meetings. With Teams, we haven’t skipped a beat when it comes to our recruiting.”
Another gain is the ability to store a candidate’s files, contact records, and video interviews on OneDrive, and then access them through file sharing and task sharing in Teams.
“Using OneDrive and Microsoft Teams for collaboration all day, every day, within and across our teams, helps us leverage the knowledge of others,” says Truesdale. “Many recruiters, for example, will ping a teammate to meet a candidate who is qualified for a role in another field, and all the materials are right there. It’s been seamless!”
 Godshall Recruiting in Greenville, SC
Security that works from home
The recruiting industry is a prime target for cybercrime, so naturally Godshall is highly security focused. The company uses Office 365 Advanced Threat Protection (ATP) to protect against malicious links in emails from external sources, and Multi-Factor Authentication (MFA) to protect against unauthorized access to accounts and documents.
Palmetto Technology Group, the IT partner for Godshall, helped the company upgrade to Microsoft 365 Business Premium a few years ago, and deployed the ATP and MFA features to every account as part of the new subscription plan. Godshall also increased security with features such as mobile device management (MDM) with Microsoft Intune, which has allowed the firm to remotely erase business data from lost or stolen devices in the past year protecting company content.
“We use a mix of Windows 10, Android, and iOS devices with Teams, and we feel very comfortable with our security measures with Microsoft 365”, notes Truesdale.
A new preferred process
Despite being 100 percent offsite since March 19, recruiters have used Teams exclusively to interview more than 100 candidates a week—the same number as before the shutdown.
“Our clients have not noticed any disruption in our communications or process because we were able to transition to virtual meetings in Teams so quickly and smoothly”, declares Truesdale. “We like how professional, easy, and secure it all is. In fact, our recruiters enjoy using Teams so much that they have asked to continue using it even after all work restrictions have lifted.”
Of course, the answer is “yes”.

by Scott Muniz | Jun 29, 2020 | Azure, Microsoft, Technology, Uncategorized
This article is contributed. See the original author and article here.
The month of JulyOT is here! To celebrate, we have curated a collection of content designed to demonstrate and teach developers how to build solutions with Azure IoT services. Each week, we will be adding new content in the form of articles, code samples, recorded videos, and livestreams! The final week (July 27-31) will focus entirely on the Azure 220 IoT Developer Certification, for a chance to apply everything you’ve learned along the way and get certified in the process! Everyone is invited to contribute their creations to #JulyOT and we can’t wait to see what you are able to create with the knowledge you gain here!
July 1 -3 : JulyOT Content Kickoff!
|

Intelligent Home Security with NVIDIA Jetson
|

Learn how to build an enterprise-scale IoT solution
|
|

What happens when R&D is free from hardware limitations?
|

Compete against peers with the Cloud Skills Challenge
|
On-demand content from NVIDIA GTC DIGITAL 2020
|
Show your WFH “coworkers” when you’re not available!
|


Recent Comments