by Scott Muniz | Aug 25, 2020 | Uncategorized
This article is contributed. See the original author and article here.
This article provides a python sample code for put block blob list.
The maximum size for a block blob created via Put Blob is 256 MiB for version 2016-05-31 and later, and 64 MiB for older versions. If your blob is larger than 256 MiB for version 2016-05-31 and later, or 64 MiB for older versions, you must upload it as a set of blocks. Therefore, if you want to upload a blob larger than 256 MiB, you may need to use Put Block List operations.
This sample code need to use azure-storage-blob sdk version 2.1.0 .
Install the sdk as following:
pip install azure-storage-blob==2.1.0
Then refer the below sample code:
from azure.storage.blob import BlockBlobService, PublicAccess, BlobBlock
import random, string
from random import randint

# Block Blob Operations
def block_blob_operations():
    # Define the upload file
    file_to_upload = "largerthan256MBfile.mp4"
    # Define the block size
    block_size = 1024*1024*4 #4MB

    # Create blockblob_service object
    blockblob_service = BlockBlobService(
        account_name="youraccountname", account_key="youraccountkey")

    # Define container name
    container_name = 'blockblobcontainer' + get_random_name(6)
    print("Container name:" + container_name)

    try:
        # Create a new container
        print('1. Create a container with name - ' + container_name)
        blockblob_service.create_container(container_name)

        blocks = []

        # Read the file
        print('2. Upload file to block blob')
        with open(file_to_upload, "rb") as file:
            file_bytes = file.read(block_size)
            while len(file_bytes) > 0:
                block_id = get_random_name(32)
                blockblob_service.put_block(container_name, file_to_upload, file_bytes, block_id)

                blocks.append(BlobBlock(id=block_id))

                file_bytes = file.read(block_size)

        blockblob_service.put_block_list(container_name, file_to_upload, blocks)

        print('3. Get the block list')
        blockslist = blockblob_service.get_block_list(container_name, file_to_upload, None, 'all')
        blocks = blockslist.committed_blocks

        print('4. Enumerate blocks in block blob')
        for block in blocks:
            print('Block ' + block.id)
    finally:
        print('5. Completed')
        #if blockblob_service.exists(container_name):
         #   blockblob_service.delete_container(container_name)
def get_random_name(length):
    return ''.join(random.choice(string.ascii_lowercase) for i in range(length))
# Main method.
if __name__ == '__main__':
    block_blob_operations()
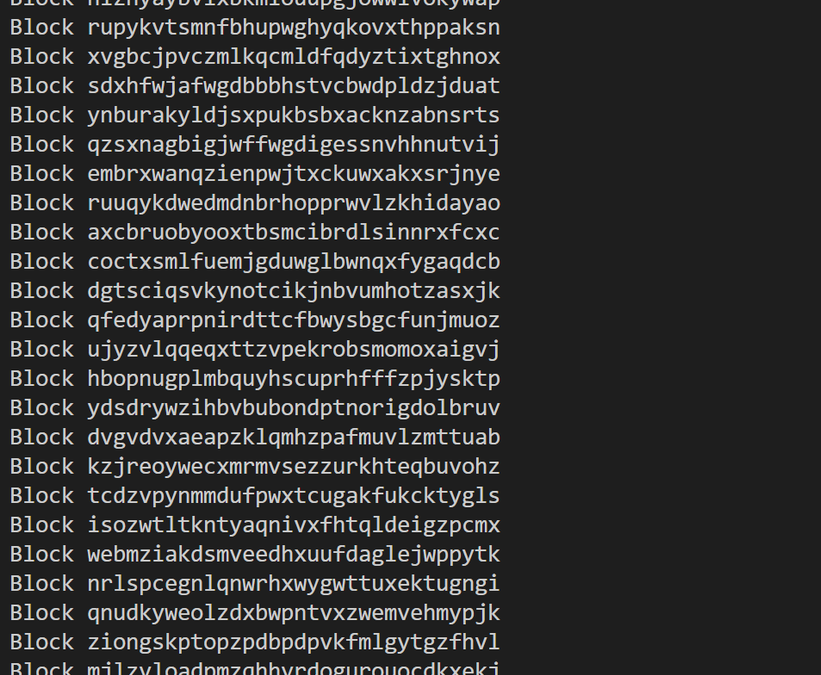
Tested above python code, following is run result:

by Scott Muniz | Aug 25, 2020 | Uncategorized
This article is contributed. See the original author and article here.
Introduction
This is John Barbare and I am a Sr Customer Engineer at Microsoft focusing on all things in the Cybersecurity space. In this blog I will walk you through the steps of navigating through the Microsoft Defender Advanced Threat Protection (ATP) portal to see how prone your organization is from an attack or breach from an application perspective. After viewing the different sections, we will see how to remediate and decrease your overall attack surface using Microsoft Endpoint Manager (MEM) so your organization’s security posture will be at a level that your CIO/CISO will be comfortable with. Without further hesitation, let’s get started and jump right into all things Microsoft Defender ATP and MEM.
Licensing requirements
Microsoft Defender ATP licensing requirements:
- Windows 10 Enterprise E5
- Windows 10 Education A5
- Microsoft 365 E5 (M365 E5) which includes Windows 10 Enterprise E5
- Microsoft 365 E5 Security
- Microsoft 365 A5 (M365 A5)
More information can be found here.
Microsoft Defender ATP for US Government Community Cloud High (GCC High) customers, built in the US Azure Government environment, uses the same underlying technologies as Microsoft Defender ATP in Azure Commercial. This offering is currently available to US Office 365 GCC High customers and is based on the same prevention, detection, investigation, and remediation as the commercial version.
If you currently use Configuration Manager, you also get Microsoft Intune/MEM to co-manage your Windows devices. For other platforms, such as iOS/iPadOS and Android, then you will need a separate license. In most scenarios, Microsoft 365 may be the best option, as it gives you MEM and Office 365. For more information, see Microsoft 365. More information on licensing and changes with licensing for co-management in MEM can be found here.
Prerequisites to use MEM with Microsoft Defender ATP
Deploy a device configuration policy with a profile type of Microsoft Defender ATP (Windows 10 Desktop) to devices that will have risk assessed by ATP.
Login into Security Center – Microsoft Defender ATP Portal
Navigate to Microsoft Defender Security Center and login with your credentials at https://securitycenter.windows.com/
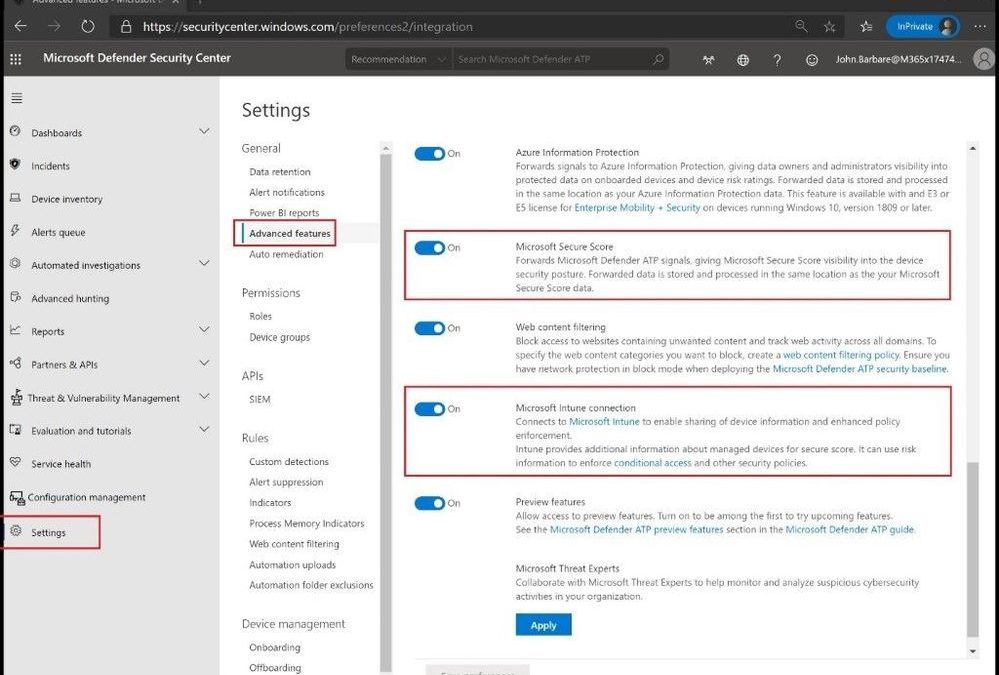
Navigate to Settings and then Advanced features. Make sure Microsoft Secure Score and Microsoft Intune connection are turned to on.
 Advanced Settings
Threat and Vulnerability Management
Go to the Threat & Vulnerability Management tab on the left and then click on Dashboard. This dashboard gives your organization an overall picture of the entire security posture broken down into three main categories.
- Exposure Score – Reflects how vulnerable your organization is to cybersecurity threats. Depending on the level of the score it will show you if you are less or more vulnerable to attacks. Several factors affect your organization’s exposure score: weaknesses discovered in your devices, likelihood of your devices to be breached, value of the devices to your organization, and relevant alerts discovered with your devices. The goal is to lower the exposure score of your organization to be more secure.
- Secure Score for Devices – Reflects how your endpoints are more resilient from cybersecurity threat attacks. It reflects the collective security configuration state of your devices across five categories which include Application, Operating system, Network, Accounts, and Security controls. You can select any of the corresponding colored horizontal bars and it will take you to the Security recommendation page. The goal is to remediate the related security configuration issues to increase your score for devices.
- Device exposure distribution – Reflects how many devices are exposed based on their exposure level. You can select a slice in the doughnut chart to go to the Devices list page and view the affected device names, exposure level, risk level, and other details such as domain, operating system platform, its health state, when it was last seen, and any tags that are assigned.
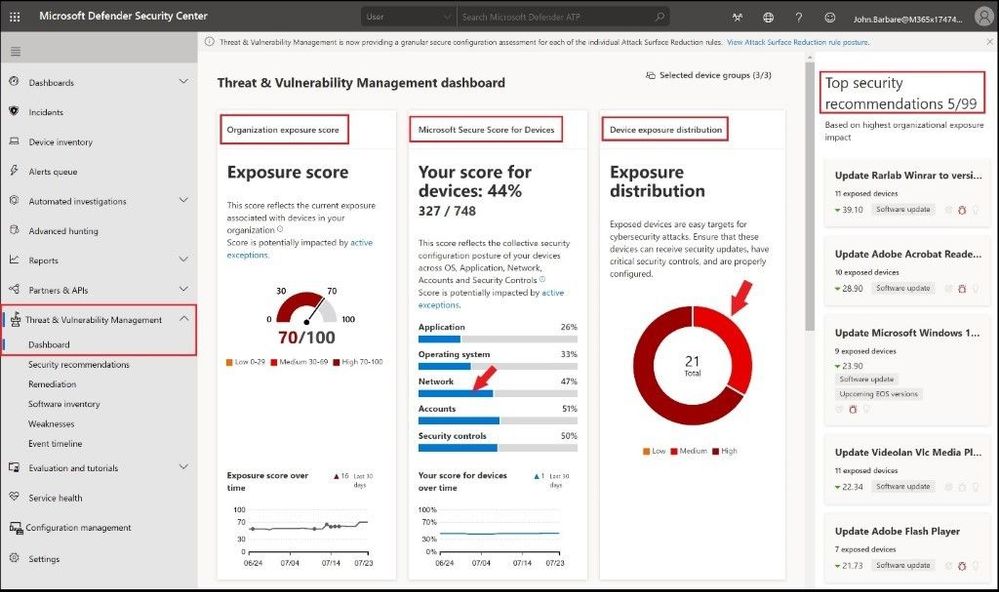 TVM Dashboard to access any exposures in your environment
The column on the far right, Top security recommendations, shows the top five software that is impacting your organization from a threat standpoint. They are sorted and prioritized based on your organization’s risk exposure and the urgency that it requires. This includes both Microsoft software and third-party installations across your entire organization.
Active Threats and Vulnerabilities
Next, we will click on the Software inventory tab which is located three tabs below the Dashboard. From here, you will see the complete list of every piece of software that is installed in your organization. Click on the Weaknesses tab twice to rank the number of software weaknesses in order from greatest to least. The number of weaknesses corresponds to the number of Common Vulnerabilities and Exposures (CVE). CVE is a list of entries that each contain an identification number, a description, and a minimum of at least one public reference for known cybersecurity vulnerabilities. Under the Threats column, you can click on any icon that is displayed as a red bug to give you threat insights into a likely breach scenario in your environment. The Exposed devices column displays the total number of exposed devices the piece of vulnerable software is installed on. The Impact displays a graph over time with a corresponding score. The lower exposure score means the devices are less vulnerable from exploitation.
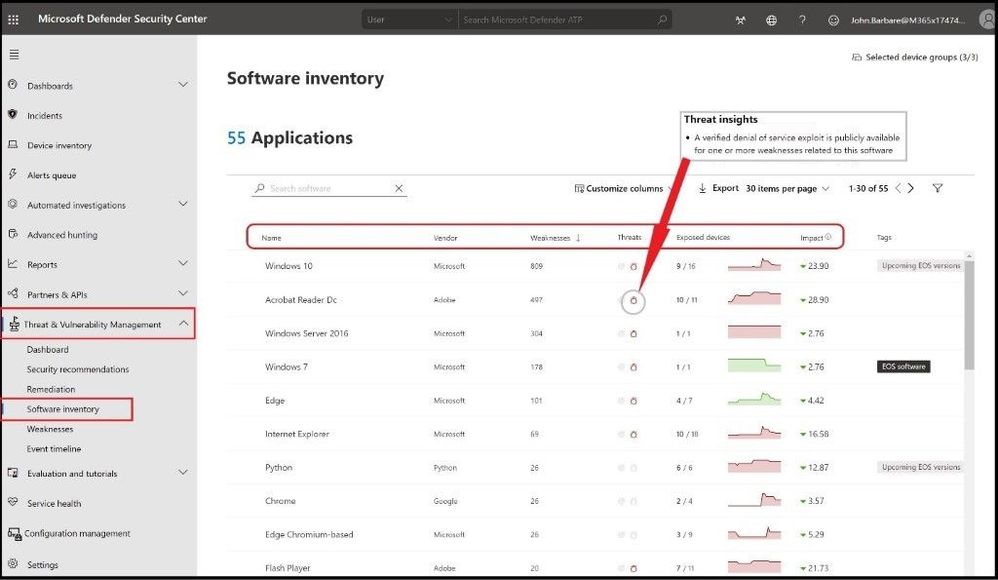 Complete software inventory and any known threats to your environment
For a fine-grained list of all the CVEs for a piece of software, click on the name of the actual software and then Discovered vulnerabilities to see each CVE associated with the software version.
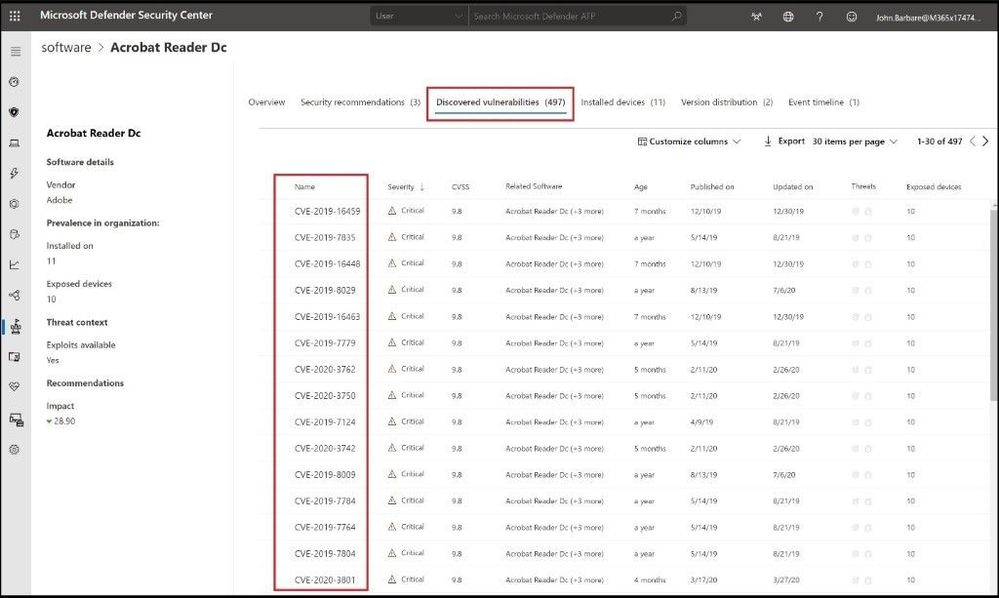 Review how many CVEs are associated with an application
Remediation
The next step, we will perform a full remediation based off the security recommendations in the previous section. MEM will be used to update the software which will be selected in the next steps.
Select the Security recommendations tab and then click on the piece of software you want to remediate. We will be updating Microsoft Edge Chromium for this task and we will select it.
A fly out screen will display and on the bottom you can expand the number of exposed and installed devices to see the full list. Next, we will click on the Remediation options button.
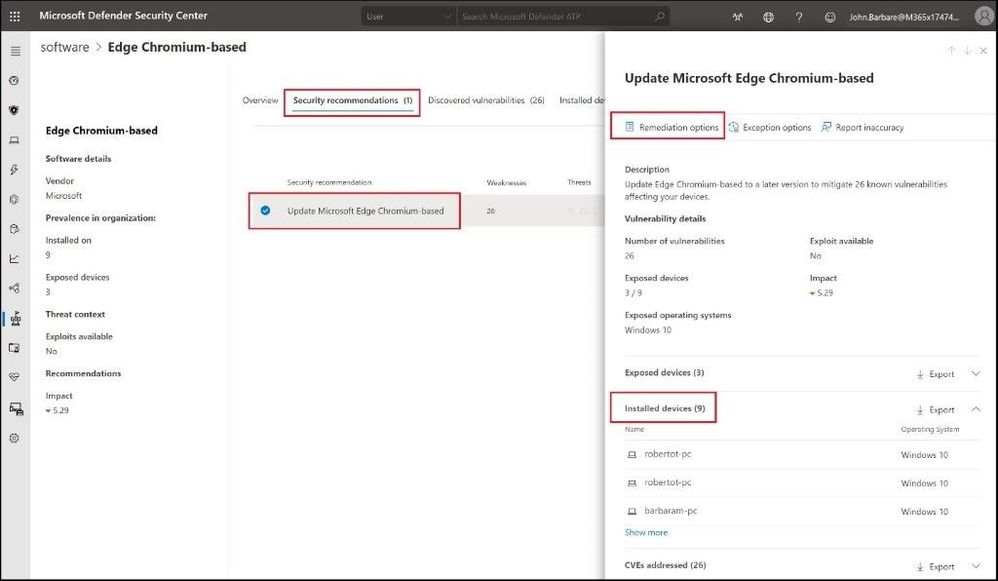 Remediation Options in MDATP
Notice for the description it states that submitting a remediation request creates an activity item, which can be used to monitor the remediation progress of this recommendation. It will not apply any changes to devices. Mitigation actions, on the other hand, will be applied immediately. Select the following items in the picture below and click submit.
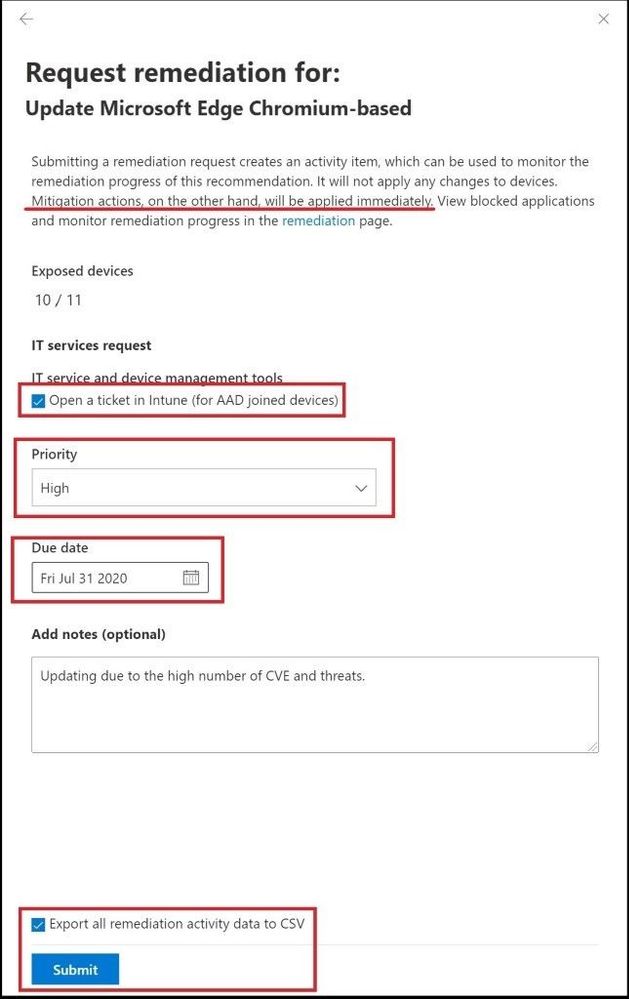 Opening a ticket and due date
As soon as you select Submit, a pop up window will appear at the top stating a ticket was open.
 Notification in MDATP
Seconds later, the gray bar will refresh to green stating a remediation ticket was created in Microsoft Defender ATP.
 Notification in MDATP
Select the Remediation tab and you will see the actual ticket and the status inside Microsoft Defender ATP.
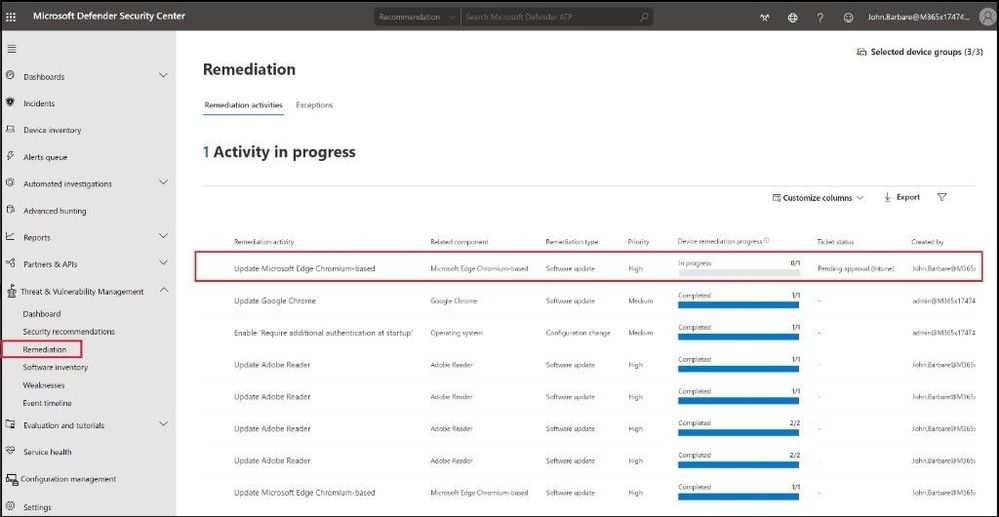 Ticket created in MDATP
Navigate to MEM and login with your credentials at https://endpoint.microsoft.com. Click on Endpoint Security and then Security Tasks.
You can see the task that was created and it is referred to as a “Security Task”.
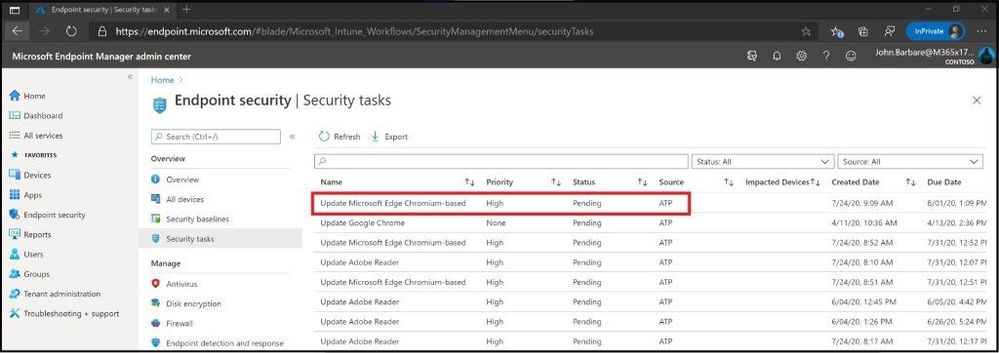 Ticket created and cross synced in MEM
When selecting the task, which is pending for the Microsoft Edge Chromium update, you will see the following information for remediation. If an app is not a managed app, MEM can only provide detailed text instructions as seen in the below image. If the app is managed, MEM will provide instructions to download an updated version and provide a link to open the deployment for the app so that the updated files can be added to the deployment. The admin then remediates the task based on the guidance provided. The guidance varies depending on the type of remediation that’s needed. When available, remediation guidance includes links that open relevant panes for configurations in MEM. After following the steps for the remediation to update the app, click accept.
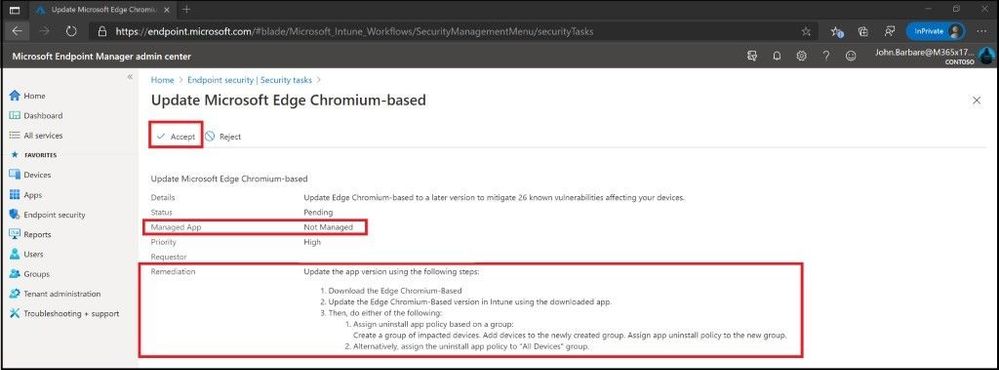 Options to remediate app in MEM
Once accepted, it will sync back over to Microsoft Defender ATP and the Ticket status column will be updated with Completed (Intune).
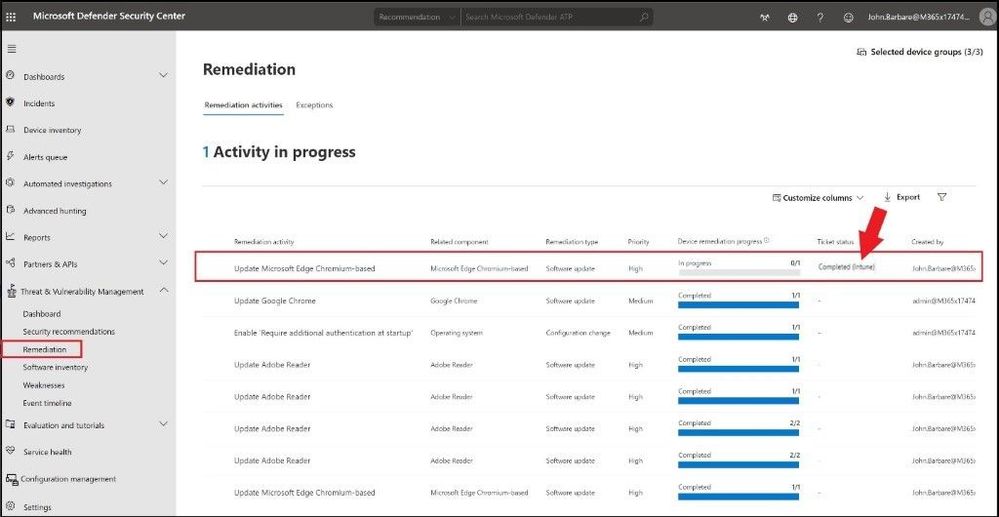 App is remediated as shown in MDATP
Select the Completed (Intune) name and a fly out window will appear. Go ahead and select Mark as completed and the remediation activity will be resolved. This will update the secure score along with other metrics and security recommendations.
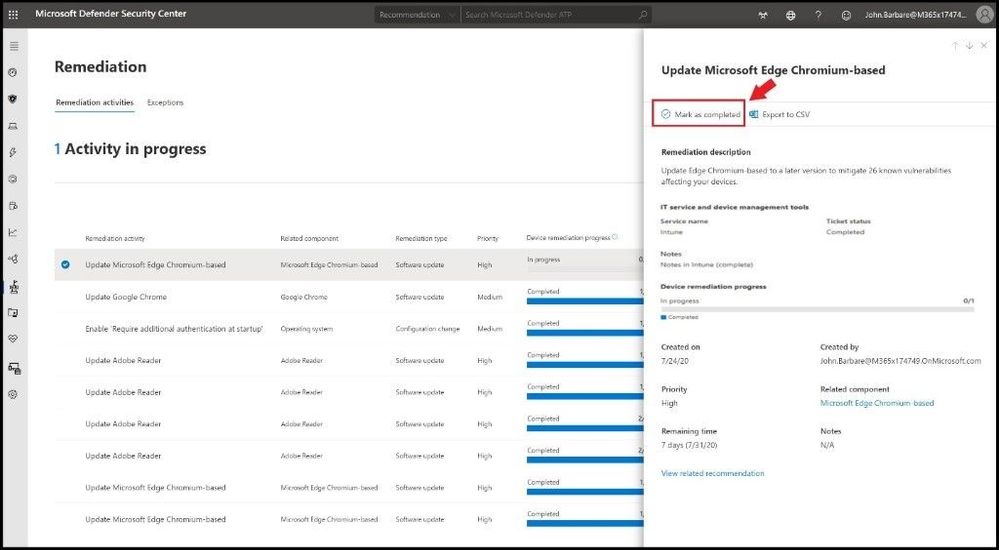 Marking application updated in MDATP
Conclusion
Thanks for taking the time to read this blog and I hope you had fun reading how to find current CVEs, software threats, possible breach activity, secure score, using the dashboard under Threat and Vulnerability Management, and to remediate and update apps using MEM. Once you start using MEM and Microsoft Defender ATP to create remediation tickets and update your apps you will find it more productive while also reducing your overall attack surface. On a finale note, Gartner just announced Microsoft as a Leader in its 2020 Magic Quadrant for Unified Endpoint Management. Read the article here. Hope to see you in my next blog and always protect your endpoints!
Thanks for reading and have a great Cybersecurity day!
Follow my Microsoft Security Blogs: http://aka.ms/JohnBarbare
References:
Microsoft Endpoint Manager
Microsoft Secure Score for Devices
Threat and Vulnerability Management
Use Intune to remediate vulnerabilities identified by Microsoft Defender ATP
by Scott Muniz | Aug 24, 2020 | Azure, Microsoft, Technology, Uncategorized
This article is contributed. See the original author and article here.
The 20.07 and 20.08 Update 1 versions of the Azure Sphere OS contain a bug that results in a memory leak for applications that use HTTPS connections via libcurl. This leak does not occur for HTTP (non-HTTPS) connections, Azure IoT C SDK connections, nor MQTT connections. Additionally, this leak does not occur when using the wolfSSL API directly to create a connection
The amount of data leaked is variable, depending on how the cURL handle is configured. We expect that it will be approximately tens of bytes leaked per HTTPS transaction.
The 20.09 OS release will include a fix for this bug. In the meantime, you can mitigate the problem by implementing a workaround.
Workaround
To work around this bug, disable the CURLOPT_SSL_SESSIONID_CACHE option when you create cURL handles. To do so, set the following option after cURL handle creation and once for each handle:
curl_easy_setopt(curlHandle, CURLOPT_SSL_SESSIONID_CACHE, 0);
For more details on how to do this, see CURLOPT_SSL_SESSIONID_CACHE explained in the cURL documentation.
This workaround will continue to work with the 20.09 release, but you may prefer to revert the workaround so that you can enable SSL session ID caching.
Solution
The fix for this will be part of the 20.09 release, and the fix will take effect whether the OS is delivered as an OTA update or via recovery. After the device has updated to 20.09, you can either revert applications that use the workaround to enable SSL session ID caching, or you can leave it disabled.

by Scott Muniz | Aug 24, 2020 | Uncategorized
This article is contributed. See the original author and article here.
Bing Ads API Development forum on MSDN is now moving to Microsoft Q&A! We’ve listened to your feedback on how we can enhance the forum experience. Microsoft Q&A allows us to add new functionality and enables easier access to all the technical resources most useful to you, like Microsoft Docs and Microsoft Learn.
Now until September 8, 2020:
From September 8, 2020 until September 21, 2020:
- New posts – Post any new questions in the Microsoft Advertising development forum’s new home on Microsoft Q&A. The MSDN forum will not allow any new questions.
- Existing posts – Interact here with existing content, answer questions, provide comments, etc.
September 21, 2020 onwards:
- The MSDN forum will be closed to all new and existing posts and all interactions will be in Microsoft Q&A.
Please start using Microsoft Q&A today! To make sure that we see your question, tag it with ‘advertising-api’.

We are excited about moving to Microsoft Q&A and seeing you there. Learn More


Recent Comments