by Scott Muniz | Aug 18, 2020 | Uncategorized
This article is contributed. See the original author and article here.
I introduced Enterprise-Scale in my first blog, which is part of the Cloud Adoption Framework (CAF). In this second blog I want to answer the question about when Enterprise-Scale should be adopted, compared to alternative solutions; in my own words and from my own view.
Azure landing zone and implementation options
On the implementation options we have a few information documented related to the question above, as follows:
“When business requirements necessitate a rich initial implementation of landing zones, with fully integrated governance, security, and operations from the start, Microsoft recommends the enterprise-scale approach.”
However, I think this does not fully address the question about the when, as from my view the following must be take into account as well:
- The culture of the organization (centrally IT-controlled vs DevOps empowered)
- The cloud and DevOps maturity of application teams
- The cloud maturity of the organization’s operating model
Should Enterprise-Scale be used?
If an organization is very much IT-controlled, and there is a mandatory layer to enable a centralized IT team to control the entire cloud adoption, including all networking aspects, identity, security, monitoring for all applications, etc., Enterprise-Scale might not be the best implementation options for Azure landing zones. This is due to the fact that such an IT-controlled approach would not align with the Enterprise-Scale design principles.
In contrast, if an organization embraces DevOps principles and methodologies, empowers application teams to implement a DevOps approach (they own an application end-to-end), Enterprise-Scale might be a very good fit. This is due to the fact that Enterprise-Scale considers a cloud-native way to build landing zones, which differs greatly from a traditional on-premises data center setup. One concrete example is the recommended approach to protect web applications and web APIs, which in an on-premises data center would be completely owned by the central IT team. In Enterprise-Scale, though, the service used to protect web applications and APIs is part of the landing zone, therefore setup in a decentralized way. But of course, configured Azure policies (guard-rails) ensure the required configuration of the protection service (Azure Application Gateway and Azure Web Application Firewall, to be precise).
by Scott Muniz | Aug 18, 2020 | Uncategorized
This article is contributed. See the original author and article here.
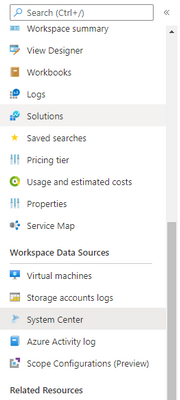
System center now has it’s own, dedicated blade in Log Analytics.
We have added a new menu entry to the sidebar menu in Log Analytics workspaces for System center:

The new blade has a new, more streamlined and accessible design:

To learn more about System center and Log Analytics follow this link.
Let us know what you think! we encourage you to reply and comment on this blog post.
Thank you,
The Log Analytics team

by Scott Muniz | Aug 18, 2020 | Uncategorized
This article is contributed. See the original author and article here.
We have added row numbers to our query editor.
When creating a Log Analytics query, each row in the query editor is indicated by a number:

This makes it easier to find the part of the query you need, when composing.
The new line numbers work in tandem with our new error messages.
If something is wrong with the query you composed, our newly designed error messages will indicate the row where an issue was found, row numbers in query editor makes it faster and easier to find the issue and fix your query:

Row numbers are optional.
The default setting for this feature is ‘on’ so Log Analytics show row numbers in query editor, however this can easily be changed from the ‘settings’ area of your Log Analytics blade:
 Let us know what you think! we encourage you to reply and comment on this blog post.
Thank you,
The Log Analytics team
by Scott Muniz | Aug 18, 2020 | Azure, Microsoft, Technology, Uncategorized
This article is contributed. See the original author and article here.
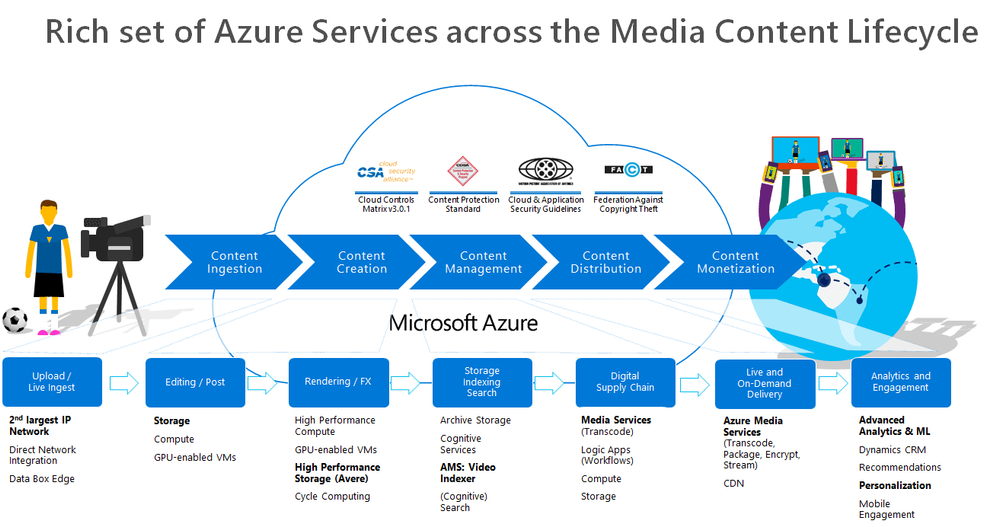
Over the last two months, I’ve engaged with a few media companies who wanted to learn how to integrate Azure Media Services into their workflow. Azure Media Services (AMS) offers a whole range of media capabilities for content ingest, storage, transcoding, video AI, encryption, dynamic packaging, and delivery – be it for live streaming or VOD through a single or multi-CDN.

This post contains 2 sample workflow implementations for content ingest and clear stream publishing
- A logic app that monitors newly uploaded content in an Azure Storage for transcoding and indexing.
- A logic app for publishing a media asset with a clear stream locator.
Reference and Set-up
Before I start, let me just share first that I referred to these 2 GitHub Repos extensively in implementing this logic app:
In doing so, I had to refactor some functions and split them into two. I also had to add some more functions to suit my needs. So I forked the v3 repository, which you can check out here: https://github.com/raffertyuy/media-services-v3-dotnet-core-functions-integration.
Create an Azure Function App and deploy the functions found in the advanced-vod-workflow folder.
Also, if you prefer to skip reading the logic app documentation below, feel free to clone the repo above and go straight to the code.
Upload and Process Workflow
Media companies will have an existing process for the creation of mezzanine files. These files are then typically uploaded to a CDN for content distribution. Given that this process already exists, the idea here is to add/modify the upload destination to an Azure Storage instead and expect it to be processed in Azure Media Services.
Media Service Assets
An Asset is a core concept specific to Azure Media Services (AMS). It is not a single blob in Azure Storage. An asset from a storage perspective will contain multiple files, such as its metadata, multiple bitrate files, etc. Internally, AMS handles this by mapping each asset to an Azure Blob container, which contains all of these files.
So the main challenge is how to upload a mezzanine file and get it recognized as a media asset by Azure Media Services, and this is where logic apps come in.
The Logic App
Azure Logic Apps is a cloud service that helps you schedule, automate, and orchestrate tasks, business processes, and workflows when you need to integrate apps, data, systems, and services across enterprises or organizations. In this particular case, we are using logic apps to:
- Monitor an Azure Storage account for new uploads
- Create an Asset in Azure Media Services
- Transcode the asset into multi-bitrate
- Send to Azure Video Indexer for Video AI insights
In implementing this logic app, I used a lot of connectors, including a connector to Azure Functions. I used Azure functions to execute code that is not available in Logic Apps.
Monitor an Azure Storage Account for New Uploads
This one is easy; I used the Azure Blob Storage trigger to monitor for new files uploaded to my /mezzanine Azure storage container. But since media files usually are quite large, we need to ensure that the file is segmented in chunks. As recommended in this article, the way is to use the “properties only” trigger and then use an additional Get blob content action.


Create an Asset in Azure Media Services
Interestingly, AMSv3, at this point, does not have a quick API call to convert a file into a recognized media asset. The process is first to create an “empty asset” and then copy the blob content over. The process looks like this:

Note that CreateEmptyAsset, StartBlobContainerCopyToAsset, and MonitorBlobContainerCopyStatus are Azure Functions.
Transcode the Asset into Multi-bitrate
Azure Media Services has out-of-the-box presents for us to do our tests, but in a real-world scenario, a media company will likely have their custom-defined list of transcoding profiles. In this sample implementation, I used the H264MultipleBitrate1080 preset. I then created a Transform (if it doesn’t yet exist) and then submitted a job for transcoding. You may refer to this article to understand these concepts better.

So I used the CreateTransform and SubmitMediaJob functions here. If you are planning to modify this logic app to suit your needs, you may need to spend some time understanding how to use these functions. In this logic app, this is where I spent most of my time. The sample code isn’t very well documented and not bug-free (As previously stated, this is a forked repo from AzureSamples), so it required a lot of trial-and-error and bug fixing.
If you are planning to create a new custom preset, you need to set "preset": "CustomPreset" and then define a "customPresetJson": {...} according to this.
After the asset is transcoded, I then move the asset to another blob container. Since there is no “move” action, I had to create in the destination container first, and then delete the original one.

Send to Azure Video Indexer
Parallel to transcoding, I added another branch for sending the file to Video Indexer. Azure Video Indexer is the media service AI solution for extracting more insights such as the transcripts, keywords, sentiments, celebrities, landmarks, etc. that are found in the media asset.
In uploading, you may choose to upload from a blob URL straight. But since we already have a media asset, I went with the Asset ID parameter option.

One interesting note here is that VI will transcode the asset again into a 720p Single Bitrate file.
Output
And here are the results after running this logic app
Azure Media Service Explorer

Media Asset in the Azure Storage

Insights from Azure Video Indexer


Publish Asset for Streaming
Publishing an asset in this article’s definition is about creating a streaming locator so that the asset is available for VOD.
The Logic App
This is a pretty simple logic app and could have been combined with the previous one. But there are many reasons for not publishing an asset immediately after transcoding such as:
- Checking the quality of the video,
- Adding AES or DRM encryption policies,
- Adding closed captions,
- and more
So to disconnect, I used an HTTP POST request to trigger this logic app, with the following JSON content-type body.
{
    "properties": {
        "alternative-media-id": {
            "type": "string"
        },
        "assetName": {
            "type": "string"
        },
        "contentKeyPolicyName": {
            "type": "string"
        },
        "endDateTime": {
            "type": "string"
        },
        "startDateTime": {
            "type": "string"
        },
        "streamingEndpointName": {
            "type": "string"
        },
        "streamingLocatorId": {
            "type": "string"
        },
        "streamingPolicyName": {
            "type": "string"
        }
    },
    "type": "object"
}
A simple request body will look like this:
{
    "assetName": "MSIntelligentMedia-679c31f7-6cb1-47ad-bf92-080e19830c64",
    "streamingPolicyName": "Predefined_ClearStreamingOnly"
}
With this HTTP request, it will be as simple as calling the PublishAsset and GetAssetUrls Azure Functions.

Output
This HTTP request will give me the following output.

Conclusion
In this post, we learned how to create an Upload-and-Publish workflow using Azure Logic Apps and Azure Functions. Azure Functions for calling the Azure Media Service APIs and Logic Apps to orchestrate the workflow. This post also shows that Azure Logic Apps is not just a low-code/no-code tool. It is fully capable of integrating with your custom code.
GitHub Repository: https://github.com/raffertyuy/media-services-v3-dotnet-core-functions-integration


Recent Comments