by Scott Muniz | Aug 18, 2020 | Uncategorized
This article is contributed. See the original author and article here.
Containers are becoming extremely popular these days and many ITPros are being asked to modernize existing applications and run those apps on Kubernetes. The process can be a bit challenging if you don’t know how to get started, and more importantly if you don’t have the right tools for the job.
In this video series we will go over the entire process of containerizing a web application running on Windows Server 2012 R2 on-premises to Azure with Azure Kubernetes Services. Here are some details on the tools used in this video, so you can try for yourself:
- Sample web application: The process shown in the video can be performed in your application, but if you just want to test it, you can use this sample app as shown in the series.
- Web Deploy: We’ll be using it to export the application from IIS. Web Deploy makes the process of exporting an IIS web site way simpler than doing it manually. Plus, you can reconfigure some parameters like Database Connection in the process.
- Windows Admin Center: The updated Containers extension now supports Web Deploy ZIP files as a source for new container images. With WAC you can point to a ZIP file from Web Deploy and WAC will do the hard work for you!
In this first video in the series, we cover how to extract the web application from IIS and use the exported ZIP file to create a new container image on Windows Admin Center. Check it out:
In the next video, we’ll cover how to push this container image to Azure so you can reuse on other container hosts, or Azure services. The final video will cover how to prepare Azure Kubernetes Services to deploy this Windows Container hosting our exported application.
I hope you like the video and the series. Let us know what you think in the comments and what you’d like to see next!
Regards,
Vinicius.
Twitter: @vrapolinario
by Scott Muniz | Aug 18, 2020 | Azure, Microsoft, Technology, Uncategorized
This article is contributed. See the original author and article here.
The August update includes the following new features, bugs fixes, changes, and improvements.
Preview
We are previewing Java Message Service (JMS) 2.0 for Azure Service Bus premium tier. The JMS 2.0 APIs empower customers to seamlessly lift and shift their Spring workloads to Azure, while helping them modernize their application stack with best in class enterprise messaging in the cloud. As an example, the Azure service bus starter will now auto create queues and topics, at runtime over AMQP, if they don’t already exist.
New
- Connection to multiple Key Vault from a single application configuration file
- Support case sensitive keys in Key Vault
- Key Vault Spring Boot Actuator
See our key vault documentation on how to leverage these new features.
Improved
We revamped the refresh logic in Azure Key Vault to better adhere to refresh intervals defined in application configuration properties, and avoid unnecessary updates.
Fixed
We upgraded the Spring Boot dependency to 2.3.2, which addresses many CVEs and cleaned up all warnings at build time.
Changed
We have adopted the mono-repo approach. Azure Spring Starters have migrated from the 4 previous locations under https://github.com/microsoft/ to https://github.com/Azure/azure-sdk-for-java/tree/master/sdk. Developers can now easily find all Azure Spring starters under this single repository under the Azure SDK for java folder. Furthermore, this change allows us to bring more timely updates from Azure service SDKs and run more regression tests for quality control and preserve compatibility integrity.
Lastly the following starters are deprecated
- azure-servicebus-spring-boot-starter
- azure-mediaservices-spring-boot-starter
- azure-storage-spring-boot-starter
by Scott Muniz | Aug 17, 2020 | Uncategorized
This article is contributed. See the original author and article here.
The Azure App Service is offered as two deployment types: the multi-tenant service and the App Service Environment. In the multi-tenant service there are thousands of customers on the same infrastructure. Your apps are always secured but the network, the address space and some other components are shared. In an App Service Environment you have a single tenant version of App Service that runs in your Azure Virtual Network. The next two articles are focused on how to configure network security in the multi-tenant App Service.
In this article, you will learn how to secure your standalone app in the multi-tenant App Service. In the next article, we will cover how to build a secure multi-tier web application.
Networking overview
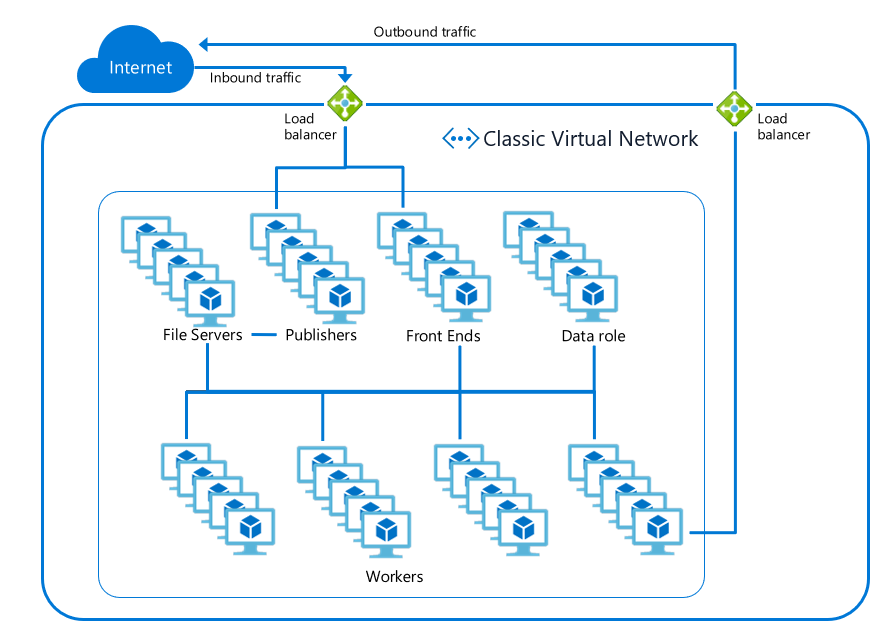
There are two aspects that need to be secured for a web app, inbound traffic and outbound traffic. Inbound traffic are visitors going to your web page, or clients sending requests to your API. Outbound traffic is when your web app makes an outbound call to a database, cache, message queue, or other service. The inbound traffic passes through a load balancer to a set of shared front end servers before reaching the workers which your apps run on. The outbound traffic leaves those workers and goes out through one of the outbound load balancers used by the scale unit. In the diagram below, the inbound and outbound load balancers are shown in green.

All traffic to and from the components inside App Service is strictly locked down and secured to prevent malicious actions. This includes preventing any worker-to-worker communication. This means users just need to secure the networking path to and from their apps–all other traffic is secured for you.
Features and Services
The following tutorial uses a number of Azure Networking features and services. Here is a quick breakdown of the features used in this article.
- Web Application Firewall: The Web Application Firewall (or WAF for short) sits between your applications and your end users. It protects your applications against common attacks like cross-site-scripting or SQL injection.
- Virtual Network: The Azure Virtual Network (VNet) is the building block for creating your network in Azure. A VNet is similar to a physical network that you would have in an on-premises network: you can assign an address space for a VNet and apply subnets to organize the network.
- Application Gateway: An Application Gateway acts as a load balancer for your application(s) and allows you to route requests based on the requested hostname or URL path. Learn more about Azure Application Gateway features
- Service endpoints: Some Azure resources are deployed into virtual networks by default. Other resources, such as the multi-tenant App Service, can gain access to the VNet using Service Endpoints. This means you can use Service Endpoints to only allow inbound traffic to your web app from a subnet within a VNet.
- Private Endpoints: Private Endpoints enable exposing the inbound traffic to a service on an address in a selected VNet.
- Azure Front Door: Front Door (AFD) provides many of the same features and benefits of an Application Gateway. It improves application performance by routing users to the nearest Point of Presence (POP).
Securing your web app
To secure the network access around your web app you will need to secure…
- Inbound request traffic to your app
- Inbound publishing traffic to your app
- Outbound calls made from your app
To secure inbound request traffic to your app, use a WAF enabled Application Gateway with Service Endpoints. To secure inbound publishing traffic to your app, use a build agent with service endpoints on the publishing endpoint. Lastly, to secure outbound traffic from your web app, use VNet Integration and an Azure Firewall.

Securing inbound traffic
- Select or create an Azure Virtual Network (VNet). To secure your inbound traffic to your app you will need to have a VNet. If you have one already, you do not need to create another. It should be in the same region as your web app. If you do not have a VNet, you can create one following these instructions Creating an Azure Virtual Network.
- Create an Application Gateway as described here in Creating an Application Gateway.
- Enable Service Endpoints to your web app.
- Once you have the VNet, App Gateway, and Service Endpoints set up, you need to add a custom domain name for your app that should point to your Application Gateway. Your web app needs to be configured with the new domain name. To add a custom domain name to your web app, follow the guidance here.
The end result is that your web app will have all inbound traffic routed through your Application Gateway to your app. You can, and should, enable Web Application Firewall (WAF) support on your Application Gateway.
Alternate Configuration
There are two alternative services that are in preview that should be noted. One is using Private Endpoints rather than Service Endpoints and the other is using Azure Front Door instead of an Application Gateway.
If you use Private Endpoints instead of Service Endpoints, you would create your Private Endpoint in a subnet other than the GatewaySubnet. This Private Endpoint would be configured against your app. This is a great solution as it also hosts the HTTPS publishing endpoint for your app. When you add Private Endpoints to your app, the app is no longer accessible from the internet. Traffic to your app must only go through the private endpoints on your app.
If you use Azure Front Door (AFD) with your app, you would need to set an IP address access restriction to secure your app to only being accessible through AFD. There are some additional changes that will soon be available that will enable you to lock you app down to specific AFD profiles. If you use AFD, you can enable a mix of capabilities such as WAF protection just like with an Application Gateway.
Secure publishing inbound traffic
Publishing is the process by which you upload your web app content to your app service instance. Unless you are using FTP, all publishing actions are performed against the scm site for your app. For every app there exists the app url and there also exists the publishing url. The publishing url is <app name>.scm.azurewebsites.net. Secure publishing is not too different from secure app access. For secure publishing you need to publish from inside your VNet. To have a secure publishing story you need to follow one of the following patterns:
- Use Access Restrictions to secure traffic to the publishing endpoint for your app
- Use service endpoints to secure traffic from a jump box being used to publish
- Use a relay agent, such as the Azure Pipeline build agent deployed on a VM in your VNet and then use service endpoints to secure your scm site to the subnet that the build agent is in.
To use the Azure Pipeline relays agent:
- Create a VM in your VNet.
- Install and configure the Azure pipeline agent
- Configure service endpoints for your app scm site against the subnet that your VM is in.
Secure outbound traffic from your web app
To secure outbound traffic from your web app you need to use the regional VNet Integration feature. This feature enables you to make calls into your VNet and have all outbound traffic subject to Network Security Groups (NSGs) and Route Tables (UDRs). With NSGs you can restrict outbound traffic to address blocks of your choosing. With UDRs you can route traffic as you see fit. If you route the outbound traffic to an Azure Firewall device, you can restrict your outbound internet traffic to only the FQDN’s you want it to reach.
To secure your outbound traffic from your web app, enable VNet Integration. By default, your app outbound traffic will only be affected by NSGs and UDRs if you are going to a private address (10.0.0.0/8, 172.16.0.0/12, 192.168.0.0/16). To ensure that all of your outbound traffic is affected by the NSGs and UDRs on your integration subnet, set the application setting WEBSITE_VNET_ROUTE_ALL to 1.
Summary
Congratulations! In this article you learned how to secure your inbound and outbound networking traffic. You are now able to assemble App Service and Networking features to create a secure internet facing web application.
Helpful Resources
by Scott Muniz | Aug 17, 2020 | Uncategorized
This article is contributed. See the original author and article here.
Have questions about setting up Microsoft Endpoint Manager to manage all the devices—Windows, Android, iOS, and macOS—used in your education environments? Our engineering and product teams will be hosting a one-hour AMA event on Wednesday, August 19, 2020 to help you better understand how Microsoft Endpoint Manager can simplify the way you manage and update devices, provide advice on specific configuration and deployment options, and troubleshoot any issues you may be encountering.
ADD TO CALENDAR
To join, simply, visit the Microsoft Endpoint Manager AMA space this Wednesday, August 19th at 8:00 a.m. Pacific Time and click “Start a New Conversation” to post your question. This event is open to all Tech Community members and we’ll have a wide variety of experts standing by to provide answers—as well as members of the MVP community who can provide their real-world expertise.
What is an AMA?
An “Ask Microsoft Anything” (AMA) event is a live, online, text-based question-and-answer event similar to a “YamJam” on Yammer or an “Ask Me Anything” on Reddit. This AMA is your chance to get answers to your questions about things like:
- Configuring new devices effectively and quickly.
- Repurposing existing shared devices for distribution to individual students.
- Managing devices when disconnected from school networks.
- Network considerations, such as VPN.
- Secure connections to on-premises resources
I’m in. How do I join?
- The Microsoft Endpoint Manager AMA space will open at 9:00 a.m. PT August 18th and remain open until 9:00 a.m. PT August 19th to ensure you have plenty of time to submit your questions.
- You can post questions anytime during the 24-hour window. To submit a question, simply click Start a new conversation—and do this for each new question.
- Our subject matter experts will be live from 8:00-9:00 a.m. PT on August 19th.
- At the end of the AMA, the Microsoft Endpoint Manager AMA space will close and become a read-only resource. We will post a final recap with a list of all questions and answers from the event.
Don’t miss this chance to get answers to your questions. We hope you can join us!

by Scott Muniz | Aug 17, 2020 | Uncategorized
This article is contributed. See the original author and article here.
If you are running SQL Server 2017 or SQL Server 2019 on Redhat 7.x or UBUNTU 16.x Linux operating systems and configured Transactional Replication or Change Data Capture feature, then sporadically log reader agent may fail to read the transactional logs with non yield dump or SQL Server core dump may be created
You might see following spinlock message in Linux /var/log/messages file or SQL Server error log.
0311305655_1586954331_applogsvarlogmessages 14712 Apr 15 07:39:08 ip-10-57-146-76 sqlservr: getspinlock pre-Sleep(): spid 0, 271030 yields on lock type “XDESMGR” (adr 0000001B7F3496C0)
0311305655_1586954331_applogsvarlogmessages 14713 Apr 15 07:39:09 ip-10-57-146-76 sqlservr: getspinlock pre-Sleep(): spid 0, 272641 yields on lock type “XDESMGR” (adr 0000001B7F3496C0)
0311305655_1586954331_applogsvarlogmessages 14721 Apr 15 07:39:18 ip-10-57-146-76 sqlservr: 2020-04-15 07:39:18.18 Server * Non-yielding Scheduler
2020-02-11 12:05:31.35 Server Process 0:0:0 (0x2a4) Worker 0x00000015AADA8160 appears to be non-yielding on Scheduler 3. Thread creation time: 13225913261587. Approx Thread CPU Used: kernel 0 ms, user 54770 ms. Process Utilization 45%. System Idle 0%. Interval: 70012 ms.
2020-02-11 12:05:41.36 Server Process 0:0:0 (0x268) Worker 0x00000015AFF12160 appears to be non-yielding on Scheduler 1. Thread creation time: 13225913261537. Approx Thread CPU Used: kernel 0 ms, user 61160 ms. Process Utilization 48%. System Idle 0%. Interval: 76426 ms.
This issue is currently investigated by SQL Server engineering team and fix will be released in upcoming CU’s.
Mean time you can enable Forced Unit Access (FUA) which will ensure the data is stored in stable media before a write request return to SQL Server using following parameters will workaround the issue.
sudo /opt/mssql/bin/mssql-conf traceflag 3979 on
sudo /opt/mssql/bin/mssql-conf set control.alternatewritethrough 0
sudo /opt/mssql/bin/mssql-conf set control.writethrough 1
After enabling the trace flag we may need to restart SQL Server for TF to take effect.
More information about FUA can be found in following blog and KB article
https://bobsql.com/sql-server-on-linux-forced-unit-access-fua-internals/
https://support.microsoft.com/en-us/help/4131496/enable-forced-flush-mechanism-in-sql-server-2017-on-linux

Recent Comments