by Scott Muniz | Aug 31, 2020 | Uncategorized
This article is contributed. See the original author and article here.
Learn how to exploit LogicApps to trigger a purge command on Azure Data explorer, both from a high-level view and step-by-step with reusable code.
Technologies
Azure Data Explorer is a fast, fully managed data analytics service for real-time analysis on large volumes of data streaming from applications, websites, IoT devices, and more.
Azure Logic Apps is a cloud service that helps you schedule, automate, and orchestrate tasks, business processes, and workflows when you need to integrate apps, data, systems, and services across enterprises or organizations.
Challenge
When using a Purge command in Azure Data Explorer, take care to know exactly what you are doing and why. See the official documentation on limitations and considerations:
one limitation is that “The predicate can’t reference tables other than the table being purged (TableName). The predicate can only include the selection statement (where). It can’t project specific columns from the table (output schema when running ‘table | Predicate’ must match table schema)“
The purge command structure should look like the following:
// Connect to the Data Management service
#connect "https://ingest-[YourClusterName].[region].kusto.windows.net"

.purge table [TableName] records in database [DatabaseName] with (noregrets='true') <| [Predicate]
An example of purge based on a where clause condition will look like this:
.purge table MyTable records in database MyDatabase <| where RelevantColumn in ('X', 'Y')
The list (‘X’,’Y’) must be explicit and cannot come from another table within the query (like a subquery or direct join). You can overcome this by exploiting two tasks of Logic Apps:
1. “Run query and visualize result” connecting it directly to the cluster
2. “Run control command and visualize results” connecting it to “https://ingest-[YourClusterName].[Region].kusto.windows.net”
Scenario
The example explained below will read a list of file names (stored in a FileDir column within a table ToDelete) and will purge data from table <TABLENAME> every 24h at 10pm, within <DATABASENAME> database.
Use these instructions to reproduce the LogicApps within the Azure Portal with the LogicApps source code provided at the end of the article. Adapt the names of tables, database, and connection strings as necessary.
The Logic App Designer View
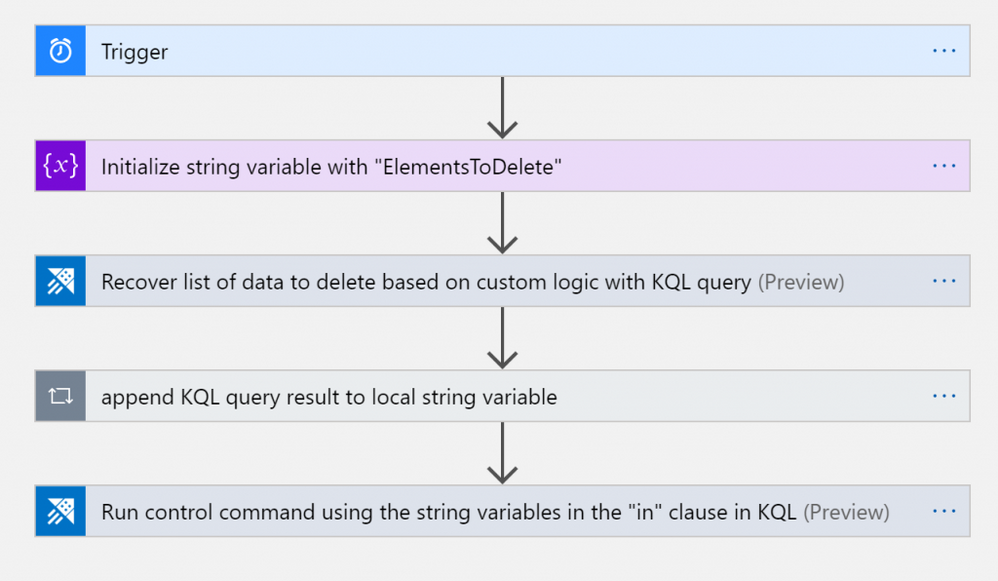
Here how it will look like within the WebDesigner:
Tasks
- Trigger: in this case it’s scheduled with a 24 hours recurrence
- String Variable initialization: filled with an initial empty string <”>
- KQL query: used to retrieve the list of names of files to purge
- Filling the String Variable: insertion of the the list of file names within the local string variable
- Run purge command: setting and running the purge command inserting the variable in the predicate
Trigger
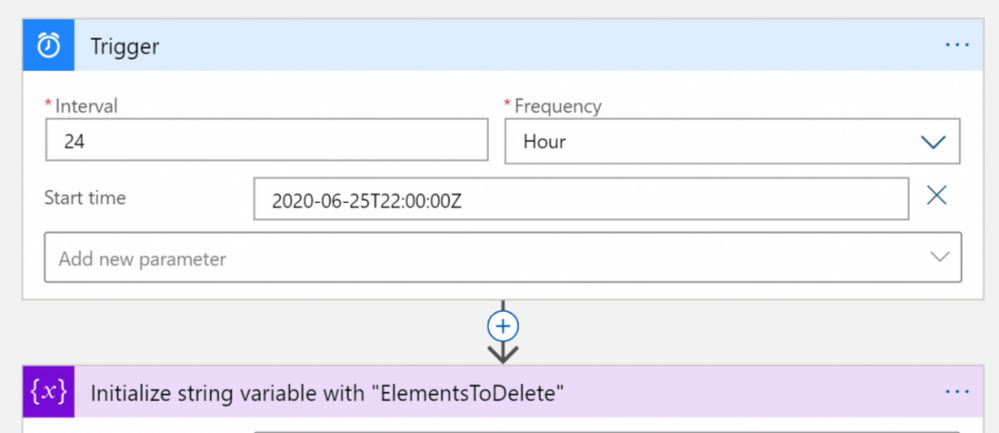
This step is needed for scheduling the LogicApps (it can be replaced with other task according to the business need)
Variable initialization
This step initializes the string variable with an empty string. Don’t leave it blank, as the empty string will be the first element of the list of names of files.
KQL Query and storing results within variable
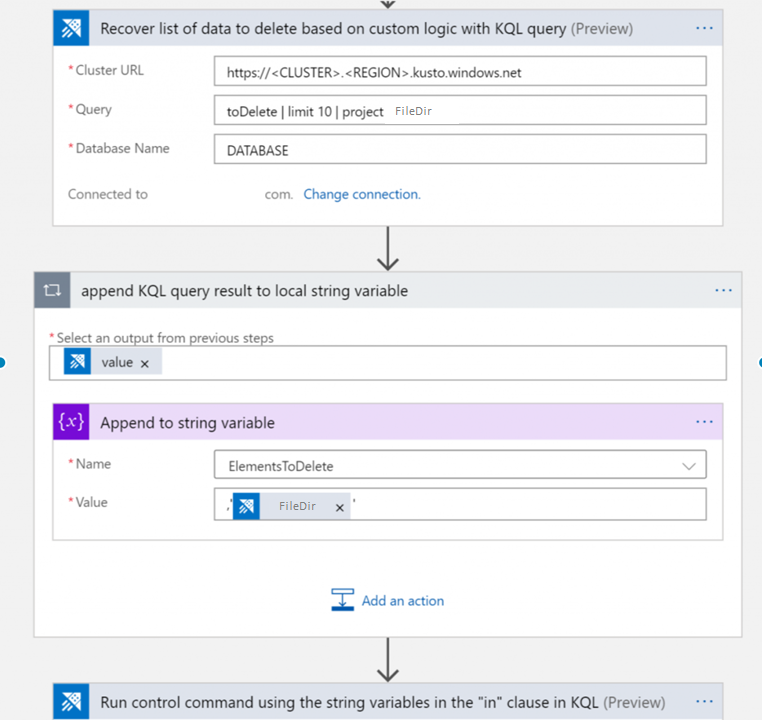
Note: the “append KQL query result to local string variable” step is a FOR cycle because there is the need of reading all the names from the list: every name of the list needs to be surrounded with quotes and the entire liste has to be preceded by a comma to produce a final list of strings for the KQL purge predicate. The LogicApps array variable is not used because it would create an array defined within brackets “[” and “]”, and the KQL command requires defining a list with parenthesis as “(” and “)”.
The string variable has been initialized with a ” string, then for every FileDir a new element has been added. After the third iteration, the string will look like:
”,’elem1′,’elem2′,’elem3′.
Purge command using list of elements previously retrieved
At this stage, the final step will be to insert the list that was previously produced within the purge command, and surround it with parenthesis as shown below.

Done!
Every night the LogicApps will purge data from the table indicated. It is possible either to keep the recurrence as explained in this example, or you can just call the LogicApps via API and manage it via external code, replacing the first step with a callable endpoint.
The Logic App Code
Here the Logic App code that can be copy/pasted within the CodeView of the Logic App
{
    "definition": {
        "$schema": "https://schema.management.azure.com/providers/Microsoft.Logic/schemas/2016-06-01/workflowdefinition.json#",
        "actions": {
            "Initialize_string_variable_with_"ElementsToDelete"": {
                "inputs": {
                    "variables": [
                        {
                            "name": "ElementsToDelete",
                            "type": "string",
                            "value": "''"
                        }
                    ]
                },
                "runAfter": {},
                "type": "InitializeVariable"
            },
            "Recover_list_of_data_to_delete_based_on_custom_logic_with_KQL_query": {
                "inputs": {
                    "body": {
                        "cluster": "https://<CLUSTER>.<REGION>.kusto.windows.net",
                        "csl": "toDelete | limit 10 | project FileDir",
                        "db": "<DATABASENAME>"
                    },
                    "host": {
                        "connection": {
                            "name": "@parameters('$connections')['kusto']['connectionId']"
                        }
                    },
                    "method": "post",
                    "path": "/ListKustoResults/false"
                },
                "runAfter": {
                    "Initialize_string_variable_with_"ElementsToDelete"": [
                        "Succeeded"
                    ]
                },
                "type": "ApiConnection"
            },
            "Run_control_command_using_the_string_variables_in_the_"in"_clause_in_KQL": {
                "inputs": {
                    "body": {
                        "chartType": "Html Table",
                        "cluster": "https://ingest-<CLUSTERNAME>.<REGION>.kusto.windows.net",
                        "csl": ".purge table MYTABLE records in database <DATABASENAME> with (noregrets='true') <| where FileDir in (@{variables('ElementsToDelete')})",
                        "db": "DATABASENAME"
                    },
                    "host": {
                        "connection": {
                            "name": "@parameters('$connections')['kusto']['connectionId']"
                        }
                    },
                    "method": "post",
                    "path": "/RunKustoAndVisualizeResults/true"
                },
                "runAfter": {
                    "append_KQL_query_result_to_local_array_variable": [
                        "Succeeded"
                    ]
                },
                "type": "ApiConnection"
            },
            "append_KQL_query_result_to_local_array_variable": {
                "actions": {
                    "Append_to_string_variable": {
                        "inputs": {
                            "name": "ElementsToDelete",
                            "value": "'@{items('append_KQL_query_result_to_local_array_variable')?['FileDir']}'"
                        },
                        "runAfter": {},
                        "type": "AppendToStringVariable"
                    }
                },
                "foreach": "@body('Recover_list_of_data_to_delete_based_on_custom_logic_with_KQL_query')?['value']",
                "runAfter": {
                    "Recover_list_of_data_to_delete_based_on_custom_logic_with_KQL_query": [
                        "Succeeded"
                    ]
                },
                "type": "Foreach"
            }
        },
        "contentVersion": "1.0.0.0",
        "outputs": {},
        "parameters": {
            "$connections": {
                "defaultValue": {},
                "type": "Object"
            }
        },
        "triggers": {
            "Trigger": {
                "recurrence": {
                    "frequency": "Hour",
                    "interval": 24,
                    "startTime": "2020-06-25T22:00:00Z"
                },
                "type": "Recurrence"
            }
        }
    },
    "parameters": {
        "$connections": {
            "value": {
                "kusto": {
                    "connectionId": "/subscriptions/<SUBSCRIPTIONGUID>/resourceGroups/<RESOURCEGROUPNAME>/providers/Microsoft.Web/connections/kusto",
                    "connectionName": "kusto",
                    "id": "/subscriptions/<SUBSCRIPTIONGUID>/providers/Microsoft.Web/locations/<REGION>/managedApis/kusto"
                }
            }
        }
    }
}Note: The web designer makes it straightforward to implement the same solution without coding. In case you are choosing to reuse the code instead, after copying and pasting the above code, insert the appropriate values for Subscription, ResourceGroup, Cluster, Database, and Tables.
by Scott Muniz | Aug 31, 2020 | Uncategorized
This article is contributed. See the original author and article here.
Welcome to the third and final video/blog post in this series where we are modernizing a web application from Windows Server 2012 R2 running on-premises to Azure Kubernetes Services using Windows Containers. In case you missed it, here are part one and part two of the video series.
In this third part of our series we cover how to create an AKS cluster and how to deploy our containerized application on top of it. We start by using the Azure portal to create a new AKS cluster with most of the default options, but with key changes to include Windows Server worker nodes, and to ensure we have authentication set up against our Azure Container Registry, so the image we uploaded can be pulled into the nodes running our application. I highly recommend you check the AKS documentation to see more details on the deployment and operation options of AKS.
After creating the AKS cluster, we used this sample YAML file to describe how the application should be deployed. Finally, instead of connecting remotely using Kubectl, we used the recently announced feature (under preview) resource management from the Azure Portal. This new feature allows you to manage Kubernetes resources directly from the portal, so we were able to paste our YAML file directly from there.
To validate everything, we looked at the deployment and opened the application running on AKS and the application worked the same way it was working before.
Hopefully, this gave you an idea on how the end to end process of modernizing your application works. We’re looking forward to seeing what you think of this video series and what you want to see next!
Vinicius!
Twitter: @vrapolinario
by Scott Muniz | Aug 30, 2020 | Azure, Microsoft, Technology, Uncategorized
This article is contributed. See the original author and article here.
Throughout this series, I’m going to discuss how Power Platform is particularly useful for ad-hoc basis jobs like provisioning resources on Azure.
- Provisioning VM for Streamers with Chocolatey
- Ad-hoc Resource Deployment through Power Apps
Everything has gone. I mean all off-line meetups and conferences disappeared. Instead, they have gone virtual – online meetups and conferences. For community events, they have two options – one that purchases a solution for online events, and the other that build a live streaming solution by themselves. If you are a community event organiser and running a live streaming session by yourself, it doesn’t really matter whether you install all necessary applications on your computer or not. However, if the event scales out, which includes inviting guests and/or sharing screens, it could be challenging unless your computer has relatively high spec enough.
For this case, there are a few alternatives. One option is to use a virtual machine (VM) on the Cloud. A VM instance can be provisioned whenever necessary, then destroyed whenever no longer required. However, this approach also has a caveat from the “live streaming” point of view. Every time you provision the VM instance, you should install all the necessary applications by hand. If this is not happening very often, it may be OK. But it’s still cumbersome to manually install those apps. Throughout this post, I’m going to discuss how to automatically install live streaming related software using Chocolatey during the provision of Azure Windows VM.
The sample code used in this post can be found at this GitHub repository.
Acknowledgement
Thanks Henk Boelman and Frank Boucher! Their awesome blog posts, Henk’s one and Frank’s one helped a lot to me set this up.
Installing Live Streaming Applications
As we’re using a Windows VM, we need those applications for live streaming.
- Microsoft Edge (Chromium): As of this writing, Chromium-based Edge is not installed as default. Therefore, it’s good to update to this version.
- OBS Studio: Open source application for live streaming.
- OBS Studio NDI Plug-in: As OBS itself doesn’t include the NDI feature, this plug-in is required for live streaming.
- Skype for Content Creators: This version of Skype can enable the NDI feature. With this feature enabled, we can capture screens from all participants and shared screens, respectively.
These are the bare minimum for live streaming. Let’s compose a PowerShell script that installs them via Chocolatey. First of all, we need to install Chocolatey using the downloadable installation script (line #2). Then, install the software using Chocolatey (line #5-8). The command may look familiar if you’ve used a CLI-based application package management tool like apt or yum from Linux, or brew from Mac.
    #Install Chocolatey
    Set-ExecutionPolicy Bypass -Scope Process -Force; iex ((New-Object System.Net.WebClient).DownloadString('https://chocolatey.org/install.ps1'))

    #Install Software
    choco install microsoft-edge -y
    choco install obs-studio -y
    choco install obs-ndi -y
    choco install skype -y
So, if this installation script can be executable while provisioning the Windows VM instance on Azure, we can always use the fresh VM with newly installed applications.
Provisioning Azure Windows VM
Now, let’s provision a Windows VM on Azure. Instead of creating the instance on Azure Portal, we can use the ARM template for this. Although there are thousands of ways using the ARM template, let’s use the quick start templates as a starting point. Based on this template, we can customise the template for our live streaming purpose. We use the template, Deploy a simple Windows VM, and update it. Here is the template. I omitted details for brevity, except VM specs like VM size (line #43) and VM image details (line #48-51).
    {
        "$schema": "https://schema.management.azure.com/schemas/2019-04-01/deploymentTemplate.json#",
        "contentVersion": "1.0.0.0",
        "parameters": {
          ...
        },
        "variables": {
          ...
        },
        "resources": [
          {
            "comments": "=== STORAGE ACCOUNT ===",
            "type": "Microsoft.Storage/storageAccounts",
            ...
          },
          {
            "comments": "=== PUBLIC IP ADDRESS ===",
            "type": "Microsoft.Network/publicIPAddresses",
            ...
          },
          {
            "comments": "=== NETWORK SECURITY GROUP: DEFAULT ===",
            "type": "Microsoft.Network/networkSecurityGroups",
            ...
          },
          {
            "comments": "=== VIRTUAL NETWORK ===",
            "type": "Microsoft.Network/virtualNetworks",
            ...
          },
          {
            "comments": "=== NETWORK INTERFACE ===",
            "type": "Microsoft.Network/networkInterfaces",
            ...
          },
          {
            "comments": "=== VIRTUAL MACHINE ===",
            "type": "Microsoft.Compute/virtualMachines",
            "apiVersion": "[variables('virtualMachine').apiVersion]",
            ...
            "properties": {
              "hardwareProfile": {
                "vmSize": "Standard_D8s_v3"
              },
              ...
              "storageProfile": {
                "imageReference": {
                  "publisher": "MicrosoftWindowsDesktop",
                  "offer": "Windows-10",
                  "sku": "20h1-pro-g2",
                  "version": "latest"
                },
                ...
              },
              ...
            }
          },
          {
            "comments": "=== VIRTUAL MACHINE EXTENSION: CUSTOM SCRIPT ===",
            "type": "Microsoft.Compute/virtualMachines/extensions",
            ...
          }
        ],
        "outputs": {}
      }
If you want to see the full ARM template, click the following link to GitHub.
See ARM Template in full
Custom Script Extension
We’ve got the VM instance ready. However, we haven’t figured out how to run the PowerShell script during the provision. To run the custom script, add this extension to the ARM template. The custom script in the template looks below. The most important part of this template is the property value. Especially, pay attention to both fileUris (line #16) and commandToExecute (line #19).
    {
        "comments": "=== VIRTUAL MACHINE EXTENSION: CUSTOM SCRIPT ===",
        "type": "Microsoft.Compute/virtualMachines/extensions",
        "apiVersion": "[providers('Microsoft.Compute', 'virtualMachines/extensions').apiVersions[0]]",
        "name": "['mystreamingvm', '/config-app')]",
        "location": "[resourceGroup().location]",
        "dependsOn": [
          "[resourceId('Microsoft.Compute/virtualMachines', 'mystreamingvm')]"
        ],
        "properties": {
          "publisher": "Microsoft.Compute",
          "type": "CustomScriptExtension",
          "typeHandlerVersion": "1.10",
          "autoUpgradeMinorVersion": true,
          "settings": {
            "fileUris": "https://raw.githubusercontent.com/devkimchi/LiveStream-VM-Setup-Sample/main/install.ps1"
          },
          "protectedSettings": {
            "commandToExecute": "[concat('powershell -ExecutionPolicy Unrestricted -File ', './install.ps1')]"
          }
        }
      }
fileUris indicates the location of the custom script. The custom script MUST be publicly accessible like GitHub URL or Azure Blob Storage URL.commandToExecute is the command to execute the custom script. As we use the PowerShell script downloaded externally, add the -ExecutionPolicy Unrestricted parameter to loosen the permission temporarily. ./install.ps1 is the filename of the executing script from the URL.
ARM Template Execution
Once everything is done, run the ARM template for deployment. Here’s the PowerShell command:
    New-AzResourceGroupDeployment `
    -Name  `
    -ResourceGroupName  `
    -TemplateFile ./azuredeploy.json `
    -TemplateParameterFile ./azuredeploy.parameters.json `
    -Verbose
And, here’s the Azure CLI command:
    az group deployment create
    -n
    -g
    --template-file ./azuredeploy.json
    --parameters ./azuredeploy.parameters.json
    --verbose
If you’re lazy enough, click the following button to run the deployment template directly on Azure Portal.

It takes time to complete all the provisioning. Once it’s done, access to VM through either RDP or Bastion.

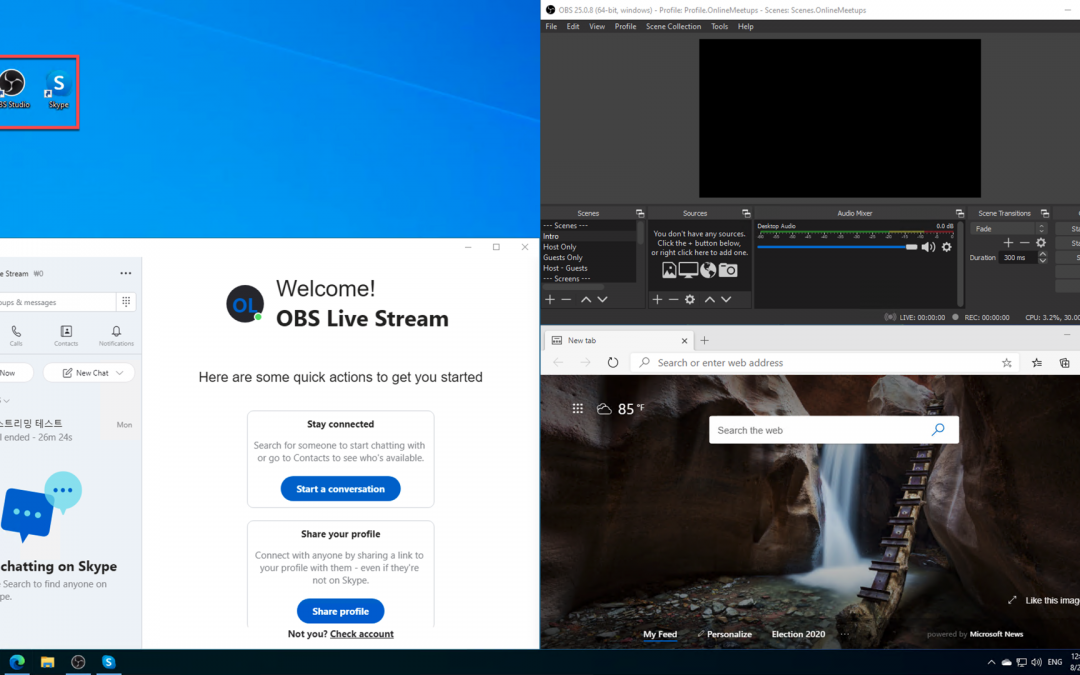
You can see all the applications have been installed!
So far, we’ve discussed how to automatically install applications for live streaming, using Chocolatey, while provisioning a Windows VM on Azure. There are many reasons to provision and destroy VMs on the Cloud. Using an ARM Template and custom script for the VM provisioning will make your life easier. I hope this post gives small tips to live streamers using VMs for their purpose.
This article was originally published on Dev Kimchi.
by Scott Muniz | Aug 30, 2020 | Azure, Microsoft, Technology, Uncategorized
This article is contributed. See the original author and article here.
This blogpost can support your DevOps journey to make your Continuous Integration and Continuous Delivery (CI CD) for companies and or customers. What is DevOps?
People, Process, and Technology to continually provide value to customers.
While adopting DevOps practices automates and optimizes processes through technology, it all starts with the culture inside the organization—and the people who play a part in it. The challenge of cultivating a DevOps culture requires deep changes in the way people work and collaborate. But when organizations commit to a DevOps culture, they can create the environment for high-performing teams to develop.
My name is James van den Berg and I’m a MVP in Cloud and Datacenter Management on my DevOps journey as an IT Infrastructure Guy managing datacenters on-prem and in the Microsoft Azure Cloud. Today It’s not only a Virtual Machine or a Website to deploy for your customers, it’s much more then that like :
- Time to market, deploy your solution fast without waiting on dependencies because you automated your process with a CI CD Pipeline.
- Security and Monitoring to keep you in Controle.
- Working together with different Teams who are each responsible for a part of the solution.
- The complete DevOps Pipeline must be Compliant
Here you can start with Azure DevOps on Microsoft Learn platform.
In the following step-by-step guide, you will see how easy it can be to Build your own first pipeline.
Before you start, you need a Microsoft Azure Subscription to start with.
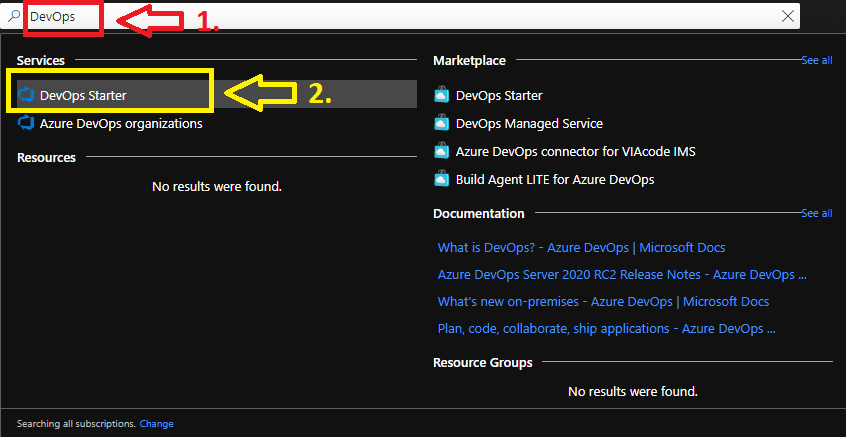
1. Login your Azure subscription and type DevOps in your search bar.

Click on DevOps Starter
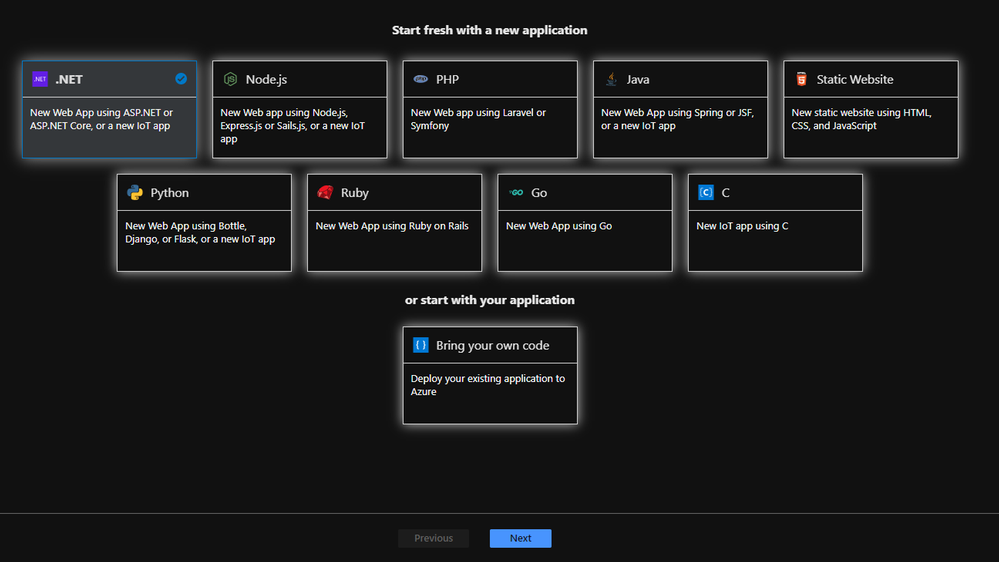
From here you can start with a new application of your choice or bring your own code from Git Hub.
I will choose a new dot NET application, but when you have your Own Code on Git Hub for example it will integrate in your Azure Cloud Pipeline like this :
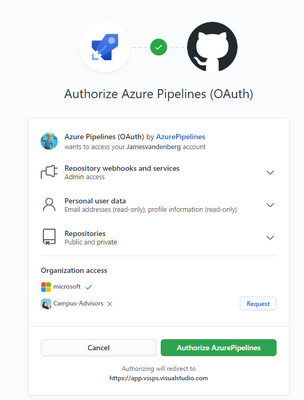
Your existing repository on Git Hub will integrate with your Azure DevOps Pipeline. But for this step-by-step guide we will make an ASP.NET Web application pipeline in Microsoft Azure Cloud.
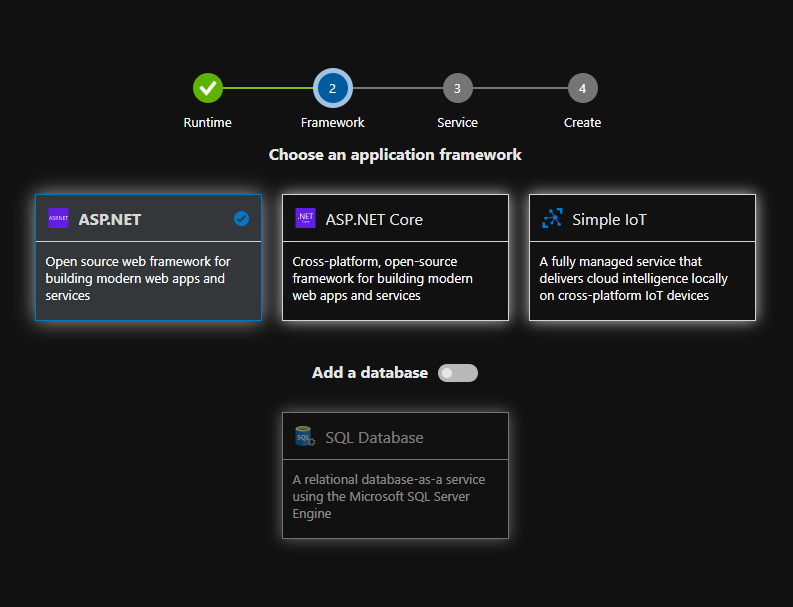
Here you choose your Application Framework and you can select a SQL Database for your Solution.
More information about all the quick starts in Azure DevOps Starter.

The Next step is to select the right Azure services to run on your ASP.NET solution. I selected the Windows Web App fully managed compute platform.
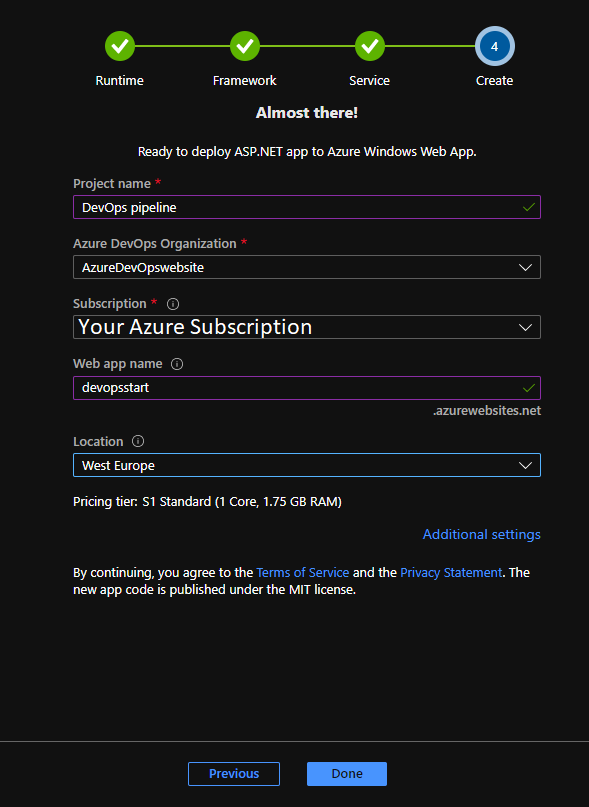
Complete the last step and you can change your Service Plan at additional settings when you need more resources. From here the Azure DevOps Starter has enough information to Build your first Azure Pipeline solution in the Cloud. 
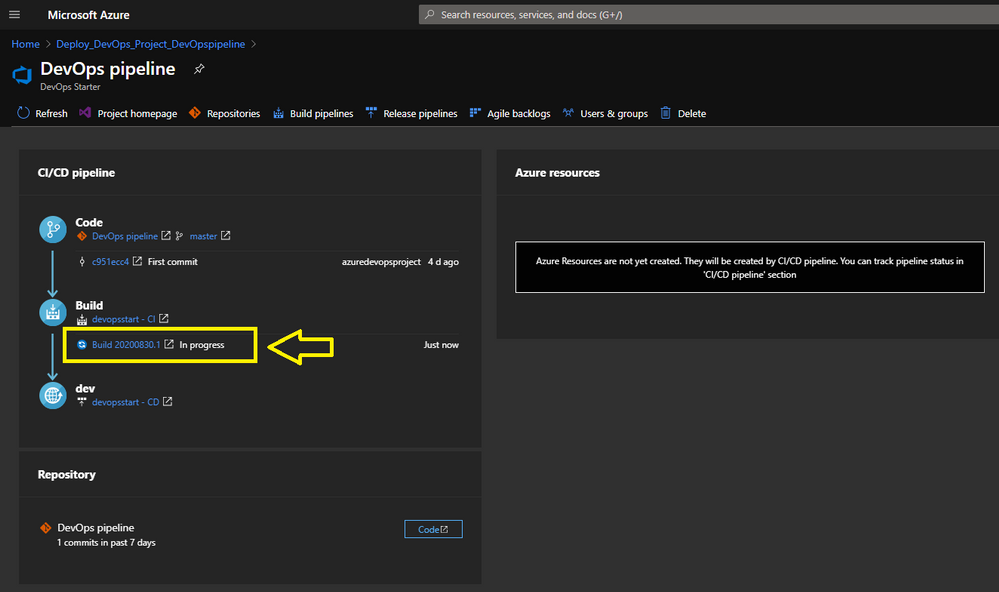
Pipeline in Progress.
When you Click here on the Build link you will be redirected to your Azure DevOps environment.
Here you find more information about Microsoft Azure DevOps
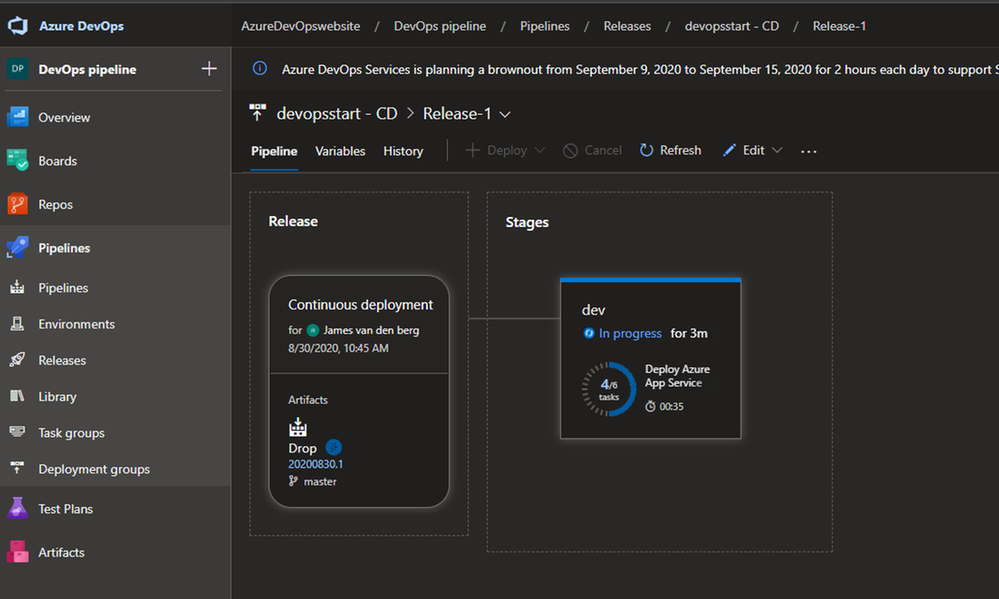
Azure DevOps Pipeline creation in Progress.
To monitor the creation of your Pipeline solution, you can see that in the live logs :
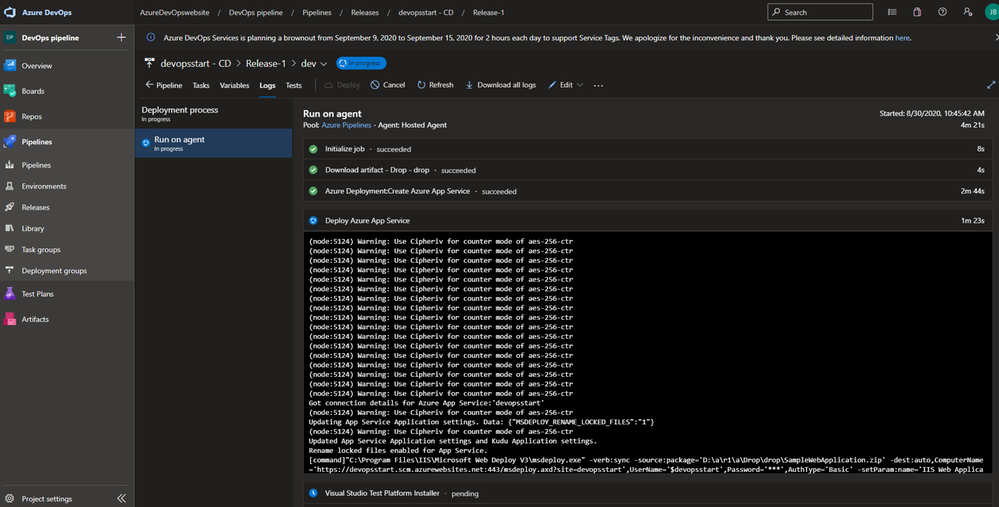
Live monitoring the deployment
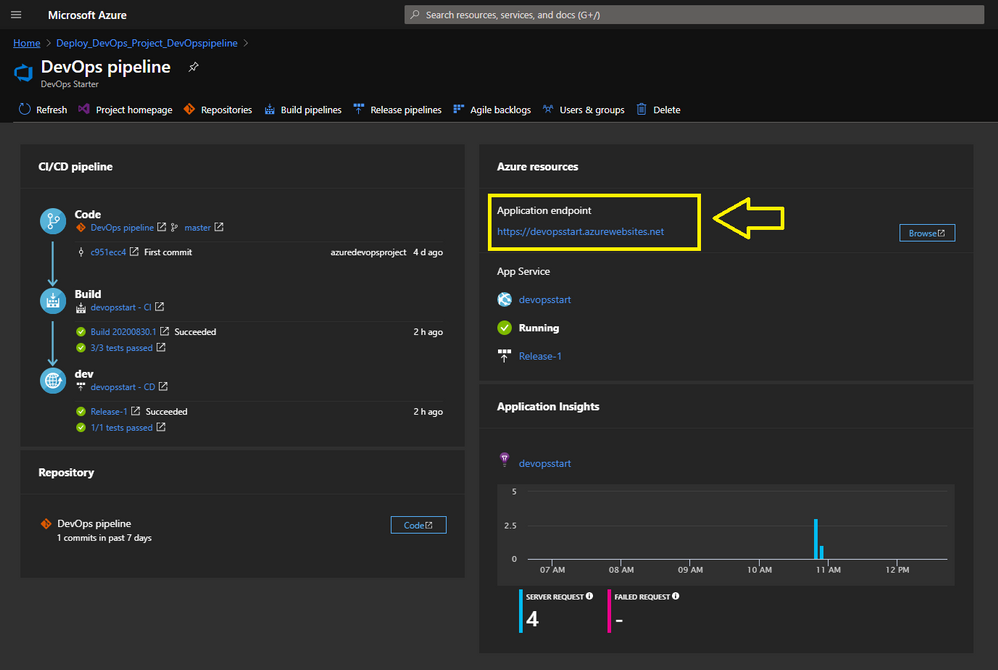
Your Azure DevOps Starter deployment is running.
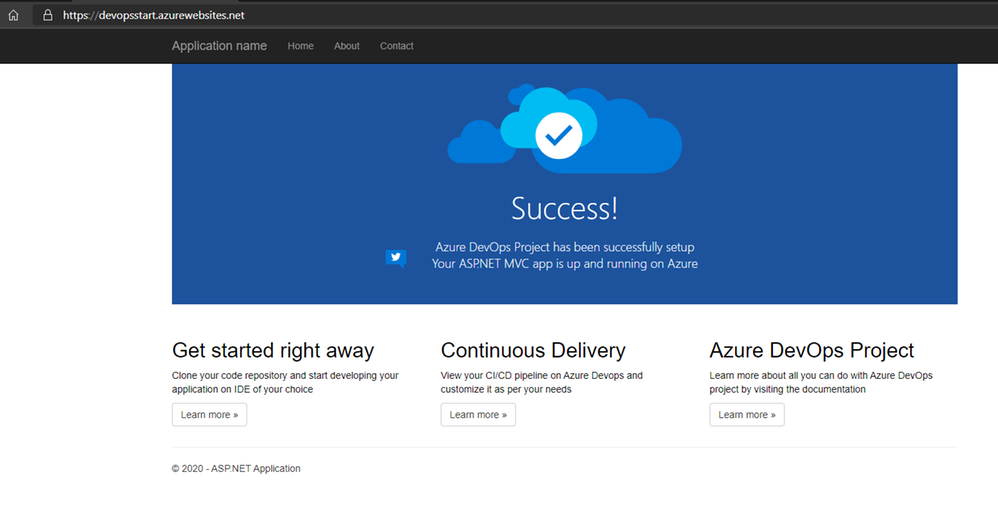
Your ASP.NET Web App running with a Pipeline.
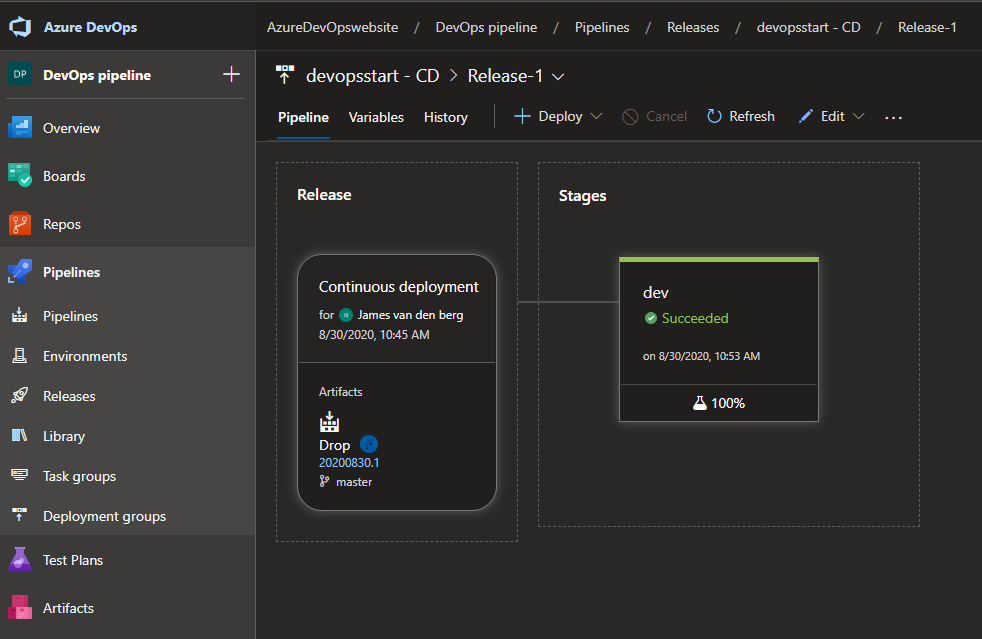
Your Deployment in Azure DevOps.
From here is the baseline deployment of your solution done with Azure DevOps Starter and can you Configure the Pipeline environment with the other teams to get RBAC and Dashboards in place to work with.
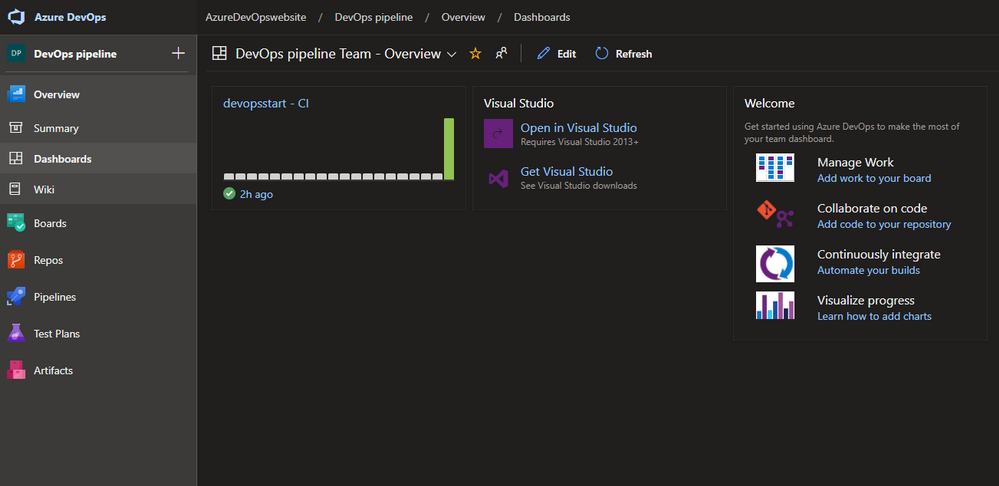
Azure DevOps Dashboard.
Conclusion :
Microsoft Azure DevOps Starter supports you with the basic of your Pipeline Solution. It’s a good start for your DevOps journey and to configure your solution with other teams to get your compliant result for your customer or business.
You can follow me on Twitter : @JamesvandenBerg
More information :
Blog : Microsoft Azure DevOps Blog
Follow on Twitter : @AzureDevOps
Start here with Microsoft Azure DevOps


by Scott Muniz | Aug 29, 2020 | Uncategorized
This article is contributed. See the original author and article here.
In Azure Data Factory, historical debug runs are now included as part of the monitoring experience. Go to the ‘debug’ tab to see all past pipeline debug runs.
You can also see what data flow debug sessions are currently active.in the ‘Data flow debug’ pane.
Additionally, now when running a debug run of a pipeline with a data flow, you can choose to spin up a new isolated just-in-time cluster or use the existing debug cluster.
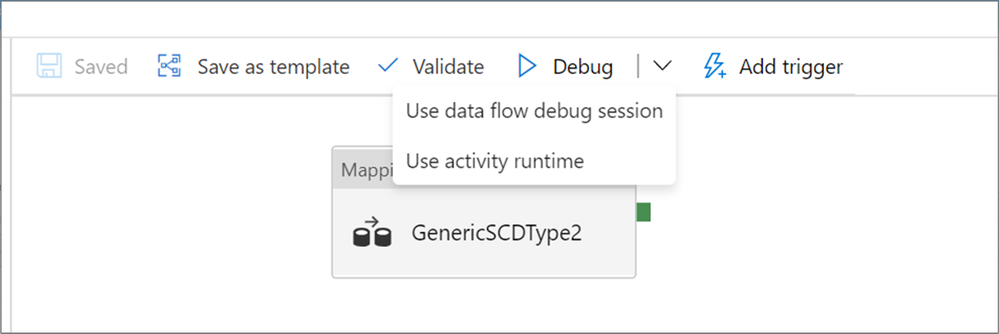
For more information on how and when to use these features, check out the ADF iterative debugging documentation!


Recent Comments