by Contributed | Sep 28, 2020 | Uncategorized
This article is contributed. See the original author and article here.
TL;DR:
The 503 response from the IIS machine, Service Unavailable, is the result of repeated application crashes. Since the w3wp.exe worker process, created by IIS to execute a web application, is crashing frequently, the respective IIS application pool is turned off. This is a feature of IIS, at Application Pool level, called Rapid-Fail Protection. It helps prevent consuming valuable system resources creating a worker process that crashes anyway, soon after spawning.
Evidence of repeated w3wp.exe crashes and Rapid-Fail Protection may be found in Windows Events, in the System log with Source=WAS.
Evidence of what causes the w3wp.exe to crash may be found in Windows Events, in the Application log: second-chance crashing exceptions with w3wp.exe.
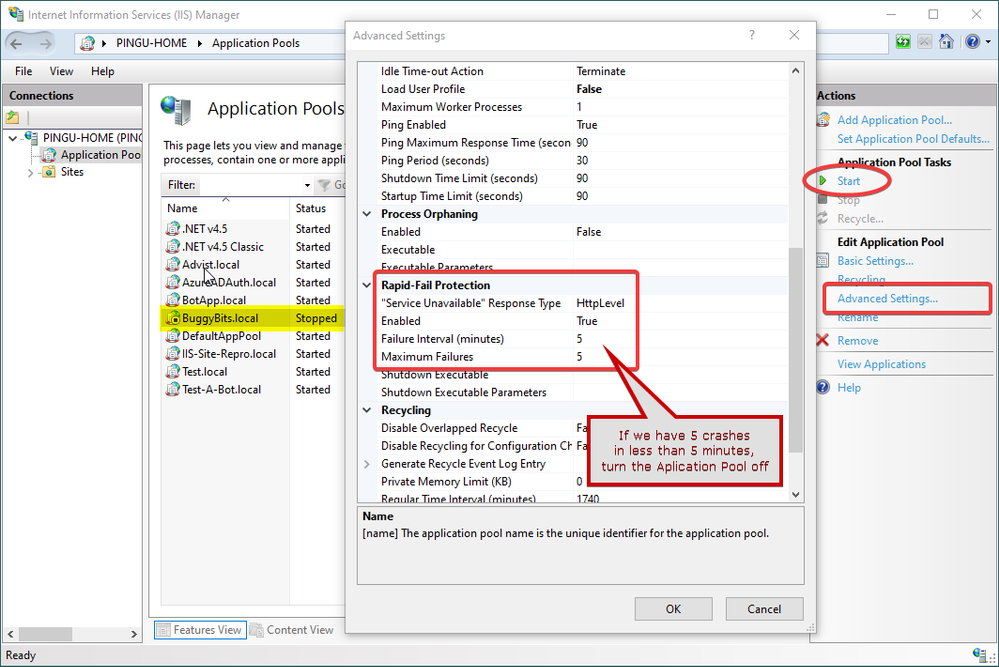
If we’re looking at the reference list of responses that IIS could send, an HTTP response status 503 means Service Unavailable. In most of the cases, we have a 503.0, Application pool unavailable; and when we check the corresponding application pool, it shows “Stopped”.
Believe it or not, that is actually a feature in IIS acting: the Rapid-Fail Protection. If the hosted application is causing the crash of its executing process for 5 times in less than 5 minutes, then the Application Pool is turned off automatically. These values are the default values; but you get the point.
 Img 1, Rapid-Fail Protection settings for an Application Pool
Rapid-Fail Protection
But why turning off the application pool at all? Why is IIS doing that?
You see, there is an IIS component called WAS, Windows (Process) Activation Service, that is creating and then monitoring the worker processes – w3wp.exe – for application pools. These are the IIS processes that are loading and then executing the Web apps, including the Asp.Net ones. These are the processes responding to HTTP requests.
If a worker process crashes, WAS would immediately try to create a new process for the Application Pool; because the Web apps needs to continue serving requests. But if these processes are repeatedly crashing, soon after being created, WAS is going to “say”:
I keep creating processes for this app, and they crash. It is expensive for the system to create these processes, which crash anyway. So why don’t I stop doing that, marking the Application Pool accordingly (Stopped), until the administrator is fixing the cause. Once the condition causing the crashes is removed, then the administrator may manually re-Start the application pool.
This WAS is reporting stuff in Windows Events, in the System log. So, if we open the Events Viewer, go to System log and filter by Event Sources=WAS, we may see a pattern like this:
 Img 2, Windows Events by WAS while monitoring w3wp.exe
There is a pattern to look for: Usually 5 Warning events 5011, for same application pool name, within a short time frame; if the PIDs, Process ID, in the Warning events are changing, it is a sign that the previous w3wp.exe instance was “killed”, it ended for some reason:
A process serving application pool ‘BuggyBits.local’ suffered a fatal communication error with the Windows Process Activation Service. The process id was ‘6992‘. The data field contains the error number.
… and then followed by an Error event 5002 for that same application pool name:
Application pool ‘BuggyBits.local’ is being automatically disabled due to a series of failures in the process(es) serving that application pool.
This behavior – turning off the application pool – is also seen when WAS can’t start the worker process at all. For instance when the application pool identity has a wrong or non-decipherable password: WAS can’t (repeatedly) start the w3wp.exe with the custom account that was set for the application pool. In Windows Events we would see Warnings/Errors from WAS like:
Event ID 5021 when IIS/WAS starts: The identity of application pool BuggyBits.local is invalid. The user name or password that is specified for the identity may be incorrect, or the user may not have batch logon rights. If the identity is not corrected, the application pool will be disabled when the application pool receives its first request. If batch logon rights are causing the problem, the identity in the IIS configuration store must be changed after rights have been granted before Windows Process Activation Service (WAS) can retry the logon. If the identity remains invalid after the first request for the application pool is processed, the application pool will be disabled. The data field contains the error number.
Event ID 5057 when app is first accessed: Application pool BuggyBits.local has been disabled. Windows Process Activation Service (WAS) did not create a worker process to serve the application pool because the application pool identity is invalid.
Event ID 5059, service becomes unavailable: Application pool BuggyBits.local has been disabled. Windows Process Activation Service (WAS) encountered a failure when it started a worker process to serve the application pool.
It is HTTP.SYS, for the inquisitive
When the application pool is turned off, hence we don’t have a w3wp.exe to process on requests for it, we’re having the HTTP.SYS driver responding status 503 instead of IIS. Remember that IIS is just a user-mode service making use of the kernel-level HTTP.SYS driver?
 Img 3, HTTP.SYS validates and queues requests for IIS to pick and process
With a normal, successful request, we have the IIS responding:
 Img 4, Success response 200; in Response headers, the Server is IIS
But when the application pool is down, the request does not even reach IIS. The response comes from HTTP.SYS, not from the w3wp.exe:
 Img 5, With a 503 Response, the Server header is HTTP.SYS
Without a w3wp.exe to process the requests which arrived for an application pool, HTTP.SYS, while acting as a proxy, basically says:
Look, dear client, I tried to relay your request to IIS, to its w3wp.exe process created to execute the called app.
But the app or its configuration is repeatedly crashing the worker process, so creation of new processes ceased.
Hence, I had no process where to relay your request; there is no service ready to process your request.
Sorry: 503, Service Unavailable.
Why is w3wp.exe worker process failing?
I think of an IIS application pool as:
As with all applications, exceptions happen, unforeseen errors. They all start as first-chance exceptions.
- Most of the first-chance exceptions are handled and they never hurt the app or its executing process.
They are handled either by the code of the application, or by the Asp.Net framework itself.
- If the unhandled exception happens in the context of executing an HTTP request, the Asp.Net Framework will do its best to treat (handle) it by wrapping it and generating an error page, usually with an HTTP response status code of 500, Server-side execution error.
The exception that was not handled by the developer’s code gets handled by the underlying framework.
- Some exceptions are unhandled, not treated by any code in the process, so they become the so-called second-chance / process-crashing exceptions.
- When these happen, the operating system simply terminates the process that generated them; all the virtual memory of the process is flushed away into oblivion.
- Exceptions occurring outside the context of a request processing (such as during application startup) have more chances to become second-chance, crashing exception.
Fortunately, these exceptions – first-chance or second-chance – may leave traces. The first place to look at is in the Windows Events, Application log.
As an illustration, the code of my application running in the BuggyBits.local application pool generated the following:
 Img 6, First-chance exception by app in .NET Runtime
Since the exception could not be handled by the Asp.Net, it immediately became a second-chance exception, causing Windows to terminate the w3wp.exe in the same second:
 Img 7, Second-chance exception crashing w3wp.exe
Pings from WAS to check on w3wp.exe
If you notice the time-stamp in the capture above, it corresponds to a Warning event from WAS in the System log, telling that the worker process did not respond (Img 2).
This response does not refer to the HTTP request/response; it refers to pings from WAS.
Remember that I said WAS is creating the worker processes, w3wp.exe, but also it monitors them. It has to know if the worker process is healthy, if it can still serve requests. Of course, WAS is not able to know everything about the health of a w3wp.exe; many things could go wrong with the code of our app. But at least it can send pings to that process.
Illustrating with the Advanced Settings of an application pool, WAS is sending pings to its instances of w3wp.exe, every 30 seconds. For each ping, the w3wp.exe (that PID) has 90 seconds to respond. If no ping response is received, WAS concludes that the process is dead: a crash or hang happened – no process thread is available to respond to the ping. Notice that we also have other time limits too that WAS is looking on.
 Img 8, Setting process pings from WAS to w3wp.exe(s)
More on exceptions
It may happen that, even looking in Windows Events > Application log, we still don’t know why our w3wp.exe is crashing or misbehaving. I’ve seen cases where the exceptions are not logged in Windows Events. In such cases, look in the custom logging solution of the web application, if it has one.
Lastly, if we don’t have a clue about these exceptions, if we have no traces left, we could attach a debugger to our w3wp.exe and see what kind of exceptions happen in there. Of course, we would need to reproduce the steps triggering the bad behavior, when using the debugger.
We can even tell that debugger to collect some more context around the exceptions, not just the exceptions itself. We could collect the call stacks or memory dumps for such context.
One such debugging tool is the command-line ProcDump. It does not require an installation; you only need to run it from an administrative console.
Let’s say I put my ProcDump in E:Dumps. Before using it, I must determine the PID, Process ID of my faulting worker process w3wp.exe:
E:Dumps>C:WindowsSystem32InetSrvappcmd.exe list wp
Then, I’m attaching ProcDump to the PID, redirecting its output to a file that I can later inspect:
E:Dumps>procdump.exe -e 1 -f "" [PID-of-w3wp.exe] > ProcDump-monitoring-log.txt
If my Windows has an UI and I’m allowed to install diagnosing apps, then I prefer Debug Diagnostics. Its UI makes it easier to configure data collection, and it determines the PID of w3wp.exe itself, based on the app pool selected. Debug Diag is better suited to troubleshoot IIS applications.
Both Debug Diag and Proc Dump are free tools from Microsoft, widely used by professionals in troubleshooting. A lot of content is available on the Web on how to use these.
by Contributed | Sep 28, 2020 | Uncategorized
This article is contributed. See the original author and article here.
As a Windows developer, a very common requirement you might be asked to implement is to track information about the installation process. For example, let’s say that you have started a special campaign to advertise your application and you want to understand how many people are installing it because they have clicked one of the promotional banners. Or, in an enterprise environment, you may want to know which is the department of the employee who is installing the application, so that you can apply a different configuration. A very common solution for this requirement is to leverage a web installation and to use query string parameters, appended to the installation URI, which must be collected by the Windows application the first time it’s launched. For example, your installation URL can be something like http://www.foo.com/setup?source=campaign. Then your application, when it’s launched for the first time, must able to retrieve the value of the query string parameter called source and use it as it’s needed (for example, by sending this information to an analytic platform like App Center).
As you might know if you follow this blog, MSIX is the most modern technology to deploy Windows application and, through a feature called App Installer, you can support web installations with automatic updates. As such, is there a way to pass activation parameters to the application from the installer URL with MSIX and App Installer? The answer is yes!
Let’s see how we can do that.
Adding protocol support
The way MSIX supports this feature is by leveraging protocol support. Your app must register a custom protocol, which will be used to launch the application after it has been installed from your website using App Installer. Then, your application will retrieve all the information about the activation through the startup arguments, like in a regular protocol activation scenario. For example, let’s say you register a protocol called contoso-expenses:. This means that, when someone invokes a URL like contoso-expenses:?source=campaign, your application will receive as activation arguments the value source=campaign. This is exactly what App Installer is going to do the first time it launches your MSIX packaged app after the installation has been completed.
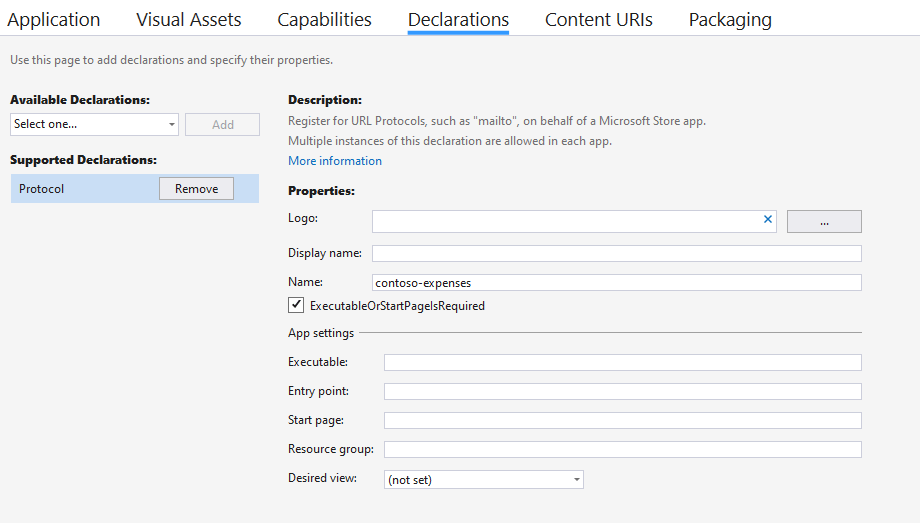
Adding protocol support in a MSIX packaged application is quite easy, thanks to the application manifest. In my scenario, I have a WPF application built with .NET Core, which is packaged as MSIX using the Windows Application Packaging Project. As such, all I have to do is to double click on the Package.appxmanifest file in the Windows Application Packaging Project and move to the Declarations section. In the Available declarations dropdown menu choose Protocol and fill the Name field with the name of the custom protocol you want to register (in my scenario, it’s contoso-expenses:(

Listening for activation arguments
The next step is to make our application aware of activation arguments. The way you implement this support changes based on the development framework you have chosen. In this sample we’re going to see how to do it in a WPF application. Activation arguments can be retrieved in the App.xaml.cs file, by overriding the OnStartup() method, which is invoked every time the application starts:
public partial class App : Application
{
    protected override void OnStartup(StartupEventArgs e)
    {
        string path = $"{Environment.GetFolderPath(Environment.SpecialFolder.Desktop)}//AppInstaller.txt";

        if (e.Args.Length > 0)
        {
            System.IO.File.WriteAllText(path, e.Args[0]);
        }
        else
        {
            System.IO.File.WriteAllText(path, "No arguments available");
        }
    }
}
The OnStartup() method gets, as input parameter, an object of type StartupEventArgs, which includes any activation parameter that has been passed to the application. They are stored inside an array called Args. In case of protocol activation, there will be only one item in the array with the full URL that has been used to activate the application. The previous sample code simply writes this information, for logging purposes, in a text file stored on the desktop of the current user.
Test the custom protocol implementation
Before putting all together for App Installer, we have a way to quickly test if the implementation we have done works as expected. Since the App Installer implementation of this feature is based on the standard approach for managing custom protocols, we can test this scenario right away, without needing to package everything together and upload it on our website. We just need to invoke our custom protocol from any Windows shell.
As first step, right click on the Windows Application Packaging Project and choose Deploy, in order to install the application on the system and register the custom protocol. Now open the Run panel in Windows 10 (or just press Start+R on your keyboard) and type a URI which uses your custom protocol. For example, in my scenario I can use something like:
contoso-expenses:?source=campaign
If you have implemented everything correctly, your application will start. The OnStartup() event will have been triggered as well, so if I check my desktop I will find a file called AppInstaller.txt with the following content:
contoso-expenses:?source=campaign
As you can see, everything is working as expected. The application has launched and, in the activation arguments, I’ve been able to get the full URL that it has been used to invoke the custom protocol.
If you encounter issues during the OnStartup() event, the Windows Application Packaging Project gives you an option to easily test this scenario. Right click on it, move to the Debug section and enable the option Do not launch, but debug my code when it starts.

Now you can press F5 to launch the debugger, but the application won’t be actively launched. The debugger will be on hold, waiting for the application to be activated. Thanks to this feature, you can easily test different activation paths. In our scenario, you can just add a breakpoint inside the OnStartup() method and then, from the Run panel, invoke the custom URL. The application will start and the debugger will wake up, triggering the breakpoint and giving you the option to debug your code.
Now that we have a working implementation in our application, let’s see how we can configure App Installer to leverage it.
Setting up App Installer
When it comes to the App Installer configuration, you don’t have to do anything special to support this scenario. The App Installer file you’re using today to deploy your MSIX application works fine. However, you will have to customize the URL that is used to trigger the installation. If you’re generating the App Installer file as part of the publishing process in Visual Studio, you will end up with a web page similar to the following one:

The Get the app button will trigger the installation of the MSIX package by leveraging the special ms-appinstaller protocol and it will look like this:
ms-appinstaller:?source=https://contosoexpensescd.z19.web.core.windows.net/ContosoExpenses.Package.appinstaller
The trick here is to add a special parameter to this URI, called activationUri. As such, open the web page with your favorite text editor and change the URL to look like this (or copy it directly in your web browser, if you just want to do a test):
ms-appinstaller:?source=https://contosoexpensescd.z19.web.core.windows.net/ContosoExpenses.Package.appinstaller&activationUri=contoso-expenses:?source=campaign
As you can see, I have added at the end an activationUri parameter with, as value, the same exact custom URL I have tested before, based on the contoso-expenses protocol registered in the application. When you do this, Windows will automatically launch this URL at the end of the MSIX deployment process, instead of simply launching your application.
The installation process won’t look different. When you click on Get the app button with the new custom URL, the user will continue to see the traditional MSIX deployment experience:

The only difference is that, as you can notice, the option Launch when ready is hidden. The application will be forcefully launched at the end of the process with the custom URL we have specified, otherwise we won’t be able to get the activation parameters. Once the deployment is complete, Windows will silently invoke the custom URL we have passed to the activationUri parameter, which in our case is contoso-expenses:?source=campaign. As a consequence, the experience will be like the one we have tested before when we have locally invoked the custom protocol: the application will be launched and, on the desktop, we’ll find a file called AppInstaller.txt with the full URL that has been used for triggering the execution.
Unfortunately, Visual Studio doesn’t have a way to customize the web page that is generated to add this custom App Installer URI. However, in a real scenario, you won’t probably use that page, but you will have the App Installer link embedded in a button or banner of your existing website.
Working with the activation parameters
An easier way to work with the activation parameters is to leverage the HttpUtility class which is included in the System.Web namespace. Thanks to this class, you can manipulate the query string parameters coming from the Uri in an easier way:
protected override void OnStartup(StartupEventArgs e)
{
    string path = $"{Environment.GetFolderPath(Environment.SpecialFolder.Desktop)}//AppInstaller.txt";

    if (e.Args.Length > 0)
    {
        UriBuilder builder = new UriBuilder(e.Args[0]);
        var result = HttpUtility.ParseQueryString(builder.Query);
        var value = result["source"];

        System.IO.File.WriteAllText(path, $"Source: {value}");
    }
    else
    {
        System.IO.File.WriteAllText(path, "No arguments available");
    }
}
As first step, we use the UriBuilder class to create a Uri object out of the activation parameter we have received inside the first position of the e.Args array. This way, we can easily access only to the query string parameters (without the whole contoso-expenses protocol) by using the Query property. By using the ParseQueryString() method and passing the query string we get in return a dictionary, which makes easy to access to all the various parameters. The previous sample shows how easily we can retrieve the value of the source parameter from the query string. Thanks to this approach, we can avoid to use string manipulation to retrieve the same information, which is more error prone.
What about a Universal Windows Platform application?
What if, instead of a .NET application like in this example, I have a UWP app? From a custom protocol registration perspective, the approach is exactly the same. The deployment technology for UWP is MSIX, so also in this case we have a manifest file where we can register our protocol. From a code perspective, instead, UWP offers a dedicated method for custom activation paths, called OnActivated(), which must be declared in the App.xaml.cs file. This is an example implementation:
protected override void OnActivated(IActivatedEventArgs args)
{
    if (args is ProtocolActivatedEventArgs eventArgs)
    {
        UriBuilder builder = new UriBuilder(eventArgs.Uri);
        var result = HttpUtility.ParseQueryString(builder.Query);
        var value = result["source"];
    }
}
As you can see, the code is very similar to the WPF implementation. The only difference is that the OnActivated event can be triggered by multiple patterns and, as such, first we need to make sure that this is indeed a protocol activation, by checking the real type of the IActivataedEventArgs parameter. In case of protocol activation, it will be ProtocolActivatedEventArgs, which gives us access to the to the Uri property we need to retrieve the activation URL.
Wrapping up
This implementation is based on the standard custom protocol support offered by Windows, so it’s very easy to implement. Every development platform support a way to get activation parameters when the application starts, so you just need to write some code to manage the desired scenario.
You can find the full sample used in this blog post on GitHub.
Happy coding!
References

by Scott Muniz | Sep 28, 2020 | Uncategorized
How do you pick a voice out of the all the chatter, and attend to what they’re saying, especially when the conversations around you are louder than the one you’re having? This is called the cocktail party problem. Yet the brain is able to defuse the ambient sound and channel the voices we’re interested in. In scientific terms this has been explained as “selective cortical representation of attended speaker in multi-talker speech perception.” No matter how you describe it, although we give it little thought, it’s a remarkable and critical ability we use every day.
Social Marketing
I often hear this question, in one form or another, “How can I, or my Web site, be heard in the worldwide crowd?” It’s easy to view the Web as a cacophony of voices in which it is impossible to expect to be heard over all the noise. That’s a reasonable conclusion. Why would you want to be heard over the voices? When you enter a crowded room are you inclined to yell in order to get everyone’s attention? It doesn’t make sense and yet some consider this to be the aim of social marketing. It’s an unattainable goal. A better approach is the cocktail party problem. Rather than trying to get everyone’s attention, enter the room, look for someone to talk to, ignore unwanted noise, and pay attention to what the other person is saying. This is exactly how we all “work the room” in real life. Also, don’t forget, the most interesting people are very good listeners. The Bible put’s it another way, “Be quick to listen, slow to speak.” (James 1:19) This is excellent advice and a principle that works online as well. Rather than clamoring for attention, if you listen carefully to online conversations, you can filter out posts about your brand, your products, customer issues, trends, and so on, allowing you to engage meaningfully with customers to bring to them real value and to bring to your business real money (to put it bluntly). More on social listening in a moment (below). Now let’s talk about social engagement … (click on header below)
Social Engagement
Social engagement is so much more effective than social marketing. Let’s take a moment to discuss social marketing. Marketing implies getting your name out there, brand recognition, top-of-mind awareness, and a million other buzz words. Abbreviations like SEO, for search engine optimization, and SEM, for search engine marketing, are the catch phrases of social marketers and unfortunately the esoteric language of online “snake oil salesmen.” SEO and SEM are passive marketing approaches that wreak of old world thinking. Consider it mathematically. Let’s say there are ten search results on Google’s home page and thirty car dealerships in your town. They all hire the best SEO and SEM marketers in the world. Can they all achieve first page ranking? For the sake of argument let’s say we lived in the world of quantum mechanics and they did manage to get thirty dealerships in to ten results, will this translate into clicks? Does this automatically translate into real business? Show me the money!
Sometimes very successful brick-and-mortar businesses appear to lose their minds when they open an online storefront. To illustrate let’s create a hypothetical retail store called Fred’s Fun Stuff. Fred spent years building a business, building relationships with customers, carving out a niche, and as a result he enjoys increased profits year over year. He knows he needs to go online so he launches an online store. He buys all the hoopla about social marketing and spends out the wazoo to get good search engine placement. It works, he gets good site traffic, but he’s not selling much online. He learns that nearly everything he has in his store can be bought on Amazon for less so he starts to cut his prices to compete with Amazon. His customers find out they can buy from him cheaper online. Now he’s moving the same amount of products, has less foot traffic in his stores, and due to smaller margins he has less profit. Well done Fred! The problem? Fred lost his mind.
In his brick-and-mortar store Fred doesn’t try to compete on price with the likes of Walmart. Why? He knows he can’t. So what does he do? Fred listens to his customers, engages with them, supports them, cares about them, and he builds relationships. “I go to Fred’s because of the personal attention.” “He has the coolest store and lets me try stuff out. If I don’t like it I can bring it back.” “Fred always stands behind his products.” You get the point. In a nutshell Fred does stuff Walmart can’t and won’t do. These are called differentiators and it is one reason some retailers stay around when others go under. There are many differentiators that make your “real world” business successful. The key is to bring those same factors to your online venture. Success tends to beget success.
Social Listening
In the cocktail party problem it’s all about attention and how that attention can change your brain. The same is true for social listening. A system has to be put in place to serve as your ears to listen in on all the conversations on Facebook, Twitter, Instagram, LinkedIn, Google+, and so on. Of course listening requires more than just ears. The system must be able to filter conversations by triggers like products, competitors, geographic location, key phrases, and then be able to bring these conversations to your attention. A dashboard shows you the conversations you want to “hear” in real time. Now you can engage. This is active, not passive, marketing.
To illustrate let’s say you’re listening to social networks for any mention of a competitor and you find several customers complaining because a product is out of stock. You have the product in stock so you engage the customer and let them know about the availability. Not only have you made a sale but, just as important, you’ve begun a new relationship. Relationship marketing, the differentiators, kick in, focusing on customer retention.
I don’t mean to give you the impression there isn’t a place for SEO and SEM. These are important components for the same reason you may list your number and put a sign above your brick-and-mortar business. There is a place for passive marketing as there is a place for advertising. Online success isn’t about achieving good search engine ranking only to wait for someone to click on your site in hopes of a sale. Online success is about pursuing relationships. To put it in the framework of the cocktail party problem: You enter the worldwide social networking mixer, you have on your SEO/SEM name tag, and you listen to the conversations to identify that next opportunity. You work the room, you engage, you follow up, and you build relationships.
by Contributed | Sep 28, 2020 | Uncategorized
This article is contributed. See the original author and article here.
This a quick post about this failure and how to fix: Error: org.apache.spark.sql.AnalysisException: java.lang.RuntimeException:
The operation failed: ‘This request is not authorized to perform this operation.’, 403
First, let’s just add some context :
When you are working on synapse workspace with the managed identity you would need to give Storage Blob Data contributor permission to the workspace that represents the managed identity permission:
https://docs.microsoft.com/en-us/azure/synapse-analytics/security/how-to-grant-workspace-managed-identity-permissions
More information here: https://docs.microsoft.com/en-us/azure/synapse-analytics/security/synapse-workspace-managed-identity
Speaking of managed identities –quick review on it: “A common challenge when building cloud applications is how to manage the credentials in your code for authenticating to cloud services. You can use the identity to authenticate to any service that supports Azure AD authentication, including Key Vault, without any credentials in your code.”
More here: https://docs.microsoft.com/en-us/azure/active-directory/managed-identities-azure-resources/overview?toc=/azure/synapse-analytics/toc.json&bc=/azure/synapse-analytics/breadcrumb/toc.json
So there you are with your workspace with the managed identity permissions granted running a notebook to create a database on Spark.
Note you are the one running the notebook on Synapse Studio and you are not using any credentials as you are under Synapse workspace:
%%spark
spark.sql("CREATE DATABASE IF NOT EXISTS nyctaxi")
It fails:
Solution:
Add the RBAC Storage Blob Data Contributor to the user that is running the notebook, or your user.
In this case, the script is running under the user that is executing the notebook. So this user needs permission as well.
That is it!
Liliam Uk Engineer.
by Contributed | Sep 28, 2020 | Uncategorized
This article is contributed. See the original author and article here.
With the latest release of SharePoint Online Client Components aka CSOM (Client-Side Object Model) (version: 16.1.20317.12000 or above), we now support methods to capture versions of Document Sets in SharePoint Online document libraries. This fills a major gap in our support for Document Sets in SharePoint Online as there was no way to capture versions of Document Sets automatically or programmatically. If you do a quick search online, you will see there are hundreds of posts where users are either asking for a way to capture version or document workarounds using JavaScript hacks and other unsupported methods. This also showcases that “Document Sets” are here to stay and will get all the support and enhancements in SharePoint Online.
Without the CSOM/API support, capturing a new version for a Document Set must be done manually through the ribbon or the ECB menu. This is true for both the classic and modern sites in both SPO and On-Premises. See below screenshot of the ECB menu to capture a version:
This API powering the “Capture Version” functionality is now generally available to everyone through the latest CSOM release. I am glad to share that I personally worked on a Design Change Request (DCR) on behalf of my customer to get this approved from Product Group. DCR is our internal process to make a business justification with enough evidence that a certain feature is needed/modified etc. That’s one of the many ways Product Group takes feedback from field broadening our impact in this role as a Customer Engineer (formerly known as Premier Field Engineer).
Here are short snippets of C# sample code that shows how the CSOM code works.
Start with basic CSOM authenticate and then get a site title.
string userName = "userid@Contoso.OnMicrosoft.com";

SecureString password = ConvertToSecureString("secretpassword");

var ctx = new ClientContext("https://Contoso.sharepoint.com/sites/ModernTeamSite");

ctx.Credentials = new SharePointOnlineCredentials(userName, password);

ctx.Load(ctx.Web);

ctx.ExecuteQuery();

Console.WriteLine(ctx.Web.Title);
Now that you have your ClientContext object ready. You can now request all the Document Set items from the library. Then request the version collection for each document set item.
var list = ctx.Web.Lists.GetByTitle("Documents");

//Use below two lines if you want to load a specific item by id

//var item = list.GetItemById(26);

//ctx.Load(item, l=>l.ContentType);

var query = new CamlQuery()

{

    ViewXml = String.Format("<View><Query><Where><Eq><FieldRef Name='ContentType' /><Value Type='Computed'>Document Set</Value></Eq></Where></Query></View>")

};

ListItemCollection items = list.GetItems(query);

ctx.Load(items);

ctx.ExecuteQuery();


foreach (var item in items)

{

    Console.WriteLine("Item id: "+ item.Id);

    var folder = item.Folder;

    ctx.Load(folder);

    var ds = Microsoft.SharePoint.Client.DocumentSet.DocumentSet.GetDocumentSet(ctx, folder);

    ctx.Load(ds);

    var dsVersions = ds.VersionCollection;

    ctx.Load(dsVersions);

    ctx.ExecuteQuery();

    Console.WriteLine("Version count: "+ dsVersions.Count);

}
To add a new version aka capture version of a document set:
//Add new version. First parameter signifies whether to capture items within docset with their major or minor versions checked in. Second parameter is a string/comment.

dsVersions.Add(true, "capture new version thru CSOM");

To get contents of a captured version of a Document set along with the site columns (fields) for the library.

List<Microsoft.SharePoint.Client.DocumentSet.DocumentSetVersionItem> itemsWithinDS = (List<Microsoft.SharePoint.Client.DocumentSet.DocumentSetVersionItem>)dsVersions[0].GetDisplayContents();

List<Microsoft.SharePoint.Client.DocumentSet.DocumentSetVersionField> fields = (List<Microsoft.SharePoint.Client.DocumentSet.DocumentSetVersionField>)dsVersions[0].GetDisplayFields();

ctx.ExecuteQuery();

Console.WriteLine("Contents count: " + itemsWithinDS.Count);

Console.WriteLine($"Field title: {fields[0].Title}, Value: {fields[0].FormattedValue}");

Do not forge to dispose of your ClientContext object :)

ctx.Dispose();
I also have the PowerShell script posted on my GitHub Gist account. It showcases how to get all Document Set items, capture versions, enumerate contents and the fields. Here is the full PowerShell script:
cls

#Import-Module Microsoft.Online.SharePoint.PowerShell

Add-Type -Path "C:Program FilesCommon FilesMicrosoft SharedWeb Server Extensions16ISAPIMicrosoft.SharePoint.Client.dll"

Add-Type -Path "C:Program FilesCommon FilesMicrosoft SharedWeb Server Extensions16ISAPIMicrosoft.SharePoint.Client.Runtime.dll"

Add-Type -Path "C:Program FilesCommon Filesmicrosoft sharedWeb Server Extensions16ISAPIMicrosoft.SharePoint.Client.DocumentManagement.dll"


#Setting this to True will create new version for any DocSet it identifies that has zero versions existing

$CreateNewVersion = $true

$AdminPass = "password"

$AdminPassword = ConvertTo-SecureString -string $AdminPass -AsPlainText -Force

#$AdminPassword=Read-Host -Prompt "Enter password" -AsSecureString

$username="MeganB@YourTenant.OnMicrosoft.com"

$Url="https://YourTenant.sharepoint.com/sites/ModernTeamSite"

$ListTitle="Documents"

$ctx=New-Object Microsoft.SharePoint.Client.ClientContext($Url)

$ctx.Credentials = New-Object Microsoft.SharePoint.Client.SharePointOnlineCredentials($Username, $AdminPassword)

$ctx.Load($ctx.Web)

$ctx.ExecuteQuery()

$list=$ctx.Web.Lists.GetByTitle($ListTitle)

$ctx.Load($list)

$ctx.ExecuteQuery()


"Document Library: "+ $ListTitle

"Total Item Count: "+ $list.ItemCount


$spqQuery = New-Object Microsoft.SharePoint.Client.CamlQuery

$spqQuery.ViewXml = "<View><Query><Where><Eq><FieldRef Name='ContentType' /><Value Type='Computed'>Document Set</Value></Eq></Where></Query></View>";

#$spqQuery.v .ViewFields = "<FieldRef Name='FileLeafRef' /><FieldRef Name='Title' />"

#$spqQuery.ViewFieldsOnly = $true


$items = $list.GetItems($spqQuery)

$ctx.Load($items)

$ctx.ExecuteQuery()


write-host "Found (" $items.Count ") DocumentSet content type items."

write-host ""

foreach ($splListItem in $items)

{

    write-host "Id: " $splListItem.Id " ," "Title:" $splListItem["Title"] -ForegroundColor Green


    $folder = $splListItem.Folder;

    $ctx.Load($folder);

    $ctx.ExecuteQuery()

    $docSetItem = [Microsoft.SharePoint.Client.DocumentSet.DocumentSet]::GetDocumentSet($ctx, $folder)

    $ctx.Load($docSetItem)

    $ctx.ExecuteQuery()

    $docSetItemVersions = $docSetItem.VersionCollection

    $ctx.Load($docSetItemVersions)

    $ctx.ExecuteQuery()

    write-host "Total versions: " $docSetItemVersions.Count


    if($docSetItemVersions.Count -gt 0)

    {

        $docSetItemVersions | %{

            Write-Host "Fetching the version contents..." -ForegroundColor Yellow

            #$_ | Get-Member

            Write-Host "Version Id: "$_.VersionLabel ", Comment: " $_.Comments ", Created: " $_.Created ", By: " $_.CreatedBy

            #$versionContents = New-Object System.Collections.Generic.List[Microsoft.SharePoint.Client.DocumentSet.DocumentSetVersionItem]

            $versionContents = [System.Collections.Generic.List[Microsoft.SharePoint.Client.DocumentSet.DocumentSetVersionItem]]$_.GetDisplayContents();

            $fieldValues = [System.Collections.Generic.List[Microsoft.SharePoint.Client.DocumentSet.DocumentSetVersionField]]$_.GetDisplayFields();

            $ctx.ExecuteQuery()

            #Write-Host $versionContents[0]

            #$versionContents[0] | Get-Member

            write-host "Found (" $versionContents.Count ") items in this doc set verion:"

            $versionContents | %{ write-host "-- ItemUrl:" $_.ItemUrl ", VersionLabel:" $_.VersionLabel ", InternalId: " $_.InternalId}

            #$fieldValues.Count

            write-host "Field values found in this version:"

            $fieldValues | %{ Write-Host "-- Title: " $_.Title ", Value: "$_.FormattedValue }

            Write-Host ""

        }

    }

    else {

        $docSetItemVersions.Add($true, "v1")

        $ctx.ExecuteQuery()

    }

    write-host ""

    write-host ""

}
$ctx.Dispose()
Here is the official MS docs for Add method that captures the version. https://docs.microsoft.com/en-us/dotnet/api/microsoft.office.documentmanagement.documentsets.documentsetversioncollection.add?view=sharepoint-server
Upcoming updates:
The Document Sets product group team is actively working on supporting Copy/Move functionality for Document Set content type items. Today the Copy/Move functionality works for Document Sets, but its scope is limited to within the document library. It doesn’t support copying/moving them across libraries or sites. With the upcoming update that’s going to change. Expect this update to roll out to all tenants in early September 2020.
Hope that helps!

Recent Comments