by Contributed | Sep 25, 2020 | Azure, Technology, Uncategorized
This article is contributed. See the original author and article here.
Hyperscale cloud technologies have become a common platform for modernization and lift-and-shift of On-Premise customers due to cost efficiencies, scalability and resiliency, Complex workloads like SAS have very particular workload characteristics and requirements that need to be understood and rationalized prior to deciding whether to move to the cloud or not, the maturity of compute and storage however has made this easier than in the past, allowing for Microsoft Azure to become a consideration for hosting such demanding workloads.
The attached whitepaper describes guidelines for deploying SAS 9.4 Grid technologies on Azure using the Lustre parallel clustered filesystem in a cost effective, performant and scalable manner.
The work is a collaboration between Donovan White and myself from Microsoft and Renier Dryer from CrunchYard.
Open the whitepaper with the link below.

by Contributed | Sep 25, 2020 | Uncategorized
This article is contributed. See the original author and article here.

Azure DevOps: Update release variables across stages
Rob Bos is a Developer Technologies MVP and DevOps consultant from The Netherlands. Rob is typically working with anything DevOps related to improve flow. As a Global DevOps Bootcamp team member, he loves to automate large setups for the yearly event and uses any tool to get things done. For more on Rob, check out his Twitter @robbos81

Compare 2 SharePoint libraries at lightning speed with Power Automate
Pieter Veenstra is a Business Applications and Office Apps & Services MVP from the United Kingdom. Working in IT consultancies in both the Netherlands and the UK, Pieter has gained experience in a number of different companies and different sectors. From a background in document management, content management and workflow, Pieter now specialises in SharePoint based solutions and business development. Follow Pieter on Twitter @PieterVeenstra and his blog SharePains

Intro to Azure Security Center
George Chrysovalantis Grammatikos is based in Greece and is working for Tisski ltd. as an Azure Cloud Architect. He has more than 10 years’ experience in different technologies like BI & SQL Server Professional level solutions, Azure technologies, networking, security etc. He writes technical blogs for his blog “cloudopszone.com“, Wiki TechNet articles and also participates in discussions on TechNet and other technical blogs. Follow him on Twitter @gxgrammatikos.

The better and improved Teams Whiteboard
Vesa Nopanen is a Principal Consultant in Office 365 and Modern Work, and is passionate about Microsoft Teams. He enjoys helping and coaching customers to find benefits and value when adopting new tools, methods, ways of working and practices for a daily work-life equation. He focuses especially on Microsoft Teams and how it can change how organizations work. He lives in Turku, Finland. Follow him on Twitter @vesanopanen.

PASS Summit 2020!
Sergio Govoni is a graduate of Computer Science from “Università degli Studi” in Ferrara, Italy. Following almost two decades at Centro Software, a software house that produces the best ERP for manufacturing companies that are export-oriented, Sergio now manages the Development Product Team and is constantly involved on several team projects. For the provided help to technical communities and for sharing his own experience, since 2010 he has received the Microsoft Data Platform MVP award. During 2011 he contributed to writing the book: SQL Server MVP Deep Dives Volume 2. Follow him on Twitter or read his blogs in Italian and English.
by Contributed | Sep 25, 2020 | Azure, Technology, Uncategorized
This article is contributed. See the original author and article here.
Azure App Services supports an interesting feature called Manage Identity from Azure Active Directory.
This allows your App Services to easily connect to Azure Resources such as Azure KeyVault, Azure Storage, Azure SQL . The complete list of resources that support this feature are available in the following document:
Azure Services that support managed identities – Azure AD | Microsoft Docs
You could refer to our documentation for more details on this feature here.
MSI-Validator helps you troubleshoot issues with Managed Identity for Azure App Services.
The link to download this tool is available in the attachments section of the blog.
Installation Steps:
- Download the zip file from the attachments.
Current version – v1.0.0.0
- Extract it to the local folder.
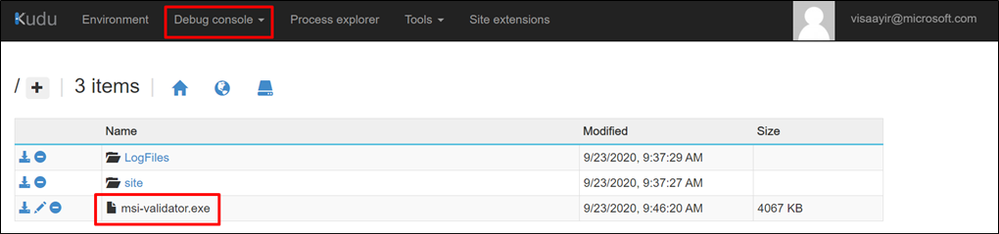
- Drag and drop “msi-validator.exe” to the Kudu console of the App Service (https://<webapp-name>.scm.azurewebsites.net)

Commands:
- To Get an Access Token :
msi-validator get-token -r <resource>
Valid Arguments for resource = keyvault, storage, sql
Sample:
msi-validator get-token -r keyvault
msi-validator get-token -r storage
msi-validator get-token -r sql
- To Test the connection
msi-validator test-connection -r <resource> -e <endpoint>
Valid Arguments for resource = keyvault, storage, sql
Sample:
msi-validator test-connection -r "keyvault" -e "https://<keyvault-name>.vault.azure.net/secrets/<secret-key>"
msi-validator.exe test-connection -r storage -e https://<storage-name>.blob.core.windows.net/webapp/<container-name>/<blob-path>
msi-validator.exe test-connection -r sql -e "Data Source=<server-name>.database.windows.net;Initial Catalog=<database-name>;"
Troubleshooting:
- From the Identity Blade of the App Service, ensure that Managed Identity is turned on.

- Navigate to Kudu Console (https://<webapp-name>.scm.azurewebsites.net) > Environment Section and search for MSI (Ctrl + F)

The Environmental Variables “MSI_ENDPOINT” and “MSI_SECRET” would have been set automatically.
- Run the command “msi-validator get-token -r <resource>” and check if a token is being returned.

An access token should be returned.
Otherwise, it indicates that MSI service has issues reaching out to Azure Active Directory to fetch a token.
Things to check :
- Does the App Service have regional VNet Integration / is the App in ASE?
Are there any User Defined Routes on the subnet to which the App Service is integrated ?
If Yes , is the device to which the traffic is force tunneled, blocking any Azure Active Directory Dependency ?
- Do you still face the issue if Managed Identity is disabled and enabled again ?
- Run the command “msi-validator test-connection -r <resource> -e “<endpoint>” ” and check if data is returned from the resource or inspect the error message..
KeyVault:
From the below error message, we see that the App Service doesn’t have necessary permissions to access the KeyVault. 
Resolution:
- Navigate to the Access Policies Blade of KeyVault from the Azure Portal.
- Click on “+ Add Access Policy“

- Provide the necessary permission.

-
Choose the Service Principal (name of the App Service)

Storage:

Resolution :
Navigate to the Access Control IAM) > Add Role assignment and choose the necessary storage related permission. The roles should be configured as per your application’s use case.

SQL:
The application could fail while connecting to Azure SQL using MSI with the error message: “Unable to connect to SQL. Exception : Login failed for user ‘<token-identified principal>’“

Resolution:
If you want, you can add the identity to an Azure AD group, then grant SQL Database access to the Azure AD group instead of the identity. For example, the following commands add the managed identity from the previous step to a new group called myAzureSQLDBAccessGroup:
groupid=$(az ad group create --display-name myAzureSQLDBAccessGroup --mail-nickname myAzureSQLDBAccessGroup --query objectId --output tsv)
msiobjectid=$(az webapp identity show --resource-group myResourceGroup --name <app-name> --query principalId --output tsv)
az ad group member add --group $groupid --member-id $msiobjectid
az ad group member list -g $groupid
In the Cloud Shell, sign in to SQL Database by using the SQLCMD command. Replace <server-name> with your server name, <db-name> with the database name your app uses, and <aad-user-name> and <aad-password> with your Azure AD user’s credentials.
sqlcmd -S <server-name>.database.windows.net -d <db-name> -U <aad-user-name> -P "<aad-password>" -G -l 30
In the SQL prompt for the database you want, run the following commands to grant the permissions your app needs. For example,
CREATE USER [<identity-name>] FROM EXTERNAL PROVIDER;
ALTER ROLE db_datareader ADD MEMBER [<identity-name>];
ALTER ROLE db_datawriter ADD MEMBER [<identity-name>];
ALTER ROLE db_ddladmin ADD MEMBER [<identity-name>];
GO
<identity-name> is the name of the managed identity in Azure AD. If the identity is system-assigned, the name always the same as the name of your App Service app. To grant permissions for an Azure AD group, use the group’s display name instead (for example, myAzureSQLDBAccessGroup).
Type EXIT to return to the Cloud Shell prompt.
The back-end services of managed identities also maintains a token cache that updates the token for a target resource only when it expires. If you make a mistake configuring your SQL Database permissions and try to modify the permissions after trying to get a token with your app, you don’t actually get a new token with the updated permissions until the cached token expires.
Modify connection string
Remember that the same changes you made in Web.config or appsettings.json works with the managed identity, so the only thing to do is to remove the existing connection string in App Service, which Visual Studio created deploying your app the first time. Use the following command, but replace <app-name> with the name of your app.
az webapp config connection-string delete --resource-group myResourceGroup --name <app-name> --setting-names MyDbConnection
You could refer to our official documentation regarding this at Tutorial: Access data with managed identity – Azure App Service | Microsoft Docs

by Contributed | Sep 25, 2020 | Azure, Technology, Uncategorized
This article is contributed. See the original author and article here.
Well Microsoft Ignite 2020 is over and while our step counters may not have captured as many steps as last year… but it doesn’t mean that there wasn’t a plethora of Azure news shared. Here are the headlines we are covering this week: The IT Professional’s role in the Responsible use of AI, Azure Automanage for VMs, Move resources to another region with Azure Resource Mover, New Windows Virtual Desktop Capabilities, Hybrid Cloud announcements surrounding Azure Arc and Azure Stack as well as the Microsoft Learn module of the week.
The IT Professional’s Role in the Responsible use of Artificial Intelligence
Artificial Intelligence, like Operations, is in everything these days. From the way we work – to the way we go about our daily lives – AI enables us to make quicker, smarter decisions on what our next steps should be. But that also raises the question of ethics and more specifically the ethical use and management of AI.
An example of responsible AI utilization came in the form of the newly announced spatial analysis capability in the Computer Vision Azure Cognitive Service. Its advanced AI models aggregate insights from multiple cameras to count the number of people in the room, measure the distance between individuals, and monitor wait and dwell times. Organizations can now apply this technology to use their space in a safe, optimal way.
I also had the opportunity to sit down with members of the Microsoft Ethics & Society team to discuss the IT Professional’s role in responsible adoption of Artificial Intelligence as well as share the corresponding resources made available.
Azure Automanage for virtual machines
Newly announced service, Azure Automanage reduces the OpEx burden for VMs further by automating day-to-day operational requirements in areas such as security, anti-malware, compliance, disaster recovery, etc. Through its virtual machine best practices capability, select services are discovered, onboarded, and configured across the entire lifecycle of both dev/test and production VMs. You can add VMs individually or do so at scale safe in the knowledge that if your VMs deviate from best practices, Azure Automanage will detect and automatically correct it.
Azure Resource Mover: Move resources across regions from resource groups
Resource Mover helps you to move Azure resources between Azure regions. You might move resources to different Azure regions to: Align to a region launch, Align for services/features, Respond to business developments, Align for proximity, Meet data requirements, Respond to deployment requirements, and Respond to decommissioning.
New Windows Virtual Desktop Capabilities Announced
To help customers continue to accelerate this move to secure remote work with Windows Virtual Desktop, Microsoft has announced several new capabilities that make it even easier to deploy, secure, and scale your virtual desktop deployments. These new capabilities will be available in public preview by the end of the calendar year 2020. These capabilities include:
- Microsoft Endpoint Manager support for Windows 10 multisession will provide IT admins with the ability to manage and secure virtual desktops the same way as physical devices.
- New integration with Azure Monitor, providing customers with a workbook that captures all the relevant monitoring insights and provides rich visualizations to identify and troubleshoot issues quickly. This is an important consideration for customers looking to monitor and troubleshoot easily while deploying virtual desktops at scale.
- The ability to add application layers from the Azure portal, helping customers onboard applications quickly — with a few clicks, you can now deploy and publish applications for your employees.
MS Learn Module of the Week
This Microsoft Learn module provides an introductory overview of various hybrid-cloud technologies and how you can connect an on-premises environment to Azure in a way that works best for your organization.
Let us know in the comments below if there are any news items you would like to see covered in next week show. Az Update streams live every Friday so be sure to catch the next episode and join us in the live chat.
by Contributed | Sep 25, 2020 | Azure, Technology, Uncategorized
This article is contributed. See the original author and article here.
Introduction
This is Andrew Coughlin and I am a Customer Engineer at Microsoft focusing on Azure IaaS. In this blog I will focus on how to add an additional server to an Azure File Sync and how to remove the old server. This process should be followed if you are looking to retire your old Azure File Sync server and want to replace it with a newer server. However, if you are currently having issues with your Azure File Sync Server this blog is not for your scenario. If you are having issues with your sync server it is best to open a support request and work with an engineer to solve the problem.
Prerequisites
- Existing Azure File Sync Service setup and configured.
- Deploy a new Windows Server.
- Download the Azure File Sync Agent here.
- Prepare your Windows Server to use Azure File Sync as documented here.
Install the Azure File Sync Agent
To install the Azure File Sync Agent, you will go to the location where you downloaded the executable.
NOTE: Each version of Windows Server has its own version of the installation executable.
- Then you will execute the installer.
- Click Next, on the welcome setup wizard.
- Accept the terms and conditions and click Next.
- Click Next, on Feature Selection.
- Set your proxy settings if required, click Next.
- Check the checkbox next to Automatically update when a new version becomes available, then select the day and time, then click Install.
- Wait for the installation to finish.
- Click Finish.

Register it to the Storage Sync Service
Once you have installed the Azure Sync Service, you need to register your server with the service. To do this you will do the following on the new server:
- Click OK, on the Azure File Sync – Agent Update
- Click Sign In.
- You will be prompted for your global administrator username / password.
- You will then select the subscription, resource group and storage sync service, then click Register.
- Network connectivity test will show green, you may need to click retest.
- Click Close once done.

Add the Server Endpoint
Currently we have installed the agent and registered the new server with the Azure File Sync Service. Next, we will add the new server endpoint to our existing Sync group. We will go to the portal and search for Storage Sync Service.

Then you will click on the Storage Sync Service you are going to add this new server to.

Click on Overview and then click on your sync group.

Click on the old Server endpoint.

Take note of your current tiering policies for volume policy and date policy.

Click on the X on the Server Endpoint Properties Window.
Click Add server endpoint.

On the Add server endpoint screen, select the server from the dropdown list on Registered Server, and type the path to be synced as part of the sync group. (Example: E:Shares)

If your current server endpoint is doing cloud tiering, enable Cloud Tiering and configure the new server endpoint to match the old server endpoint configuration, then click Create.

You will now see 2 server endpoints, and the new one you just added will be in a pending status.

When the setup is complete the new server should show healthy:

If you switch to the new server, you will see new files being populated:

We now have our new server added and part of the sync group. As files are created on the old server, they are synced to the file share and back to the second file server.
Verify Sync on new Azure File Sync Server
Next you need to verify that the new server has completed a sync. To do this we will open eventvwr on the new server.
Then navigate to Applications and Services Logs Microsoft FileSync Agent Telemetry. We want to filter on Event ID 9102, this is logged once a sync has completed. For additional information around this event id you can visit this page.

Next thing to do is to create the shares. This is one article that explains how to export / import share permissions.
Remove Server Endpoint
WARNING: Before completing this next step make sure synchronization, as noted in ‘Verify Sync on new Azure File Sync Server’, has completed and no client devices are no longer talking to this server. Don’t complete these steps until all clients are talking to the new server. There are several ways you can move your client devices:
- Add the server to the existing DFS target folder, see my blog here for more information.
- Shutdown the old server, rename the new server to the old server name, be advised the server endpoint in the portal doesn’t update the name as noted here.
- Create a CNAME from the old server to the new server, for documentation for creating a cname use this link.
Normally when you remove a server endpoint you may only have 1 server in the sync group. Before you do this, you would make sure to recall those files. In this scenario, we have 2 servers in the sync group and therefore we do not need to recall the files. However if you are retiring an Azure File Sync server that you want to keep the files locally on the file server you will want to recall the files before proceeding as documented here.
Go back to the Azure Portal, then the Storage Sync Service and the Sync Group. Click on the old sync server and click Delete.

Type the name of the server in the text box and click Delete.


Remove Registered Server
The second to the last step is unregistering the server from the Azure File Sync Service. To do this go back to the Azure Portal, then the Storage Sync Service. Click Registered Servers and click on the server you are wanting to retire. Next, we will click on Unregister Server.

Type the name of the server in the text box and click Unregister.


Uninstall the Azure File Sync agent
The last step is an optional task, since we removed the server from the sync group and unregistered it, those are the more important tasks. If you would like to uninstall the agent, it is 4 simple steps as outlined below:
- Click Start > Control Panel > Add/Remove Programs (Programs and Features).
- Click on Storage Sync Agent > Click Uninstall.

- Click Yes, on Are you sure you want to uninstall Storage Sync Agent.
- Click Yes to restart now, or No to restart later.
Conclusion
In 6-7 easy steps, we replaced an old Windows Server running Azure File Sync with a new Windows Server. Are you a Premier or Unified customer? If so and you are wanting to know more about Azure File Sync, ask your CSAM about the Activate Azure with Azure File offering. Thank you for taking the time to read this blog, I hope this helps you and see you next time.

Recent Comments