Change Locale/language of SQL Server on Azure VM

Change Locale/language of SQL Server on Azure VM

This article is contributed. See the original author and article here.

Currently Azure marketplace SQL Images are only available in English locale. If you want to change your SQL locale to any other than English, then you can deploy a virtual machine that contains SQL Server initially. We will walk through the steps involved in changing SQL Server language from English to Japanese in this blog. 


SQL Server database engine executable file is common to all languages, you can store, extract, and search Japanese data without having to perform the following steps. The default collation of the database can be specified when the database is created. You can explicitly specify the collation of a table column, or if not, the collation of the database is inherited.  


If you want to manage from SQL Server Management Studio with a Japanese UI on a remote machine, you do not need to do the following. If you only need the Japanese user interface for administrative tools, you will need to Change locale for SQL Server.  The following is an example of SQL Server 2016, but the procedure remains almost the same for other versions of SQL Server: 


Uninstall SQL Resource Provider 


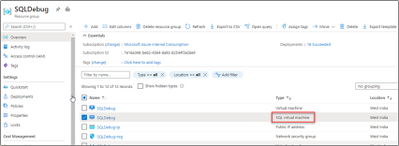
From the Azure Portal, navigate to your resource group. Click on your “SQL virtual machine” Resource. 


Ujjwalpatel_1-1600939155760.png


Delete SQL Virtual Machine resource. We are not deleting the Virtual Machine here. 


Ujjwalpatel_2-1600939155748.png


Uninstall SQL Server and its related components. 


  • To start the Uninstall process, we will Uninstall SQL instance. Review the list of features and components that will be uninstalled so you can install those when you install the new instance. 
  • We need to uninstall “Data Tier Application Framework” and “Microsoft Visual Studio Shell” related packages from programs and features. 


Ujjwalpatel_3-1600939155771.png


At the end of this step there are no SQL instance, features or components on this machine. Everything has been uninstalled. 


Configure Operating System to Support Localized Versions 


Before you can install the Japanese version of SQL Server on an English operating system, you must change the language settings of the operating system.  Please follow the below steps: 


  • User interface settings for the operating system  
  • User locale settings for the operating system  
  • System locale settings  


To change the operating system user interface setting 

  1. If not already installed, install the operating system MUI that matches your localized version of SQL Server. 
  2. In Control Panel, open Regional and Language Options. 
  3. On the Languages tab, for Language used in menus and dialogs, select a value from the list. This setting will affect the user interface language of SQL Server, so it must match your localized version of SQL Server. 
  4. Click Apply to confirm the change, and OK to close the window. 

To change the operating system user locale setting 

  1. If not already installed, install the operating system MUI that matches your localized version of SQL Server.
  2. In Control Panel, open Regional and Language Options. 
  3. On the Regional Options tab, for Select an item to match its preferences, select a value from the list.  This setting will affect culture-specific data formatting. 
  4. Click Apply to confirm the change, and OK to close the window. 

To change the system locale setting 

  1. If not already installed, install the operating system MUI that matches your localized version of SQL Server. 
  2. In Control Panel, open Regional and Language Options. 
  3. On the Advanced tab, for Select a language to match the language version of the non-Unicode programs you want to use, select a value from the list. This setting will allow SQL Server Setup to choose the best default collation for your SQL Server installation. 
  4. Click Apply to confirm the change, and OK to close the window. 


Installing the SQL Server with your preferred Locale/Language 


Ujjwalpatel_4-1600939155766.png


  • Set the package type to ISO and download it. 


Ujjwalpatel_5-1600939155768.png


  • You will also need a Microsoft account to download. After downloading, mount the appropriate ISO file and load it into the DVD drive. 


Ujjwalpatel_6-1600939155762.png


  • On the SQL Azure VM, open C:/SQLServer_13.0_Full/x64/DefaultSetup.ini. 


DefaultSetup.ini 


******************** 


SQL Server 2016 Configuration File 


[OPTIONS] 


PID:”XXXXX-XXXXX-XXXXX-XXXXX-XXXXX” 


PCUSOURCE: “. 


******************** 


The XXXXX becomes the actual product key which we need to use while installing. Start the installation of the Japanese version of SQL Server 2016. (By default, it is mounted on the E drive, so start setup from here.) ) 


On the Product Key page, you can change the Edition from Evaluation by entering the product key. 


Ujjwalpatel_7-1600939155764.png


For more information about installing SQL, please check Install SQL Server 2016 from the Installation Wizard (Setup) 


Reinstall Resource Provider 


Install SQL Resource Provider . This will sync your billing and the SQL Version/Edition we installed with the Azure Portal. 


References 


Install non-English language versions of SQL Server Management Studio (SSMS)  

Microsoft 2012 SP1 Japanese locale Evaluation 

Microsoft 2014,2016,2017,2019 Japanese locale Evaluation Version 

Local Language Versions in SQL Server 

Experiencing Live Metrics issue in Azure Portal for Application Insights – 09/24 – Resolved

This article is contributed. See the original author and article here.

Final Update: Thursday, 24 September 2020 09:50 UTC

We’ve confirmed that all systems are back to normal with no customer impact as of 9/24, 09:40 UTC. Our logs show the incident started on 9/24, 09:00 UTC and that during the 40 minutes that it took to resolve the issue some customers may have experienced failure accessing live metrics data.

  • Root Cause: The failure was due to configuration changes in one of our dependent service.
  • Incident Timeline: 40 minutes – 9/24, 09:00 UTC through 9/24, 09:40 UTC

We understand that customers rely on Application Insights as a critical service and apologize for any impact this incident caused.

-Harshita


Microsoft Ignite 2020: Windows Containers and Azure Kubernetes Service on Azure Stack HCI!

This article is contributed. See the original author and article here.

If Azure Kubernetes Services (AKS) was the first Kubernetes based home on Azure that Windows containers have, I am so happy now we got a second brand new home. That is AKS on Azure Stack HCI announced at Ignite this week! As the driver to build and execute the product strategy helping customers lift and shift, and modernize traditional Windows apps with Windows containers, I am thrilled we are bringing AKS on Azure Stack HCI to customers for on-prem or hybrid needs of leveraging Windows containers.


As a starter, from the official doc here, “Azure Kubernetes Service on Azure Stack HCI is an on-premises implementation of Azure Kubernetes Service (AKS), which automates running containerized applications at scale. Azure Kubernetes Service is now in preview on Azure Stack HCI, making it quicker to get started hosting Linux and Windows containers in your datacenter.”


I had the honor participating as an SME in a few Digital Breakout sessions and the Ask the Experts sessions related to AKS on Azure Stack HCI this Ignite. I was blown away by the strong interest from the community. Lots of great questions were asked. To make it easy, I compiled the following relevant links for folks who wanted to get started:


General materials:

Ignite Sessions:

If you are interested in learning more about WAC tooling related to containers, check out 2 previous blogs from Vinicius:


Have fun at Ignite. Have fun trying out Windows containers on AKS on Azure Stack HCI. Keep your questions coming in. Share your feedback with us. Thank you!


Weijuan

Twitter: @WeijuanLand

Email: win-containers@microsoft.com

Log Analytics – Query Dialog gets a new search option

Log Analytics – Query Dialog gets a new search option

This article is contributed. See the original author and article here.

Over the last few months we have added hundreds of example queries to help you reach insights fast.

The Log Analytics UI primes and filters queries to make it easier to find what you need, for example, when launching logs from a VM context, our queries UI will auto filter to only show queries related to VMs.


Search examples

We have taken this feature a step forward and we have now added the ability to search for the example queries you want, directly from the query dialog:

Search in the new query experience.gif


Searching for queries will search the query’s title and description allowing you to find the queries you need even faster.


Search, Group by and filter

The search option joins the multiple UI elements that are designed to help you find what you need – fast.

You can use the search option in tandem with our grouping and filtering options to search and arrange your queries, exactly as you want them, to get to your insights faster.


Summary:

Searching for a query is an fast and easy way to find exactly what you need.

Searching for a query is now available in the query dialog and in the query side bar and works in tandem with our group by and filtering experiences.


Feedback:

Let us know what you think! please share your thoughts and comments about this enhancement in the comments section of this blog!


Log Analytics – search query history

Log Analytics – search query history

This article is contributed. See the original author and article here.

Log Analytics query history is one of the most well loved and used features in our UI.

When using Log Analytics frequently, you may create hundreds of queries – all saved in your query history.

We’ve added a new search option to help you quickly find specific items in your query history.


How does it work:

Searching your query history is accessed through the magnifying glass icon in your query history view:

Search in query history.gif

You can search your query text and move between different search ‘hit’s with the arrows next to the search box.


Summary:

Query history contains a wealth of queries already tried and tested.

Searching query history will help you get to the queries you were looking for faster and with more ease.


Feedback:

Let us know what you think! please share your thoughts and comments about this enhancement in the comments section of this blog!