by Scott Muniz | Sep 22, 2020 | Uncategorized
This article is contributed. See the original author and article here.
In today’s digital world, managing work and personal tasks can be overwhelming. Microsoft To Do is a task management app that helps you stay organized, be productive, and get more time for yourself. With Microsoft To Do, you can easily create to-do lists, set reminders, and collaborate with friends and colleagues. Microsoft To Do is integrated with Microsoft 365 apps like Outlook, Planner, and Microsoft Teams. Microsoft To Do is available on Windows, Android, iOS, Mac, and web, so you always have access to your tasks.
Let’s see how To Do can help you stay on top of your tasks.
Meet Microsoft To Do
Learn more about how to get started with Microsoft To Do.
Manage tasks with Microsoft To Do in Outlook
Microsoft To Do integrates seamlessly with Outlook. You can create tasks by dragging and dropping emails to the My Day pane, or highlight a section of an email to create a task out of it. When you flag an email in Outlook, we create a task for you in To Do so you can find all your pending work in one place.
Focus on what matters with My Day
Do you feel overwhelmed by the number of tasks on your plate? With My Day, you get a blank canvas every day. Create a short list so you can focus on a few key things. Learn how to make the most of your day with My Day.
How to make time for yourself with Microsoft To Do
Microsoft To Do helps you collect what you need so you can focus on what matters. From planning your day to starting a big project, you can make more time for yourself with Microsoft To Do.
Get things done with Microsoft To Do
Microsoft To Do helps you stay organized and get things done. You can create lists and reminders and set due dates to stay on top of your tasks.
Get started with Microsoft To Do: https://msft.it/6000TUO8K
Follow us on Twitter : https://twitter.com/MicrosoftToDo
Find us on Facebook: https://www.facebook.com/MicrosoftToDo
Email us at todofeedback@microsoft.com
by Scott Muniz | Sep 22, 2020 | Uncategorized
This article is contributed. See the original author and article here.
In the 6 months since Microsoft Build 2020, where we made exciting steps forward, such as the GA availability of Bot Framework Composer and the Virtual Assistant Solution Accelerator, we have continued to drive the Conversational AI platform forward – improving the developer experience and meeting the needs of our enterprise customers. Azure Bot Service now handles 2.5 billion messages per month, double the rate announced at Build, with over 525,000 registered developers.
Our updates for Ignite 2020 include a new release of Bot Framework Composer, a public preview of Orchestrator, providing language understanding arbitration / decision making, optimized for conversational AI applications and version 4.10 of the Bot Framework SDK.
New release of Bot Framework Composer
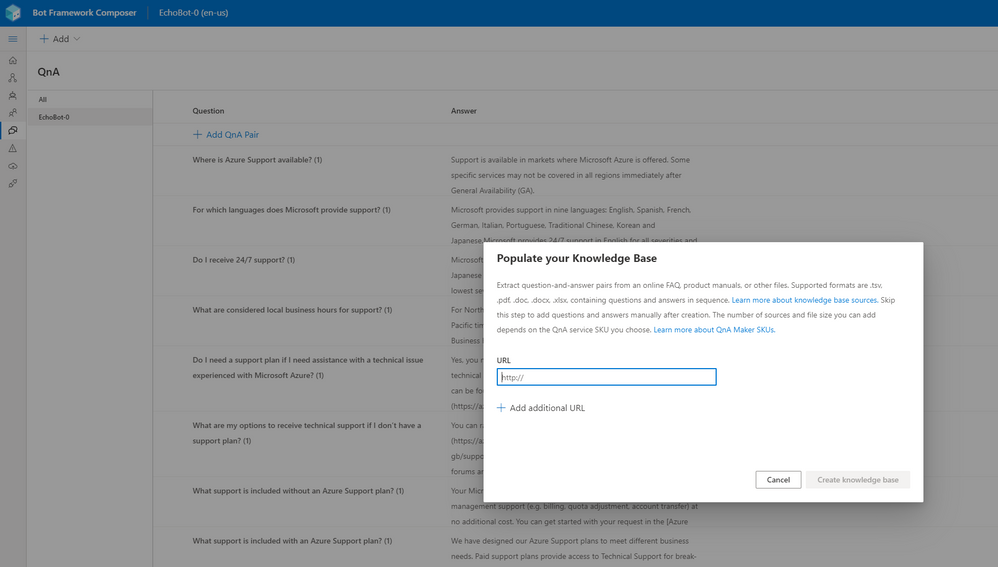
Bot Framework Composer v.1.1.1, released earlier this month, has added a number of significant features to the application, including the addition of creation and management capabilities for QnA Maker knowledgebases. Now, as with the existing integration for LUIS apps, QnA pairs can be added / edited from within Composer, improving overall productivity by removing the need to use a separate portal for these tasks.
 QnA Maker integration in Composer
The ability to build bots that target multiple languages has been added, with a user able to produce appropriate LU (language understanding) and LG (language generation) assets in seconds to target one or more alternative locales.
Other enhancements in this release include automatic generation of manifests when developing Bot Framework Skills, the addition of Intellisense for text editing and preview support for a JavaScript bot runtime.
We also continue to deepen our integration with other key partners within Microsoft and starting this fall, users of Power Virtual Agents will be able to create custom dialogs and directly add them to Power Virtual Agents bots. These dialogs can be saved, hosted, and executed together with Power Virtual Agents bot content, providing a simpler way to extend bot capabilities with custom code.
The next release of Composer, later this year, will feature further QnA Maker integration, improvements to the authoring canvas and the ability to easily re-use assets built with Composer between projects.
Additionally, we are updating the list of pre-built skills, that we released as part of Virtual Assistant Solution Accelerator 1.0, to be based on Bot Framework Composer and adaptive dialogs.
Get started with Composer today at http://aka.ms/bfcomposer.
Orchestrator public preview!
Conversational AI applications today are built using multiple technologies to fulfil various language understanding needs, such as LUIS and QnA Maker, as well as often being composed of multiple skills, with each fulfilling a specific conversation topic. Orchestrator answers a critical need for language understanding arbitration and decision making, to route incoming user request to an appropriate skill or to dispatch to a specific sub-component within a bot.
Orchestrator is a transformer-based solution, which is heavily optimized for conversational AI applications and runs locally within a bot. You can find more details and try the Orchestrator public preview by visiting https://aka.ms/bf-orchestrator.
Later this year, we plan to introduce a preview of Orchestrator support within Composer and the Virtual Assistant Solution Accelerator.
Bot Framework SDK 4.10 released
Version 4.10 of the Bot Framework SDK is now available, adding several new supporting features for our key partners. These included enhanced support for building skills for Power Virtual Agents and adding adaptive dialog and additional lifecycle event support for Microsoft Teams.
A core focus of this release was on quality across the entire stack, covering key pillars of documentation, customer supportability, customer feature requests, code quality and improvements to our internal team agility. Almost 600 GitHub issues were resolved as part of the release, across our SDK languages (C#, JavaScript, Python, Java) and our tools, including accessibility improvements for WebChat.
See the August 2020 release notes for more details on v4.10 of the SDK.
Azure Bot Service
In response to feedback from customers, Azure Bot Service (ABS) now has support for WhatsApp, allowing you to surface your bot on the popular chat app, alongside the existing channels available via ABS. Built in partnership with InfoBip, the WhatsApp adapter can be added to your bot within minutes. Get started with WhatsApp integration for Bot Framework at https://aka.ms/bfwhatsapp.
As part of our commitment to customer privacy and security, ABS has introduced support for Azure Lockbox. Lockbox enables approval flows and audits when support engineers require access to customer data and, additionally, we will soon add customer managed encryption keys.
Azure Bot Service now has expanded channel support within the Azure US Government region and, looking ahead, we will be adding a preview of Adaptive Cards 2.0 and SSO (single sign-on) support for the Teams and WebChat channels.
Ignite 2020 sessions
Conversational AI Customer and Employee Virtual Assistants
Darren Jefford, Group Program Manager, Conversational AI
Building Bots with Power Virtual Agents and extending them with Microsoft Bot Framework
Marina Kolomiets – Senior Program Manager, Power Virtual Agents
by Scott Muniz | Sep 22, 2020 | Uncategorized
This article is contributed. See the original author and article here.
Scenario
One of the Azure Synapse Analytics customer received following error while querying the external table.
HdfsBridge::recordReaderFillBuffer – Unexpected error encountered filling record reader buffer: HadoopExecutionException: Too many columns in the line
Background
Customer has employee data in CSV format with following columns.
|
Column1
|
NAME(1)
|
STREET(2)
|
CITY, ST ZIP(3)
|
Following code works fine and is executed without any errors.
CREATE DATABASE SCOPED CREDENTIAL sccred
WITH IDENTITY = ‘SHARED ACCESS SIGNATURE’,
SECRET = {access key};
CREATE EXTERNAL DATA SOURCE dsblob
WITH
(
TYPE = Hadoop,
CREDENTIAL = sccred,
LOCATION = ‘wasbs://poccon@pocsa.blob.core.windows.net’
);
CREATE EXTERNAL FILE FORMAT FFTextFile
WITH (
FORMAT_TYPE = DelimitedText,
FORMAT_OPTIONS (FIELD_TERMINATOR = ‘,’)
);
CREATE EXTERNAL TABLE stg.EmpData
(
[Column1] NVARCHAR(MAX) ,
[NAME(1)] NVARCHAR(MAX) ,
[STREET(2)] NVARCHAR(MAX) ,
[CITY, ST ZIP(3)] NVARCHAR(MAX)
) WITH (LOCATION=’/datafile.csv’,
DATA_SOURCE = dsblob,
FILE_FORMAT = FFTextFile, REJECT_TYPE = VALUE,
REJECT_VALUE = 0
);
But SELECT * FROM stg.EmpData gives error.
Following are some points for verifications.
- Verify you are not pointing to the wrong container having files with same name.
- Verify number of columns in external table are matching to that in file.
If you take closer look at file columns. you will notice a column is having comma in column name i.e. CITY,ST ZIP(3). This is creating the issue. As we have specified FIELD_TERMINATOR = ‘,’, this is making one column as two different columns. Hence, we are getting error: “Too many columns in the line.”
The column definitions, data types and number of columns, must match the data in files. If there is a mismatch, the data rows will be rejected when querying the actual data.
by Scott Muniz | Sep 22, 2020 | Uncategorized
This article is contributed. See the original author and article here.
Azure Logic Apps has grown to become the cornerstone of Azure Integration Services, an industry-leading Integration Platform as a Service (iPaaS) offering trusted by over 40,000 customers. With its innovative API-driven graphical designer and declarative workflow engine incorporating nearly 400 connectors, Logic Apps has transformed our customers’ capabilities to integrate their applications and services quickly, easily and reliably. More than 60% of the Fortune 500 depend on Logic Apps with many trusting Azure for their most mission critical business processes.
To push the boundaries further, today we’re announcing the Public Preview of a new set of capabilities for Logic Apps that provide developer toolchain consistency, better integration with Azure Functions, new runtime hosting flexibility and improved performance- enabling every developer to build modern workflow-enabled Apps.
Putting Developers at the Center
Logic Apps has always been popular with system integrators, IT Pros and specialists. But for developers with the most demanding requirements Logic Apps is now addressing a number of customer feedback areas that you’ve told us are important. Firstly, Logic Apps now provides integration with VS Code through a new extension, released in Public Preview today, enabling local development. Today’s release aligns our hosting architecture with Azure Functions and Azure App Service enabling you to easily create Workflows and Functions that interoperate and extend each other’s capabilities in a more seamless way. In addition Logic Apps is integrated with the full developer toolchain, including GitHub Actions and a new deployment model based around a similar grouping concept to Function Apps, enabling multiple workflows to be deployed into a single Logic App compute boundary simplifying automated deployments and CI/CD pipelines. And because you are now able to target these runtimes, Logic Apps inherits a number of additional features such as private endpoints, simpler and more cost effective VNET access, deployment slots and more.
Hosting Flexibility
One key capability you’ve asked us for is the ability to run Logic apps workflows where you need to, including on-premises and edge environments. With this release you can now run Logic Apps wherever you run Azure Functions – containerized in Docker or Kubernetes environments such as AKS (Azure Kubernetes Service) or App Service for a managed PaaS experience. This is in addition to local development in VS Code to provide you with more flexibility than ever in where and how you run your workloads. Additionally, with direct support for Dapr, you can use Logic Apps as a microservice workflow orchestrator, making complex API interactions easier to understand with Logic Apps’ visual designer.
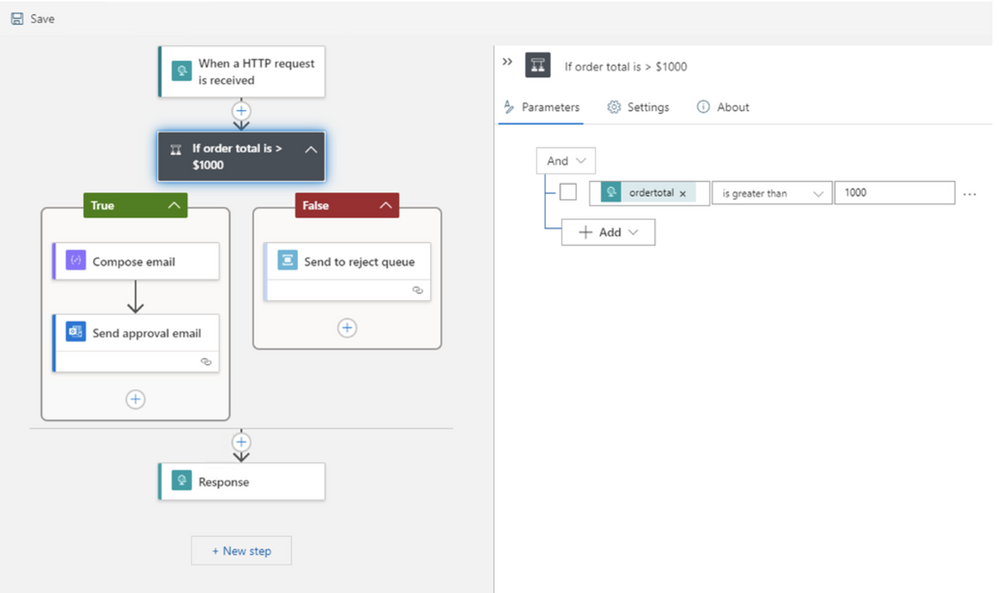
New Designer
With all these runtime improvements we have not overlooked your requests for more designer and editing enhancements and are pleased to share the next evolution of the Logic Apps workflow designer sporting a more modern, compact design. This makes it easier to author larger, more complex workflows and view more steps at once without scrolling. We’ve moved much of the step configuration out of the cards into a new panel design for simpler and faster authoring. We have additional features planned as well including a new layout engine enabling additional gestures to enable you more control over how your workflows are organized.

Performance with Stateless Workflows
Finally, we’ve also heard you ask for better performance for request/response scenarios particularly and are excited to release stateless workflows. The primary intention of stateless workflows is to execute dramatically faster than regular Logic Apps which is made possible due to their stateless nature. Not only that, but stateless workflows provide almost all the same features and capabilities – and we’re working hard to close the differences further. Stateless workflows enable Logic Apps to be used as high performing backend APIs to your applications, as well as enabling API orchestration visually to be able to more easily understand complex service interactions – without performance penalty.
Wrapping up and Getting Started
We thank all of you for depending on Logic Apps to run your business, for sharing your feedback and for helping make Logic Apps even better. This is a big release. We are continuing to enhance all these new features during public preview as we work towards General Availability and we encourage you to try out this groundbreaking release and share your feedback.
To get started right away, follow the detailed guide we’ve put together here. We can’t wait to see what you do and hear what you think!
– Jon & the entire Logic Apps team
by Scott Muniz | Sep 21, 2020 | Uncategorized
This article is contributed. See the original author and article here.
I. Background
Azure PowerShell is a faster iterative product. We expect our customers to update their locally installed versions constantly to stay up to date. The most common way to update it is to use PowerShellGet, a tool built-in to PowerShell for module management.
Usually, you run “Install-Module -Name Az” to install the latest versions of Azure PowerShell modules. When you run “Install-Module -Name $moduleName” to install a specific Az module, you’ll find both the target module and Az.Accounts are installed.

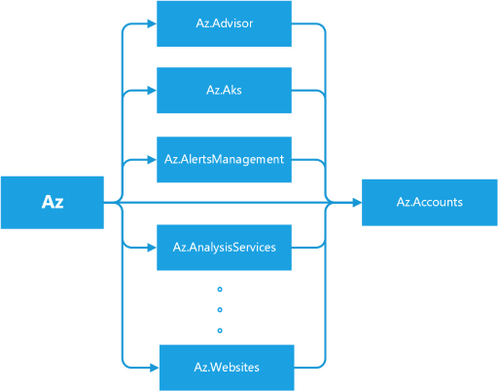
Figure –1 Dependencies among Az Modules
From the behaviors, you will find Az is a bundle of several modules, which depends on all sub-modules of Az rather than a simple single module. When running Install-Module, PowerShellGet fetches Az’s dependencies from the PowerShell gallery and installs the module itself with all the modules it depends on. Meanwhile, each sub-module of Az, for example, Az.Compute, also depends on Az.Accounts. That’s why Az.Accounts is always installed regardless of what Azure PowerShell module is installed. Figure 1, as shown above, illustrates the relationship between the Azure PowerShell modules.
II. Problems
1. Uninstaller’s Negligence
You might expect uninstallation to be a reverse process of installation. Unfortunately, it is not. “Uninstall-Module -Name Az” only removes the Az module without removing the sub-modules. A similar installation and uninstallation process happens to AzureRM. That’s why many people who are migrating from AzureRM to Az have difficulty removing the AzureRM modules.
The package’s dependency information is stored in the original NuGet package but discarded when unpacking the package downloaded during the installation process. When uninstalling the Az module, PowerShellGet doesn’t know the relationship between Az and its sub-modules. Therefore, it only uninstalls the Az module and not the sub-modules.
2. Forgotten Preview Modules
Azure PowerShell often adds new modules. When a new module first onboards, it is in preview mode. This allows for breaking changes in the subsequent versions. At this stage, its version starts with zero, such as 0.1.0. We have released 104 Az sub-modules, 45 of them are in preview mode. When a module goes stable, we upgrade its version to start with a non-zero value, such as 1.0.0, which means it is a general release. After generally released, a module can still release preview versions to include new unstable features. Almost every module contains a preview version before or now. For convenience, we refer to both as being in preview mode and the modules’ preview versions as preview modules.
Most users are unaware of preview modules because they are released independently, not part of the Az module bundle. Sometimes it is difficult to find preview modules, especially the modules without general release versions unless you know their exact names. Since they are not in the Az module bundle, you can only install them individually.
3. Risky Update
If you have several scripts based on Az modules, you need to check whether the upcoming update contains a breaking change (the upgrade of the major version number). “Update-Module” helps you to do the update, but it does everything silently. You must perform the verification manually before running it.
III. Our solution: Az.Tools.Installer
To solve the problems mentioned above, we are launching a new tool, Az.Tools.Installer. It’s based on PowerShellGet and solves the issues we’ve found with it. The first version has three cmdlets which cover installation, uninstallation, and updating.
Compared to PowerShellGet, Az.Tools.Installer perceives the relationship between Az and sub-modules and can manipulate them as a bundle. It collects the information via “Find-Module” from PowerShellGet, which returns the dependency relationship between modules. We also use the cmdlet to retrieve the preview modules.
As Az.Tools.Installer performs the search before the writing operation which causes its cmdlets to take more time to run than similar ones in PowerShellGet. A local cache might shorten the running time though. However, we’re not currently using local caching because it’s easily invalidated since Azure PowerShell changes rapidly.
1. Install-AzModule
Table-1 The Syntax of Install-AzModule
| Install-AzModule [-MaximumVersion <String>] [-MinimumVersion <String>] [-RequiredVersion <String>] -Repository <String> [-RemovePrevious] [-RemoveAzureRm] [-Force] [-Name <String[]>] [-SkipPublisherCheck] [-WhatIf] [-Confirm] [<CommonParameters>] |
| Install-AzModule -Repository <String> [-RemovePrevious] [-RemoveAzureRm] [-Force] -AllowPrerelease [-Name <String[]>] [-SkipPublisherCheck] [-WhatIf] [-Confirm] [<CommonParameters>] |
1.1 Clear the Environment and Install Az with the Specific Version
- Install-AzModule -RequiredVersion 4.5.0 -Repository PSGallery –RemovePrevious – RemoveAzureRm [-Name Storage,Network]
You can uninstall everything related to Azure PowerShell and AzureRM on your local machine and install all the modules from a target Az release easily with Install-AzModule. If “-RemovePrevious” is present, the cmdlet removes all the modules that the previous version installed. If “-RemoveAzureRm”, it removes all the modules from AzureRM.
You can install modules with the Az release version by specifying “-RequiredVersion” or with module names by specifying “-Name”.
Note: Install-AzModule only installs Az sub-modules without the Az module itself.
Please don’t add the “Az.” prefix when specifying the module name. The cmdlets in Az.Tools.Installer add this prefix automatically.
1.2 Install All Az Modules in both General and Preview Release
- Install-AzModule -Repository PSGallery –AllowPrerelease [-Name Storage,Network]
This cmdlet also provides an easy way to install preview modules with the parameter “-AllowPrerelease”. When this parameter is present, the cmdlet installs all the Az modules with the latest versions whether they are in general release or preview without parameter “-Name”. It tries to retrieve all the Az modules in the target repository before the installation and consequently takes more time to run.
The “-Name” parameter allows you to limit the installation of preview modules to only the ones specified.
Note: The preview version of Az.Accounts is not going to be installed because it contains breaking changes which break other modules.
2. Uninstall-AzModule
Table-2 The Syntax of Uninstall-AzModule
| Uninstall-AzModule [-RemoveAzureRm] [-Force] [-Name <String[]>] [-WhatIf] [-Confirm] [<CommonParameters>] |
| Uninstall-AzModule [-MaximumVersion <String>] [-MinimumVersion <String>] [-RequiredVersion <String>] [-RemoveAzureRm] [-Force] [-Name <String[]>] -Repository <String> [-WhatIf] [-Confirm] [<CommonParameters>] |
| Uninstall-AzModule [-RemoveAzureRm] [-Force] -AllowPrerelease [-Name <String[]>] – AllVersion [-WhatIf] [-Confirm] [<CommonParameters>] |
| Uninstall-AzModule [-RemoveAzureRm] [-Force] -AllowPrerelease [-Name <String[]>] [-WhatIf] [-Confirm] [<CommonParameters>] |
| Uninstall-AzModule [-RemoveAzureRm] [-Force] [-Name <String[]>] -AllVersion -Repository <String> [-WhatIf] [-Confirm] [<CommonParameters>] |
2.1 Uninstall the Modules Attached to a Specific Az
- Uninstall-AzModule -Repository PSGallery [-RequiredVersion 4.6.1] [-Name Storage,Network]
As an enhancement of Uninstall-Module, Uninstall-AzModule helps to uninstall the numerous modules related to Az. Firstly, you can uninstall the modules attached to a release version of Az using “-RequiredVersion” or “-MinimumVersion” or “-MaximumVersion”. If any of these are specified, by default the cmdlet removes all the modules attached to the Az version that fills the condition. If “-Name” is specified, the cmdlet removes the modules attached to the Az version for the specified name or list of names. If no version condition is provided explicitly, the latest Az version in the repository provided (PSGallery in the example above) is used.
2.2 Uninstall all the Az Modules Installed
- Uninstall-AzModule -Repository PSGallery –AllVersion [-Name Storage,Network]
To remove all the Az modules on your local machine, you can specify “-AllVersion”. You can provide a list of modules with “-Name” to remove all the versions of the specified modules.
2.3 Uninstall Preview Modules
- Uninstall-AzModule -AllowPrerelease [-Name Storage,MySql] [-AllVersion]
The cmdlet also enables you to remove preview modules in three different ways. By default, when “-AllowPrerelease” is specified, it removes all the modules’ latest version whether they’re in general release or preview. By using “-Name”, you can limit the uninstallation to the specified modules. Further, -AllVersion removes all versions of the modules related to Az.
Note the difference between “Uninstall-AzModule -AllowPrerelease –AllVersion” and “Uninstall-AzModule –AllVersion”. The later only removes the modules in general release. If you want to clean up your environment thoroughly, you can run “Uninstall-AzModule -RemoveAzureRm -AllowPrerelease –AllVersion”.
3. Update-AzModule
Table-3 The Syntax of Update-AzModule
| Update-AzModule [-Name <String[]>] [-RemovePrevious] [-Force] [-WhatIf] [-Confirm] [<CommonParameters>] |
3.1 Generate a Report on What to Update
- Update-AzModule -WhatIf [-Name Accounts,Storage, Network]
The advance of “Update-AzModule” compared to “Update-Module” is to provide you with a table of what modules to update and how to update them. “-WhatIf” prevents the cmdlet from performing the operation on the modules. It can be used to generate a report of what would happen without performing the operation. With “-Name”, you can check only the modules you are interested in. This also makes it complete faster. Table 1 shows an example of the “To-Update” report.
Table-4 The Report of Modules Can be Updated
|
Name
—-
|
InstalledVersion
—————-
|
Repository
———-
|
VersionToUpgrade
—————-
|
| Az.Accounts |
1.9.2 |
PSGallery |
1.9.3 |
| Az.Automation |
1.3.7 |
PSGallery |
1.4.0 |
| Az.Compute |
4.2.1 |
PSGallery |
4.3.1 |
| Az.DataFactory |
1.9.0 |
PSGallery |
1.10.0 |
| Az.DesktopVirtualization |
1.0.0 |
PSGallery |
2.0.0 |
| Az.HDInsight |
3.4.0 |
PSGallery |
3.5.0 |
| Az.KeyVault |
2.0.0 |
PSGallery |
2.1.0 |
| Az.Maintenance |
1.0.0 |
PSGallery |
1.1.0 |
| Az.Monitor |
2.0.2 |
PSGallery |
2.1.0 |
| Az.RecoveryServices |
2.11.1 |
PSGallery |
2.12.0 |
| Az.Resources |
2.4.0 |
PSGallery |
2.5.0 |
| Az.Storage |
2.4.0 |
PSGallery |
2.5.0 |
3.2 Perform a replacement Update
- Update-AzModule [-Name Compute,Storage,Network] [-RemovePrevious]
After viewing the report, you would like to perform the update. If you only want to update some of the modules, you can provide a list of module names with “-Name”. If you want to update all the modules that have newer versions, you can run “Update-AzModule”. If you want to replace the currently installed version with the latest version, specify “-RemovePrevious”.
Note that “Update-AzModule” only updates the modules currently installed. If you provide the name of a module not on your local machine, the cmdlet does nothing. Note: This cmdlet cannot be used to update preview modules. If, for example, Az.Storage releases a preview version newer than the existing general release version, run “Install-AzModule –Name Storage -Repository PSGallery –AllowPrerelease” to install the latest preview.
IV. Limitation and Future Work
PowerShell Core can import modules from the Windows PowerShell path, however, it has no rights to write to that path. This causes a conflict when you are trying to install a module with a version existing in the Windows PowerShell path. Therefore, Az.Tools.Installer warns you of the installation of Azure PowerShell in the Windows PowerShell path when you use it in PowerShell Core. One solution is to grant PowerShell Core administrator rights and another way is only to use Azure PowerShell either in Windows PowerShell or PowerShell Core. Further, PowerShell Core is recommended.
Another obvious issue of Az.Tools.Installer is the performance. As it accesses the remote repository frequently to fetch the information and install the modules, you experience a delay for several minutes while the cmdlet runs. We are going to optimize it in a future release.
Your feedback on Az.Tools.Installer is important to us. If you have any questions or suggestions, feel free to reach out to us on GitHub.

Recent Comments