Introduction to Az.Tool.Installer
This article is contributed. See the original author and article here.
I. Background
Azure PowerShell is a faster iterative product. We expect our customers to update their locally installed versions constantly to stay up to date. The most common way to update it is to use PowerShellGet, a tool built-in to PowerShell for module management.
Usually, you run “Install-Module -Name Az” to install the latest versions of Azure PowerShell modules. When you run “Install-Module -Name $moduleName” to install a specific Az module, you’ll find both the target module and Az.Accounts are installed.

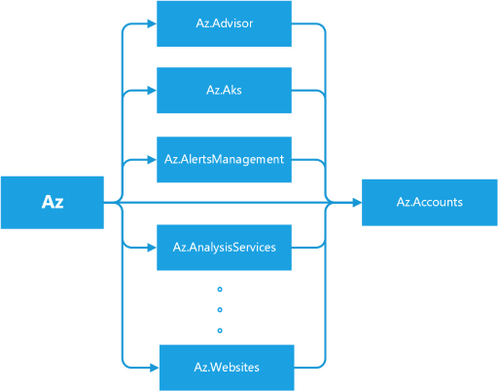
Figure –1 Dependencies among Az Modules
From the behaviors, you will find Az is a bundle of several modules, which depends on all sub-modules of Az rather than a simple single module. When running Install-Module, PowerShellGet fetches Az’s dependencies from the PowerShell gallery and installs the module itself with all the modules it depends on. Meanwhile, each sub-module of Az, for example, Az.Compute, also depends on Az.Accounts. That’s why Az.Accounts is always installed regardless of what Azure PowerShell module is installed. Figure 1, as shown above, illustrates the relationship between the Azure PowerShell modules.
II. Problems
1. Uninstaller’s Negligence
You might expect uninstallation to be a reverse process of installation. Unfortunately, it is not. “Uninstall-Module -Name Az” only removes the Az module without removing the sub-modules. A similar installation and uninstallation process happens to AzureRM. That’s why many people who are migrating from AzureRM to Az have difficulty removing the AzureRM modules.
The package’s dependency information is stored in the original NuGet package but discarded when unpacking the package downloaded during the installation process. When uninstalling the Az module, PowerShellGet doesn’t know the relationship between Az and its sub-modules. Therefore, it only uninstalls the Az module and not the sub-modules.
2. Forgotten Preview Modules
Azure PowerShell often adds new modules. When a new module first onboards, it is in preview mode. This allows for breaking changes in the subsequent versions. At this stage, its version starts with zero, such as 0.1.0. We have released 104 Az sub-modules, 45 of them are in preview mode. When a module goes stable, we upgrade its version to start with a non-zero value, such as 1.0.0, which means it is a general release. After generally released, a module can still release preview versions to include new unstable features. Almost every module contains a preview version before or now. For convenience, we refer to both as being in preview mode and the modules’ preview versions as preview modules.
Most users are unaware of preview modules because they are released independently, not part of the Az module bundle. Sometimes it is difficult to find preview modules, especially the modules without general release versions unless you know their exact names. Since they are not in the Az module bundle, you can only install them individually.
3. Risky Update
If you have several scripts based on Az modules, you need to check whether the upcoming update contains a breaking change (the upgrade of the major version number). “Update-Module” helps you to do the update, but it does everything silently. You must perform the verification manually before running it.
III. Our solution: Az.Tool.Installer
To solve the problems mentioned above, we are launching a new tool, Az.Tool.Installer. It’s based on PowerShellGet and solves the issues we’ve found with it. The first version has three cmdlets which cover installation, uninstallation, and updating.
Compared to PowerShellGet, Az.Tool.Installer perceives the relationship between Az and sub-modules and can manipulate them as a bundle. It collects the information via “Find-Module” from PowerShellGet, which returns the dependency relationship between modules. We also use the cmdlet to retrieve the preview modules.
As Az.Tool.Installer performs the search before the writing operation which causes its cmdlets to take more time to run than similar ones in PowerShellGet. A local cache might shorten the running time though. However, we’re not currently using local caching because it’s easily invalidated since Azure PowerShell changes rapidly.
1. Install-AzModule
Table-1 The Syntax of Install-AzModule
| Install-AzModule [-MaximumVersion <String>] [-MinimumVersion <String>] [-RequiredVersion <String>] -Repository <String> [-RemovePrevious] [-RemoveAzureRm] [-Force] [-Name <String[]>] [-SkipPublisherCheck] [-WhatIf] [-Confirm] [<CommonParameters>] |
| Install-AzModule -Repository <String> [-RemovePrevious] [-RemoveAzureRm] [-Force] -AllowPrerelease [-Name <String[]>] [-SkipPublisherCheck] [-WhatIf] [-Confirm] [<CommonParameters>] |
1.1 Clear the Environment and Install Az with the Specific Version
- Install-AzModule -RequiredVersion 4.5.0 -Repository PSGallery –RemovePrevious – RemoveAzureRm [-Name Storage,Network]
You can uninstall everything related to Azure PowerShell and AzureRM on your local machine and install all the modules from a target Az release easily with Install-AzModule. If “-RemovePrevious” is present, the cmdlet removes all the modules that the previous version installed. If “-RemoveAzureRm”, it removes all the modules from AzureRM.
You can install modules with the Az release version by specifying “-RequiredVersion” or with module names by specifying “-Name”.
Note: Install-AzModule only installs Az sub-modules without the Az module itself.
Please don’t add the “Az.” prefix when specifying the module name. The cmdlets in Az.Tool.Installer add this prefix automatically.
1.2 Install All Az Modules in both General and Preview Release
- Install-AzModule -Repository PSGallery –AllowPrerelease [-Name Storage,Network]
This cmdlet also provides an easy way to install preview modules with the parameter “-AllowPrerelease”. When this parameter is present, the cmdlet installs all the Az modules with the latest versions whether they are in general release or preview without parameter “-Name”. It tries to retrieve all the Az modules in the target repository before the installation and consequently takes more time to run.
The “-Name” parameter allows you to limit the installation of preview modules to only the ones specified.
Note: The preview version of Az.Accounts is not going to be installed because it contains breaking changes which break other modules.
2. Uninstall-AzModule
Table-2 The Syntax of Uninstall-AzModule
| Uninstall-AzModule [-RemoveAzureRm] [-Force] [-Name <String[]>] [-WhatIf] [-Confirm] [<CommonParameters>] |
| Uninstall-AzModule [-MaximumVersion <String>] [-MinimumVersion <String>] [-RequiredVersion <String>] [-RemoveAzureRm] [-Force] [-Name <String[]>] -Repository <String> [-WhatIf] [-Confirm] [<CommonParameters>] |
| Uninstall-AzModule [-RemoveAzureRm] [-Force] -AllowPrerelease [-Name <String[]>] – AllVersion [-WhatIf] [-Confirm] [<CommonParameters>] |
| Uninstall-AzModule [-RemoveAzureRm] [-Force] -AllowPrerelease [-Name <String[]>] [-WhatIf] [-Confirm] [<CommonParameters>] |
| Uninstall-AzModule [-RemoveAzureRm] [-Force] [-Name <String[]>] -AllVersion -Repository <String> [-WhatIf] [-Confirm] [<CommonParameters>] |
2.1 Uninstall the Modules Attached to a Specific Az
- Uninstall-AzModule -Repository PSGallery [-RequiredVersion 4.6.1] [-Name Storage,Network]
As an enhancement of Uninstall-Module, Uninstall-AzModule helps to uninstall the numerous modules related to Az. Firstly, you can uninstall the modules attached to a release version of Az using “-RequiredVersion” or “-MinimumVersion” or “-MaximumVersion”. If any of these are specified, by default the cmdlet removes all the modules attached to the Az version that fills the condition. If “-Name” is specified, the cmdlet removes the modules attached to the Az version for the specified name or list of names. If no version condition is provided explicitly, the latest Az version in the repository provided (PSGallery in the example above) is used.
2.2 Uninstall all the Az Modules Installed
- Uninstall-AzModule -Repository PSGallery –AllVersion [-Name Storage,Network]
To remove all the Az modules on your local machine, you can specify “-AllVersion”. You can provide a list of modules with “-Name” to remove all the versions of the specified modules.
2.3 Uninstall Preview Modules
- Uninstall-AzModule -AllowPrerelease [-Name Storage,MySql] [-AllVersion]
The cmdlet also enables you to remove preview modules in three different ways. By default, when “-AllowPrerelease” is specified, it removes all the modules’ latest version whether they’re in general release or preview. By using “-Name”, you can limit the uninstallation to the specified modules. Further, -AllVersion removes all versions of the modules related to Az.
Note the difference between “Uninstall-AzModule -AllowPrerelease –AllVersion” and “Uninstall-AzModule –AllVersion”. The later only removes the modules in general release. If you want to clean up your environment thoroughly, you can run “Uninstall-AzModule -RemoveAzureRm -AllowPrerelease –AllVersion”.
3. Update-AzModule
Table-3 The Syntax of Update-AzModule
| Update-AzModule [-Name <String[]>] [-RemovePrevious] [-Force] [-WhatIf] [-Confirm] [<CommonParameters>] |
3.1 Generate a Report on What to Update
- Update-AzModule -WhatIf [-Name Accounts,Storage, Network]
The advance of “Update-AzModule” compared to “Update-Module” is to provide you with a table of what modules to update and how to update them. “-WhatIf” prevents the cmdlet from performing the operation on the modules. It can be used to generate a report of what would happen without performing the operation. With “-Name”, you can check only the modules you are interested in. This also makes it complete faster. Table 1 shows an example of the “To-Update” report.
Table-4 The Report of Modules Can be Updated
|
Name —- |
InstalledVersion —————- |
Repository ———- |
VersionToUpgrade —————- |
| Az.Accounts | 1.9.2 | PSGallery | 1.9.3 |
| Az.Automation | 1.3.7 | PSGallery | 1.4.0 |
| Az.Compute | 4.2.1 | PSGallery | 4.3.1 |
| Az.DataFactory | 1.9.0 | PSGallery | 1.10.0 |
| Az.DesktopVirtualization | 1.0.0 | PSGallery | 2.0.0 |
| Az.HDInsight | 3.4.0 | PSGallery | 3.5.0 |
| Az.KeyVault | 2.0.0 | PSGallery | 2.1.0 |
| Az.Maintenance | 1.0.0 | PSGallery | 1.1.0 |
| Az.Monitor | 2.0.2 | PSGallery | 2.1.0 |
| Az.RecoveryServices | 2.11.1 | PSGallery | 2.12.0 |
| Az.Resources | 2.4.0 | PSGallery | 2.5.0 |
| Az.Storage | 2.4.0 | PSGallery | 2.5.0 |
3.2 Perform a replacement Update
- Update-AzModule [-Name Compute,Storage,Network] [-RemovePrevious]
After viewing the report, you would like to perform the update. If you only want to update some of the modules, you can provide a list of module names with “-Name”. If you want to update all the modules that have newer versions, you can run “Update-AzModule”. If you want to replace the currently installed version with the latest version, specify “-RemovePrevious”.
Note that “Update-AzModule” only updates the modules currently installed. If you provide the name of a module not on your local machine, the cmdlet does nothing. Note: This cmdlet cannot be used to update preview modules. If, for example, Az.Storage releases a preview version newer than the existing general release version, run “Install-AzModule –Name Storage -Repository PSGallery –AllowPrerelease” to install the latest preview.
IV. Limitation and Future Work
PowerShell Core can import modules from the Windows PowerShell path, however, it has no rights to write to that path. This causes a conflict when you are trying to install a module with a version existing in the Windows PowerShell path. Therefore, Az.Tool.Installer warns you of the installation of Azure PowerShell in the Windows PowerShell path when you use it in PowerShell Core. One solution is to grant PowerShell Core administrator rights and another way is only to use Azure PowerShell either in Windows PowerShell or PowerShell Core. Further, PowerShell Core is recommended.
Another obvious issue of Az.Tool.Installer is the performance. As it accesses the remote repository frequently to fetch the information and install the modules, you experience a delay for several minutes while the cmdlet runs. We are going to optimize it in a future release.
Your feedback on Az.Tool.Installer is important to us. If you have any questions or suggestions, feel free to reach out to us on GitHub.


Recent Comments