by Scott Muniz | Sep 21, 2020 | Uncategorized
This article is contributed. See the original author and article here.
Overview
Microsoft BizTalk Server is a rich and robust integration platform and is nearing its twentieth birthday(!). Hundreds, if not thousands, of customers have made significant investments over the years developing their integration solutions on BizTalk Server. As they move workloads to Azure to either run both in conjunction with BizTalk Server and within Azure natively, they would like to be able to leverage those investments with minimal refactoring.
Azure Logic Apps is an integration cloud service which allows users to schedule, automate, and orchestrate tasks, business processes, and workflows. Logic Apps functionality both overlaps and complements functionality in BizTalk, but quite helpfully, it also allows for the reuse of existing BizTalk artifacts, such as schemas and maps.
BizTalk maps transform messages between different schemas, and use a number of tools within the map to manipulate data during the transformation. The maps can also utilize external .NET assemblies for these transformations, but because of how BizTalk references these assemblies natively, the maps need some changes in order to be able to reference those assemblies when run in Logic Apps. This article shows how to edit a map created in BizTalk to utilize external assemblies when run in Logic Apps.
Scenario
For the purpose of this blog, we will setup a small solution consisting of two schemas, a BizTalk map, as well as an external .NET assembly. The full solution of BizTalk artifacts and sample files is available here.
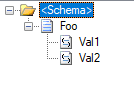
In this scenario, we have two sample schemas: Foo, representing our source schema, and Bar, representing the target.


We also have a .NET Framework class library, called MapperAssemblies, which contains a small class with two trivial methods: AddTodayToValue, which will simply append today’s day of the week value to the input value, and ConcatValues, which concatenates the input values.
using System;

namespace MapperAssemblies
{
    public class TransformValues
    {
        public string AddTodayToValue(string input)
        {
            return $"{input} today is {DateTime.Now.DayOfWeek.ToString()}";
        }
        public string ConcatValues(string val1, string val2)
        {
            return string.Concat(val1, val2);
        }
    }
}
As per most libraries used in BizTalk, this assembly has been signed and added to the global assembly cache (GAC).
Finally, we have the map: This map performs a simple transform of the incoming two values from Foo to the three values in Bar.

Each of the three functoids pictured is referencing the sample assembly code, for exmple:

Testing the map with the following sample input
<ns0:Foo xmlns:ns0="http://MapWithAssmeblyReference.FooSchema">
  <Val1>Value 1</Val1>
  <Val2>Value 2</Val2>
</ns0:Foo>
Will yield the following output
<ns0:Bar xmlns:ns0="http://MapWithAssmeblyReference.BarSchema">
    <Val1>Value 1 today is Monday</Val1>
    <Val2>Value 2 today is Monday</Val2>
    <Val1Val2>Value 1Value 2</Val1Val2>
</ns0:Bar>
Adding the artifacts to Logic Apps
In order to utilize the BizTalk artifacts in Logic Apps, the artifacts must be stored to an Integration Account in Azure. Integration Accounts are a companion resource to Logic Apps in Azure, and can be used as a container to store integration artifacts such as maps, schemas and assemblies, as well as certificates and trading partner agreements.
Create the Integration Account
- Information on creating an Integration Account is documented here. For the purpose of this sample, the free tier for the Integration Account is adequate.
Adding Schemas
For both the Foo and Bar schemas, perform the following steps:
- Open the Integration Account
- Click on Schemas under Settings
- Click on + Add
- Select “Small File” and click the file icon and navigate to the XSD in your BizTalk solution. The schema name will auto-populate.
- Click “OK” to add the schema
Adding the map
This step is not quite as intuitive as adding the schemas because BizTalk maps files (btm) are not natively supported by Logic Apps. However, as BizTalk files compile to XSLT, the output XSLT can be loaded to the Integration Account.
- Open Visual Studio and open your BizTalk map file.
- Right-click the BizTalk map file in Solution Explorer, and select “Validate Map”
- In the Output window for BizTalk output, there will be a link to the output XSLT. Copy this file location.
- In the Azure portal, open the Integration Account
- Click on Maps under Settings
- Click on + Add
- Leave the Map Type as XSLT
- Click the file icon and navigate to the XSLT path from the “Validate Map” step about. The map name will auto-populate.
- Click “OK” to add the map
Adding the Assembly
- In the Azure portal, open the Integration Account
- Click on Assemblies under Settings
- Click on + Add
- Click the file icon and navigate to the DLL for your assembly. The assembly name will auto-populate.
- Note: For DLLs larger than 2 MB, select the “Large File” option. This will require you to first upload your DLL to Azure Storage and provide the URI to the file.
- Click “OK” to add the assembly
Adding the Logic App
While there are many ways to trigger and test the logic app, in this scenario we will create a simple Logic App with an HTTP Trigger and use Postman to test the Logic App.
Create the Logic App
- In the Azure portal, click “+ Create a resource” and enter Logic App into the search. Select “Logic App” and follow the wizard to create a new Logic App.
- Navigate to the newly created Logic App and select Workflow settings under Settings
- Under “Integration account” select the integration account created in the initial step. Click Save to save the changes.
- Click Logic app designer under Development Tools
- This test will create a simple Logic App with four (4) steps:
- Set the initial trigger to “HTTP request”. Do not change any settings on this step.
- Add a XML Validation step to the Logic App after the HTTP request trigger. The Content will be the value of the Body from the HTTP request. Add the “Foo schema for the schema name.
- Add a Transform XML step to the Logic App after the XML Validation step. The Content will be the value of the Body from the HTTP request and the map will be the Foo-2-Bar map imported to the Integration Account.
- Add a Response step to the Logic App after the Transform XML step. The body will be the Transformed XML from the Transform step.
- Save the Logic App

Testing the Logic App
This scenario will use Postman to test the Logic App, but any equivalent tool can be used.
- After saving the Logic App, the HTTP POST URL will be displayed. Copy this URL to Postman and set the request type to “POST”
- In the request body, use the sample used previously to test the map
<ns0:Foo xmlns:ns0="http://MapWithAssmeblyReference.FooSchema">
  <Val1>Value 1</Val1>
  <Val2>Value 2</Val2>
</ns0:Foo>
- Click “Send” to submit the POST to Logic Apps.
- In the Azure portal, click the “Overview” link and view the Runs history.
Looking at the “Runs” history will display an error in the Transform XML step. The specific error will be similar to the following:
“Code”: “Invalid XsltContent”,
“Message”: “An error occured while processing map. ‘Cannot find a script or an extension object associated with namespace ‘http://schemas.microsoft.com/BizTalk/2003/ScriptNS0‘.'”

Understanding the error
Looking inside the XSLT generated by the BizTalk map will show us the source of the error. When BizTalk generates the XSLT, it leaves a namespace reference to the assembly (ScriptNS0), but does not explicitly reference the assembly, which causes Logic Apps to throw the error as it does not know which assembly to associate with this.
<?xml version="1.0" encoding="UTF-16"?>
<xsl:stylesheet xmlns:xsl="http://www.w3.org/1999/XSL/Transform" xmlns:msxsl="urn:schemas-microsoft-com:xslt" xmlns:var="http://schemas.microsoft.com/BizTalk/2003/var" exclude-result-prefixes="msxsl var s0 ScriptNS0" version="1.0" xmlns:ns0="http://MapWithAssmeblyReference.BarSchema" xmlns:s0="http://MapWithAssmeblyReference.FooSchema" xmlns:ScriptNS0="http://schemas.microsoft.com/BizTalk/2003/ScriptNS0">
  <xsl:output omit-xml-declaration="yes" method="xml" version="1.0" />
  <xsl:template match="/">
    <xsl:apply-templates select="/s0:Foo" />
  </xsl:template>
  <xsl:template match="/s0:Foo">
    <xsl:variable name="var:v3" select="string(Val1/text())" />
    <xsl:variable name="var:v4" select="string(Val2/text())" />
    <ns0:Bar>
      <xsl:variable name="var:v1" select="ScriptNS0:AddTodayToValue(string(Val1/text()))" />
      <Val1>
        <xsl:value-of select="$var:v1" />
      </Val1>
      <xsl:variable name="var:v2" select="ScriptNS0:AddTodayToValue(string(Val2/text()))" />
      <Val2>
        <xsl:value-of select="$var:v2" />
      </Val2>
      <xsl:variable name="var:v5" select="ScriptNS0:ConcatValues($var:v3 , $var:v4)" />
      <Val1Val2>
        <xsl:value-of select="$var:v5" />
      </Val1Val2>
    </ns0:Bar>
  </xsl:template>
</xsl:stylesheet>
Fixing the error
In order to tell Logic Apps how to associate this reference with the uploaded assembly, we need to tweak the XSLT. To do this we will need to know the assembly details, the name of the namespace for the helper class, as well as the class name and method signatures of all referenced methods.
As shown in the sample below, we will add an msxsl:script element to the generated XSL which will help Logic Apps associate the script with the assembly. The key parts to the element are:
- The implements-prefix attribute indicates which xmlns to associate (e.g. ScriptNS0).
- The msxsl:assembly element gives the assembly information, including name, version, Culture and PublicKeyToken.
- msxsl:using namespace attribute indicates which namespace within the assembly is being referenced.
- One CDATA block for each method being referenced in the mapper.
For this example, the modified XSLT will look like this (note the msxsl:script element):
<?xml version="1.0" encoding="UTF-16"?>
<xsl:stylesheet xmlns:xsl="http://www.w3.org/1999/XSL/Transform" xmlns:msxsl="urn:schemas-microsoft-com:xslt" xmlns:var="http://schemas.microsoft.com/BizTalk/2003/var" exclude-result-prefixes="msxsl var s0 ScriptNS0" version="1.0" xmlns:ns0="http://MapWithAssmeblyReference.BarSchema" xmlns:s0="http://MapWithAssmeblyReference.FooSchema" xmlns:ScriptNS0="http://schemas.microsoft.com/BizTalk/2003/ScriptNS0">
	<msxsl:script language="C#" implements-prefix="ScriptNS0">
		<msxsl:assembly name="MapperAssemblies, Version=1.0.0.0, Culture=neutral, PublicKeyToken=c62342917314647d" />
		<msxsl:using namespace="MapperAssemblies" />
		<![CDATA[public string AddTodayToValue(string input){ TransformValues helper = new TransformValues(); return helper.AddTodayToValue(input); }]]>
		<![CDATA[public string ConcatValues(string val1, string val2){ TransformValues helper = new TransformValues(); return helper.ConcatValues(val1, val2); }]]>
	</msxsl:script>
	<xsl:output omit-xml-declaration="yes" method="xml" version="1.0" />
  <xsl:template match="/">
    <xsl:apply-templates select="/s0:Foo" />
  </xsl:template>
  <xsl:template match="/s0:Foo">
    <xsl:variable name="var:v3" select="string(Val1/text())" />
    <xsl:variable name="var:v4" select="string(Val2/text())" />
    <ns0:Bar>
      <xsl:variable name="var:v1" select="ScriptNS0:AddTodayToValue(string(Val1/text()))" />
      <Val1>
        <xsl:value-of select="$var:v1" />
      </Val1>
      <xsl:variable name="var:v2" select="ScriptNS0:AddTodayToValue(string(Val2/text()))" />
      <Val2>
        <xsl:value-of select="$var:v2" />
      </Val2>
      <xsl:variable name="var:v5" select="ScriptNS0:ConcatValues($var:v3 , $var:v4)" />
      <Val1Val2>
        <xsl:value-of select="$var:v5" />
      </Val1Val2>
    </ns0:Bar>
  </xsl:template>
</xsl:stylesheet>
Retesting the Logic App
After modifying the XSLT, we need to re-upload the modified file to the Integration Account.
- Open the Integration Account in the Azure portal
- Select “Maps” under Settings
- Click on the map previously uploaded
- Click the “Update” button and select the new XSLT file
Re-run the test in Postman. The Runs history in the Logic App should indicate a successful run, and there should be a response body in Postman with the values which are generated in the C# assembly.
Summary
In this scenario, we looked at how to modify the XSLT generated by the BizTalk mapper to correctly reference an external assembly when the map is run in Logic Apps.
by Scott Muniz | Sep 21, 2020 | Azure, Technology, Uncategorized
This article is contributed. See the original author and article here.
Over the course of the last couple weeks, I have been asked many questions about how the different RBAC roles in Azure Security Center and how they should be assigned. In this blog post, I will discuss how to assign the roles used across Azure Security Center and the types of scenarios that determine how they could be assigned.
Assigning permissions to users for specific workloads
To assign permissions for Azure workloads:
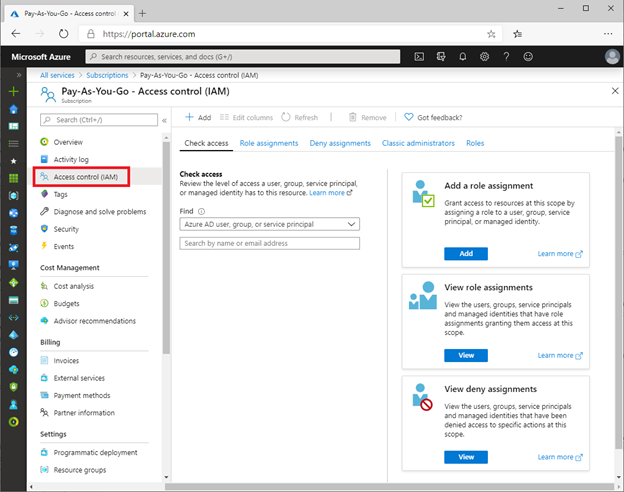
- Log into the Azure portal > type “Subscriptions” in the search bar > select your subscription > then look for Access Control (IAM).

- Once in Access Control (IAM) you will need to add a role assignment, click on “Role assignment”> Add role assignment. The role assignment pane will open and you will select the role assignment to be granted to user.

To perform remediation of recommendations, users will need the appropriate permissions and access to those workloads. For example, to remediate recommendations related to virtual machines, the user will need the Security Admin or Contributor on resource group level for people that should manage resources. This role allows users with that role assignment to view Virtual machines in the portal to make changes.
Assigning permissions for using Logic Apps/Workflow Automation
One thing that might be confusing in terms of permissions are Logic Apps, which are used in the Workflow Automation part of Azure Security Center. These Logic Apps can be automatically triggered once a new alert or recommendation appears. You cannot use any type of Logic App for Workflow Automation, but only those with a Security Center Alerts API Connector or a Security Center Recommendations API Connector. So, if you want to configure workflow automation, you must create a Logic App which then can be triggered.
The LogicApp itself uses a Managed Identity which can be granted access to resources, if necessary. For example, when your Logic App is supposed to get information about all resources in a subscription from Azure Resource Graph or the Azure Security Center Assessments API once a new recommendation pops up, the Managed Identity would need to be assigned the Reader or Security Reader role on the subscription.
The person who creates a new workflow automation does not necessarily have access to all the resources the Logic App will access, because the automation artifact itself has its own permissions. But what level of access is needed to create a workflow automation?
Your user account needs to have the right to create a new workflow automation in a particular resource group and at the same time, to trigger the Logic App you want to use in your workflow automation. So, it’s not enough to only see the Logic App so you can use it, and it is also not enough to only be able to manage Azure Security Center. You will have to make sure that your account will get at least the following permissions:
- Logic App Contributor on the Logic App’s scope, so you can trigger it
- Microsoft.Security/automations/write on the resource group you want to create the workflow automation in. This level of access is included in the Security Admin and the Contributor roles.
It is important to understand, that the Security Admin role alone does not allow you to see or manage resources, but only security-related information and settings.
Permissions for Quick Fixes
Quick Fix Remediation enables you to quickly remediate a recommendation directly in the console and improve your secure score quickly. Quick Fixes, use a template deployment or REST PATCH or PUT API call to configure the resource. To view the list of recommendations with Quick Fixes, you can click here.

Users that will be using the “Quick Fix” feature in Azure Security Center may require additional permissions depending on the logic/action the in the specific recommendation.
The screenshot below shows the result of the Diagnostic logs in Logic Apps should be enabled recommendation for a test user which I’ve granted three different sets of access rights on three different resource groups in a test subscription.

With the Security Reader role, the user will see the assessment result for a particular recommendation, but in order to be able to remediate it, the account would need either the Security Administrator, or Contributor roles assigned.
If we take a deeper look at the Security Admin role, we realize that this role does not allow an account to directly access resources, such as storage accounts, VMs, virtual networks, but it will give your account the right to create resource deployments and configure everything which is related to security.

As you learned above, the quick fix option in Azure Security Center leverages a REST PATCH or PUT API call which is what is incorporated in the Microsoft.Resources/deployments/* set of access rights. So, in case you want to build a custom role in addition to Security Reader (which will enable you to only see, but not change security configurations), you need to make sure to include the deployments rights as sketched above.
Depending on the scope you grant access rights on, the Secure Score within one subscription might change between user accounts. So, for example, if you have one subscription with several resource groups, and you assign one account the Security Admin role on subscription level, and a second account the Security Reader role on two of these resource groups, the second account might see a higher Secure Score, than the overall Secure Score the first account might see for the subscription. This is because the Secure Score calculation takes place on the scope of resources you can see related information for. The owner of the second account, who only sees Security Recommendations and Alerts for a subset of resources, might think that the overall Secure Score is a lot higher than what is true for the subscription. We will cover that topic with more details in an upcoming blog post.
Common ASC scoping Scenarios – and the why
Azure Security Center is a tool that can give you tenant-wide visibility into your security posture depending on the level and scope of access rights your user account has in your Azure environment. For example, if your account has a role assignment for the Security Reader role on your Tenant Root Group (the upmost Management Group in every Azure Tenant), you will , existing, and future ones, within your company’s environment, r. If your account has been assigned the Contributor role on a single Resource Group in one of your subscriptions only, ASC will exclusively provide you with information about resources within this scope.
For the purpose of this post, we will focus on the three most common scenarios:
- Security is owned (and enforced) by a central team
- Security is owned by resource owners
- A mix of both
In the first scenario, a central team is responsible for enforcing security over all subscriptions. It is common practice to assign this team the Security Administrator and Contributor roles on a central scope, such as the Tenant Root Management Group, so they can:
- Enforce security policies across all subscriptions
- Remediate security controls and recommendations for all resources in the environment
- Enforce resource eviction (quarantine) in case a security threat or configuration issue is found
This is a scenario which will give the security team a lot of power and responsibility, which is good from a process point of view, but what also might lead to bad situations in terms of service availability. Therefore, this approach should be chosen for companies only that have a very high level of automation so it can be made sure that security won’t break their business.
In the second scenario, there is no central IT security team, or at least, the team does not own security for the company’s Azure subscriptions, which makes the resource owners responsible for security. In this scenario, the central team does not have access to any of the subscriptions, so subscription (or resource group) owners will have the Owner or Contributor roles assigned to their accounts on either subscription or resource group level. In this scenario, every resource owner will see security alert, controls, and recommendations for their owned resources only. However, this approach comes with at least four:
- There is no central visibility for security threats and security posture information
- Without enforcement, resource owners decide if they want to remediate security controls and recommendations, what might lead to security issues.
- Resource owners only see security controls and recommendations for their particular scope. If there is no one who owns the overall security (and gets visibility into subscription- and tenant-wide recommendations), they will never be seen and remediated.
- Security policy is assigned per subscription and can be changed and controlled by the subscription owners
This is why most of my customers chose to go with the third scenario: Resource owners will own security for their resources, but there is a central team that gets insights into the overall security posture. Role assignments for this scenario might be:
- Owner or Contributor roles for resource owners on subscription or resource group level which will enable them to see security controls and alerts for their resources and to remediate recommendations within their scope.
- Security Reader role on Management Group level for a central IT security team so they can gather insights for all subscriptions and make resource owner accountable for improving their resources’ security postures.
- Custom RBAC role(s) on Management Group level for the central team to enable them doing advanced tasks, such as create a security policy on Management Group level which can then be assigned by the resource owners only.
Let’s talk more about custom RBAC. As you learned before, you need to have the Microsoft.Resources/deployments/* access rights to remediate recommendations using the quick fix feature in ASC, which is part of both, Security Admin and Contributor roles. But in the third scenario, we might not want to give this level of access to the central team, because they only should get visibility but not remediation rights. However, imagine they should be able to create new policy definitions that can be used by resource owners to enforce different settings in their subscriptions or resource groups. For example, you want to give resource owners the option to enable the ASC Standard Pricing tier on their resource scope, only. In this case, you could create a custom RBAC role which will give the central team the right to create a new policy definition on Management Group level, but not the right to assign the definition. This RBAC role definition could be created with the following access rights:
{
“Name”: “Policy Definition Contributor”,
“Id”: null,
“IsCustom”: true,
“Description”: “Allows to create Policy Definitions”,
“Actions”: [
“Microsoft.Authorization/policyDefinitions/*”,
“Microsoft.Authorization/policySetDefinitions/*”,
“Microsoft.Management/managementGroups/read”
],
“NotActions”: [],
“AssignableScopes”: [
“/providers/microsoft.management/managementGroups/<Root Management Group ID>”
]
}
With that role assigned to the central team, they can then create one or several central deploy if not exists policies (DINE), as you can find them in the Azure Security Center GitHub repository.
You learned that not only security alerts and recommendations, but also your Secure Score itself will always depend on the set of access rights your account will have. In a future blog post, we will cover this aspect more deeply because it is mandatory to understand how the overall Secure Score might be different from a Secure Score that is true for a subset of resources, only.
Contributors:
Tom Janetscheck, Senior Program Manager
Fernanda Vela, Program Manager
Reviewers:
Yuri Diogenes, Principal Program Manager
Meital-Taran-Gutman, Principal PM Manager
Liron Kachko, Senior Software Engineer

by Scott Muniz | Sep 21, 2020 | Azure, Technology, Uncategorized
This article is contributed. See the original author and article here.

We have worked with the following partners during the preview of Azure Arc. We have trained their engineers and collaborated with them to develop unique proof of concepts. We have found that these partners demonstrate expertise with Azure Arc and are well positioned to help their customers transform their digital infrastructure leveraging Azure Arc.
Please reach out to the following partners if you need help with Azure Arc in your IT environment.

Microsoft doesn’t accept any liability on behalf of these partners.

by Scott Muniz | Sep 21, 2020 | Azure, Technology, Uncategorized
This article is contributed. See the original author and article here.
Database copy provides a way to create a transactionally consistent snapshot of the source database as a new database on the same server or different server. It also enables copy across regions, subscriptions, and Azure tenants using the same or different service level objective.
On Azure SQL Hyperscale the time taken by database copy depends on the source and destination chosen for the copy
- If the destination is the same region as the source, then the copy is created from snapshots of blobs created by database backups. This kind of copy is a fast operation regardless of database size.
- If the destination region for the copy is different from the source region, the copy is a size of data operation. Page server blobs are copied in parallel, so the copy time is not directly proportional to the size of data, yet it is a potentially long running size of data operation.
Below are some sample durations for database copy in Hyperscale:
|
Database size
|
Source region
|
Destination region
|
Elapsed time (mins)
|
|
1TB
|
West US 2
|
Central US
|
12
|
|
1 TB
|
West US 2
|
West US 2
|
180
|
|
7.2TB
|
West US 2
|
Central US
|
269
|
|
7.2TB
|
West US 2
|
West US 2
|
13
|
Creating a Database Copy
Database copy can be created started with PowerShell, Azure CLI, REST API, or T-SQL. Cross subscription and cross tenant copy is only supported using T-SQL. If you do not specify a service objective for the target database, the default service objective and configurations are used, which is HS_Gen5_2 with 1 additional replica which can be used for reads.
Azure CLI
az sql db copy --resource-group "sourceRG" --server sourceServer --name "sourceDB" --dest-resource-group destDB --dest-server destServer --dest-name destDB --service-objective HS_Gen5_2 --read-replicas 0
PowerShell
New-AzSqlDatabaseCopy -ResourceGroupName "sourceRG" -ServerName sourceServer  `-DatabaseName "sourceDB" `
-CopyResourceGroupName "destinationRG" -CopyServerName destServer -CopyDatabaseName "destDB"
TSQL
CREATE DATABASE Database2 AS COPY OF SourceServer.Database1;
Portal
Another way to copy the database is via the Azure portal.
 Portal
Monitoring database copy:
In the master database:
select * from sys.dm_operation_status
GO
 sys.dm_operation_status
Note: the progress status values are limited to 0/50/100%.
Current preview Limitations
- sys.dm_database_copies does not currently track progress of database copy, this will be addressed before GA.
- Currently portal target database allows choice of elastic pool but the copy will fail as Hyperscale does not support Elastic pools
by Scott Muniz | Sep 21, 2020 | Azure, Technology, Uncategorized
This article is contributed. See the original author and article here.
Search for training on Windows Server and you’re likely to find that the top results are about Windows Server virtual machines on Azure. But we also know that many organizations run Windows Server on-premises: in a server room in their own building or in a separate data center.
Some of our most popular sessions that our team delivered at at Microsoft Ignite the Tour 2019 were about Windows Server 2019:
Migrating to Windows Server 2019 – about upgrading services like Active Directory, DHCP, DNS and files shares to Windows Server 2019.
Top 5 (or so) Windows Server 2019 features – Windows Admin Center, Storage Migration Services, System Insights and more!
However, there’s only so much information you can fit into a conference session, even at an in-person event.
We are thrilled to tell you about three new instructor-lead courses, developed by Microsoft’s Worldwide Learning team in conjunction with our very own Windows Server expert, Orin Thomas. (He literally wrote a Microsoft Press book on it – Windows Server 2019 Inside Out).
Course WS-0011T00-A: Windows Server 2019 Administration
This 5 day instructor-lead course is designed primarily for IT professionals who have some experience with Windows Server. It is designed for professionals who will be responsible for managing identity, networking, storage and compute by using Windows Server 2019, and who need to understand the scenarios, requirements, and options that are available and applicable to Windows Server 2019.
It contains 12 modules, complete with labs:
- Windows Server Administration Overview
- Identity Services in Windows Server
- Network Infrastructure services in Windows Server
- File Servers and Storage management in Windows Server
- Hyper-V virtualization and containers in Windows Server
- High Availability in Windows Server
- Disaster recovery in Windows Server
- Windows Server security
- Remote Desktop Services in Windows Server
- Remote access and web services in Windows Server
- Monitoring, performance, and troubleshooting
- Upgrade and migration in Windows Server
Course WS-012T00-A: Windows Server 2019 Hybrid and Azure IaaS
This 3 day course is intended primarily for IT Professionals who have experience with managing an on-premises Windows Server environment. Its purpose is to prepare professionals for planning, implementing, and managing environments that include Azure IaaS-hosted Windows Server-based workloads. The course covers how to leverage the hybrid capabilities of Azure, how to migrate virtual and physical server workloads to Azure IaaS, and how to manage and secure Azure VMs running Windows Server 2019.
It contains 8 modules, complete with labs:
- Introducing Azure Hybrid IaaS with Windows Server 2019
- Implementing identity in hybrid scenarios
- Facilitating hybrid management and operational monitoring in hybrid scenarios
- Implementing security solutions in hybrid scenarios
- Implementing file services in hybrid scenarios
- Deploying and configuring Azure VMs
- Managing and maintaining Azure VMs
- Planning and implementing migration and recovery services in hybrid scenarios
Course WS-013T00-A: Azure Stack HCI
This 3 day course is intended primarily for IT Professionals who already have significant experience with managing an on-premises Windows Server environment. Its purpose is to cover advanced topics related to Windows Server software-defined datacenter, Azure Stack HCI, and other Azure Stack products. The course also describes the use of existing Microsoft System Center products to implement and manage software-defined datacenters with Windows Server 2019. This course is advanced and is designed for people that want to run their virtual workloads on Windows Server 2019 at medium-to-large scale using software-defined datacenter and hyper-converged principles.
It contains 4 modules, complete with labs:
- Introducing Azure Stack HCI
- Operating and maintaining Azure Stack HCI
- Planning for and implementing Azure Stack HCI storage
- Planning for and implementing Azure Stack HCI networking
Click on the title of each course to learn more, and click the Find a learning partner button on each page, to see course delivery options in your local area.
Learn more

Recent Comments