by Contributed | Nov 26, 2020 | Technology
This article is contributed. See the original author and article here.
With a diminishing boundary between work and life, it becomes more important to keep a track of things to do! Microsoft To Do helps you in managing all your work and personal tasks in one place, while ensuring proper syncing across all devices in an intelligent way.
As a part of our “six tips on To Do” series, in this article, we will focus on the exclusive To Do features available on Android. For six tips on To Do Windows click here.
Happy reading!
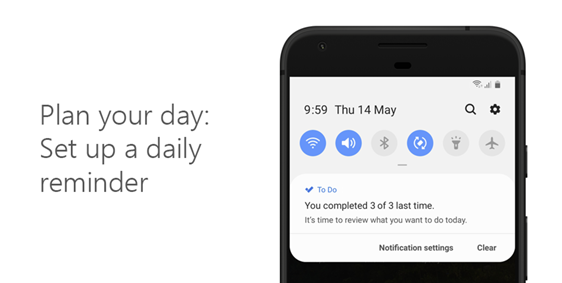
1. Reminders to plan your day
Forgot to set up My Day this morning? On Android, you can set a daily reminder to keep on top of your tasks. Find it in your settings!
2. Drag and drop between apps on Android
Quickly add a note or step in Android by dragging and dropping between any app and To Do in split screen view.

3. Home screen shortcut
Have a list you like to look at frequently? Add a shortcut to your home screen on Android to access it quickly.

4. To Do widget on Android
To Do widget is available on Android! By using the To Do widget on your Android device you can quickly add and complete tasks without opening the app.

5. Swipe it!
Another quick action for you: just swipe left on any task to delete it, or swipe right to move it or add it to My Day.

6. Quick add:
Exclusively available for Android To Do users, this persistent notification in your Android notifications area helps you add a task in To Do with just one tap. You can enable it from the notification setting area.

We hope that you enjoyed this article! let us know your feedback in the comments below or over on Twitter and Facebook. You can also write to us at todofeedback@microsoft.com.
by Contributed | Nov 26, 2020 | Technology
This article is contributed. See the original author and article here.
Now Git is something I never thought I’d have to learn, a few years ago if you’d suggest I learn Git I would have laughed and said I wasn’t a developer, however I probably use Git at least once a week now.
Last year I called out how you can get started with Git, so if it’s still something you aren’t sure about go check out that article.
There is one thing I still kinda of struggle with within Git, and that’s branches. I am that person that’s guilty of committing directly to the main branch of whatever repository I am working on. Which has got me in trouble a few times with some things.
What is a Git Branch?
The best way I can think of to describe Git Branches is it’s a way of tracking your changes while you make modifications or add features to the main project. It’s kind of a kin to printing out a document, making some changes with old fashion pen and paper and then getting approval from a peer before changing the main document.
A branch gives you a chance to play with changes, new features without breaking or “messing” with the main source of code or documentation.
How to work with a branch?
So, let’s see branches in action, let’s look at GitHub and Git and working with branches.
I’m taking a generic, test GitHub repository that I have for testing features and trying things out on. It’s here https://github.com/weeyin83/Test, at the moment it only has one branch the main one, where everything is stored.
The first thing I am going to do is clone a copy of this repository to my local computer
git clone https://github.com/weeyin83/Test.git
I now have a copy to work with on my laptop.
I want to restructure the files and folders within this repository, so let’s create a new branch where I can do that with. So within my Git Bash command interface I say
git branch restructure
With restructure being the name of the branch, I want to create, you can specify anything you want here. To start working in this new branch I need to issue the command:
git checkout restructure
I’m now no longer in the main branch so can make my changes. If I’m ever unsure of what branch I am working in I can run the command
git symbolic-ref –short HEAD or git branch and it will show me which branch I am working in.
Once all my changes have been made and I am happy I can then issue the following commands
git add .
git commit -m “folder restructure changes”
git push –set-upstream origin restructure
These three command add changes in the working directory (branch) to a staged area, commits the new changes to that branch and then pushes them up to my GitHub repository.
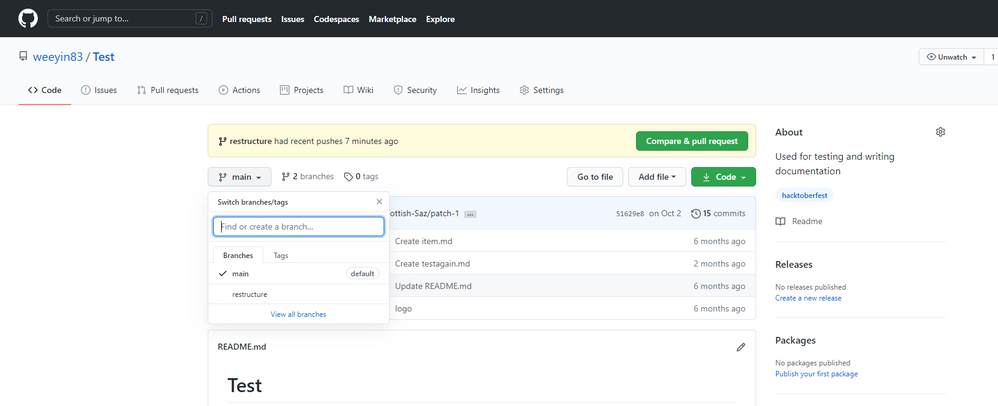
Now within GitHub I can see that I have two branches to this repository
Git Branches within GitHub
Now that I am happy with my changes in the branch and I want to commit them all to the main/default branch I need to do the following:
git checkout main
This switches me back into the main branch of the repository. Now I can do:
git merge restructure
git push
Which merges the changes I made in the restructure branch and then push those new changes back into GitHub. So, my main branch now looks just like the restructure branch.
How do you use branches?
As I said at the start of the post I’ve made some mistakes in my main branch and had to scramble to get things working again, so branches are something I need to get Are branches a helpful feature when you are working with repositories?
Feel free to comment below with your stories of join us on the team Discord server to chat about Git, Git mistakes and branches. ;)
by Contributed | Nov 25, 2020 | Technology
This article is contributed. See the original author and article here.
Seems creating O365 Group sites via CSOM not working. We have to use Graph API and this sample should help get started. ROPC authentication is used. Delegated authentication should also work but not tested.
Setup Steps:
1] Setup Native App in AAD.
2] Copy the App Id as you will need to provide it later in the code.
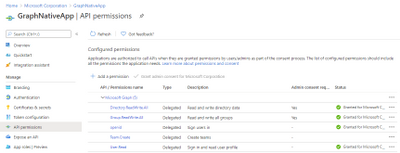
3] Provide following Delegated Graph API permissions.
Groups.ReadWite.All, Directory.ReadWrite.All, openid, Team.Create, User.Read
4] Grant Admin consent.
5] See screenshot below:
6] Sample C# code to Create O365 Group site with Teams:
using System;
using System.Net.Http;
using System.Net.Http.Headers;
using System.Collections.Generic;
using System.Threading.Tasks;
using Newtonsoft.Json;
using Newtonsoft.Json.Linq;
using System.Text;

namespace CreateGroupMultiGeo
{
    class Program
    {
        static async Task Main(string[] args)
        {
            string clientId = "50168119-04dd-0000-0000-000000000000";
            string email = "someuser@spotenant.onmicrosoft.com";
            string passwordStr = "password

            var req = new HttpRequestMessage(HttpMethod.Post, "https://login.microsoftonline.com/bc8dcd4c-0d60-0000-0000-000000000000/oauth2/token")
            {
                Content = new FormUrlEncodedContent(new Dictionary<string, string>
                {
                    ["resource"] = "https://graph.microsoft.com",
                    ["grant_type"] = "password",
                    ["client_id"] = clientId,
                    ["username"] = email,
                    ["password"] = passwordStr,
                    ["scope"] = "openid"
                })
            };

            HttpClient httpClient = new HttpClient();

            var res = await httpClient.SendAsync(req);

            string json = await res.Content.ReadAsStringAsync();

            if (!res.IsSuccessStatusCode)
            {
                throw new Exception("Failed to acquire token: " + json);
            }
            var result = (JObject)JsonConvert.DeserializeObject(json);
            //create a group

            HttpClient httpClientGroup = new HttpClient();

            httpClientGroup.DefaultRequestHeaders.Authorization = new AuthenticationHeaderValue("Bearer", result.Value<string>("access_token"));

            // Create a string variable and get user input from the keyboard and store it in the variable
            string grpName = "MultiGeoGraphAPIGrp1";

            string contentGroup = @"{
              'displayName': '" + grpName + @"',"
              + @"'groupTypes': ['Unified'],
              'mailEnabled': true,
              'mailNickname': '" + grpName + @"',"
              + @"'securityEnabled': false,
              'visibility':'Public',
              'preferredDataLocation':'GBR',
              'owners@odata.bind': ['https://graph.microsoft.com/v1.0/users/ecc0fc81-244b-0000-0000-000000000000']
            }";

            var httpContentGroup = new StringContent(contentGroup, Encoding.GetEncoding("utf-8"), "application/json");

            var responseGroup = httpClientGroup.PostAsync("https://graph.microsoft.com/v1.0/groups", httpContentGroup).Result;

            var content = await responseGroup.Content.ReadAsStringAsync();

            dynamic grp = JsonConvert.DeserializeObject<object>(content);

            Console.WriteLine(responseGroup.Content.ReadAsStringAsync().Result);

            System.Threading.Thread.Sleep(3000);

            //create a Team

            HttpClient httpClientTeam = new HttpClient();

            httpClientTeam.DefaultRequestHeaders.Authorization = new AuthenticationHeaderValue("Bearer", result.Value<string>("access_token"));

            //create a team

            string contentTeam = @"{
                'memberSettings': {
                    'allowCreateUpdateChannels': true
                },
                'messagingSettings': {
                    'allowUserEditMessages': true,
                    'allowUserDeleteMessages': true
                },
                'funSettings': {
                    'allowGiphy': true,
                    'giphyContentRating': 'strict'
                }
            }";

            var httpContentTeam = new StringContent(contentTeam, Encoding.GetEncoding("utf-8"), "application/json");

            ////Refere: https://docs.microsoft.com/en-us/graph/api/team-put-teams?view=graph-rest-1.0&tabs=http
            var responseTeam = httpClientTeam.PutAsync(@"https://graph.microsoft.com/v1.0/groups/" + grp.id + @"/team", httpContentTeam).Result;

            Console.WriteLine(responseTeam.Content.ReadAsStringAsync().Result);

            Console.ReadKey();
        }
    }
}
by Contributed | Nov 25, 2020 | Azure, Microsoft, Technology
This article is contributed. See the original author and article here.
Running SQL Server on Azure Virtual Machines provides a suite of free manageability capabilities that are available only on Azure, and which make it easier to run in a cost-effective, secured, and optimized manner. As a SQL Server customer, you can migrate your SQL workloads to SQL Server on Azure Virtual Machines while making the most of your current SQL Server license investments and benefit from the manageability benefits that SQL Server virtual machines offer today. In this episode with Amit Banerjee, we will cover why running SQL Server on an Azure virtual machine provides the best lift-and-shift experience for workloads where OS-level access is required.

by Contributed | Nov 25, 2020 | Technology
This article is contributed. See the original author and article here.
 By Request! Over the last several months more organizations than ever are leveraging the power of Live Events webcasting to deliver training, executive engagement, and more within their organizations. With this proliferation of the use of both Live and On-Demand rich media content challenges have arisen around network configuration, production best practices, and more.
Join Microsoft’s Samantha Brown and Michael Gannotti for this customer requested Ask Me Anything webcast focusing on YOUR questions around Microsoft Teams Live Events and Microsoft Stream. This event will take place on Wednesday December 2nd. Grab the .ics calendar invite file to add the event to your calendar, share this post with your colleagues, and join us!!
See you Wednesday!!
Thanks for visiting – Michael Gannotti LinkedIn | Twitter
 Michael Gannotti

Recent Comments