by Contributed | Nov 30, 2020 | Technology
This article is contributed. See the original author and article here.
Log Analytics Allows users and admin to configure and use multiple scopes to ingest and query logs.
Admins can configure ingestion to various workspaces and query logs in workspaces, resources and even resource types.
To help you better understand the various concepts and scopes in Log Analytics and to help you better leverage Log Analytics flexibility and make the most out of Logs we have created this short movie:
We value your input! Tell us what you think about this movie by adding comments to this blog.
by Contributed | Nov 30, 2020 | Technology
This article is contributed. See the original author and article here.
Thamires Lemes
Thamires Lemes
2
115
2020-11-30T11:45:00Z
2020-11-30T11:45:00Z
5
1424
8118
67
19
9523
16.00
true
2020-11-26T11:24:29Z
Standard
Internal
72f988bf-86f1-41af-91ab-2d7cd011db47
e2002e1c-6ae2-4efb-82fe-097026bef49b
0
Clean
Clean
false
false
false
false
EN-US
X-NONE
<w:LidThemeComplexscript>X-NONE</w:LidThemeComplexscript>
There are cases in which the time It takes to perform the delete operations are higher than what is acceptable, even if there are no resources constraint and the execution plan is good. In such a cases, we may consider reviewing the process.
I will show two options to achieve this, one using multiple tables and other using a partitioned table, which will not only improve the performance, but also reduce transaction log consumption, table fragmentation and eliminate the need to scale up the database and reduce the costs or prevent increasing It.
I have provided some examples, but please keep in mind you should implement your own process and test It in a non-production environment first.
For a simple demonstration, we will consider a table called ‘Log’ which may contain several columns, but the ones we are most interested in are: ‘ID’, that is an int identity(1,1) column and ‘insert_time’, which is a datetime column that stores when the data was inserted. The only index present is the primary key PK_Log on ID. We will perform the clean-up task once a month and delete everything that is older than 2 months.
- Store the data by month in different tables
We could switch between 3 tables once a month and truncate the one that contains the older data. We can have a view with the union all of the 3 tables if necessary.
If the application only writes to this table and It is only read manually when necessary, it may not be necessary application changes. However, if the application also needs to read the data, it may be necessary to make a few changes to have It read from the view or It would only show the most recent data (< 1 month). We need to take this in consideration when performing this change.
EXAMPLE
|
–Initial setup:
—
–1. Create two additional tables to store the older data per month, as for example: Log_1month, Log_2month
—
–2. Grant permissions to the new tables
—
–3. Create a new index for insert_time on the tables.
–CREATE INDEX Log_insert_time ON Log (insert_time);
–CREATE INDEX Log_1month_insert_time ON Log_1month (insert_time);
–CREATE INDEX Log_2month_insert_time ON Log_2month (insert_time);
—
–4. Create a view to select the 3 tables if necessary, as for example:
–CREATE VIEW dbo.Log_select
–AS
–select * from dbo.[Log]
–UNION ALL
–select * from dbo.[Log_1month]
–UNION ALL
–select * from dbo.[Log_2month]
—
–5. Update Statistics
DECLARE @minDate DATE;
DECLARE @limitDate DATE;
–We will remove everything that is older than 2 months, so that is going to be the limitDate:
SET @limitDate = cast(DATEADD(month,-2,CURRENT_TIMESTAMP) AS DATE);
–Checking what is the newest data in the table log_2month:
SELECT @minDate = max(insert_time) from dbo.log_2month;
print @minDate
print @limitDate
–If the table log_2month has data newer than 2 months, which is the retention period, the process is not executed
IF (@minDate <= @limitDate or @minDate is NULL)
BEGIN
truncate table dbo.[Log_2month]
BEGIN TRANSACTION
EXEC sp_rename ‘dbo.Log_2month’,‘Log_new’;
EXEC sp_rename ‘dbo.Log_1month’,‘Log_2month’;
EXEC sp_rename ‘dbo.Log‘,‘Log_1month’;
EXEC sp_rename ‘dbo.Log_new’,‘Log‘;
–Change the identity of the table to continue from the ID the other one was
declare @currentSeedValue int;
declare @changeIdent_sql nvarchar(max);
set @currentSeedValue = IDENT_CURRENT( ‘dbo.Log_1month’ );
set @changeIdent_sql = ‘DBCC CHECKIDENT (”dbo.Log”, RESEED, ‘ + cast(@currentSeedValue as varchar) + ‘)’;
exec sp_executesql @changeIdent_sql;
COMMIT;
END
ELSE
print ‘Please double check you need to run this process, as It might have been executed recently!’
|
- Partition the current table or create a new partitioned table.
It is important to point out that, since on Azure SQL DB you do not have control on where the data is physically stored, we can only configure the partitions to use the primary filegroup.
If we partition by insert_time, keeping the primary key in the ID, we will need to first recreate the primary key as nonclustered. It would also require to, every time we perform the clean-up process, drop the primary key before performing the truncate and recreate It afterwards, because It will not be a partitioned index, so It won’t support this operation. In terms of efficiency, I believe this is not the best option, so I recommend partitioning by ID.
If we partition by the ID, it will not be as precise as the insert_time when we need to perform the truncate. We might have to leave a partition with data that has already reached the retention period, because It might also have newer data. The amount of data will depend on the range of each partition, so this can be mitigated by having smaller ranges.
We could partition the current table or create a new partitioned table: The creation of a new partitioned table would avoid the maintenance window, but It would require to grant permissions and rename the tables, so the new one can assume the place of the old one and the application start writing to It. We could then keep the old table for the historical data until the retention period is reached.
EXAMPLE (Partitioning the existing table)
|
–I create the partitions for every 100.000 records, but you can reduce the range as much as you would like
CREATE PARTITION FUNCTION [PF_PARTITIONBYID](int) AS RANGE RIGHT
FOR VALUES (‘100000’,‘200000’,‘300000’,‘400000’,‘500000’,‘600000’, ‘700000’,‘800000’,‘900000’,‘1000000’,
‘1100000’,‘1200000’,‘1300000’,‘1400000’,‘1500000’, ‘1600000’,‘1700000’,‘1800000’,‘1900000’,‘2000000’);
–As It’s not possible to manage where the data will be physically stored on Azure SQL DB, you have to set all to primary
CREATE PARTITION SCHEME [PS_PARTITIONBYID]
AS PARTITION [PF_PARTITIONBYID]
ALL TO ([PRIMARY]);
–You can recreate the PK as the clustered partitioned index
alter table dbo.[Log] DROP CONSTRAINT [PK_Log]
ALTER TABLE dbo.[Log] ADD CONSTRAINT [PK_Log] PRIMARY KEY CLUSTERED (id)
WITH (STATISTICS_NORECOMPUTE = OFF, IGNORE_DUP_KEY = OFF,
ALLOW_ROW_LOCKS = ON, ALLOW_PAGE_LOCKS = ON) ON PS_PARTITIONBYID(id)
–You can create a partitioned index on insert_time and id to make the search for the partitions to remove/truncate faster.
CREATE INDEX Log_insert_time ON Log (insert_time, id);
–To check the partitions
SELECT SCHEMA_NAME(o.schema_id) + ‘.’ + OBJECT_NAME(i.object_id) AS [object]
, p.partition_number
, i.index_id
, p.rows
, CASE boundary_value_on_right
WHEN 1 THEN ‘less than’
ELSE ‘less than or equal to’
END AS comparison
, rv.value
FROM sys.partitions p
INNER JOIN sys.indexes i
ON p.object_id = i.object_id
AND p.index_id = i.index_id
INNER JOIN sys.objects o
ON p.object_id = o.object_id
INNER JOIN sys.partition_schemes ps
ON ps.data_space_id = i.data_space_id
INNER JOIN sys.partition_functions f
ON f.function_id = ps.function_id
INNER JOIN sys.destination_data_spaces dds
ON dds.partition_scheme_id = ps.data_space_id AND dds.destination_id = p.partition_number
INNER JOIN sys.filegroups fg
ON dds.data_space_id = fg.data_space_id
LEFT OUTER JOIN sys.partition_range_values rv
ON f.function_id = rv.function_id AND p.partition_number = rv.boundary_id
WHERE o.object_id = OBJECT_ID(‘dbo.Log‘)
|
Note: For a new table, it would be basically the same steps, since we will first need to create a copy, without data, of the old one. The only thing that would change would be the name of the table in which we would be creating the partition and the rename of both tables at the end.
EXAMPLE (Truncating the partition)
|
–Get the list of partitions to be removed, based on the 2 months retention period
DECLARE @Max_id int;
declare @truncate_sql nvarchar(max)
declare @merge_sql nvarchar(max)
SELECT @Max_id = max(id) from dbo.Log where insert_time < cast(DATEADD(month,-2,CURRENT_TIMESTAMP) As Date);
SELECT @truncate_sql = ‘TRUNCATE TABLE dbo.[Log] WITH (PARTITIONS(‘ + CAST(min(partition_number) AS VARCHAR) + ‘ TO ‘ + CAST(max(partition_number) AS VARCHAR) + ‘))’
, @merge_sql = ‘ALTER PARTITION FUNCTION [PF_PARTITIONBYID]() MERGE RANGE (‘ + cast(max(rv.value) as varchar) + ‘)’
FROM sys.partitions p
INNER JOIN sys.indexes i
ON p.object_id = i.object_id
AND p.index_id = i.index_id
INNER JOIN sys.objects o
ON p.object_id = o.object_id
INNER JOIN sys.partition_schemes ps
ON ps.data_space_id = i.data_space_id
INNER JOIN sys.partition_functions f
ON f.function_id = ps.function_id
INNER JOIN sys.destination_data_spaces dds
ON dds.partition_scheme_id = ps.data_space_id AND dds.destination_id = p.partition_number
INNER JOIN sys.filegroups fg
ON dds.data_space_id = fg.data_space_id
LEFT OUTER JOIN sys.partition_range_values rv
ON f.function_id = rv.function_id AND p.partition_number = rv.boundary_id
WHERE i.index_id < 2 AND o.object_id = OBJECT_ID(‘dbo.Log‘) AND rv.value <= @Max_id
print ‘max_id: ‘ + cast(@Max_id as varchar)
print ”
print ‘truncate command: ‘ + @truncate_sql
print ”
print ‘merge command:’ + @merge_sql
–I will leave the executions commented, so there is no risk of running by mistake
–exec sp_executesql @truncate_sql
–exec sp_executesql @truncate_sql
|
by Contributed | Nov 30, 2020 | Azure, Microsoft, Technology
This article is contributed. See the original author and article here.
If you’ve built and managed Windows Servers in an on-premises environment, you may have a set of configuration steps as well as regular process and monitoring alerts, to ensure that server is as secure as possible. But if you run a Windows Server VM in Azure, apart from not having to manage the physical security of the underlying compute hardware, what on-premises concepts still apply, what may you need to alter and what capabilities of Azure should you include?
Windows Security Baselines – Most server administrators would start by configuring the default Group Policy settings to meet their organization’s security requirements, and would search for guidance on other settings that could be tweak to make the environment more restrictive. Traditional Windows Server hardening guidance can now get out of date easily, as we ship more frequent updates and changes to the operating system, though some practices are universally good to apply. In addition, security guidance can change, especially as we learn from the latest threats.
To keep up with the current advice, relevant to your server’s current patch levels, we recommend the use of the Windows Security Baselines. Provided inside the Security Compliance Toolkit, the baselines bring together feedback from Microsoft security engineering teams, product groups, partner and customers into a set of Microsoft-recommended configuration settings and their security impact. On the Microsoft Security Baselines blog, you can keep track of changes to the baselines through the Draft and Final stages, for example as they relate to the Windows Server version 20H2 release
This guidance applies to Windows Server whether it’s on-premises or in the Cloud.
Hardening your Windows Server – In addition, my colleague Orin Thomas does a great presentation on Hardening your Windows Server environment. It includes things like Credential Guard, Privileged Administration Workstations, Shielded VMs and more. Download the presentation deck and the demo videos here: Orin-Thomas/HardenWinSvr: Hardening Windows Server presentation (github.com)
Server Roles and applications
You also need to pay attention to the role that your server is performing, which will install additional files and settings to the base operating system, for example if it’s running IIS or SQL Server. These components come with their own security guidance, and Orin has written up advice on hardening IIS here: Windows Server 101: Hardening IIS via Security Control Configuration.
And then there’s the configuration of any applications you are hosting on the server. Have you custom applications been developed to protect against attacks or exploits? Are any third-party applications secure or do they require you to “relax” your security configurations for them to function properly (for example, turning off UAC)? Do you restrict who can install applications onto your server and which applications can be installed or run?
Microsoft Azure considerations
With some of the Windows Server considerations covered, let’s explore the Azure considerations and capabilities.
Networking
One of the biggest differences to running an on-premises server is how you manage the network configuration. IaaS VMs should always be managed through Azure, not via their network settings inside the operating system.
RDP – It’s still not a good idea to leave open the default RDP port, due to the high number of malicious attempts at taking servers down by flooding this port with invalid authentication attempts. Instead, for a secure connection to a remote server session for administration, check out Azure Bastion instead which is instigated through the Azure Portal.
Network security groups – Network security groups allow granular control of traffic to and from Azure resources, including traffic between different resources in Azure. Plan your routing requirements and configure these virtual firewalls to only allow necessary traffic.
Just-in-time VM access – If you do have a requirement to open ports sometimes, consider implementing just-in-time (JIT) VM access. This allows Azure Security Center to change networking settings for a specified period of time only, for approved user requests.
VPN Gateways – Implement a virtual network gateway for encrypted traffic between your on-premises location and your Azure resources. This can be from physical sites (such as branch offices), individual devices (via Point to Site gateways) or through private Express Route connections which don’t traverse the public internet. Learn more at What is a VPN Gateway?
Identity
Role Based Access Control – Specific to Azure, Role Based Access Control (RBAC) lets you control who has access to the properties and configuration settings of your Azure resources via the Azure Resource Manager (including the Azure Portal, PowerShell, the Azure CLI and Cloud Shell). These permissions are packaged by common roles, so you could assign someone as a Backup Operator and they’d get the necessary rights to manage Azure Backup for the VM, for example. This identity capability helps you implement a “least privilege” model, with the right people having only the access that they need to perform their roles.
Privileged Identity Management – Similar to JIT VM access, Privileged Identity Management enables an approved user to elevate to a higher level of permissions for a limited time, usually to perform administration tasks.
Other advanced Identity features – With the Cloud, you can take advantage of additional advanced security features for securing authentication requests, including Conditional Access and Multi-Factor Authentication. Check out Phase 1:Build a foundation of security in the Azure Active Directory feature deployment guide.
Security Compliance & Monitoring
Azure Security Benchmarks – Similar to the Windows Security Benchmarks, the Azure Security Benchmarks help you baseline your configuration against Microsoft recommended security practices. These include how security recommendations map to security controls from industry sources like NIST and CIS, and include Azure configuration settings for your VM (such as privileged access, logging and governance).
Azure Defender for Servers – Azure Security Center allows for advanced security capabilities and monitoring of server VMs with Azure Defender for Servers. This is my “if you only do one thing in this article, do this” recommendation. It’s needed for JIT access and also includes things like file integrity monitoring, adaptive network hardening and fileless attack detection.
Azure Policy – Other things can fall under the security umbrella, like staying compliant with the Payment Card Industry’s Data Security Standard (PCI DSS), or ensuring that Cloud resources can only be created in an approved list of countries (with corresponding Azure regions) for your organization. Investigate how Azure Policy can help enforce these requirements when a new VM is created or can alert you if an existing VM has it’s configuration changed so it’s now non-compliant.
Conclusion
While it’s easy to imagine a security scenario of an open application database or a hacking attempt to exploit application code, there are a significant number of security aspects to running a Windows Server VM in the cloud too. Start with this list and you’re going in the right direction to make your cloud servers as secure as possible, aligned with the specific requirements for your organization.
by Contributed | Nov 30, 2020 | Technology
This article is contributed. See the original author and article here.
Background:
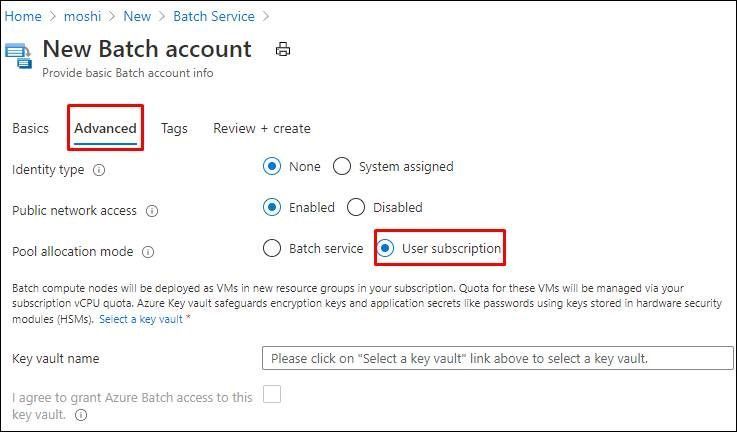
Currently we can enable Azure Managed Identity to use platform-managed keys or customer-managed keys to encrypt the customer data which is stored in Azure Batch: https://docs.microsoft.com/en-us/azure/batch/batch-customer-managed-key. However, the managed identity on the Batch account is not available on the compute nodes. There was an active feature request submitted to Azure Batch team and Azure Active Directory team asking for supporting MSI in Azure Batch environment: https://feedback.azure.com/forums/269742-batch/suggestions/33640984-support-managed-service-identity#:~:text=Actually%2C%20Azure%20Batch%20is%20not,variables%20and%20clear%20text%20configuration. The implementation of this feature has begun but there is no ETA at this time. As an optional plan, we could enable MSI for compute nodes in user subscription mode which means that user would need to manage his own Virtual Machine Scale Sets (VMSS) and those nodes are in MSI enabled environment.
Purpose:
In user subscription mode, customer can enable MSI for compute nodes directly by their own. Please note the following limitations:
- Right now this optional plan is only valid when the pool allocation mode is user subscription which means all the compute nodes are going to be provisioned in your subscription. Please check this document for the details: https://docs.microsoft.com/en-us/azure/batch/batch-account-create-portal#create-a-batch-account
- When these Batch VMs are provisioned every time, for example, Batch Service creates a new Virtual Machine Scale Sets due to some scale out activity, you are required to enable the MSI manually. You can do it via Portal, PowerShell or REST API .
Pre-requirement:
- Prepare an Azure Batch account with User Subscription mode
Steps:
- Create a new pool in the Batch account, the VMSS will be added to your subscription in a different resource group.

- Access to the resource group and select VMSS.
- Access to the VMSS and select the Identity tab to enable the MSI. This document provides more information about enabling system-assigned managed identify and user-assigned managed identity: https://docs.microsoft.com/en-us/azure/active-directory/managed-identities-azure-resources/qs-configure-portal-windows-vm#enable-system-assigned-managed-identity-on-an-existing-vm.

- You will be able to modify the role assignments. In my example, I assigned Owner role of subscription in the Azure role assignments.
- RDP to the VMSS to test if the MSI works or not. Now I can get the token to list the information of my resource group. This document lists the PowerShell command that I used in this example: https://docs.microsoft.com/en-us/azure/active-directory/managed-identities-azure-resources/tutorial-windows-vm-access-arm#get-an-access-token-using-the-vms-system-assigned-managed-identity-and-use-it-to-call-azure-resource-manager.
$response = Invoke-WebRequest -Uri ‘http://169.254.169.254/metadata/identity/oauth2/token?api-version=2018-02-01&resource=https://management.azure.com/‘ -Method GET -Headers @{Metadata=”true”}
$content = $response.Content | ConvertFrom-Json
$ArmToken = $content.access_token
(Invoke-WebRequest -Uri ‘https://management.azure.com/subscriptions/a2d49d28-b5b1-48fe-83dc-ada50a035a99/resourceGroups/moshi?api-version=2016-06-01‘ -Method GET -ContentType “application/json” -Headers @{ Authorization=”Bearer $ArmToken”}).content

by Contributed | Nov 30, 2020 | Technology
This article is contributed. See the original author and article here.
This last week I had a service request where our customer faced a high wait time due to a parameter sniffing. In this situation, our customer is not able to change any option of the query and they asked about if there is any other option to fix this issue.
We have several alternatives but I would like to share 3 of them besides other ones:
Alternative 1
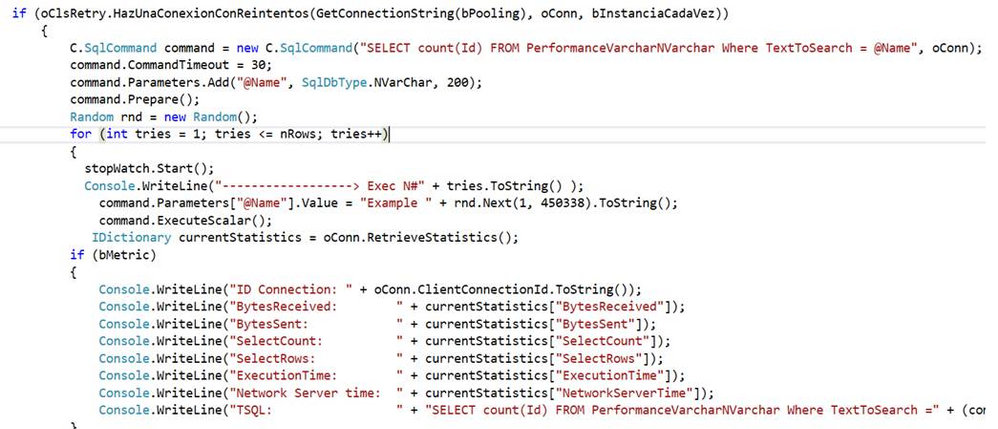
- I developed an application that is running a parametrized query like our customer has.
- As you could see we have a process that creates a cached plan.
SELECT plan_handle,UseCounts,RefCounts, Cacheobjtype, Objtype,  TEXT AS SQL
FROM sys.dm_exec_cached_plans
CROSS APPLY sys.dm_exec_sql_text(plan_handle)
where text like '%SELECT count(Id) FROM PerformanceVarcharNVarchar%' AND objtype='Prepared'

Alternative 2
- Other option that you have is to disable parameter sniffing in the database properties. But, you could have other performance issue for the rest of the queries.

Alternative 3
SELECT TOP 2500
       databases.name,
       dm_exec_sql_text.text AS TSQL_Text,
       CAST(CAST(dm_exec_query_stats.total_worker_time AS DECIMAL)/CAST(dm_exec_query_stats.execution_count AS DECIMAL) AS INT) as cpu_per_execution,
       CAST(CAST(dm_exec_query_stats.total_logical_reads AS DECIMAL)/CAST(dm_exec_query_stats.execution_count AS DECIMAL) AS INT) as logical_reads_per_execution,
       CAST(CAST(dm_exec_query_stats.total_elapsed_time AS DECIMAL)/CAST(dm_exec_query_stats.execution_count AS DECIMAL) AS INT) as elapsed_time_per_execution,
       dm_exec_query_stats.creation_time,
       dm_exec_query_stats.execution_count,
       dm_exec_query_stats.total_worker_time AS total_cpu_time,
       dm_exec_query_stats.max_worker_time AS max_cpu_time,
       dm_exec_query_stats.total_elapsed_time,
       dm_exec_query_stats.max_elapsed_time,
       dm_exec_query_stats.total_logical_reads,
       dm_exec_query_stats.max_logical_reads,
       dm_exec_query_stats.total_physical_reads,
       dm_exec_query_stats.max_physical_reads,
       dm_exec_query_plan.query_plan,
       dm_exec_cached_plans.cacheobjtype,
       dm_exec_cached_plans.objtype,
       dm_exec_cached_plans.size_in_bytes,*
FROM sys.dm_exec_query_stats
CROSS APPLY sys.dm_exec_sql_text(dm_exec_query_stats.plan_handle)
CROSS APPLY sys.dm_exec_query_plan(dm_exec_query_stats.plan_handle)
INNER JOIN sys.databases
ON dm_exec_sql_text.dbid = databases.database_id
INNER JOIN sys.dm_exec_cached_plans
ON dm_exec_cached_plans.plan_handle = dm_exec_query_stats.plan_handle
WHERE NAME='DotNetExample'
and dm_exec_sql_text.text like '%SELECT count(Id) FROM PerformanceVarcharNVarchar%'
ORDER BY tsql_text DESC;
- I created a plan guide recompiling the query every time that I executed the query in this way:
EXEC sp_create_plan_guide
    @name =  N'Guide1',
    @stmt = N'SELECT count(Id) FROM PerformanceVarcharNVarchar Where TextToSearch = @Name',
    @type = N'SQL',
    @module_or_batch = null,
    @params = N'@Name nvarchar(200)',
    @hints = N'OPTION (RECOMPILE)';
- Finally, if I need to drop the plan guide, basically, I could run the following command to delete it:
EXEC sp_control_plan_guide N'DROP', N'Guide1';
Enjoy!

Recent Comments