
by Contributed | Nov 27, 2020 | Azure, Microsoft, Technology
This article is contributed. See the original author and article here.
An introduction of a powerful development tool for Web applications: Babylon.js Editor
Takayuki Fujiwara is an MVP for Windows Development who focuses on adapting XR applications and systems for business layers especially in Japan. Moreover, Takayuki contributes Babylon.js which is a strong WebGL framework and share a lot of knowledge and tips of the framework on his blog. Follow him on Twitter @WheetTweet.

Building microservices through Event Driven Architecture part12 : Produce events to Apache KAFKA.
Gora Leye is a Solutions Architect, Technical Expert and Devoper based in Paris. He works predominantly in Microsoft stacks: Dotnet, Dotnet Core, Azure, Azure Active Directory/Graph, VSTS, Docker, Kubernetes, and software quality. Gora has a mastery of technical tests (unit tests, integration tests, acceptance tests, and user interface tests). Follow him on Twitter @logcorner.

Teams Real Simple with Pictures: Microsoft Teams Loves Microsoft Lists Pt 2
Chris Hoard is a Microsoft Certified Trainer Regional Lead (MCT RL), Educator (MCEd) and Teams MVP. With over 10 years of cloud computing experience, he is currently building an education practice for Vuzion (Tier 2 UK CSP). His focus areas are Microsoft Teams, Microsoft 365 and entry-level Azure. Follow Chris on Twitter at @Microsoft365Pro and check out his blog here.

C#.NET: HOW TO BUILD WEB URL QUERY PARAMETERS
Asma Khalid is an Entrepreneur, ISV, Product Manager, Full Stack .Net Expert, Community Speaker, Contributor, and Aspiring YouTuber. Asma counts more than 7 years of hands-on experience in Leading, Developing & Managing IT related projects and products as an IT industry professional. Asma is the first woman from Pakistan to receive the MVP award three times, and the first to receive C-sharp corner online developer community MVP award four times. See her blog here.

Azure Service Bus Explorer On Azure Portal (Preview)
George Chrysovalantis Grammatikos is based in Greece and is working for Tisski ltd. as an Azure Cloud Architect. He has more than 10 years’ experience in different technologies like BI & SQL Server Professional level solutions, Azure technologies, networking, security etc. He writes technical blogs for his blog “cloudopszone.com“, Wiki TechNet articles and also participates in discussions on TechNet and other technical blogs. Follow him on Twitter @gxgrammatikos.
by Priyesh Wagh | Nov 27, 2020 | Dynamics 365, Microsoft, Technology
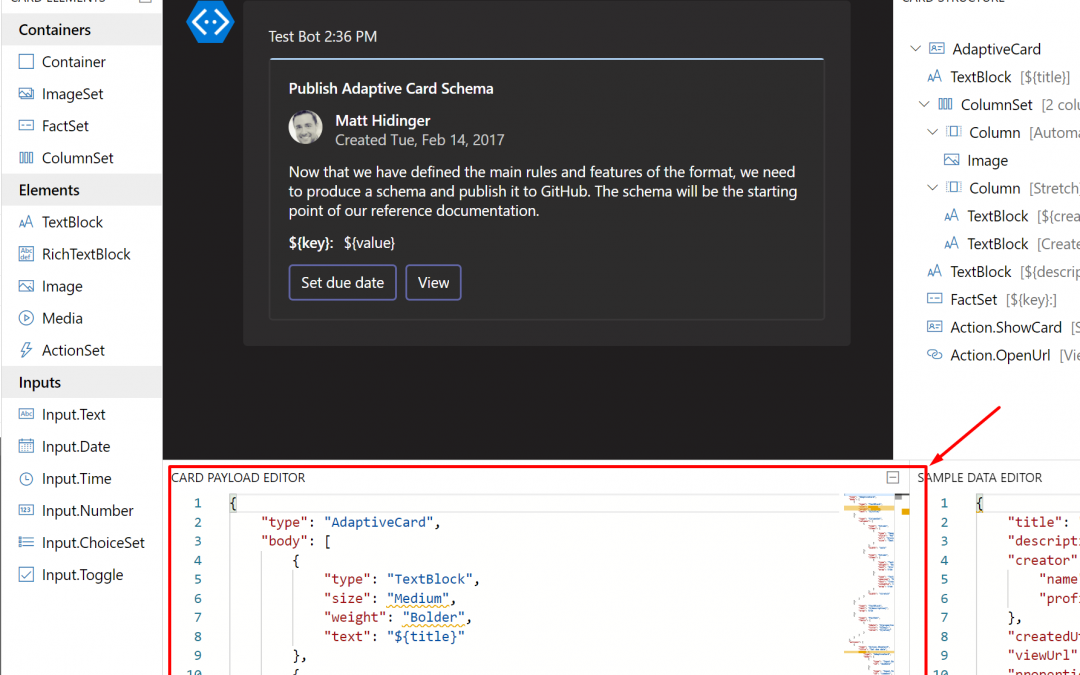
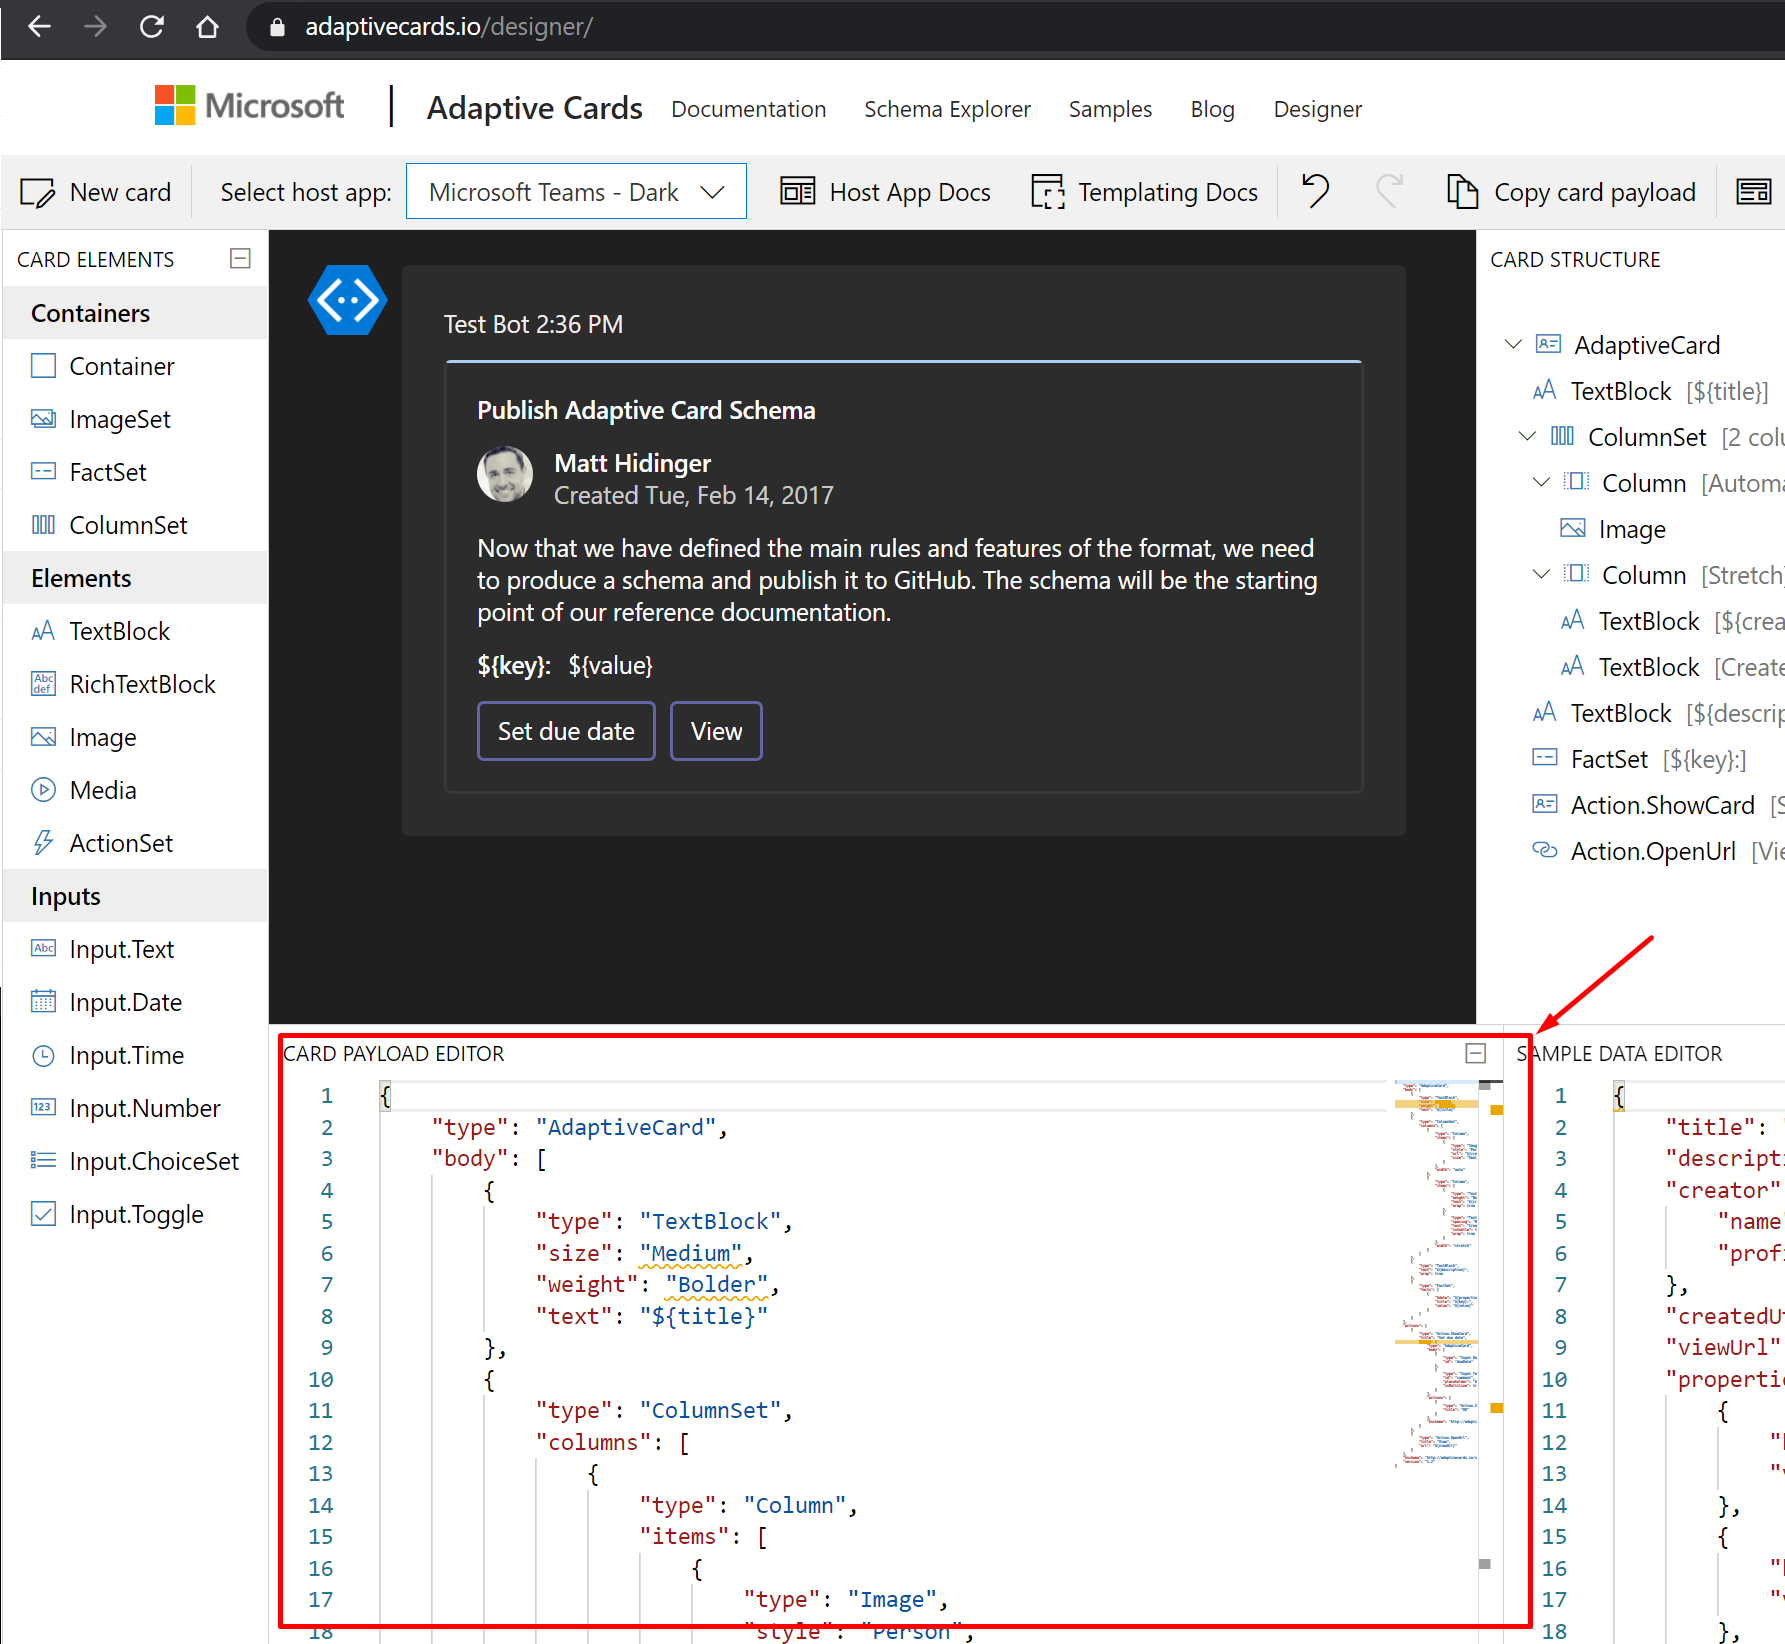
If you’ve started working on Adaptive Cards recently and always struggle with losing Adaptive Card payload from https://adaptivecards.io/designer/, you should use the Adaptive Cards Studio Extension.
So there’s a Visual Studio Code Extension for the same which will help you preserve and preview the Adaptive Card you are working on.
Problem Statement
While working with Adaptive Cards, we often struggle to make sure the browser tab doesn’t gets closed accidently and you lose your progress on the Adaptive Cards you are working on.
And, if you are struggling to maintain the Card Payload in a temporary file, there’s a smarter way available to do so using VS Code’s Extension – “Adaptive Cards Studio”
VS Code Extension – Adaptive Card Studio
Here’s how you can use the Adaptive Card Studio and how it can be useful.
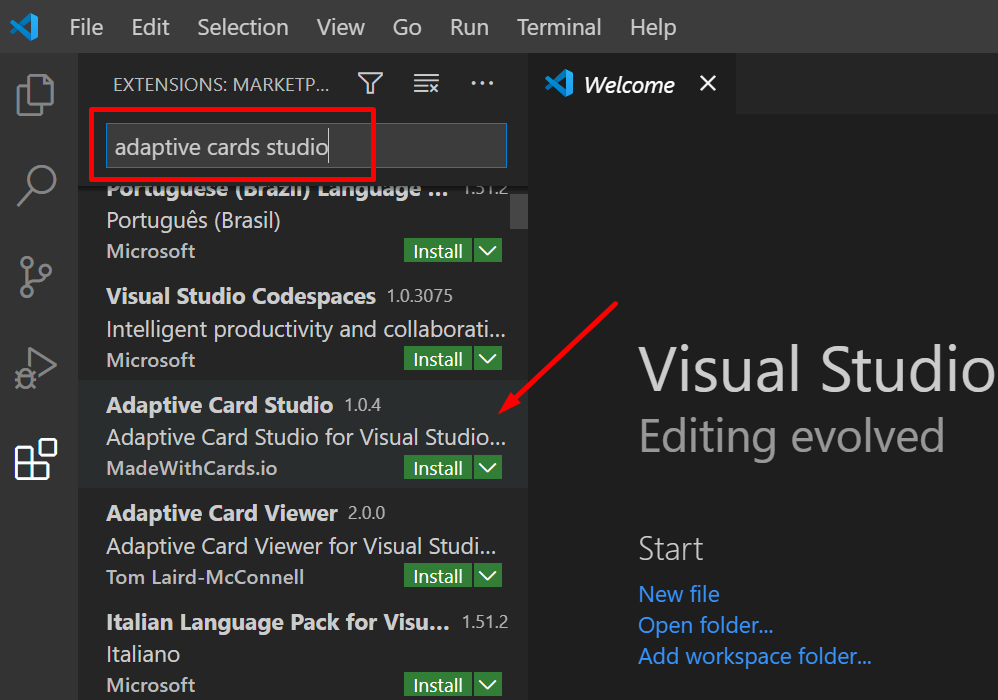
- Open Extensions in Visual Studio Code and search for Adaptive Cards Studio
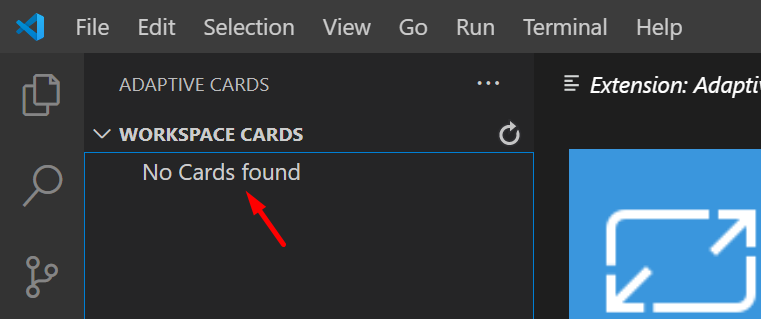
- Once installed, it’ll appear on the left hand side as below –
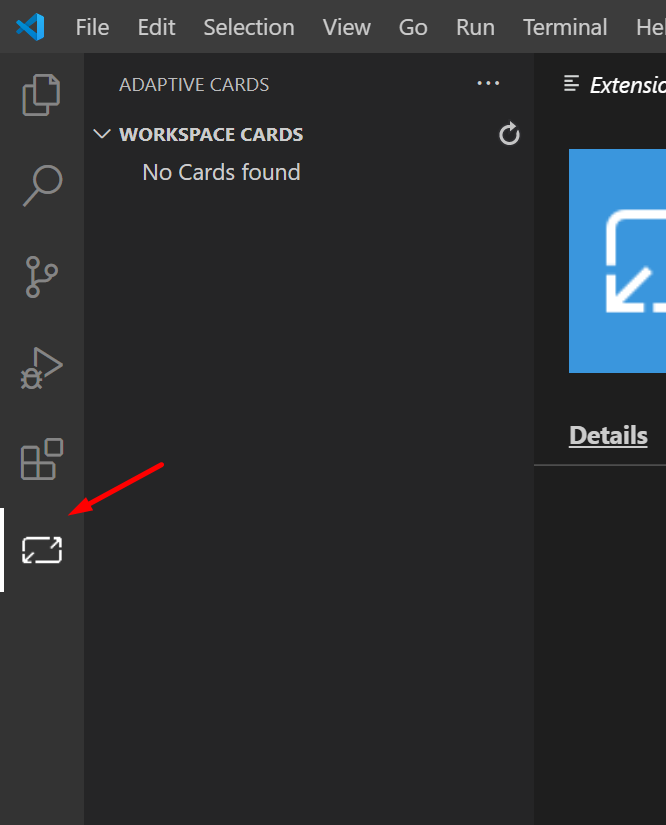
- On the right hand side in VS Code, it’ll search for the Workspace for the Adaptive Cards to detect. Make sure the folder in which your Adaptive Cards is saved is added to the Workspace.
Else, the Extension won’t detect an Adaptive Card.
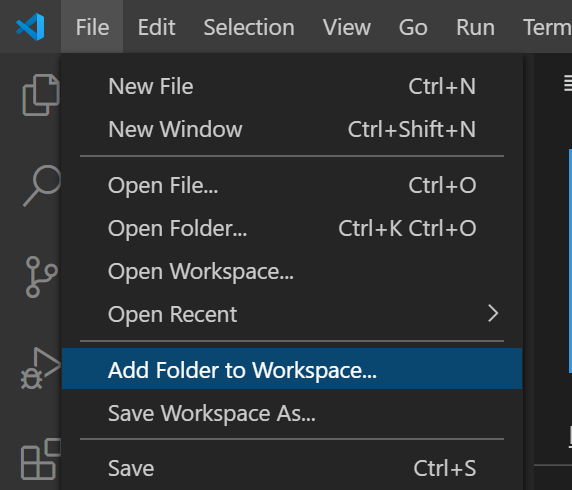
In case you have saved the JSON file elsewhere which is not added to your Workspace, you can use this option to add the Folder to your current Workspace. (Depends on your Project structure)
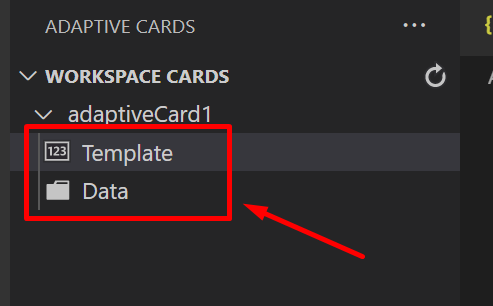
- Once the correct Folder is added to Workspace in VS Code, the Adaptive Card you saved will appear

- If you expand the card, you’ll find Template and Data which you can get and paste from the Adaptive Cards online Designer and paste the same in here.
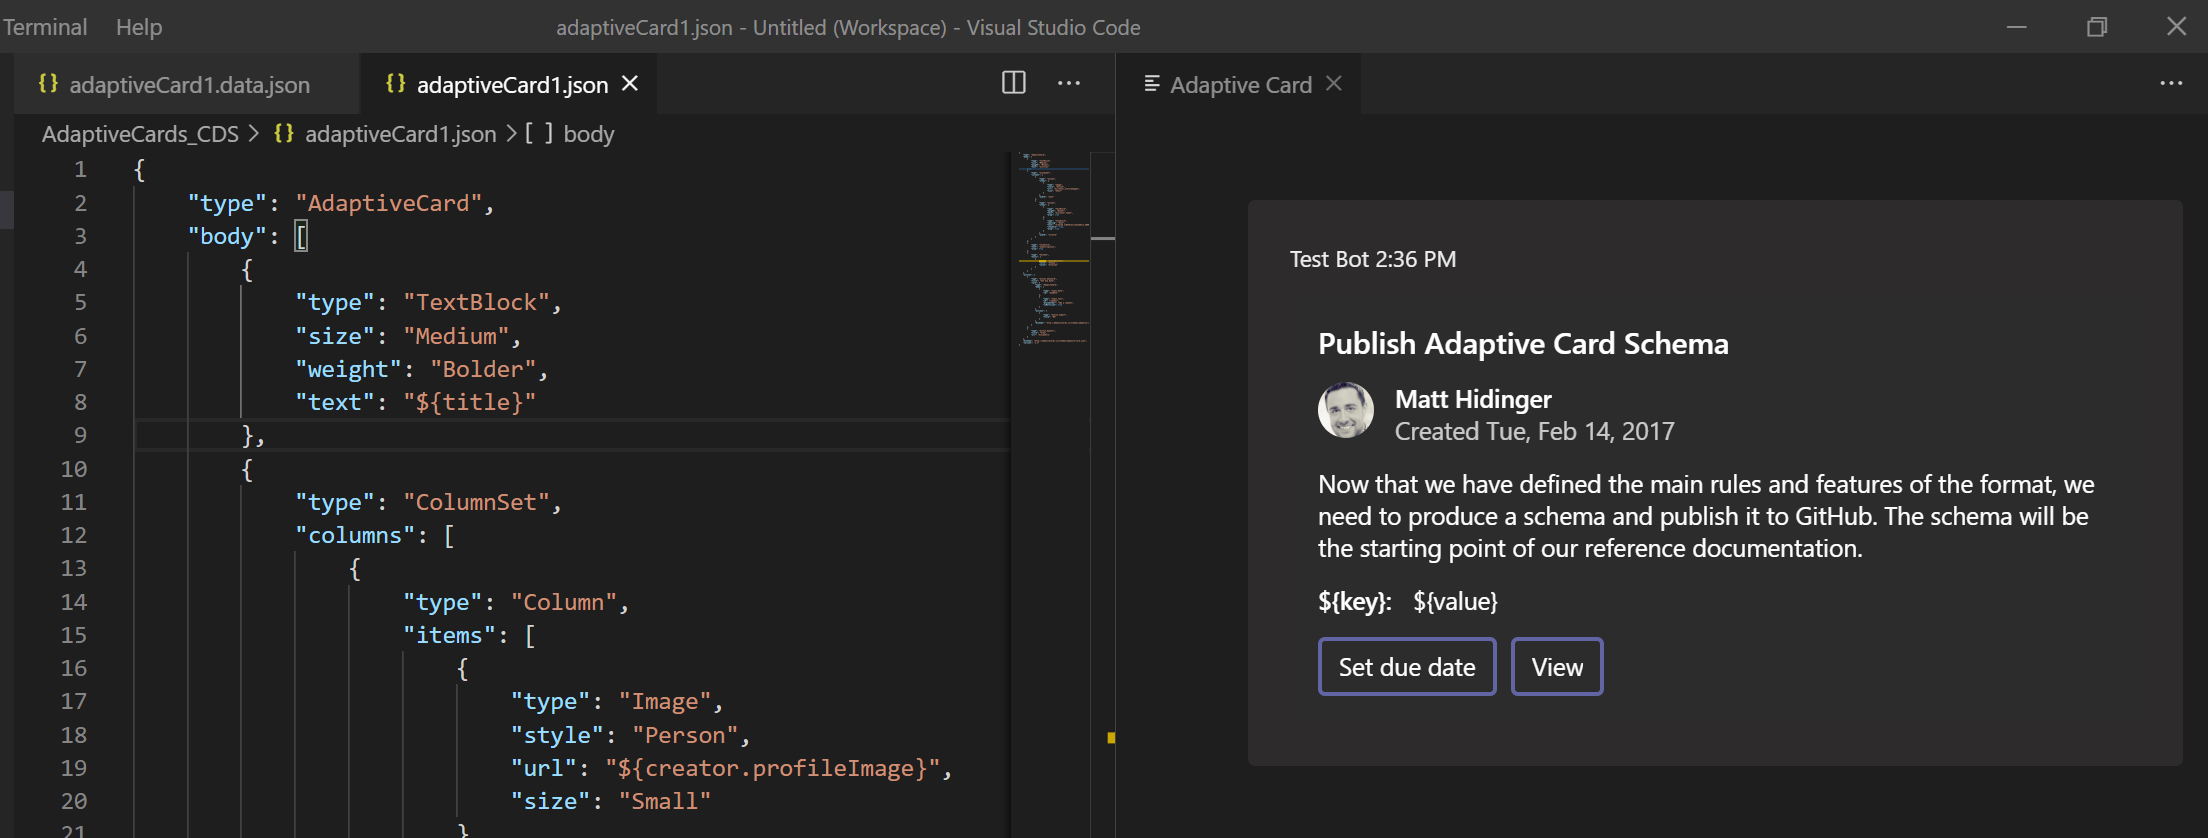
- Now, if you look at the main Window, you’ll be able to see the Template and Data JSON on the left and the Card on the right
Here’s the link to the GitHub for complete Info on the Adaptive Cards Studio: https://marketplace.visualstudio.com/items?itemName=madewithcardsio.adaptivecardsstudiobeta
And then further, copy the Payload onto your application where this will eventually be deployed.
Hope this was useful!
Here are some more posts that relate to Adaptive Cards usage / Power Platform –
- Adaptive Cards for Outlook Actionable Messages using Power Automate | Power Platform
- Adaptive Cards for Teams to collect data from users using Power Automate | SharePoint Lists
- Task Completion reminder using Flow Bot in Microsoft Teams | Power Automate
- Accept HTTP Requests in a Flow and send Response back | Power Automate
- Run As context in CDS (Current Environment) Flow Trigger | Power Automate
- Using triggerBody() / triggerOutput() to read CDS trigger metadata attributes in a Flow | Power Automate
Thank you!!
Brought to you by Dr. Ware, Microsoft Office 365 Silver Partner, Charleston SC.

by Contributed | Nov 27, 2020 | Azure, Microsoft, Technology
This article is contributed. See the original author and article here.
It might be snowing in parts of the Northern Hemisphere, but we won’t let that stop us from sharing Azure news with you. News covered this week includes: New Azure Portal updates for November 2020, Azure Resource Manager template support for Azure file share backup, How to use Windows Admin Center on-premises to manage Azure Windows Server VMs, Multiple new features for Azure VPN Gateway now Generally Available, and our Microsoft Learn Module of the Week.
Azure Portal for November 2020
Two new updates have been applied to the Azure portal which include:
- Resource moving: the ability to navigate to a resource group and move resources to another region. The ability to add missing dependencies, customize destination properties, and track the progress of moves are also now available.
- Filter pills: bring further consistency to the filtering experience while also making it WCAG 2.1 compliant and fully accessible
Further details can be found here: Azure portal November 2020 update
ARM Template support for Azure File Share Backup
Azure Resource Manager (ARM) provides a powerful way to manage infrastructure through declarative templates. Azure Backup now supports configuring backup for existing Azure file shares via ARM templates. This enables organizations to backup existing file shares by specifying the vault and backup policy details in a JSON file which is deployable via using the Azure portal, CLI or Powershell.
Further details can be found here: ARM Template – Backup Azure File Share to Recovery Services Vault
Managing Azure Windows Server VMs via On-Premises Windows Admin Center
Currently the Windows Admin Center (WAC) add-in for the Azure Portal is in preview and it might be a while before the feature becomes generally available. Sonia Cuff and Orin Thomas share steps to spin up a WAC gateway server instance on a local VM, configure Windows Server’s built in Azure Network Adapter as a VPN connection.
Details on the steps required to complete this can be found here: Using Windows Admin Center on-premises to manage Azure Windows Server VMs
Multiple new features for Azure VPN Gateway
The following new Azure VPN Gateway features have recently been announced as generally available:
- Custom IPsec/IKE policy with DPD timeout: Setting IKE DPD (Dead Peer Detection) timeout allows organizations to adjust the IKE session timeout value based on their connection latency and traffic conditions to minimize unnecessary tunnel disconnect.
- High availability for RADIUS servers in point-to-site VPN: Organizations can now enable highly available configuration via RADIUS/AD authentication for their point-to-site VPN.
- FQDN support for site-to-site VPN: Organizations without static public IP addresses can now connect to Azure VPN gateways leveraging dynamic DNS services and their Fully Qualified Domain Name (FQDN). Azure VPN gateways will automatically resolve and update VPN targets to establish IPsec/IKE connections.
- APIPA support for BGP speaker: Organizations with legacy VPN routers and Amazon Web Service (AWS) VGW, Google Cloud Platform (GCP) VPN which use Automatic Private IP Addressing (APIPA) addresses as their Border Gateway Protocol (BGP) speaker IP addresses are now supported and can establish BGP sessions with Azure VPN gateways using APIPA (169.254.x.x) addresses.
Community Events
- Festive Tech Calendar – New content from different communities and people around the globe for the month of December
- Introduction to Cloud Adoption Framework – Sarah Lean investigates Microsoft’s Cloud Adoption Framework offering and what is available for organizations to take advantage of
- Patch and Switch – It has been a fortnight, so Rick Claus and Joey Snow are back for another episode.
MS Learn Module of the Week
Implement Windows Server hybrid cloud management, monitoring, and security
Looking to addresses problems related to managing, monitoring, and securing a hybrid environment? This learning path provides insight on how to manage and maintain hybrid Azure and on-premises workloads.
This learning path can be completed here: Windows Server hybrid cloud management, monitoring, and security
Let us know in the comments below if there are any news items you would like to see covered in next week show. Az Update streams live every Friday so be sure to catch the next episode and join us in the live chat.
by Contributed | Nov 27, 2020 | Azure, Microsoft, Technology
This article is contributed. See the original author and article here.
Overview
This document covers the step by step procedure to set up and configure SAP on Oracle ASM (Oracle Linux 8.2 /Oracle 19c) on Azure . As this setup involves a large number of steps, it is very easy to miss or misconfigure ,that may result in errors/issues ,which could be very cumbersome to resolve. Hence these steps are covered here in detail. Since we are talking about the Oracle ASM install, scope of this document is restricted to SAP DB instance install.
High Level Process Flow :
- Create VMs
- Patch OS and pre-install
- Create disks
- Setup ASM
- DB Install with SWPM
- Oracle software installation
- SBP Oracle DB instance
- SBP Oracle Grid
- Confirm patching successful + run Oracle Enterprise Manager
Deploy Linux VMs
via Azure portal
- Create a Resource Group
- Create a Virtual network
- Use the Virtual Network create above
- Create Virtual Machine 1 for App server . Virtual Machine 2 for ASCS server, Virtual Machine 3 for DB server .Use at least Oracle Linux 8.0 image from azure marketplace image gallery. In this example Oracle Linux 8.2 image is used.
via Azure CLI
1. Login to Azure
az login
- Create a resource group
az group create –name oraasmtestrg –location <location>
3. Create a virtual machinesaz group create
App server
az vm create –resource-group oraasmtestrg –name oraapp1 –image Oracle:Oracle-Linux:ol8_2-gen2:8.2.01 –size Standard_E4s_v3 –admin-username sapadmin –admin-password <password> –location southeastasia –vnet-name oraasmtestvnet –subnet default
ASCS:
az vm create –resource-group oraasmtestrg –name oraascs1 –image Oracle:Oracle-Linux:ol8_2-gen2:8.2.01 –size Standard_E4s_v3 –admin-username sapadmin –admin-password <password> –location southeastasia –vnet-name oraasmtestvnet –subnet default
Database server:
az vm create –resource-group oraasmtestrg –name oradb7 –image Oracle:Oracle-Linux:ol8_2-gen2:8.2.01 –size Standard_E8s_v3 –admin-username sapadmin –admin-password <password> –data-disk-sizes-gb 512 512 512 512 –location southeastasia –os-disk-size-gb 128 –vnet-name oraasmtestvnet –subnet default
Jump server
az vm create –resource-group oradgsap-rg –name oradgjmp-vm –image win2016datacenter–size Standard_E2s_v3 –admin-username sapadmin –admin-password <password> –location < location> –vnet-name oraasmtestvnet –subnet default
It is a good practice to disable the public Ip Addresses of SAP VMs. You can access these VMs from Jump box via private Ip Addresses
OS configuration and pre-install
Resize OS disk
The default provisioned size of OS disk on Linux Vm on azure is 30GB which is not sufficient for the Oracle install. As the OS selected is Oracle Linux 8.2 which has GPT partition in OS disk, follow the steps here https://docs.microsoft.com/en-us/azure/virtual-machines/linux/resize-os-disk-gpt-partition to resize the OS Disk with GPT partition
Install ASM libraries
Refer Oracle ASMLib Downloads for Oracle Linux 8 For more information about installing Oracle ASM libraries.
- Login as root for install
sudo su –
sudo yum update
- Download and install the Oracle Preinstallation RPM:
# yum -y install oracle-database-preinstall-19c
# rm oracle-database-preinstall-19c-1.0-1.el7.x86_64.rpm
- Install Oracle ASM libraries
yum list | grep oracleasm
- Verify that Oracle ASM is installed:
rpm -qa |grep oracleasm
- This should result in following output
oracleasm-support-2.1.12-1.el8.x86_64
oracleasmlib-2.0.17-1.el8.x86_64
- Verify users and groups were created correctly:
id oracle
- This should result in following output similar to the following:
id=54321(oracle) gid=54321(oinstall) groups=54321(oinstall),54334(asmdba),54322(dba),54323(oper),54324(backupdba),54325(dgdba),54326(kmdba),54330(racdba),54331(sapinst),54332(asmoper),54333(asmadmin)
Setup Oracle ASM
- Create a folder for user oracle and change the owner:
mkdir /oracle
chown oracle:oinstall /oracle
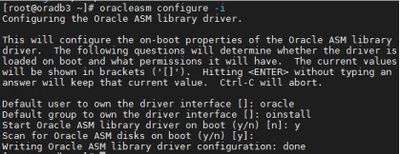
- Setting up the Oracle ASM library driver involves defining the default user (oracle) and default group (oinstall) as well as configuring the drive to start on boot (choose y) and to scan for disks on boot (choose y). You need to answer the prompts from the following command:
# oracleasm configure -i
- The output of this command should look similar to the following, with prompts to be answered:
- View the disk configuration:
cat /proc/partitions
- Enter the following command to load the oracleasm kernel module
# oracleasm init
- Verify the Oracle ASM status:
oracleasm status
- Format disk /dev/sda, /dev/sdb, /dev/sdc, /dev/sdd by running the following commands
fdisk /dev/sda
fdisk /dev/sdb
fdisk /dev/sdc
fdisk /dev/sdd
- Answer the prompts from the above fdisk commands with:
n for new partition
p for primary partition
1 to select the first partition
press enter for the default first cylinder
press enter for the default last cylinder
press w to write the changes to the partition table
oracleasm createdisk DATA_DISK_01 /dev/sda1
oracleasm createdisk DATA_DISK_02 /dev/sdb1
oracleasm createdisk ARCH_DISK_01 /dev/sdc1
oracleasm createdisk RECO_DISK_01 /dev/sdd1
oracleasm listdisks
- Change the passwords for the root and oracle users:
passwd oracle
passwd root
- Change the directory permissions:
chmod -R 775 /oracle
chown grid:oinstall /oracle
chown oracle:oinstall /dev/sda1
chown oracle:oinstall /dev/sdb1
chown oracle:oinstall /dev/sdc1
chown oracle:oinstall /dev/sdd1
chmod 600 /dev/sda1
chmod 600 /dev/sdb1
chmod 600 /dev/sdc1
chmod 600 /dev/sdf1
DB Instance Install(SWPM)
Before we begin the DB instance install , mount the sapmnt (NFS share) directory which must have been created during the ASCS instance setup.
- Install NFS libraries
sudo yum -y install nfs-utils
- Create sapmnt directory and mount remote NFS file system
mkdir /sapmnt
mount <<ip of NFS server>>:/sapmnt /sapmnt
- Every host running the SAP installer requires the presence of the C shell command language interpreter as documented a. here. Verify the existence of the /bin/csh script file. When not existing install using following command:
yum install csh
- Verify that the /bin/csh script file exists using the following command:
ls -al /bin/csh
- Start the SAP SWPM installer and select the appropriate options:
Software Provisioning Manager 1.0 SP 29 –> SAP NetWeaver 7.5 –> Oracle à Application Server ABAP–> Distributed System –> Database Instance
- Specify the profile directory


- You may see this error – “Supported Linux distributions for SAP Products…” .This can be safely ignored

- Select 19 as Oracle server and client versions.

- Select ‘Remove database and recreate’


- Enter ORACLE_HOME and ORACLE_SID for GRID and select “Oracle Grid Software not installed”

- Select the Number of parallel jobs based on the CPU cores. The default number is 3

- SWPM stops for the installation of Oracle software

Oracle Grid Install
- Download the following from SAP portal as documented in SAP Note 509314
An empty folder /oracle/stage/19 is created by SWPM installer. We downloaded the grid and oracle rdbms installer into this folder
- Run the grid installer setup .Login as oracle and unzip the grid installer:
cd /oracle/stage/19/grid_home
unzip -q linuxx64_12201_grid_home.zip
- Run the grid installer setup .This would launch Oracle Grid Infrastructure Setup Wizard
./gridSetup.shCurrently we have a known issue with Oracle 8.2 install.The Oracle Installer fails with error INS-08101:
- Currently we have a known issue with Oracle 8.2 install.The Oracle Installer fails with error INS-08101:

The work around to resolve this is:
⦁ Set the OS parameter in your terminal to a previous version and re-start the Oracle Universal Installer.
export CV_ASSUME_DISTID=OEL7.8
- Enter the Disk group name for DATA, select the disk path of Data disks and set the discovery path (e.g. ‘dev/oracleasm/disks/):

- Specify the password for ASM user accounts (SYS and SNMP)


- Select name of operating system group,which you want to use for system authentication to Oracle ASM

- Select the path for Oracle base

- Select Oracle inventory directory path

- If you choose to run the configuration scripts automatically , specify the ‘root’ user credentials

- Verify the settings and click Next to finish


We have just configured/created data group named ‘DATA’ .. To configure other disk groups (ARCH and RECO) , we use ASM Configuration Assistant tool.
- To start ASMCA, enter asmca at a command prompt inside the Oracle Grid Infrastructure home.
cd $ORACLE_HOME/bin
./asmca


Oracle DB Installation:


SAP Bundle Patches
Download following SBP patches(19.8) for Oracle RDBMS and GRID, and follow the instructions from respective readme files :
Oracle Database SAP Bundle Patch
- Following files were downloaded to the database host for Oracle DB SAP Bundle Patch:
SAP19P_2008-70004508.ZIP (this SBP)
GIRU19P_2008-70004508.ZIP (DBRU 19.8.0.0.200714)
OPATCH19P_2008-70004508.ZIP (OPatch 12.2.0.1.21)

- Follow the instructions in ‘readme’ file (README19P_2008-70004508.HTM ) and install the SAP Bundle Patch. Main command to install this Patch is:
env ORACLE_HOME=$IHRDBMS $IHRDBMS/MOPatch/mopatch.sh -v -s SAP19P_2008- 70004508.ZIP
Oracle Database SAP Bundle Patch for Grid Infrastructure
Downloaded the following files for SAP Bundle Patch for Grid Infrastructure:
SGR19P_2008-70004550.ZIP (this SBP)
GIRU19P_2008-70004550.ZIP (GIRU 19.8.0.0.200714)
OPATCH19P_2008-70004550.ZIP (OPatch 12.2.0.1.21)

Follow the instructions in the ‘readme’ file(README19P_2008-70004550.HTM) and Install the patches of the SAP Bundle Patch into the grid home. Main command to install this Patch is:
env ORACLE_HOME=$OHGRID $OHGRID/MOPatch/mopatch.sh -v -s SGR19P_2008-70004550.ZIP
Continue/complete the DB Instance install (SWPM)
- SWPM was stopped/paused for the installation of Oracle software . Now that Oracle software(RDBMS, Grid ) and SAP Bundle Patches are installed, we can click ‘Next’ to continue with the installation.

- This completes the Installation of Oracle DB instance with ASM.

- You may verify by running the ASM instance .

- You can verify the setup by running the Oracle Enterprise manager
https://mydbhost.example.com:5500/em/
for example:
https://oradb.internal.cloudapp.net:5500/em/
When prompted for your username and password, log in as a user with DBA privilege (such as SYS or SYSTEM)
References (SAP Notes and relevant documents/papers)


Recent Comments