by Contributed | Dec 18, 2020 | Technology
This article is contributed. See the original author and article here.
Integration with Application Insights
As we have seen in an earlier post, your Logic App is integrated with Application Insights giving you access to all telemetry data in the form of tables in a database. Workflow execution specific logs are available under the traces table.
Select Logs under Monitoring in your Application Insights.
Application Insights provides a query language for extracting, manipulating, and visualizing the data.
Within each Application Insights table, some of the Functions or Logic App event data is in a field named customDimensions. For example, the following query retrieves all traces that have log level set to Error:
traces
| where customDimensions["Category"] == "Host.Triggers.Workflows"
| where customDimensions.LogLevel == "Error"
Alongside a severity level, each event type is assigned an Id and a name. This table shows some notable Event Ids and names associated with the workflow and job activity related events:
Event Id
|
Event Name
|
Event description
|
50
|
JobDebug
|
Job debug messages
|
51
|
JobWarning
|
Job warning messages
|
52
|
JobError
|
Job related errors
|
53
|
JobCritical
|
Job critical messages
|
54
|
JobOperation
|
Job operation messages
|
55
|
JobHistory
|
Job history messages
|
201
|
WorkflowRunStart
|
Workflow run starts
|
202
|
WorkflowRunEnd
|
Workflow run ends
|
203
|
WorkflowTriggerStart
|
Workflow trigger starts
|
204
|
WorkflowTriggerEnd
|
Workflow trigger ends
|
205
|
WorkflowActionStart
|
Workflow action starts
|
206
|
WorkflowActionEnd
|
Workflow action ends
|
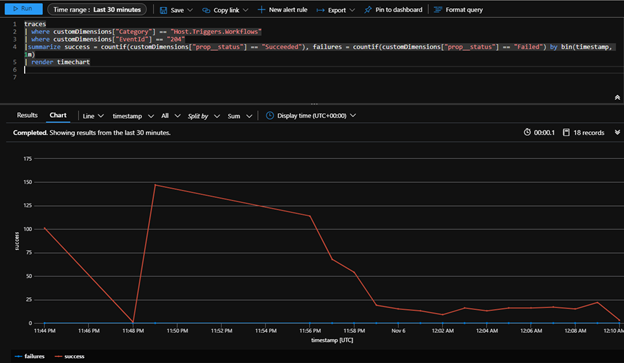
Using the EventName property in customDimensions,
here’s a query example that shows the workflow trigger success rate over time:
traces
| where customDimensions["Category"] == "Host.Triggers.Workflows"
| where customDimensions["EventName"] == "WorkflowTriggerEnd"
|summarize success = countif(customDimensions["prop__status"] == "Succeeded"), failures = countif(customDimensions["prop__status"] == "Failed") by bin(timestamp, 1m)
| render timechart
Tracked Properties
You can use tracked properties to augment the WorkflowActionEnd events with the outputs from the actions. Below example shows how we can set the header content from an http action outputs as a tracked property.

We can then query for this property in the WorkflowActionEnd event as follows:
traces
|where customDimensions["EventName"]=="WorkflowActionEnd"
and customDimensions["prop__flowRunSequenceId"]=="08585933276440232737734257234CU00"
and customDimensions["prop__actionName"]=="HTTP"
|extend prop=customDimensions["prop__properties"]
|project extractjson("$.trackedProperties.trackedProperty.Date", dynamic_to_json(prop), typeof(string))

Application map (preview).
With the recent major update of the portable Logic Apps runtime, we have enabled Application Insights advanced scenarios such as the Application map.
In Application Insights, select Application map under the Investigate section.
Workflow events interacting with external dependencies such as Event Hubs or HTTP endpoints are tracked as dependency operation and the corresponding node is visible in the Application map.
Each Logic App trigger or action being executed is reported as a request operation and mapped as a call in the Application map.
Consider the following workflow with an http trigger followed by various actions such as an outgoing http calls, a compose action, an event sent to Event Hub, and finally a blob written to Azure Storage using a Logic App connector:

The corresponding application map would include the following components, tracking the number of actions executed as well as their external targets:

You can click through from any component to more detailed diagnostics, such as the list of triggers or actions executed, the number of executions or the average duration.
Each action map to an operation executed in Application Insights. Select investigate performance to list all the operations as well as a set of associated metrics:

Live metrics stream.
In Application Insights, select Live metrics Stream under the Investigate section. Sampled log entries are displayed under Sample Telemetry.
Live metrics stream is used to get a near real time overview of the performance and behavior of your Logic App. This includes a holistic view of all the compute environment, such as the CPU and memory usage of each cloud instance as well as the evolution of the number of cloud instances with each autoscaling event.
What’s next?
We continue improving how workflow events integrate with Application Insights and your feedback can be submitted in our Gitub repository.
by Contributed | Dec 18, 2020 | Technology
This article is contributed. See the original author and article here.
Many customers connect their private corporate networks to Microsoft 365 to benefit their users, devices, and applications. However, there are many well-documented ways these private networks can be compromised. As we have seen in recent events related to the SolarWinds compromise, on-premises compromise can propagate to the cloud. Because Microsoft 365 acts as the “nervous system” for many organizations, it is critical to protect it from compromised on-premises infrastructure.
This document will show you how to configure your systems to protect your Microsoft 365 cloud environment from on-premises compromise. We primarily focus on Azure AD tenant configuration settings, the ways Azure AD tenants can be safely connected to on-premises systems, and the tradeoffs required to operate your systems in ways that protect your cloud systems from on-premises compromise.
We strongly recommend you implement this guidance to secure your Microsoft 365 cloud environment.
Understanding primary threat vectors from compromised on-premises environments
Your Microsoft 365 cloud environment benefits from an extensive monitoring and security infrastructure. Using machine learning and human intelligence that looks across worldwide traffic can rapidly detect attacks and allow you to reconfigure in near-real-time. In hybrid deployments that connect on-premises infrastructure to Microsoft 365, many organizations delegate trust to on-premises components for critical authentication and directory object state management decisions. Unfortunately, if the on-premises environment is compromised, these trust relationships result in attackers’ opportunities to compromise your Microsoft 365 environment.
The two primary threat vectors are federation trust relationships and account synchronization. Both vectors can grant an attacker administrative access to your cloud.
- Federated trust relationships, such as SAML authentication, are used to authenticate to Microsoft 365 via your on-premises Identity Infrastructure. If a SAML token signing certificate is compromised, federation would allow anyone with that certificate to impersonate any user in your cloud. We recommend you disable federation trust relationships for authentication to Microsoft 365 when possible.
- Account synchronization can be used to modify privileged users (including their credentials) or groups granted administrative privileges in Microsoft 365. We recommend you ensure that synchronized objects hold no privileges beyond a user in Microsoft 365, either directly or via inclusion in trusted roles or groups. Ensure these objects have no direct or nested assignment in trusted cloud roles or groups.
Principles for Protecting Microsoft 365 from on-premises compromise
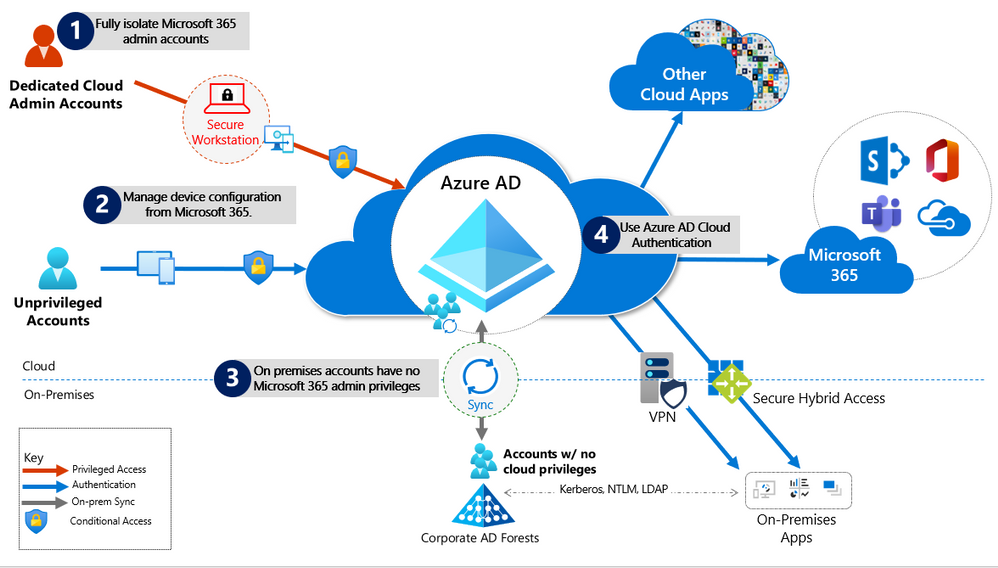
To address the threat vectors outlined above, we recommend you adhere to the principles illustrated below:
- Fully Isolate your Microsoft 365 administrator accounts. They should be
- Mastered in Azure AD.
- Authenticated with Multi-factor authentication (MFA).
- Secured by Azure AD conditional access.
- Accessed only by using Azure Managed Workstations.
These are restricted use accounts. There should be no on-premises accounts with administrative privileges in Microsoft 365. For more information see this overview of Microsoft 365 administrator roles. Also see Roles for Microsoft 365 in Azure Active Directory.
- Manage devices from Microsoft 365. Use Azure AD Join and cloud-based mobile device management (MDM) to eliminate dependencies on your on-premises device management infrastructure, which can compromise device and security controls.
- No on-premises account has elevated privileges to Microsoft 365. Accounts accessing on-premises applications that require NTLM, LDAP, or Kerberos authentication need an account in the organization’s on-premises identity infrastructure. Ensure that these accounts, including service accounts, are not included in privileged cloud roles or groups and that changes to these accounts cannot impact the integrity of your cloud environment. Privileged on-premises software must not be capable of impacting Microsoft 365 privileged accounts or roles.
- Use Azure AD cloud authentication to eliminate dependencies on your on-premises credentials. Always use strong authentication, such as Windows Hello, FIDO, the Microsoft Authenticator, or Azure AD MFA.
Specific Recommendations
The following sections provide specific guidance on how to implement the principles described above.
Isolate privileged identities
In Azure AD, users with privileged roles such as administrators are the root of trust to build and manage the rest of the environment. Implement the following practices to minimize the impact of a compromise.
For more information, see Securing privileged access, which has detailed guidance on this topic. Also, see Secure access practices for administrators in Azure AD.
Use cloud authentication
Credentials are a primary attack vector. Implement the following practices to make credentials more secure.
Limitations and tradeoffs
- Hybrid account password management requires hybrid components such as password protection agents and password writeback agents. If your on-premises infrastructure is compromised, attackers can control the machines on which these agents reside. While this will not compromise your cloud infrastructure, your cloud accounts will not protect these components from on-premises compromise.
- On-premises accounts synced from Active Directory are marked to never expire in Azure AD, based on the assumption that on-premises AD password policies will mitigate this. If your on-premises AD is compromised and synchronization from AD connect needs to be disabled, you must set the option EnforceCloudPasswordPolicyForPasswordSyncedUsers.
Provision User Access from the Cloud
Provisioning refers to the creation of user accounts and groups in applications or identity providers.

- Provision from cloud HR apps to Azure AD: This enables an on-premises compromise to be isolated without disrupting your Joiner-Mover-Leaver cycle from your cloud HR apps to Azure AD.
- Cloud Applications: Where possible, deploy Azure AD App Provisioning as opposed to on-premises provisioning solutions. This will protect some of your SaaS apps from being poisoned with malicious user profiles due to on-premises breaches.
- External Identities: Use Azure AD B2B collaboration. This will reduce the dependency on on-premises accounts for external collaboration with partners, customers, and suppliers. Carefully evaluate any direct federation with other identity providers. We recommend limiting B2B guest accounts in the following ways.
- Limit guest access to browsing groups and other properties in the directory.
- Use the external collaboration settings to restrict guest ability to read groups they are not members of.
- Block access to the Azure portal. You can make rare necessary exceptions.
- Disconnected Forests: Use Azure AD Cloud Provisioning. This enables you to connect to disconnected forests, eliminating the need to establish cross-forest connectivity or trusts, which can broaden the impact of an on-premises breach.
Limitations and Tradeoffs:
- When used to provision hybrid accounts, the Azure AD from cloud HR systems relies on on-premises synchronization to complete the data flow from AD to Azure AD. If synchronization is interrupted, new employee records will not be available in Azure AD.
Use cloud groups for collaboration and access
Cloud groups allow you to decouple your collaboration and access from your on-premises infrastructure.
- Collaboration: Use Microsoft 365 Groups and Microsoft Teams for modern collaboration. Decommission on-premises distribution lists, and Upgrade distribution lists to Microsoft 365 Groups in Outlook.
- Access: Use Azure AD security groups or Microsoft 365 Groups to authorize access to applications in Azure AD.
- Office 365 licensing: Use group-based licensing to provision to Office 365 using cloud-only groups. This decouples control of group membership from on-premises infrastructure.
Owners of groups used for access should be considered privileged identities to avoid membership takeover from on-premises compromise. Take over includes direct manipulation of group membership on-premises or manipulation of on-premises attributes that can affect dynamic group membership in Microsoft 365.
Manage devices from the cloud
Use Azure AD capabilities to securely manage devices.
Workloads, applications, and resources
- On-premises SSO systems: Deprecate any on-premises federation and Web Access Management infrastructure and configure applications to use Azure AD.
- SaaS and LOB applications that support modern authentication protocols: Use Azure AD for single sign-on. The more apps you configure to use Azure AD for authentication, the less risk in the case of an on-premises compromise.
- Legacy Applications
- Authentication, authorization, and remote access to legacy applications that do not support modern authentication can be enabled via Azure AD Application Proxy. They can also be enabled through a network or application delivery controller solution using secure hybrid access partner integrations.
- Choose a VPN vendor that supports modern authentication and integrate its authentication with Azure AD. In the case of an on-premises compromise, you can use Azure AD to disable or block access by disabling the VPN.
- Application and workload servers
- Applications or resources that required servers can be migrated to Azure IaaS and use Azure AD Domain Services (Azure AD DS) to decouple trust and dependency on AD on-premises. To achieve this decoupling, virtual networks used for Azure AD DS should not have connection to corporate networks.
- Follow the guidance of the credential tiering. Application Servers are typically considered Tier 1 assets.
Conditional Access Policies
Use Azure AD Conditional Access to interpret signals and make authentication decisions based on them. For more information, see the Conditional Access deployment plan.
Monitoring
Once you have configured your environment to protect your Microsoft 365 from an on-premises compromise, proactively monitor the environment.
Scenarios to Monitor
Monitor the following key scenarios, in addition to any scenarios specific to your organization. For example, you should proactively monitor access to your business-critical applications and resources.
- User Entity Behavioral Analytics (UEBA) alerts: Use UEBA to get insights on anomaly detection.
- Microsoft Cloud App Discovery (MCAS) provides UEBA in the cloud.
- You can integrate on-prem UEBA from Azure ATP. MCAS reads signals from Azure AD Identity Protection.
- Emergency access accounts activity: Any access using emergency access accounts should be monitored and alerts created for investigations. This monitoring must include:
- Sign-ins.
- Credential management.
- Any updates on group memberships.
- Application Assignments.
- Privileged role activity: Configure and review security alerts generated by Azure AD PIM. Monitor direct assignment of privileged roles outside PIM by generating alerts whenever a user is assigned directly.
- Azure AD tenant-wide configurations: Any change to tenant-wide configurations should generate alerts in the system. These include but are not limited to
- Updating custom domains
- Azure AD B2B allow/block list changes
- Azure AD B2B allowed identity providers (SAML IDPs through direct federation or social logins)
- Conditional Access or Risk policy changes
- Application and service principal objects:
- New applications or service principals that might require Conditional Access policies
- Additional credentials added to service principals
- Application consent activity
- Custom roles:
- Updates of the custom role definitions
- New custom roles created
Log Management
Define a log storage and retention strategy, design, and implementation to facilitate a consistent toolset such as SIEM systems like Azure Sentinel, common queries, and investigation and forensics playbooks.
- Azure AD Logs Ingest logs and signal produced following consistent best practices (e.g., diagnostics settings, log retention, SIEM ingestion, etc.). The log strategy must include the following Azure AD logs:
- Sign-in activity
- Audit logs
- Risk events
Azure AD provides Azure Monitor integration for the sign-in activity log and audit logs. Risk events can be ingested through Microsoft Graph API. You can stream Azure AD logs to Azure monitor logs.
- Hybrid Infrastructure OS Security Logs. All hybrid identity infrastructure OS logs should be archived and carefully monitored as a Tier 0 system, given the surface area implications. This includes:
- Azure AD Connect. Azure AD Connect Health must be deployed to monitor identity synchronization.
- Application Proxy Agents
- Password write-back agents
- Password Protection Gateway machines
- NPS that have the Azure MFA RADIUS extension
Stay up to date
The Solarwinds attack is an ongoing investigation, and our teams continue to act as first responders to these attacks. As new information becomes available, we will make updates through our Microsoft Security Response Center (MSRC) blog at https://aka.ms/solorigate.
by Contributed | Dec 18, 2020 | Technology
This article is contributed. See the original author and article here.
By Lothar Zeitler – Senior Program Manager | Microsoft Endpoint Manager – Intune
The E-FOTA service is provided by Samsung as part of Samsung Knox and can be connected to Microsoft Endpoint Manager. In this blog article, we look at the possibilities of E-FOTA in combination with Enterprise Mobility Management (EMM) and how to connect E-FOTA with Microsoft Endpoint Manager.
With the Knox service, Samsung offers E-FOTA (Enterprise Firmware-Over-The-Air) updates for Samsung Android devices. With E-FOTA, for example, device groups can be created for individual update settings, such as which updates are to be installed on the devices and at what times. In addition, admins can set whether the user is still allowed to change the device configuration or not. E-FOTA offers granular update management for corporate devices.
Devices managed in Microsoft Intune can be integrated into E-FOTA update management. Devices do not have to be adopted specifically into E-FOTA (e.g. CSV import), but can be added and managed immediately with group membership. As a further advantage, it can be ensured that only devices managed by Intune are managed with E-FOTA.
Device groups in Azure Active Directory (Azure AD) can be used to classify devices which will be assigned to the corresponding E-FOTA configuration groups (campaigns) in E-FOTA. Examples can be pilot groups to test firmware updates, or groups for corporate divisions which will receive different versions of updates or kiosk devices which will execute update installation in a certain time window.
These E-FOTA groups (campaigns) can each have different update settings and the corresponding Azure AD device groups can be assigned to them individually. Thus, if an Azure AD group is assigned to a campaign, all the Azure AD group devices receive the settings from the campaign to which the Azure AD groups are assigned.
This article requires Azure AD and that the device management is in Microsoft Intune. Besides Intune and Azure AD, we also need access to Samsung Knox.
The following demonstrates how to use E-FOTA within an existing Intune environment where Samsung devices are already managed.
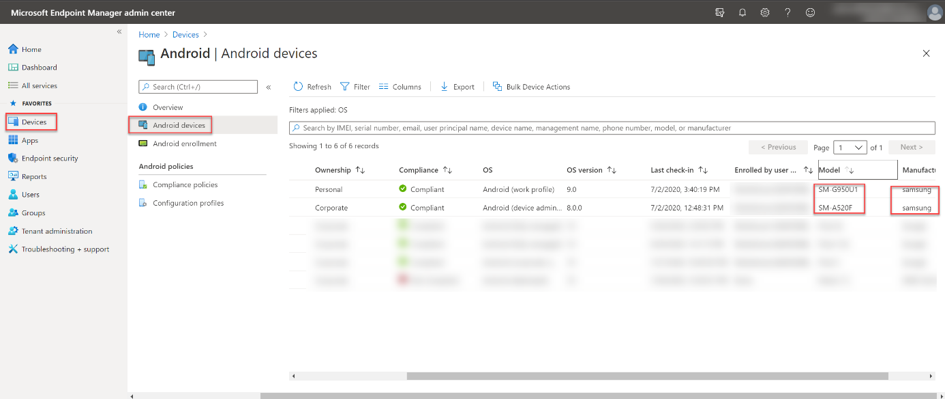
In the Intune console, we see two Samsung devices:
(Devices – Android Devices)
Intune admin console – All Android devices blade
To get started, an Azure AD group needs to be created that contains these two Samsung models, this will bring them into the update management in E-FOTA later. The group is dynamically created to automatically add new registered Samsung devices. If new devices come into the group, they are also automatically assigned to the setting assigned to the appropriate campaign in E-FOTA.
To create a dynamic group, we go to Groups > New Group in the Intune console. In this example, we use “Samsung EFOTA G950U1 A520F” as the name. Because devices are to be added to the respective devices’ group, we use the Dynamic Device group type.
 Dynamic Device group configuration
For the group criteria, we use Samsung as the manufacturer, as well as specific models for a granular control of the group membership.
The criteria in our example is:
(device.deviceManufacturer -eq "samsung") and ((device.deviceModel -contains "SM-G950U1") or (device.deviceModel -contains "SM-A520F")).
Note that more complex logical groupings can no longer be displayed in the UI/Querybuilder and therefore it must be entered in the Rule Syntax field. After entering the rule, Save and Create to confirm your rule. The devices will be added automatically to the group. Keep in mind, the process of adding devices can take a few minutes.
 Dynamic membership rule configuration
After the first Azure AD group for E-FOTA has been created, E-FOTA and Intune must be connected. The communication between E-FOTA and Azure AD takes place via the Graph API. Access to Azure AD resources, such as groups, requires identification in Azure AD. An application must be registered in Azure AD for this purpose. An application can be a web or mobile app as well as a web-API.
Note: This Samsung Knox site offers great guidance on E-FOTA.This blog essentially follows this guide.
First, the app must be registered in Azure AD. The best way to do this is to use the Azure Portal (portal.azure.com). A new app can then be registered under Azure AD > App registrations > New registration.
On the registration page, the name of the app needs to be specified. The app should only be made known for the organization by selecting Accounts in this organizational directory only. The Register action finishes the registration in Azure AD.
 Knox E-FOTA One app registration
After successful registration, a summary of the registration appears. For further configurations, it is important to remember the Application (client) ID and the Directory (tenant) ID.
 Knox E-FOTA One app registration summary
The next step is to create a client secret. This ensures that it is only possible to communicate with the app if the client secret is known. To create a client secret in Azure AD for the Knox E-FOTA One app, go to Certificates & secrets via the app properties and then select the New client secret option in the Client secrets section. Add a Description, we suggest including the name, e.g. “Client secret for Knox E-FOTA One” and select when the secret should expire. In this example, we set the value to “never.” Add generates the Secret.
 Knox E-FOTA One – Clients & secrets configuration
The generated client secret is required on a later step.
 Client secret for Knox E-FOTA One
As a last step, API entitlements need to be set. Access to Intune Groups is performed by Microsoft Graph, which ensures that the devices administrated in Intune are established in E-FOTA. The following requirements are needed:
The entitlements can be added through API-Permissions and Add a permission. Microsoft Graph is selected on the page Request API permissions.
 API permissions request for Microsoft Graph
Select API Permission in the following dialog box and search for the permissions Device.Read.All, Group.Read.All and DeviceManagementManagedDevices.Read.All. Add them by clicking Add permission. If this process is completed, the relating permissions will have to be acknowledged with the command Grant admin consent for <org>.
 API Permission request – Granting admin consent for your organization
At this point, the configuration in Azure AD is complete. The following steps must be set out in the Samsung Knox E-FOTA console:
Here it is important to establish the connection from E-FOTA to the corresponding Azure AD. This is done via the app that was previously created in Azure AD. After logging into the Samsung Knox setting, Microsoft Intune can be added by selecting EMM Groups and Connect EMM in the E-FOTA section.
After clicking Microsoft Intune, the following dialogue will appear: «Connect with your EMM Dialog». The values for Client ID, Client Secret and Tenant ID are learned from the Azure AD app’s properties Knox E-FOTA One.
 Connect with your EMM dialog box
After registering successfully, device groups from Azure AD will be displayed.
Here, we select the dynamic group which was set up at the beginning. Later, further groups can be added as well.
 Add dynamic device groups to E-FOTA
All the devices which are members of the group will be added in E-FOTA. An explicit registration of the devices in Samsung Knox is not necessary.
Note: EMM groups with E-FOTA:
- Groups are synchronized every six hours.
- Devices deleted in EMM are deleted from E-FOTA as well.
- Devices added to an EMM group are added to E-FOTA automatically.
- If devices are transferred to another EMM group, the assignment will reflect in E-FOTA accordingly.
Learn more about Managing EMM groups (samsungknox.com).
If the devices are in the E-FOTA system, these can become part of a campaign. Each campaign, in turn, can contain an individual setting profile. In the E-FOTA console you’ll find a menu entry to configure a campaign.
 Screenshot of the Knox E-FOTA Campaigns console
With the function Create Campaign, a new update configuration can be created in E-FOTA.
In this example, the campaign is named, ”EFOTA for Intune Devices”. Various settings can be configured after the campaign is created.
 Knox E-FOTA portal – New campaign information
As the final step, the devices must be assigned to the campaign. Under Assign devices and firmware you will find the corresponding option, Assign Devices.
 Knox E-FOTA portal – Assigning devices
Note: In the case of devices that have been recently added, it can take several hours until the list showing the available firmware options is generated.
 Knox E-FOTA portal – Selecting the target firmware to push to devices
Learn more on how to Create a campaign (samsungknox.com).
After Azure AD and E-FOTA have been configurated, the devices still need to be set up in Microsoft Intune so that the device can establish a connection with the E-FOTA service.
Regarding this step, there are two possibilities in Microsoft Intune:
The E-FOTA app can be downloaded/pushed to the Samsung devices with the Intune app installation. After the app is installed, the device is ready to be included in a campaign but the user has to activate the device by starting E-FOTA.
The second option is to automate the process. With Microsoft Intune, OEMConfig profiles can be created and configured to help set up the E-FOTA client on Samsung devices. The installation/configuration of the required software happens fully automated. Only the E-FOTA disclaimer must be confirmed once.
Note: Additional Information on OEMConfig can be found on: Use OEMConfig on Android Enterprise devices in Microsoft Intune – Azure | Microsoft Docs.
Automating the process is more complex, we will walk you through the steps.
First you must create an Android Enterprise Configuration Profile with the type OEMConfig.
 Android Enterprise Configuration Profile with the OEMConfig profile
After choosing a profile name, the Knox Service Plugin (KSP) is selected. The KSP processes the OEMConfig profile’s settings.
 Selecting the Knox Service Plugin as the OEMConfig app
Under Configuration Settings, the E-FOTA special settings can then be searched and configured. It is also possible to make further, non-E-FOTA settings here. To find the E-FOTA options, you can search via the locate link with the search term E-FOTA.
 Enabling the E-FOTA settings
After adding the E-FOTA options to the configuration, the settings can be configured.
 Configuring the E-FOTA options
The last step is to automatically assign the device group to be configured using OEMConfig. This is done under assignments.
Once the assignment has been made, the registration with the E-FOTA service and the setting of the parameters from the OEMConfig proceeds largely automatically. Not much can be seen on the respective device itself during execution. In the system notifications of the device, the actions (e.g. installation of E-FOTA) or the sequence can be tracked.
The only necessary interaction is to confirm the E-FOTA disclaimer. Below, screenshots show a few notifications during the installation/configuration processes as well as the disclaimer.
 User experience to confirm the E-FOTA disclaimer
If a device is successfully assigned to a campaign, it receives the update management settings from E-FOTA. The E-FOTA console can be used to check the devices’ status and their allocation to campaigns. If the status is “Campaign active“, the device updates are successfully managed through E-FOTA.
 Knox E-FOTA portal – Device overview
Samsung Knox offers granular update management by E-FOTA services for Samsung devices. These settings are in addition to the standard EMM settings. With the integration of Azure AD, Microsoft Intune and Samsung E-FOTA, the strengths of the respective platforms can be easily combined.
For further information on E-FOTA, see: Knox E-FOTA (samsungknox.com) to learn more.
If you have any questions on this post, just let us know by commenting back on this post. You can also ask quick questions at @IntuneSuppTeam out on Twitter.

Recent Comments