This article is contributed. See the original author and article here.
Microsoft security researchers have been investigating and responding to the recent nation-state cyber-attack involving a supply-chain compromise followed by cloud assets compromise.
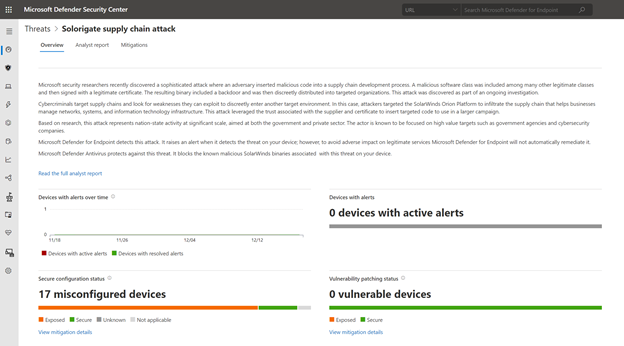
Microsoft 365 Defender can help you track and respond to emerging threats with threat analytics. Our Threat Intelligence team has published a new Threat analytics report, shortly following the discovery of this new cyber attack. This report is being constantly updated as the investigations and analysis unfold.
The threat analytics report includes deep-dive analysis, MITRE techniques, detection details, recommended mitigations, updated list of indicators of compromise (IOCs), and advanced hunting queries that expand detection coverage.
Given the high profile of this threat, we have made sure that all our customers, E5 and E3 alike, can access and use this important information.
If you’re an E5 customer, you can use threat analytics to view your organization’s state relevant to this attack and help with the following security operation tasks:
Monitor related incidents and alerts
Handle impacted assets
Track mitigations and their status, with options to investigate further and remediate weaknesses using threat and vulnerability management.
For our E3 customers, you can read similar relevant Microsoft threat intelligence data, including the updated list of IOCs, through the MSRC blog. Monitor the blog, Customer Guidance on Recent Nation-State Cyber Attacks, where we share the latest details as the situation unfolds.
Specifically my SQL scripts have demos all over the place and Buck Woody said I have to clean up myvery messy room…. Azure Synapse Analytics environment
Create a Pull Request in Azure Synapse Analytics to merge our new branch with the main
Approve the Pull Request in Azure DevOps
Validate our main branch is updated in our Azure Synapse Analytics Environment
This time we will:
Create an Artifact pipeline
This is to create an Artifact we can use to deploy to another environment
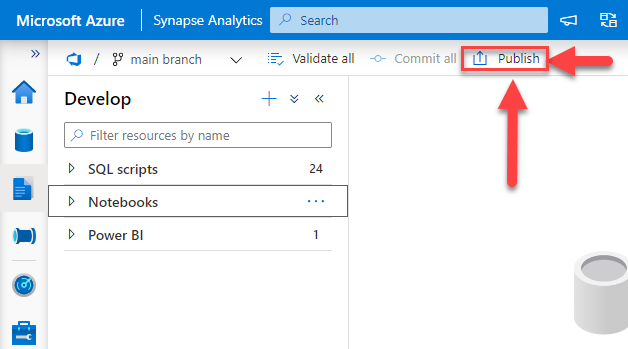
First we are going to examine a very important part of our Azure Synapse Analytics environment. The Publish button.
Why all the arrows and boxes? Because this is important. This publish button saves the templates that we will use to deploy our environment to another Azure Synapse Analytics workspace. When you click publish a few messages should appear. Publishing In progress, Publishing completed, Generating templates, and Generating templates completed.
If you get an error do not fear, validation will occur and show you where the error is in your workspace. I’ve encountered this a time or two. Eventually I will intentionally write a blog in this series where we break things just to fixt them. For now, let us presume that everything went just fine.
Next we will move over to our Azure DevOps Repo. Find the folder that is the same name as your Azure Synapse Analytics workspace. In this picture mine is bballasw. Under that folder you will find two files, TemplateForWorkspace.json & TemplateParametersForWorkspace.json.
*NOTE – these templates are not the same templates you would use to deploy a new environment. These are only for deploying the artifacts from one environment to another. In part 5 we will look at generating the ARM templates needed for deploying a new environment from Azure DevOps.
We will be using these files to create our artifact build pipeline. Also highlighted is the WorkspaceDefaultSqlServer_connectionString, this string is of the type secureString. This is important when we reach our release pipeline in Part 4, if we do not handle this string properly the release will fail.
For this exercise I’ve created another Azure Synapse Analytics Environment for us to deploy to named bballaswqa in a separate resource group from bballasw.
Right now there is nothing in bballaswqa.
Especially compared to bballasw.
With our destination of bballaswqa in mind, we begin with our build pipeline. Moving over to Azure DevOps we want to move to Pipelines.
Click New pipeline.
At the very bottom of the page, in super tiny font you will find Use the classic editor. Make sure to click on that lin.
This is where we configure the project, repository, and the default branch for our builds. All of this information is correct. We are using Azure Repos Git, we will click the Continue button.
At the very top of our next page we have different options for our pipeline template. We will click on the Empty job link.
Now we are finally to the pipeline. First we will rename the default name. I use ASW in my naming convention as it stands for Azure Synapse Workspace. We rename the pipeline to ASW Build Pipeline. Then we click on the Triggers section. The Triggers section is where we will configure our CI portion of our build.
Check the Enable continuous integration check box. Under branch filters we want main, as that is the branch we are publishing to for all of our builds. But we need to add a Path filter. Ever time we merge a branch to main it would cause the build pipeline to run. I only want the pipeline to run when we publish from our Azure Synapse Analytics environment.
After this return to the tasks window.
On the Agent job 1 click the + button. We need the Copy files task. Add that to our pipeline.
In Azure DevOps there are some reserved variables. One of the Build variables is Build.ArtifactStagingDirectory, for a full list see this Docs article Predefined variables – Azure Pipelines | Microsoft Docs. This defines a local path on a build agent and this is where we want our build files deployed to. In part 4 we will build a Release Pipeline and that Release will be linked to the artifacts we produce.
We will change our Display name to Copy ARM Template Files to: $(Build.ArtifactStagingDirectory). When you use a variable in Azure DevOps you invoke it with $(variableName). Now click on the three ellipsis next to the Source Folder text box.
We will select the folder that has the same name as our Azure Synapse Analytics workspace that has our Template JSON files.
We finish configuring this task by setting our contents to *.json. This will pull in only the JSON files under our folder. We set the Target Folder to $(Build.ArtifactsStagingDirectory)/ARM.
We don’t need the folder path. At this time there are no other object in my build pipeline. If we ever want to add them we can have additional subfolders, but for now my OCD won and I created a folder.
Now click on the + sign on Agent Job 1. We need to add the Publish Pipeline Artifacts task.
Our File or Directory path will be $(Build.ArtifactsStagingDirectory). Our Artifact name will be ASW_Drop.
Hit Save & queue.
Enter a save comment, click Save and run.
Click on the Agent job 1 section of the page and open the build agent window.
OH WOW! IT ALL TURNED GREEN AND WORKED!!! …..it’s not like I did this a few 100 times failing miserably until I figured it out…… Now click on the small arrow next to the Jobs run to return to the pipeline.
Under the header Related 0 work items click on 1 published; 1 consumed.
Expand the arrow next to ASW_Drop, ARM, and we can see our Template files. Success we have a build artifact that we can now call in a Release pipeline.
Ok Dear Reader, it’s late and we are done for today. In our next blog we will cover the release pipeline and look at what was deployed to our QA environment!
This article was originally posted by the FTC. See the original article here.
You’ve probably spent a good part of 2020 doing some online shopping. Now that the holidays are here, you definitely want to be sure you — or your friends and family — actually get what you ordered. On this 11th day of Consumer Protection, take these steps to help Rudolph find his way to your house.
Confirm that the seller is legit. Read reviews and recommendations about the product, seller, and warranties from sources you trust. Look for reviews about their reputation and customer service, and be sure you can contact the seller if you have a dispute.
’Twas the night before? Look carefully at the shipping date before you order. If there’s no date given, the seller has 30 days to ship. If you’re notified about a delay in shipping, you have the right to cancel the order and get a full refund. If you decide to cancel, let the seller know right away so you won’t be billed.
Give them some credit. If possible, pay with a credit card — that gives you many protections under the law. If you pay with a credit card, you may be able to dispute certain charges — and temporarily withhold payment for those charges pending an investigation.
Track— and guard — your delivery. Keep a record of your order, including tracking numbers. That way you can see where your stuff is in the shipping process. Also, consider having your items held at the post office or delivered to a family member or neighbor in case you’re not home. Some companies have their own secure locations where you can have your merchandise delivered. This protects you from having some Grinch steal your holiday right from your doorstep.
Brought to you by Dr. Ware, Microsoft Office 365 Silver Partner, Charleston SC.
This article is contributed. See the original author and article here.
The holiday season is upon us and while things may be quiet on the Azure news front, many creatures are stirring with tales of what was in 2020. News items to be covered this week include Microsoft Learn’s plan to help you stay current with in-demand skills through free certification renewals, A retrospect to announcements shared on AzUpdate over the course of 2020, AzUpdate Team gadget holiday picks, and a very special Microsoft Learn Module of the Week.
Providing certified professionals a new method to renew their Microsoft Certifications
With Microsoft moving away from product-focused certifications, they looked at new ways to continue investing in role-based learning offerings. When the pandemic hit, 1,000 new Azure capabilities were created to address our current situation by allowing us to innovate with key advancements in AI, machine learning, and virtualization. To keep pace with this exponential growth, Microsoft has announced a couple of upcoming updates to the certification program.
Beginning in early February 2021, once you’ve completed and passed your initial exam, you’ll be able to renew your role-based and specialty certifications by passing a free renewal assessment on Microsoft Learn. The renewal assessment is completed online within six months before your certification expires. Once passed, certification is extended by one additional year from the current expiration date and can be completed annually.
As mentioned earlier, over one thousand new Azure services were launched in 2020. Here is a quick recap on a couple of announcements that the AzUpdate team reported on:
Detecting large-scale cryptocurrency mining attack against Kubernetes clusters – April 17th (S01E01) Written by Yossi Weizman, a Security Research Software Engineer with the Azure Security Center team, this blog post describes a recent large-scale cryptocurrency mining attack against Kubernetes clusters that was recently discovered by Azure Security Center. The post shares details on what Azure Security Center discovered during the attack and how others can better protect themselves from similar attacks.
Microsoft announces next evolution of Azure VMware Solution – May 8th (S01E04) The new Azure VMware Solution empowers customers to seamlessly extend or completely migrate their existing on-premises VMware applications to Azure without the cost, effort, or risk of re-architecting applications or retooling operations. Customers can also save money with Windows Server and SQL Server workloads running on Azure VMware by taking advantage of Azure Hybrid Benefits.
AMD Nested Virtualization Support now available – June 12 (S01E08) Nested Virtualization is not a new idea. In fact, we announced our first preview of Nested Virtualization running on Windows way back in 2015. Unfortunately, users of AMD hardware were unable to take advantage of Nested Virtualization on Windows…. until now. Windows Build 19636 saw the public preview of Nested Virtualization on AMD processors
New Windows Virtual Desktop capabilities now generally available – July15 (S01E15) New Windows Virtual Desktop capabilities now GA including Azure portal integration for deployment / management and new audio/video redirection capabilities providing seamless meeting and collaboration experience for Microsoft Teams.
New Microsoft Learn Modules for Azure and Windows Server IT Pros – August 14 (S01E17) Whether you’re just starting or an experienced professional, the hands-on approach helps you arrive at your goals faster, with more confidence and at your own pace. In the last couple of days, we published a couple of new Microsoft Learn modules around Azure, Hybrid Cloud, and Windows Server for IT Pros. These modules help you to learn how you can leverage Microsoft Azure in a hybrid cloud environment to manage Windows Server.
Azure IoT Central new and updated features – September 18 (S01E21) A plethora of new IoT Central capabilities were announced in September and included the redesign of Jobs creation with a new wizard experience, added File upload support, newly added data export capabilities, CLI improvements and others. Biggest Azure IoT Central update of the year making it easier for organizations to deploy and manage their IoT infrastructures.
Microsoft Ignite 2020 saw the announcement of Azure Automanage, an exciting new preview service which aims to simplify the management of Windows Server virtual machines. When you deploy a virtual machine (VM) into any environment, on prem or within the Cloud there are other components and services that you need to consider. Backup, Monitoring, Patch Management, etc. The management and operations of a VM. What Azure Automanage helps you with is enrolling and configuring those supporting components for you.
Using Windows Admin Center on-premises to manage Azure Windows Server VMs – November 27 (S01E30) Sonia Cuff and Orin Thomas share how to spin up a WAC gateway server instance on a local VM, configure Windows Server’s built in Azure Network Adapter as a VPN connection (between your on-premises server and the VNet that hosts your Windows Server VMs in Azure), and then add connections from the WAC gateway server to your Windows Server VMs in Azure.
Azure Synapse now Generally Available – December 4 (S01E31) Solutions like data lakes and data warehouses have helped organizations collect and analyze several types of data. The process however, created niches of expertise and specialized technology. Azure Synapse rearchitects operational and analytics data stores to take full advantage of a new, cloud-native architecture. The solution enables organizations to query data using either serverless or dedicated resources at scale while maintaining consistent tools and languages. Think of it as your organization’s one pane of glass to analyze all its captured data. Azure Synapse combines capabilities spanning the needs of data engineering, machine learning, and BI without creating silos in processes and tools.
Community Events
Patch and Switch – It’s the holidays and Rick Claus and Joey Snow are back one final time in 2020 with surprises in store.
Festive Tech Calendar – Continuing this month’s content from different Azure communities and people around the globe for the month of December
All Around Azure – A Beginners Guide to IoT – Focus on topics ranging from IoT device connectivity, IoT data communication strategies, use of artificial intelligence at the edge, data processing considerations for IoT data, and IoT solutioning based on the Azure IoT reference architecture
Introduction to Cloud Adoption Framework – Sarah Lean investigates Microsoft’s Cloud Adoption Framework offering and what is available for organizations to take advantage of
MS Learn Module of the Week
Kids out on holiday break? Looking for a fun way to keep them entertained and possibly have some fun yourself? Check out this ne Learn module which is fun for the whole family!
Explore data in basketball; inspired by Space Jam: A New Legacy
Basketball and coding both require creativity, curiosity, and the ability to look at the big picture while strategizing your next move. Space Jam: A New Legacy is the perfect inspiration to learn computer and data science, and we’ve teamed up to create unique learning paths for data science and machine learning.
Develop skills in Visual Studio Code, Azure, GitHub, JavaScript, and Python, to gain insights into how individual moments throughout a player’s history can lead to a critical game decision in the finals.
Let us know in the comments below if there are any news items you would like to see covered in the next show. AzUpdate will return for Season 2 on January 8th, 2021 so be sure to catch the next episode and join us in the live chat.
This article is contributed. See the original author and article here.
Some customer asked me about the following topic.
“We use App Service for hosting applications and Azure Front Door as global L7 load balancer. We would like to permit access only from Azure Front Door to Azure App Service as simply as possible. Could you please share good solution with us?”
By default, each App Service has a public IP address and is accessible via FQDN from across theglobe. If you simply deploy App Service behind Azure Front Door, everyone can access App Service directly. Therefore, we have to configure permit only access from Azure Front Door at App Service. If you were me, what do you think is a good solution?
What is Azure Front Door?
If you are not familiar with Azure Front Door, please read the following document.
I would like to walk through how to configure access restriction from other than Azure Front Door to App Service. If you can access Azure environment, I recommend following my instruction. In this article, I use quick start tutorial for Azure Front Door.
We can choose several options to configure Azure Front Door – Azure Portal, CLI, PowerShell, and ARM template. In this article, I use Azure Portal to configure access restriction.
Even if we don’t create two App Service instances, we can test access restriction. You may follow the quick start tutorial dutifully, of course.
Create App Service instance
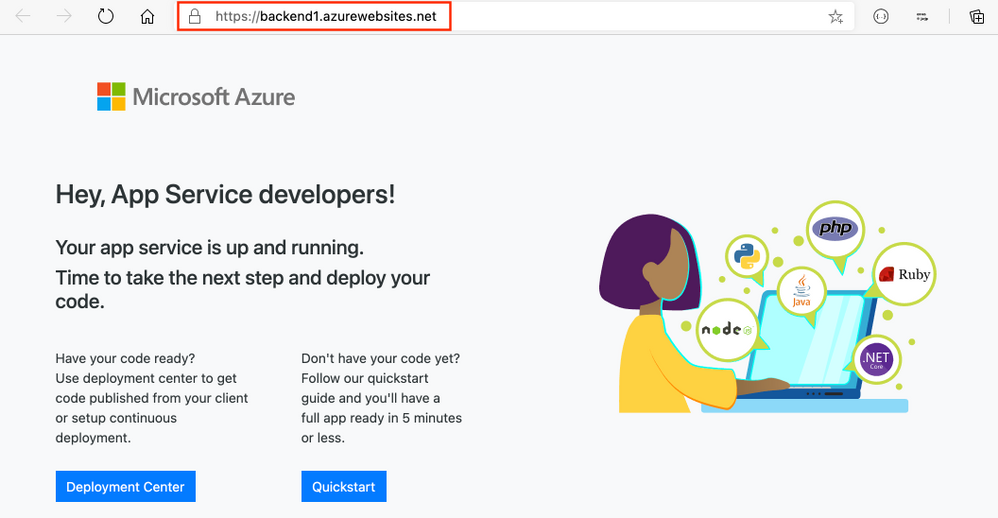
Following the tutorial, we can create simple App Service instances for backend service. Nothing special configuration is required. At this point, you should be able to access the instances via FQDN.
Configure Front Front Door
Following the tutorial, you can configure Azure Front Door. Note that we have to specify “App Service” when choosing “Backend host type”.
After specifying backend host type, we should see the following image.
When all configuration is ready, click “Create” and wait a minute. When Azure Front Door is ready, we can test if access via Azure Front Door is available.
At this point, we can still access App Service instances directly via FQDN since we have not configured access restrictions yet.
Configure access restriction for App Service instances
We open App Service instances created in the previous step in Azure Portal. And, we select “Settings” > “Networking” > “Access Restrictions” > “Configure Access Restrictions”.
Clicking “Add rule”, some screen appears from righthand where we create access restriction rule.
We can specify some attributes. Name, priority, and description as we like. And then, this the most important thing in this article! We have to choose “Service Tag (preview)” among several options of “type”. When choosing “Service Tag (preview)”, we can choose a service tag among options. In this case, we have to pick up “AzureFrontDoor.Backend” among them, and click “Add rule”.
If you create two App Service instances, you have to repeat to do these steps to the other instance.
That’s it. It’s simple, isn’t it?
Give it a try!
First of all, we test access via Azure Front Door. This access is permitted and we can see the following image.
How about access to App Service directly? This access is restricted and HTTP 403 returns.
Conclusion
In this article, I describe a simple way of access restrictions when using Azure Front Door and App Service. Hope this helps.


Recent Comments