by Contributed | Dec 16, 2020 | Azure, Microsoft, Technology
This article is contributed. See the original author and article here.
Overview
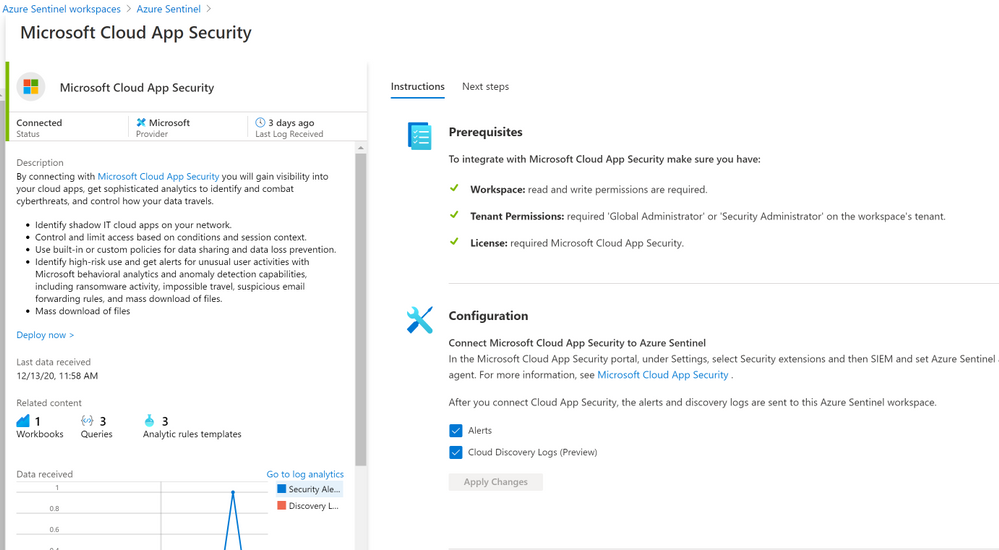
The Microsoft Cloud App Security (MCAS) connector lets you stream alerts and Cloud Discovery logs from MCAS into Azure Sentinel. This will enable you to gain visibility into your cloud apps, get sophisticated analytics to identify and combat cyberthreats, and control how your data travels, more details on enabling and configuring the out of the box MCAS connector (Connect data from Microsoft Cloud App Security)
Cloud App Security REST API (URL Structure , Token & Supported Actions)
The Microsoft Cloud App Security API provides programmatic access to Cloud App Security through REST API endpoints. Applications can use the API to perform read and update operations on Cloud App Security data and objects.
To use the Cloud App Security API, you must first obtain the API URL from your tenant. The API URL uses the following format:
https://<portal_url>/api/<endpoint>
To obtain the Cloud App Security portal URL for your tenant, do the following steps:
– In the Cloud App Security portal, click the question mark icon in the menu bar. Then, select About.
 – In the Cloud App Security about screen, you can see the portal url.

Once you have the portal url, add the /api suffix to it to obtain your API URL. For example, if your portal’s URL is https://m365x933168.eu2.portal.cloudappsecurity.com, then your API URL is https://m365x933168.eu2.portal.cloudappsecurity.com/api.
Cloud App Security requires an API token in the header of all API requests to the server, such as the following:
Authorization: Token <your_token_key>
Where <your_token_key> is your personal API token. For more information about API tokens, see Managing API tokens., here’s an example of CURLing MCAS Activity log:

The following table describes the actions supported:

Where Resource represents a group of related entities, fore more details please visit MCAS Activities API
Implementation (MCAS Activity Connector)
- Log in to the Azure tenant, http://portal.azure.com
- Go to Azure Sentinel > Playbooks
- Create a new Playbook and follow the below gif / step-by-step guide, the code being uploaded to github repo as well:
- Add a “Recurrence” step and set the following field, below is an example to trigger the Playbook once a daily basis:
- Interval: 1
- Frequency: Day
- Initialize a variable for the MCAS API Token value, make sure to generate MCAS API Token following this guide
- Name: MCAS_API_Token
- Type: String
- Value: Token QhXXXXBSlodAV9AXXXXXXQlMcFhweXXXXXRXXh1OGkXXkXXkeX
- Set an HTTP endpoints to Get MCAS Activity data:
- HTTP – MCAS Activities API:
- Parse MCAS Activities data via Json:
- Parse JSON – MCAS Activities:
- Content: @{body(‘HTTP_-_MCAS_Activities_API’)}
- Schema: uploaded to github
- Initialize an Array Variable:
- Name: TempArrayVar
- Type: Array
- Append to array variable:
- Name: TempArrayVar
- Value: @{body(‘Parse_JSON_-_MCAS_Activities’)}
- Add For each control to iterate MCAS Activities parsed items:
- Select an output from previous steps: @variables(‘TempArrayVar’)
- Send the data (MCAS Activity Log) to Azure Sentinel Log analytics workspace via a custom log tables:
- JSON Request body: @{items(‘For_each’)}
- Custom Log Name: MCAS_Activity_Log

Notes & Consideration
- You can customize the parser at the connector’s flow with the required and needed attributed / fields based on your schema / payload before the ingestion process, also you can create custom Azure Functions once the data being ingested to Azure Sentinel
- You can customize the for-each step to iterate MCAS Activity log and send them to the Log Analytics workspace so eventually each activity log will be logged in a separate table’s record / row
- You can build your own detection and analytics rules / use cases, a couple of MCAS Activities analytics rules will be ready to use at github, stay tuned
- Couple of points to be considered while using Logic Apps:
Get started today!
We encourage you to try it now!
You can also contribute new connectors, workbooks, analytics and more in Azure Sentinel. Get started now by joining the Azure Sentinel Threat Hunters GitHub community.
by Contributed | Dec 16, 2020 | Technology
This article is contributed. See the original author and article here.
In this guide, you will use the Azure Synapse Analytics Knowledge center to understand the Manage hub blade of Synapse Studio. You will learn how Synapse integrates with other data sources, even non-Azure ones, such as Amazon S3; explore data contained within those sources; and then address access control scenarios in Synapse to facilitate collaboration while keeping resources secure.
Creating a Dedicated SQL Pool in Manage Hub
To successfully complete this tutorial, you will need to have a dedicated SQL pool provisioned. Luckily, you can do this within the Manage hub. To access the Hub, locate the selector on the left-hand bar of Synapse Studio.

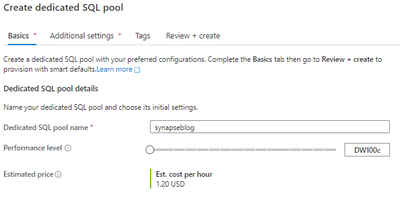
Under Analytics pools, select SQL pools. You will notice that your workspace comes with a serverless SQL pool by default. To create a dedicated pool, select + New.

Provide a name for your dedicated pool and set it to a reasonable performance tier.
Select Review + create. Then, select Create. Wait for your pool to provision and come online. If you want to learn more information about the difference between dedicated SQL pools and serverless SQL pools, you can find more here.
Creating a Pipeline from Knowledge Center
You will need to access the Knowledge center. Recall that it can be accessed under the ? button in the upper right-hand corner of Synapse Studio. Knowledge center will be the first menu option.

Select Browse gallery. Then, select Pipelines. Search for the Movie Analytics pipeline. Select the pipeline and then select Continue.

You will need to provide three user inputs to provision the pipeline: MoviesS3, MoviesADLS, and SinkDW.

On the right side of the page, under the Preview section, you also see a high-level view of the pipeline. Configure MoviesS3 first. Lower the dropdown menu and select + New. The New linked service (Amazon S3) window will open. Provide the following configuration:
- Name: Any descriptive name will suffice
- Authentication type: Access key
- Access Key ID: Provide the Access Key ID for an AWS IAM user with read permissions to the source S3 bucket
- Secret Access Key: The Secret Access Key for the IAM user
- Service URL: A path-style S3 URL referencing the bucket, not the CSV file in the bucket. Find more information here.

If you want to confirm your S3 connection settings, select the Test connection button in the bottom right-hand corner of the page. You can test the connection to the S3 bucket or to the moviesDB.csv file by changing the selection of the Test connection radio buttons. Either way, both tests should be successful.

Once the tests succeed, select Create. You have created your first linked service in Azure Synapse. Consider linked services like connection strings. Connection information is stored in linked services to simplify the process of creating datasets from sources. To specify the MoviesADLS input, select the dropdown. When you provisioned your Synapse workspace, you provisioned an Azure Data Lake Storage Gen2 account. Selecting your account linked service will suffice for this exercise.

Finally, specify SinkDW. Again, choose the default linked service. It refers to the DNS endpoint of your workspace’s dedicated SQL pool(s).

Now that you have specified all User inputs, select Open pipeline. In Synapse Studio, you will now see the Movie Analytics pipeline in the Data hub. We will be editing this pipeline soon.

Configuring the Movie Analytics Pipeline
Select the MoveFromS3ToADLS activity. Select the Source tab. Select Open next to the MoviesS3 dataset. Verify that the Connection information is set correctly:
- Linked service: The S3 linked service you created earlier
- File path: The location of your moviesDB.csv file in [bucket]/[directory]/moviesDB.csv format
- First row as header: selected
- Retain all other defaults

To test that your settings are correct, select the Preview data button.

Returning to the Copy data activity, select the Sink tab. Select Open next to the MoviesADLS dataset. Ensure that the following information is provided under the Connection tab.
- Linked service: Choose the reference to your workspace’s ADLS Gen2 account
- File path: sample-data/ready-demo/moviesDB.csv
- First row as header: selected
- Keep all other defaults

You are now ready to execute the Copy data activity. Add a breakpoint to the Copy data activity and debug it, as the image below demonstrates.

After a few seconds, in the Output tab, you should see that the activity succeeds.

You will now execute the AggregateAndWriteToDW data flow. First, turn on data flow debug. When you do this, Azure temporarily provisions an eight core cluster.

Choose OK for the Turn on data flow debug dialog.
Open the AggregateAndWriteToDW data flow.

Select the MoviesADLS source. Then choose the Data preview tab. Select Refresh to see the data loaded from ADLS Gen2.

Since the emphasis of this guide is not on the data handling capabilities of Azure Synapse Analytics, proceed to the SinkToDW sink. Under the Settings tab, ensure that Allow upsert is enabled.

Under the Sink tab, next to the Dataset dropdown, select Open.
Under the Connection tab, open Linked service properties. For DBName, provide the name of your dedicated SQL pool as the value. Keep the Table value the same (ADF_Lab_Sink).
Return to the Integrate hub and access the Movie Analytics pipeline.

Debug the pipeline. Do not set breakpoints.
In the Output tab, monitor the execution of both activities. As indicated below, the eyeglasses icon allows you to examine the debug results of a pipeline activity more in-depth.

Examining the results for the AggregateAndWriteToDW data flow should reveal that 737 rows were written to the SQL dedicated pool.

Feel free to Publish your new pipeline and your modifications to it. That will facilitate your knowledge of securing Azure Synapse resources.
Access Control in Azure Synapse Analytics
Now that you have created SQL pools, created and edited pipelines, and added linked services, this raises the question of securing your resources. To control access to your resources, Microsoft recommends the use of Azure Active Directory security groups, simplifying security administration to verifying that users are placed in the correct groups. For example, you might create a SynapseContributors security group for developers. Synapse Roles, like Synapse Contributor, can then be assigned to security principals, which include AAD groups. These role assignments can be limited to a certain scope.

Such a role assignment can be created in the Manage hub. Locate the Access control page under the Security tab and select Add. Here are a couple of Synapse Roles that you should be aware of:
- Synapse Administrator: Access to all Synapse resources and published artifacts. The recipient can grant others roles.
- Synapse Contributor: Access to all Synapse resources except managed private endpoints (more information below) and credentials.
Note that you can change the scope of your Azure Synapse role assignments. For example, we can give a certain user permissions to use the Synapse workspace’s managed identity (WorkspaceSystemIdentity). Note that the Synapse Roles you can assign to the security principal are reduced–in this example, only the Synapse Administrator and Synapse Credential User (preview) roles can leverage the managed identity. Managed identities provide simple and secure authentication to services that use Azure Active Directory for authentication, like Azure Data Lake.

Azure provides even more capabilities to govern the access and administration of Azure Synapse Analytics. For users to create compute resources, including SQL pools, they must have at least the Azure Contributor role on the workspace. This role assignment can be added through the Access control (IAM) panel of the Synapse workspace Azure resource.

Lastly, we will discuss SQL permissions. If you have the Synapse Administrator role, you are already a db_owner on the serverless pool which is provided with your workspace, Built-in. Suppose you are a developer on the project. The Synapse Administrators can give you access through the SynapseContributors group using the following commands:
CREATE DATABASE analyticsdb;
use analyticsdb
CREATE USER [SynapseContributors] FROM EXTERNAL PROVIDER;
ALTER ROLE db_owner ADD MEMBER [SynapseContributors];
SynapseContributors is an AAD security principal (group). To enter this script, navigate to the Develop hub. Then, create a new SQL script.

The situation is slightly different for the dedicated SQL pool. Instead of using the ALTER ROLE T-SQL statement, you use the sp_addrolemember stored procedure.
CREATE USER [SynapseContributors] FROM EXTERNAL PROVIDER;
EXEC sp_addrolemember ‘db_owner’, ‘SynapseContributors’;
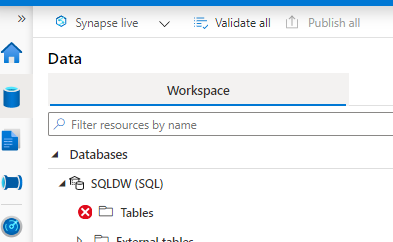
In the Connect to bar, the dedicated pool is specified and the specific database used in the pipeline earlier has been selected.

Azure Synapse Analytics provides a whole host of access control solutions. To learn more, please consult this. We will conclude this post with a discussion of network security in Azure Synapse Analytics.
Network Security in Azure Synapse Analytics
Azure Synapse Analytics allows you to provision a managed virtual network for your workspace. With the managed VNet, administators do not need to handle the burden of configuring traffic management rules, since that configuration is handled by Synapse. Moreover, using the managed VNet provides support for managed private endpoints. These endpoints are created in the managed VNet and enable access to Azure services. Communication between private endpoints and Azure resources occurs over private links, which transfer data through Microsoft’s network infrastructure.

Examine the image above from the Microsoft documentation. Here are a couple of important ideas you can pull from this diagram:
- The SQL pools exist outside of the managed VNet, but they can be referenced using managed private endpoints
- Private endpoints can reference Azure resources within the same Azure tenant and even resources in subscriptions outside of the AAD tenant
Clearly, using managed virtual networks with your Synapse workspaces avoids data exfiltration. You can manage private endpoints in the Manage hub, as seen below. If you provision you workspace with support for managed VNets, endpoints referencing both the SQL pool and the serverless SQL pool are automatically created.

To reap the benefits of managed VNets in Synapse workspaces, you will need to provision your workspace with support for the managed VNet–you cannot add this after the workspace is provisioned.

In this image, managed virtual network support is enabled for this Synapse workspace deployment. Moreover, since the Allow outbound data traffic only to approved targets is set, the AD tenants of target resources will need to be added.
Clean-up
In this post, you created a dedicated SQL pool. To locate the pool, navigate to Manage hub, and select SQL pools below Analytics pools. Select the three dots next to the dedicated pool you created.

You can either Pause the SQL pool if it is running, or Delete the pool. Note that if you pause the dedicated pool, you will release the compute node(s), thus halting compute billing. Alternatively, you can delete the SQL pool.
Quick get started with Azure Synapse and try this tutorial with these resources:

by Contributed | Dec 16, 2020 | Technology
This article is contributed. See the original author and article here.
Following a concise summary of some tips for troubleshooting Synapse Studio:
Troubleshoot Synapse Studio connectivity – Azure Synapse Analytics | Microsoft Docs
Troubleshoot Synapse Studio – Azure Synapse Analytics | Microsoft Docs
Examples:
1) I am trying to load SQLDW on Synapse Studio and it shows not accessible. Keep in mind make questions to investigate the issue:
- Do you in fact have permission to open SQLDW?
- Is your SQL DW pause?
- Can you connect from SSMS or Azure Data Studio?
- Does the issue affect only your user or Any User?
Script to check permissions:
SELECT     DPUsers.name, 'has the '
           , permission_name
		   , 'permission on the item described as class = '
		   , class, 'id = '
		   , major_id
FROM sys.database_permissions AS DP
JOIN sys.database_principals AS DPUsers
    ON DP.grantee_principal_id = DPUsers.principal_id
	--where DPUsers.name like 'nameoftheuser'
You are trying to use SQL Serverless and the database is unreachable.
Almost the same questions:
- Can you connect from SSMS or Azure Data Studio?
- Does the issue affect only your user or Any User?
- Does this issue affect only your user or any user?
- If you switch browser can you connect?

In one of the cases, we had a situation while the customer was using firefox when he hit this CORR Issue documented here:
https://bugzilla.mozilla.org/show_bug.cgi?id=465397
https://bugzilla.mozilla.org/show_bug.cgi?id=923067
https://github.com/google/caja/issues/1878
He was able to get by capturing the console log:
Cross-Origin Request Blocked: The Same Origin Policy disallows reading the remote resource at https://workspacename-ondemand.sql.azuresynapse.net/.….
(Reason: CORS request did not succeed). 2
Har trace available on the developer tools can be a strong allied to get those very specific case scenarios and behaviors.
https://docs.microsoft.com/en-us/azure/azure-portal/capture-browser-trace
Another good post to take into consideration while troubleshooting this kind of issue:
Synapse Workspace Pools and On Demand Inaccessible – Microsoft Tech Community
That is it!
Liliam Leme
UK Engineer

by Contributed | Dec 16, 2020 | Technology
This article is contributed. See the original author and article here.
We are thrilled to announce that the OneDrive iOS app now uploads Live Photos. When you take a Live Photo, you capture a still image along with several seconds of before and after video. OneDrive now stores and plays back the full motion and sound of your Live Photos, bringing your memories to life.
Uploading Live Photos from the OneDrive iOS app
To upload your Live Photos in all their moving glory, simply turn on automatic camera-roll upload, or you can also hand-pick a few favorite memories to save one-by-one. In both cases you will need to run OneDrive app build 12.11 or higher and iOS 13 or higher.
If you have uploaded Live Photos from your device prior to OneDrive’s support of Live Photos, then these were stored in OneDrive as still photos by default. However, you can easily re-upload these to OneDrive as Live Photos. To do this, make sure you are on OneDrive app build 12.11 or higher and iOS 13 or higher. Then go to the OneDrive Settings > tap “Camera Upload” > tap “Reupload from Original Formats” > toggle ON the switch labeled “Reupload Still Photos as Live Photos”. Note: This action cannot be undone and will upload Live Photos in their original format (by default, iOS devices capture Live Photos in the HEIC format which some Windows and Android devices can’t display.)
Uploading and playing back Live Photos is only supported for OneDrive personal accounts. It is not enabled for OneDrive work or school accounts. Additionally, Live Photos are roughly twice the size of still photos, and they will take up more of your OneDrive storage space than still photos.
Viewing a Live Photo
You can view your Live Photos on the OneDrive website and in the OneDrive iOS app. To play back the motion and sound of your Live Photo in the OneDrive iOS app, simply tap and hold on the photo in the OneDrive iOS app. To play back the motion and sound of your Live Photo on OneDrive for web, click the “Live” badge in the top left of the image.
At this time, Live Photo playback is not supported on the OneDrive Android App or the OneDrive sync clients. When you view a Live Photo in either of these places you will see a still photo.
Sharing a Live Photo
When you share a Live Photo in OneDrive, your recipient will be able to play back the Live Photo if they are viewing it on the OneDrive iOS app or on OneDrive for web. Recipients who view the Live Photo from the OneDrive Android app or the OneDrive sync client will see a still photo.
Editing a Live Photo in OneDrive
Editing of Live Photos is not currently supported in OneDrive. If you change a Live Photo by performing a rotate, markup, crop, or other edit, OneDrive will save the edits as a still photo. If you would like to revert these changes and restore the photo to the original Live Photo, you can do this by clicking on the Version History command for the photo on OneDrive for web, and clicking “Restore” on the previous version. Note, previous versions are kept in version history for 30 days.
Thank you to the many people who requested this feature on our feedback platform, User Voice. Your requests and feedback help us to build a better product, and we’re delighted to release this feature today.
by Contributed | Dec 16, 2020 | Technology
This article is contributed. See the original author and article here.
Hi Teams Community,
Our team is constantly hard at work to bring you Diagnostics to help troubleshoot and resolve the top issues we see in Microsoft Teams Support. We’ve just released Teams Voicemail Diagnostic written by my teammate @TonyQ Tony Quintanilla
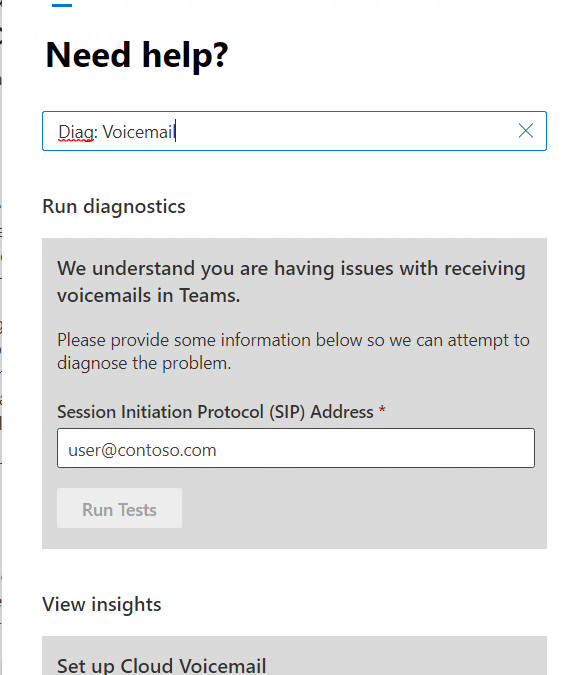
If you or your users are having issues with Teams Voicemail, this Diagnostic is for you. We check the most common causes of Voicemail issues in Teams including User Provisioning, Policies, Licensing, and Voicemail configuration.
As always you can call the diagnostic directly in your M365 Admin Portal with by typing in Diag: Voicemail as in the following example:

Here’s an example where a user didn’t have Voicemail enabled via policy:

And here’s an example where the User had Busy on Busy set. Occasionally users will have Busy on Busy set and not realize it. When BoB is set and the user is in another call (or joined to a meeting) any incoming calls will be rejected with a Busy signal. Read more about that here: Busy on Busy is available when on a call

And of course the Diagnostic does a lot more than that! So if you’re having trouble with Voicemail for a particular user, please use the Diagnostic as your starting point for troubleshooting.
As always, we’re constantly working on new diagnostics and expanding our existing ones; for a full list, click here.
Questions? Comments? Please post below and we’ll happily follow up!
Thanks!
Microsoft Teams Support

Recent Comments