by Contributed | Dec 16, 2020 | Technology
This article is contributed. See the original author and article here.
Learn how you can combine the best of Azure Sphere IoT security with the power of Azure RTOS to deliver new IoT solution categories. Covered in this article is a brief introduction to Azure RTOS, Azure Sphere, and the MediaTek MT3620 MCU architecture. You will also learn why you might want to run real-time applications on an Azure Sphere, how applications communicate across cores and how to get started.
Azure RTOS
Azure RTOS is a Real-Time Operating System available from Microsoft that runs on most microcontrollers. Azure RTOS includes a small powerful Real Time operating system called ThreadX, a GUI designer plus GUI library, and more. Azure RTOS ThreadX makes it easier to build reliable embedded solutions with a rich set of services including real-time, multithreading, inter-thread communication, synchronization, timers, and memory management.
Azure RTOS is free to use on an Azure Sphere MT3620 MCU and is covered by the “Distribution and Production Use” license.
Azure Sphere
The traditional approach to IoT microcontroller development is that you are responsible for integrating and maintaining all the bits of a solution. This includes the communications stack, security, authentication, certificates, identity, encryption libraries, update processes, your solution and more. Not only are you a solution domain expert, but you are now responsible for tracking new and emerging security threats, mitigating, and updating to protect IoT devices.
Azure Sphere is a unique highly secure IoT platform. You focus on your solution, Azure Sphere deals with security, identity, certificates, reporting, tracking emerging attack vectors, mitigating, updating the platform, and application distribution to protect your solutions, customers, and reputations.
Azure Sphere consists of the following components:
- Azure Sphere–certified chips from hardware partners include built-in Microsoft security technology to provide connectivity and a dependable hardware root of trust.
- Azure Sphere OS adds layers of protection and ongoing security updates to create a trustworthy platform for new IoT experiences.
- Azure Sphere Security Service brokers trust for device-to-cloud communication, detects threats, and renews device security.
Together these components implement The Seven Properties of Highly Secure Devices .

Azure Sphere MediaTek MT3620 MCU architecture
The first Azure Sphere certified MCU is the MediaTek MT3620 microcontroller unit (MCU). This MCU which has three developer-accessible cores, a Cortex-A7 that runs a hardened Linux kernel, and two Cortex-M4 cores.
- The Cortex-A7 core runs less timing-sensitive tasks such as setting up network connections, negotiating security, refreshing certificates, updating the device OS and applications. You can run a custom application on this core and send and receive messages to predefined network endpoints including cloud gateways such as Azure IoT Hub.
- On the Cortex M4 cores you can run bare-metal code, or applications running on a real-time operating system such as Azure RTOS or FreeRTOS.

What is an RTOS (Real-Time Operating System)
A system is said to be real-time if the total correctness of an operation depends not only upon its logical correctness, but also upon the time in which it is performed Link to Wikipedia Article.
A Real-Time Operating System is system software that provides services and manages processor resources for applications. These resources include processor cycles, memory, peripherals, and interrupts. The main purpose of a real-time Operating System is to allocate processing time among various duties the embedded software must perform.
Why run real-time Azure RTOS applications on Azure Sphere
The main reasons to run real-time applications on an Azure Sphere include:
- Your application requires precise or deterministic timing that cannot be guaranteed on the Cortex-A7 Linux kernel core where it would have to compete for resources with other services.
- You are migrating existing Cortex M4 code to an Azure Sphere.
- Running your application across multiple cores to take advantage of all the memory and processing resources on the Azure Sphere.
- Dedicating a core to running compute intensive applications like machine learning models
Intercore communications
For security reasons, applications running on the Cortex M4 cores cannot directly access network endpoints. Applications can communicate with applications running on other cores through a secure mailbox mechanism. As an added layer of security, applications can only communicate across cores with applications they have been partnered with at development time.
Solution architecture example
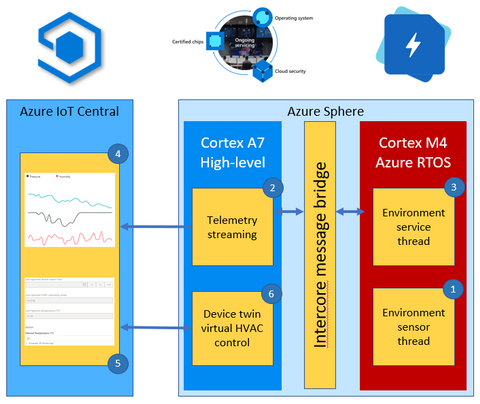
This environment monitoring solution shows how you can integrate a real-time Azure RTOS application with Azure Sphere and IoT Central.
The solution architecture is as follows:
- The Azure RTOS real-time environment sensor thread runs every 2 seconds. The thread stores in memory the latest environment temperature, humidity, and pressure data.
- The high-level Azure Sphere applications requests environment data from the real-time Azure RTOS application.
- The Azure RTOS real-time ‘environment service thread’ responds with the latest environment data.
- The high-level application serializes the environment data as JSON and sends the telemetry message to IoT Central.
- The IoT Central user can also set the desired temperature for the room by setting a property in IoT Central.
- The Azure Sphere then sets the HVAC operating mode to meet the desired temperature.

Developer Experience
You can develop Azure Sphere and Azure RTOS applications on Linux and Windows. On Windows, you can develop high-level and real-time applications with Visual Studio (free Community Edition or better), Visual Studio Code, or integrate with your existing toolchains. On Linux you can develop high-level and real-time applications with Visual Studio Code or integrate with your existing toolchains.
Next Steps
There are two Microsoft Learn modules which include hands-on labs you can download to start your Azure Sphere and Azure RTOS journey.
- Develop secure IoT solutions for Azure Sphere, Azure RTOS and Azure IoT Central
- Develop secure IoT Solutions for Azure Sphere, Azure RTOS and IoT Hub
Skip to unit 16 to learn more about real-time Azure RTOS running on an Azure Sphere.
by Priyesh Wagh | Dec 16, 2020 | Dynamics 365, Microsoft, Technology
Now, Unified Interface being the only interface we have to work on in Dynamics 365 CRM, Here’s a quick tip on how and where you can set the Entity Icon for the Unified Interface.
Default Icons
One each entity, Custom or otherwise, here’s where you can set the Icon.
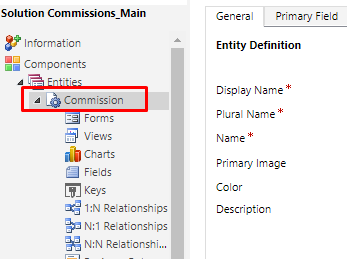
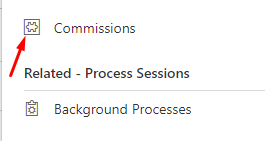
- Let’s say Commissions is a custom entity which has a default Icon.
- This is how it appears in the Unified Interface for any custom entity which doesn’t have any Icon set.
- Now, let’s look at how we can set the entity icons.
Set Icons for Entity
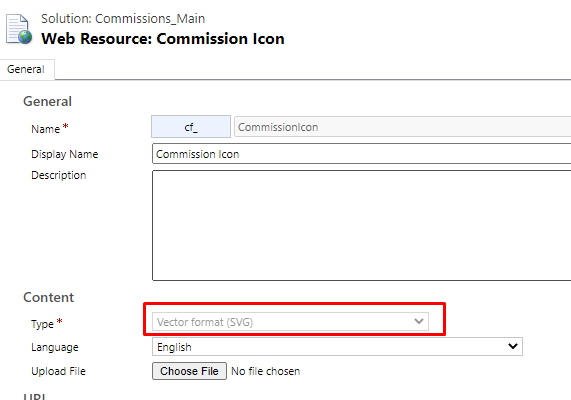
- Firstly, you need to create a Web Resource of type SVG Icon.
- Select the entity you want to set the Icon to in the Unified Interface. Let’s say Commission entity shows the Default Icon. Select the entity and look for Update Icons on the Solution.
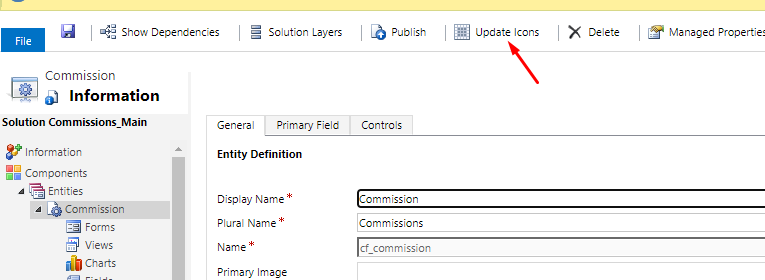
- When you click on Update Icon, you’ll need to go to the Unified Interface.

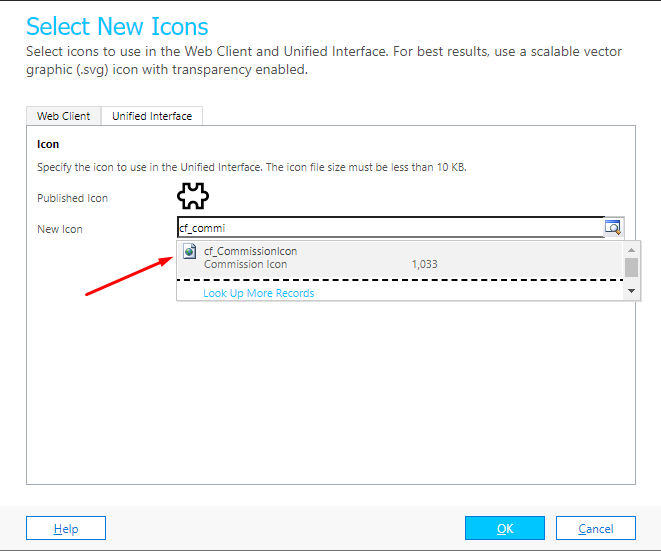
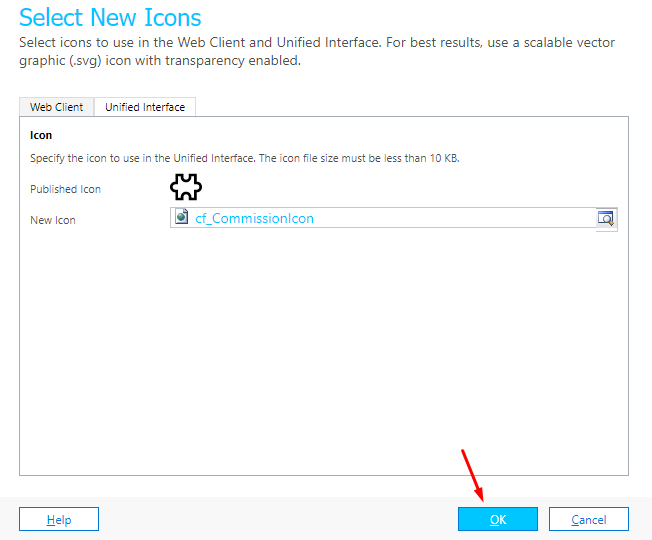
- Now, in the New Icon field, you’ll have to select the Name of the SVG Icon from Step #1 above, i.e. cf_commission in this case.
- Select OK and Publish changes.
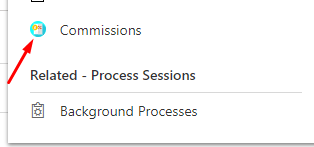
- And you’ll find the Icon is now updated for the entity entirely wherever it’ll be used on the Unified Interface. Since the Classic UI has been ruled out, we don’t need to update the classic Icons anymore.
Here are some Dynamics 365 related posts which you might need to check out –
- Find deprecated JS code used in your Dynamics 365 environment | Dynamics 365 v9 JS Validator tool | XrmToolBox
- Make On-Demand Flow to show up in Dynamics 365 | Power Automate
- Track and Set Regarding are disabled for Appointments in Dynamics 365 App For Outlook message | Demystified
- Cancelled Bookings Imported in Time Entries in Dynamics 365 PSA issue | [Quick Tip]
- Remove ‘This Email has been blocked due to potentially harmful content.’ message in Dynamics 365 Emails | OrgDbSettings utility
- Get GUID of the current View in Dynamics 365 CRM JS from ribbon button | Ribbon Workbench
- Get Dynamics 365 field metadata in a Canvas App using DataSourceInfo function | Common Data Service
- Dynamics 365 App For Outlook missing on SiteMap in CRM? Use shortcut link [Quick Tip]
- Debug Ribbon button customization using Command Checker in Dynamics 365 CE Unified Interface
- Pass Execution Context to JS Script function as a parameter from a Ribbon button in Dynamics 365 | Ribbon Workbench
Thank you!!
Brought to you by Dr. Ware, Microsoft Office 365 Silver Partner, Charleston SC.
by Contributed | Dec 16, 2020 | Technology
This article is contributed. See the original author and article here.
Configuring transactional replication with Azure SQL Managed Instance there are some limitations that we need to take into consideration. One of them is that both the publisher and distributor need to be placed either on Managed Instance or on the on-premises server. The other requirements can be found here.
In the docs there are already covered two types of topologies:
- Azure SQL Managed Instance Publisher, Distributor and Subscriber
- Azure SQL Managed Instance Publisher and Distributor, Azure SQL VM Subscriber
In this article we will focus more on the scenario in which instead of a Azure SQL VM Subscriber, we will have an on-premises Subscriber. Being similar to the second above topology type the steps will also be alike, after configuring the on-premises and Managed Instance servers we need to do the following:
After that comes the create subscription step where the difference will be in the @subscriber parameter. For an on-premises subscriber we will not need a private DNS zone so the syntax will be similar to this:
use [ReplTutorial]
exec sp_addsubscription
@publication = N'ReplTest',
@subscriber = N'OnPremServerName',
@destination_db = N'ReplSub',
@subscription_type = N'Push',
@sync_type = N'automatic',
@article = N'all',
@update_mode = N'read only',
@subscriber_type = 0

exec sp_addpushsubscription_agent
@publication = N'ReplTest',
@subscriber = N'OnPremServerName',
@subscriber_db = N'ReplSub',
@job_login = N'azureuser',
@job_password = '<Complex Password>',
@subscriber_security_mode = 0,
@subscriber_login = N'azureuser',
@subscriber_password = '<Complex Password>',
@dts_package_location = N'Distributor'
GO
Common issues
- Failed to connect to Azure Storage
2019-11-19 02:21:05.07 Obtained Azure Storage Connection String for replstorage 2019-11-19 02:21:05.07 Connecting to Azure Files Storage ‘replstorage.file.core.windows.netreplshare’ 2019-11-19 02:21:31.21 Failed to connect to Azure Storage ” with OS error: 53.
Recommendations:
– Ensure that the port 445 is open in the outbound security rules of the Network Security Group (NSG) that your Managed Instance is using
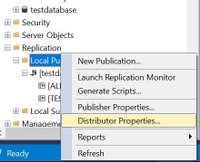
– Check Distributor properties as below:
Right-click on Local Publications and access Distributor properties:
After that access the Publishers page and press on the below highlighted area:

After that you should have a window similar to this:

In here please check that the Default Snapshot Folder is in the correct format and for the Storage Account Connection String you can also re-enter it here from here:

More details on this error are accessible here Failed to connect to Azure Storage.
- Could not connect to Subscriber
Error messages:
The process could not connect to Subscriber ‘REPLMITOVM.REPLDNS.COM’. (Source: MSSQL_REPL, Error number: MSSQL_REPL0)
Get help: http://help/MSSQL_REPL0
Named Pipes Provider: Could not open a connection to SQL Server [53]. (Source: MSSQLServer, Error number: 53)
Get help: http://help/53
A network-related or instance-specific error has occurred while establishing a connection to SQL Server. Server is not found or not accessible. Check if instance name is correct and if SQL Server is configured to allow remote connections. For more information see SQL Server Books Online. (Source: MSSQLServer, Error number: 53)
Get help: http://help/53
Query timeout expired, Failed Command: (Source: MSSQLServer, Error number: HYT00)
Get help: http://help/HYT00
Recommendations:
– Ensure that the port 1433 is open in the outbound security rules of the Managed Instance NSG
– As an alternative to T-SQL script mentioned here you can also add the subscription directly from the GUI of SSMS:
Right-click on the publication and click New Subscriptions

Click Next, select the publication name and click Next, Run all agents at the Distributor, Add SQL Server Subscriber:

Here we will need to connect to the on-premises server with SQL Authentication as mentioned in the first part of the requirements.
After the subscription was added click on the highlighted area below:

On the top part use login that you are using for the distributor (SQL login that you are accessing the Azure SQL Managed Instance) and on the bottom part of the window enter the SQL login used previously to access the on-premises server.
After that you can leave the Synchronization Schedule together with the Initialize Subscription steps as default and Finish the New Subscription Wizard.
As a short summary the recommendations for the Could not Connect to Subscriber error would be:
- Ensure that the port 1433 is open and that the other requirements are met
- Try as an alternative to add the subscription with SSMS
- Provide the IP address of the on-premises server in the sp_addsubscription stored procedure
- Check if the @@SERVERNAME is the same with SERVERPROPERTY(N’servername’)
SELECT SERVERPROPERTY(N'servername')
SELECT @@SERVERNAME
If the results are different this can be fixed by using this script:
DECLARE @actualname NVARCHAR(100)
DECLARE @currentname NVARCHAR(100)
SELECT @actualname = CONVERT(NVARCHAR(100), SERVERPROPERTY(N'servername'))
SELECT @currentname = @@SERVERNAME
EXEC sp_dropserver @currentname
EXEC sp_addserver @actualname, local
Reference article: SQL SERVER – FIX – Replication Error: SQL Server replication requires the actual server name to make a connection to the server
More details about the Could not connect to Subscriber error can also be found here.
by Contributed | Dec 16, 2020 | Technology
This article is contributed. See the original author and article here.
As part of this year’s Festive Tech Calendar event which is being run by Gregor Suttie and Richard Hooper, myself and a couple of my colleagues will be doing a fun Q&A or Ask Me Anything session.
On the 16th December at 3pm UK time, 4pm Switzerland time and 10am Ottawa time, myself, Pierre Roman and Thomas Maurer will be answering your questions on Azure, Hybrid Cloud, Windows Server or we are happy to take questions on our home office setups, what certification tips we have, or what our favourite Christmas movie is.
The stage is open for you to ask us a question and we’ll try and answer it. This session will be an hour long and we’d love to have you all join us LIVE.
You can tune into the event on our YouTube channel, be sure to hit that reminder button so you are reminded of the event, or download the calendar ICS file here and add it to your diary and block out that time. :calendar:
The recording will be available on demand after the live event so if you aren’t able to tune in but would love to ask a question please drop it in the comments below and we’ll try our best to get to it and you can watch the recording for the answer. ;)
A massive thank you to Gregor and Richard for organising this event and for all those that have contributed so far this month.
by Contributed | Dec 16, 2020 | Technology
This article is contributed. See the original author and article here.
PROBLEM:
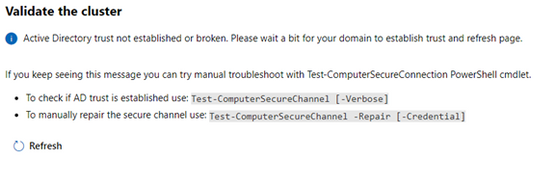
I began configuring a Windows Server 2019 Storage Space Direct (S2D) cluster using 3 virtual machines running on a physical Windows 2019 Hyper-V server. I started the installation using Windows Admin Center (v2009 Bld: 1.2.2009.21002) Cluster Creation wizard. I selected the Windows Server Deploy a failover cluster to run VMs or cluster roles and apps on Windows Servers option. I filled in all the screen information until I got to the end of the Networking: Virtual Switch page. When I clicked Next: Clustering it took me to the Validate Cluster page and presented the following error:
Active Directory trust not established or broken. Please wait a bit for your domain to establish trust and refresh page…
The error message leads you to believe there is an Active Directory trust relationship issue with at least one of the nodes. Therefore, I started testing the nodes trust relationships with Active Directory. I confirmed all the nodes were in the domain and had connectivity with each other and the domain. Running the Test-ComputerSecureChannel command confirmed all the connections and did not show any errors. I could not find any issues with the trust relationship between the nodes and Active Directory.
SOLUTION:
The time zone was off/misconfigured on one of the nodes. I corrected it, the error went away, and I was able to proceed to Validate the cluster.
Therefore, confirm that the trust relationship with the nodes in the cluster and Active directory is healthy.
If they are all set properly, ensure that the time zone is the same on all S2D nodes. If necessary, set the time zone to the same zone on all the cluster nodes. If it is different on even one of the nodes, you will get the error when entering the Validate Cluster page.
And that is it. The steps above were successful in resolving the issue I had with the S2D-Active Directory trust not established or broken… I hope this post saves you time if you ever encounter these errors.

Recent Comments