
by Contributed | Dec 14, 2020 | Dynamics 365, Microsoft 365, Technology
This article is contributed. See the original author and article here.
If you’re responsible for the smooth operation of warehouse operations across your organization, you know that managing inventory, machines, people, and resources efficiently while meeting tight delivery deadlines means that you need to have resilience in your supply chain. To help companies like yours execute mission-critical manufacturing and distribution processes without interruptions, we recently announced a preview for cloud and edge scale unit add-ins for Dynamics 365 Supply Chain management.
So how can your company benefit from cloud and edge scale units? One effective tactic is to place scale units near the location where production work is donewhether that’s in the cloud or right inside the four walls of the warehouse facility. That way, you can take advantage of the dedicated capacity that scale units provide.
Monogram Foods Solutions is a leading manufacturer and marketer of value-added meat products, snacks, and appetizers. Their team is participating in the preview. As noted here, they’re having great success with scale units:
“Our frozen goods warehouse has a tighttime constrained picking process, and it is critical for our warehouse team to have a consistent and reliably quick response throughout the entire picking operation. The architectural design of the solution ensures that these critical warehouse workloads are isolated from the rest of our operations, eliminating points of contention during these time-sensitive processes.”
Transition to workloadsforresilientwarehouseexecution
You can find more information about what scale units are and how to set them up for the warehouse executionworkload inthe documentation.In this blog post, we’re going to take a deeper look into how to implement dedicated scale units.
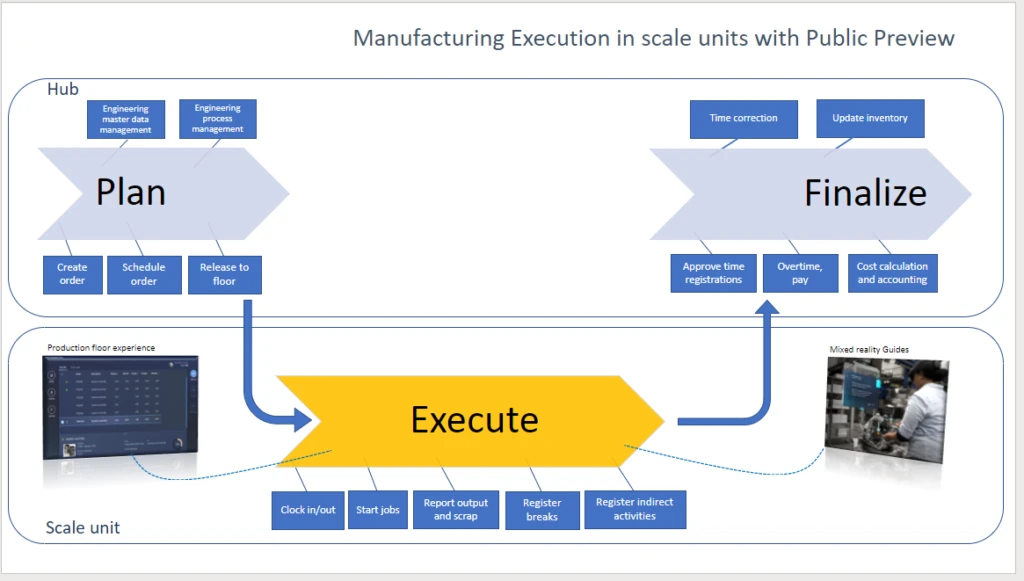
With theworkloadforwarehouseexecution,you cantransition theexecution phase of warehouse processes intodedicatedscale units.The workload definesthescopeof business processes, data, andpoliciesincluding rules, validation, and ownershipfor what runs in thescale unit.Inbound, outbound, and otherwarehouse management processeshave beensplit into decoupled phases for planning, execution, receiving, and shipping.
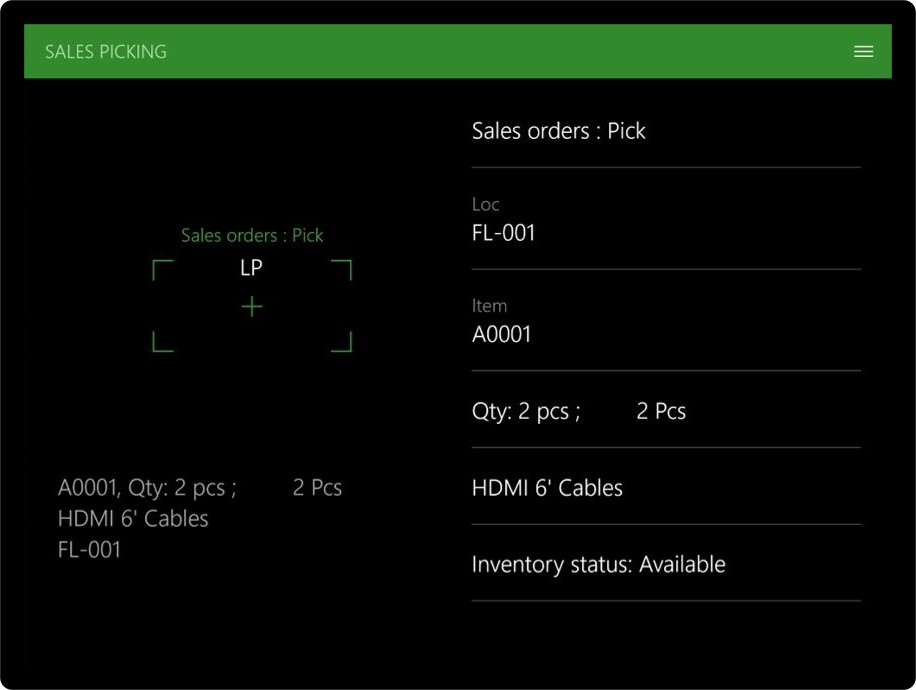
After you configure the workload, the workers on thewarehousefloorcontinue to go through the work,like choosing the mobile warehousemanagement experience,connecteddirectlyto thededicated processing capacity in thescale unit.
Hybrid multi-node topology makes it all work
Inthehybridmulti-node topology,individual nodes are responsiblefor pieces in the distribution processes.The hub supports data management, warehouse process management, and release of orders to the warehouseand as well as some finalization steps, depending on the scenario.
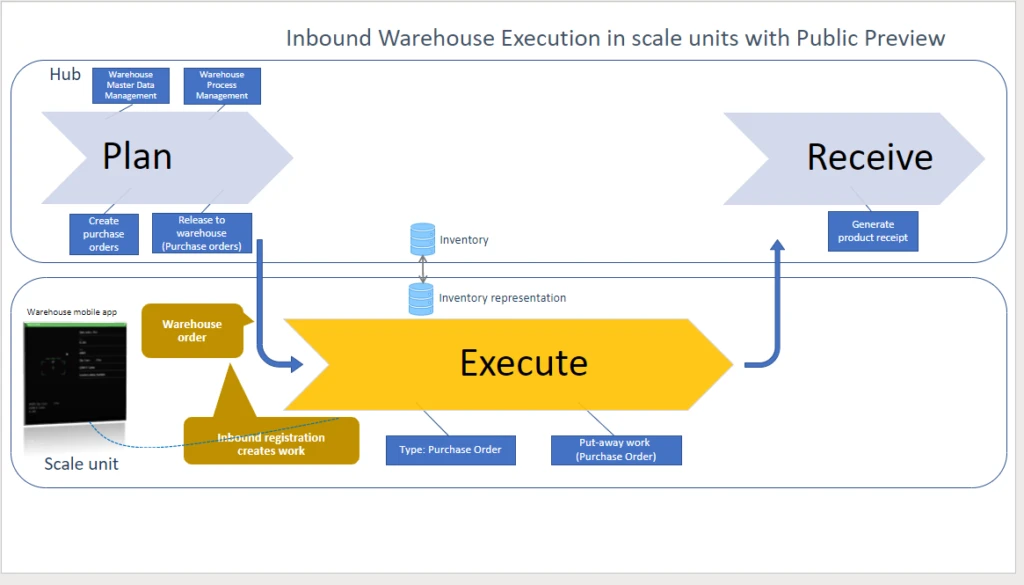
For inbound warehouse processes, the responsibility of the workload on the scale unit beginswhen thepurchasing agentreleasespurchase ordersto the warehouse.Itusesrecordsofthe newtype ofwarehouseordersto trigger theworkforthe warehouseclerkson thefloor.
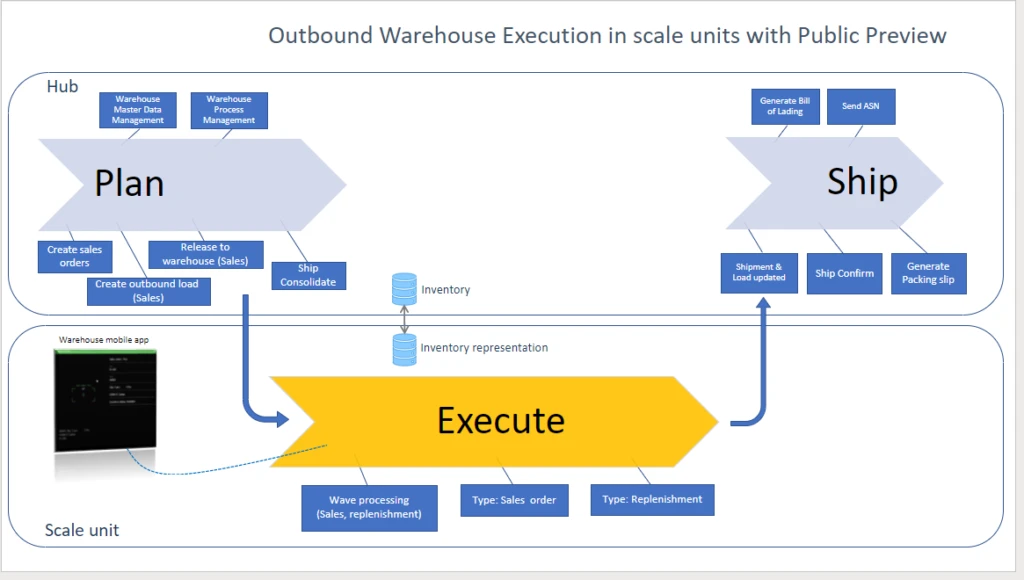
A copy of the relevant inventoryisavailable on the scale unit and isconstantly keptin syncwith the central inventory. For temporarily disconnected edge scale units, this local inventory acts as alocal cache, so the warehouse workercancompletework like put-away,independentlyof thescale unit.
As soon as warehouseworkershave completedatask, the cloud hub runs thenext steps.In the public preview,thisincludesthe generation of thereceiptsfor the receiving process.The transition happensinstantaneouslyifthe (edge) scale unithasconnectivity.
Sales clerksfindsupportinoutboundwarehouse processeswhenreleasingsales orders to the warehouse.Theworkload in thescale unit will apply the relevantwave processing methodandwarehouseworkerswillperformtaskslike picking.From there,theshipping processwilltakeover. Tasks likethe packing slip generation willstill continue onthe cloud hubin the previewversion.
The workload for warehouse execution supports additionaloperations that runfullyon the scale unit.Warehouse workers caninquireaboutitems,itemlocations,and license plates,as well as moveitemswithinthe warehouse.
Take away: Scale units help you to build resilient warehouse execution
Dynamics 365 Supply Chain Management transitions to a multi-node supply chain topology. This allows customers to build resilience by deploying scale units in the cloud or on the edge with built-in redundancy and flexible management.
The warehouse execution workloads in the public preview show how business processes support resilience in this hybrid multi-node topology for supply chain management. Microsoft will continue finetuning the responsibilities of workloads in scale units based on customer feedback to address the most common use cases out of the box.
In the upcoming Spring release updates, you will find several important enhancements. Warehouse workers in outbound scenarios can perform simple picking and loading work for transfer orders on scale units. Label printing will be available on scale units, including support for wave labels. Further enhancements include cluster picking, wave processing for shipments, change of workers, cancelation, location movement, and completion of work for sales and transfer orders.
Nextsteps
Learn moreabout cloud andedgescaleunits and other important topics in the documentationfor Dynamics 365 Supply Chain Management.
The post Robust warehouse execution with Dynamics 365 Supply Chain Management appeared first on Microsoft Dynamics 365 Blog.
Brought to you by Dr. Ware, Microsoft Office 365 Silver Partner, Charleston SC.
by Contributed | Dec 14, 2020 | Technology
This article is contributed. See the original author and article here.
The Integrate Hub within Azure Synapse Analytics workspace helps to manage, creating data integration pipelines for data movement and transformation. In this article, we will use the knowledge center inside the Synapse Studio to immediately ingest some sample data, US population by gender and race for each US ZIP code sourced from 2010 Decennial Census. Once we have access to the data, we will use a data flow to filter out what we don’t need and transform the data to create a final CSV file stored in the Azure Data Lake Storage Gen2.
Using Sample Data From Azure Synapse Knowledge Center
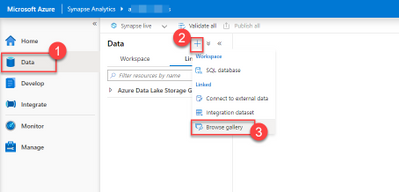
Our first step will be to get access to the data we need. Inside the Synapse workspace, choose the Data option from the left menu to open the Data Hub.
Data Hub is open. The plus button to add new artifacts is selected. Browser Gallery from the list of linked data source options is highlighted.
Once in the gallery, make sure Datasets page is selected. From the list of available sample datasets, choose US Population by ZIP Code and select Continue.

Knowledge Center dataset gallery is open. US Population by ZIP Code dataset is selected. Continue button is highlighted.
On the next screen, you can see the dataset’s details and observe a preview of the data. Select Add dataset to include the dataset into your Synapse workspace as a linked service.

US Population by ZIP Code dataset details are shown. Add dataset button is highlighted.
Data Exploration With the Serverless SQL Pool
Once the external dataset is included to your workspace as a linked service, it will show up under the Data hub as under Azure Blog Storage / Sample Datasets section. Select the Actions button for us-decennial-census-zip represented as “…” to see a list of available actions for the linked data source.

us-decennial-census-zip sample dataset is selected. The actions button is highlighted.
We will now query the remote data source using our serverless SQL pool to test our access to the data source. From the Actions menu Select New SQL Script / Select Top 100 rows. This will bring an auto-generated SQL script.

The actions menu for us-decennial-census-zip is shown. New SQL script is selected, and Select Top 100 rows command is highlighted.
Select Run and see the data presented in Results tab.

The actions menu for us-decennial-census-zip is shown. New SQL script is selected, and Select Top 100 rows command is highlighted.
Creating Integration Datasets for Ingest and Egress
Now that we proved our access to the data source, we can create integration datasets that will be our source and sink datasets. Feel free to close the current SQL Script window and discard all changes.

The Data hub is on screen. Add new resource button is selected. From the list of resources integration dataset is highlighted.
Select the “+” Add new resource button to open the list of available resources we can add to our Synapse workspace. We will create two integration datasets for our example. The first one will help us integrate our newly added remote data source into a data flow. The second one will be an integration point for the sink CSV file we will create in our Azure Data Lake Storage Gen2 location.
Select Integration dataset to see a list of all data sources you can include. From the list, pick Azure Blob Storage and select Continue.

New integration dataset window is open. Azure Blob Storage option is selected. Continue button is highlighted.
Our source files are in the Parquet format. Pick Parquet as the file format type and select Continue.

File format options window is open. Parquet is selected. Continue button is highlighted.
On the next screen set the dataset name to CensusParquetDataset. Select us-decennial-census-zip as the Linked service. Finally, for the file path set censusdatacontainer for Container, and release/us_population_zip/year=2010 for Directory. Select OK to continue.

Dataset properties window is open. The dataset name is set to CensusParquetDataset. Linked Service is set to us-decennial-census-zip. File path is set to censusdatacontainer. File Path folder is set to release/us_population_zip/year=2010. Finally, the OK button is highlighted.
Select the “+” Add new resource button and pick Integration dataset again to create our sink dataset. For this round, choose Azure Data Lake Storage Gen2 for the data store.

New integration dataset window is open. Azure Data Lake Storage Gen2 option is selected. Continue button is highlighted.
Our target file will be a CSV file. Pick DelimitedText as the file format type and select Continue.

File format options window is open. DelimitedText is selected. Continue button is highlighted.
On the next screen, set the dataset name to USCensus. Select Synapse workspace default storage as the Linked service. Finally, for the file path, select the Browse button and pick a location to save the CSV file. Select OK to continue. In our case, we selected default-fs as the file system and will be saving the file to the root folder.

Dataset properties window is open. The dataset name is set to USCensus. Linked Service is set to the default workspace storage. File path is set to default-fs. Finally, the OK button is highlighted.
Now that we have both our source and sink datasets ready. It is time to select Publish all and save all the changes we implemented.

CensusParquetDataset and USCensus datasets are open. Publish All button is highlighted.
Data Transformation With a Pipeline and a Dataflow
Switch to the Integrate Hub from the left menu. Select the “+” Add new resource button and select Pipeline to create a new Synapse Pipeline.

Integrate Hub is open. Add Resource is selected. Pipeline command is highlighted.
Name the new pipeline USCensusPipeline and search for data in the Activities panel. Select Data flow activity and drag and drop one onto the screen.

New pipeline window is open. Pipeline’s name is set to USCensusPipeline. The activities search box is searched for data. Data flow activity is highlighted.
Pick Create new data flow and select Data flow. Select Continue.

New data flow window is open. Create new data flow option is selected. Data flow is selected. The OK button is highlighted.
Once you are in the Dataflow designer give your Dataflow a name. In our case, it is USCensusDataFlow. Select CensusParquetDataset as the Dataset in the Source settings window.

Dataflow name is set to USCensusDataFlow. The source dataset is set to CensusParquetDataset.
Select the “+” button on the right of the source in the designer panel. This will open the list of transformation you can do. We will filter out the data to only include the ZIP Code 98101. Select Filter Row Modifier to add the activitiy into the data flow.

Data transformations menu is open. Filter row modifier is highlighted.
On the Filter settings tab you can define your filtering expression in the Filter on field. Select the field box to navigate to the Visual expression builder.

Filter settings tab is open. Filter on field is highlighted.
The data flow expression builder lets you interactively build expressions to use in various transformations. In our case, we will use equals(zipCode, “98101”) to make sure we only return records with the 98101 ZIP code. Before selecting Save and finish make sure you take a look at the Expression elements list and the Expression values that includes the fields extracted from the source data schema.

Visual expression builder is open. Expression is set to equals(zipCode, “98101”). Expression elements, expression values are highlighted. Save and finish button is selected.
Our data flow’s final step is to create the CSV file in Azure Data Lake Storage Gen2 for further use. We will add another step to our data flow. This time, it will be a sink as our output destination.

Data transformations menu is open. Sink is highlighted.
Once the sink is in place, set the dataset to USCensus. This is the dataset targeting our Azure Data Lake Storage Gen2.

Sink dataset is set to USCensus.
Switch to the Settings tab for the sink. Set the File name option to Output to single file. Output to single file combines all the data into a single partition. This leads to long write times, especially for large datasets. In our case, the final dataset will be very small. Finally, set the Output to single file value to USCensus.csv.

Sink settings panel is open. Output to single file is selected and it’s value is set to USCensus.csv. Set Single partition button is highlighted.
Now, it’s time to hit Publish All and save all the changes.

Publish all button is highlighted.
Close the data flow editor. Go back to our USCensusPipeline. Select Add Trigger and Trigger now to kick start the pipeline for the first time.

USCensusPipeline is open. Add trigger is selected and Trigger now command is highlighted.
Results Are In
To monitor the pipeline execution go to the Monitor Hub. Select Pipeline runs and observe your pipeline executing.

Monitor Hub is open. Pipeline runs is selected. USCensusPipeline pipeline row is highlighted showing status as in progress.
Once the pipeline is successfully executed, you can go back to the Data hub to see the final result. Select the workspace’s default Azure Data Lake Storage Gen2 location that you selected as your sink and find the resulting USCensus.csv file that is only 26.4KB with census data for the ZIP code used as the filter.

Data Hub is open. Workspace’s default ADLS Gen2 storage is open. USCensus.csv file and its 26.5KB size is highlighted.
Keeping Things Clean and Tidy
We created a list of artifacts in our Synapse workspace. Let’s do some cleaning before we go.
First of all, delete the CSV file our pipeline created. Go to the Data hub, select the workspace’s default Azure Data Lake Storage Gen2 location that you selected as your sink and find the resulting USCensus.csv file. Select Delete from the command bar to delete the file.

Data Hub is open. Workspace’s default ADLS Gen2 storage is open. USCensus.csv file is selected. Delete command is highlighted.
Go to the Integrate hub and select the USCensusPipeline we created. Select the Actions command and select Delete to remove the pipeline. Don’t forget to hit Publish All to execute the delete operation on the Synapse workspace.

Integrate Hub is open. USCensusPipeline is selected. Actions menu is open and delete command is highlighted.
Go to the Develop hub and select the USCensusDataFlow we created. Select the Actions command and select Delete to remove the dataflow. Don’t forget to hit Publish All to execute the delete operation on the Synapse workspace.

Develop Hub is open. USCensusDataFlow is selected. Actions menu is open and delete command is highlighted.
Go to the Data hub and select the USCensus we created. Select the Actions command and select Delete to remove the dataset. Repeat the same steps for the CensusParquetDataset as well. Don’t forget to hit Publish All to execute the delete operation on the Synapse workspace.

Develop Hub is open. USCensus is selected. Actions menu is open and delete command is highlighted.
Go to the Manage hub and select Linked services. From the list, select the us-decennial-census-zip. Select Delete to remove the linked service.

Manage Hub is open. The Linked services section is selected. The delete button for us-decennial-census-zip linked service is highlighted.
We are done. Our environment is the same as it was before.
Conclusion
We connected to a third-party data storage service that has parquet files in it. We looked into the files with the serverless SQL Pool. We created a pipeline with a data flow connecting to the outside source, filtering data out and putting the result in a CSV file in our data lake. While going through these steps, we have met with linked services, datasets, pipelines, dataflows, and a beautiful expression builder.
Go ahead, try out this tutorial yourself today by creating an Azure Synapse workspace.
by Contributed | Dec 14, 2020 | Technology
This article is contributed. See the original author and article here.
This year’s release of .NET happened a few weeks ago with .NET 5. (Core is gone from the name now.) I have some sample code that works as sort of a boilerplate to verify basic functionality without containing anything fancy. One of those is a web app where one can sign in through Azure AD B2C. Logically I went ahead and updated from .NET Core 3.1 to .NET 5 to see if everything still works.
It works, but there are recommendations that you should put in some extra effort as the current NuGet packages are on their way to deprecation. Not like “will stop working in two weeks”, but might as well tackle it now.
The Microsoft Identity platform has received an overhaul in parallel to .NET and a little while before the .NET 5 release the Identity team released Microsoft.Identity.Web packages for handling auth in web apps. (Not just for Azure AD B2C, but identity in general.)
Why is this upgrade necessary? Well, the old libraries were based on the Azure AD v1 endpoints, but these new libraries fully support the v2 endpoints. Which is great when going for full compliance with the OAuth and OpenID Connect protocols.
Using my sample at https://github.com/ahelland/Identity-CodeSamples-v2/tree/master/aad-b2c-custom_policies-dotnet-core I wanted to do a test run from old to new.
The current code is using Microsoft.AspNetCore.Authentication.AzureADB2C.UI. (You can take a look at the code for the Upgraded to .NET 5 checkpoint for reference.)
You can start by using NuGet to download the latest version of Microsoft.Identity.Web and Microsoft.Identity.Web.UI. (1.4.0 when I’m typing this.) You can also remove Microsoft.AspNetCore.Authentication.AzureADB2C.UI while you’re at it.
In Startup.cs you should make the following changes:
Replace
services.AddAuthentication(AzureADB2CDefaults.AuthenticationScheme)
  .AddAzureADB2C(options => Configuration.Bind("AzureADB2C", options)).AddCookie();
With
services.AddAuthentication(OpenIdConnectDefaults.AuthenticationScheme)
  .AddMicrosoftIdentityWebApp(Configuration.GetSection("AzureADB2C"));
And change
services.AddRazorPages();
To
services.AddRazorPages().AddMicrosoftIdentityUI();
If you have been doing “classic” Azure AD apps you will notice how B2E and B2C are now almost identical. Seeing how they both follow the same set of standards this makes sense. As well as making it easier for .NET devs to support both internal and external facing authentication.
B2C has some extra logic in the sense that the different policies drive you to different endpoints, so the UI has to have awareness of this. And you need to modify a few things in the views.
In LoginPartial.cshtml:
Change
@using Microsoft.AspNetCore.Authentication.AzureADB2C.UI
@using Microsoft.Extensions.Options
@inject IOptionsMonitor<AzureADB2COptions> AzureADB2COptions

@{
  var options = AzureADB2COptions.Get(AzureADB2CDefaults.AuthenticationScheme);
}
To
@using Microsoft.Extensions.Options
@using Microsoft.Identity.Web
@inject IOptions<MicrosoftIdentityOptions> AzureADB2COptions

@{
  var options = AzureADB2COptions.Value;
}
And change the asp-area in links from using AzureADB2C:
<a class="nav-link text-dark" asp-area="AzureADB2C" asp-controller="Account" asp-action="SignOut">Sign out</a>
To using MicrosoftIdentity:
<a class="nav-link text-dark" asp-area="MicrosoftIdentity" asp-controller="Account" asp-action="SignOut">Sign out</a>
And that’s all there is to it :)
Azure AD B2C SignUp
Now this is a fairly stripped down sample app without the complexity of a real world app, but this was a rather pain free procedure for changing the identity engine in a web app.
by Contributed | Dec 14, 2020 | Technology
This article is contributed. See the original author and article here.
Ever since we introduced Windows Containers in Windows Server 2016, we’ve seen customers do amazing things with it – either with new applications that leverage the latest and greatest of .Net Core and all other cloud technologies, but also with existing applications that were migrated to run on Windows Containers. MSMQ falls into this second scenario.
MSMQ was an extremely popular messaging queue manager launched in 1997 that became extremely popular in the 2000’s with enterprises using .Net and WCF applications. Today, as companies look to modernize existing applications with Windows Containers, many customers have been trying to run these MSMQ dependent applications on containers “as is” – which means no code changes or any adjustments to the application. However, MSMQ has different deployment options and not all are currently supported on Windows Containers.
In the past year, our team of developers have tested and validated some of the scenarios for MSMQ and we have made amazing progress on this. This blog post will focus on the scenarios that work today on Windows Containers and some details on these scenarios. In the future we’ll publish more information on how to properly set up and configure MSMQ for these scenarios using Windows Containers.
Supported Scenarios
MSMQ can be deployed on different modes to support different needs from customers. Between private and public queues, transactional or not, and anonymous or with authentication, MSMQ can fit different scenarios – but not all can be easily moved to Windows Containers. The table below lists the currently supported scenarios:
Scope
|
Transactional
|
Queue location
|
Authentication
|
Send and receive
|
Private
|
Yes
|
Same container (single container)
|
Anonymous
|
Yes
|
Private
|
Yes
|
Persistent volume
|
Anonymous
|
Yes
|
Private
|
Yes
|
Domain Controller
|
Anonymous
|
Yes
|
Private
|
Yes
|
Single host (two containers)
|
Anonymous
|
Yes
|
Public
|
No
|
Two hosts
|
Anonymous
|
Yes
|
Public
|
Yes
|
Two hosts
|
Anonymous
|
Yes
|
The scenarios above have been tested and validated by our internal teams. In fact, here are some other important information on the results of these tests:
- Isolation mode: All tests worked fine with both isolation modes for Windows containers, process and hyper-v isolation.
- Minimal OS and container image: We validated the scenarios above with Windows Server 2019 (or Windows Server, version 1809 for SAC), so that is the minimal version recommended for using with MSMQ.
- Persistent volume: Our testing with persistent volume worked fine. In fact, we were able to run MSMQ on Azure Kubernetes Service (AKS) using Azure files.
Authentication with gMSA
From the table above, you can deduce that the only scenario we don’t support is for queues that require authentication with Active Directory. The integration of gMSA with MSMQ is currently not supported as MSMQ has dependencies on Active Directory that are not in place at this point. Our team will continue to listen to customer feedback, so let us know if this is a scenario you and your company are interested in. You can file a request/issue on our GitHub repo and we’ll track customer feedback there.
Let us know how the validation of MSMQ goes with your applications. We’re looking forward to hear back from you as you continue to modernize your applications with Windows containers.

Recent Comments