by Contributed | Dec 24, 2020 | Technology
This article is contributed. See the original author and article here.
As a result of an order from the Russian Government, Volgograd will move back to Moscow time (UTC+03:00) at 02:00 AM local time on December 27, 2020.
Microsoft plans to release an update to support this time zone change; however, there is insufficient time to properly build, test, and release such an update before the change goes into effect. In the meantime, we recommend that organizations with devices in Volgograd follow the interim guidance below.
Interim guidance
Microsoft recommends that users temporarily set the time zone on their devices to “(UTC+3:00) Moscow, St. Petersburg” on December 27, 2020 at 02:00. Selecting this time zone will then reflect the correct local time (Note: events that have occurred in the past, before the update, will not show correctly).
This can be done in one of the two ways:
- Select the Windows logo key, type “time zone”, and select Change the time zone system setting. From the time zone dropdown, select “(UTC+3:00) Moscow, St. Petersburg” time zone.
- Go to Control Panel > Date and Time > Change time zone. From the time zone dropdown, select “(UTC+3:00) Moscow, St. Petersburg” time zone. Click Ok.
We recommend returning time zone settings to “(UTC+3:00) Volgograd” after an update from Microsoft has been released and installed.
For Microsoft’s official policy on DST and time zone changes, please see Daylight saving time help and support. For information on how to update Windows to use the latest global time zone rules, see How to configure daylight saving time for Microsoft Windows operating systems.
by Priyesh Wagh | Dec 24, 2020 | Dynamics 365, Microsoft, Technology
Retrieving OptionSet Labels from CDS data in a Cloud Flow / Power Automate / Flow is an extra step than just picking from the Dynamic Values. Check this post!!
Scenario
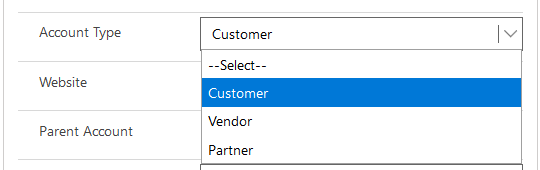
While working with data that is either a result of a Dataverse Trigger (on Create/Update) or Action like (Get record, list record), the OptionSet fields from CDS/Dataverse return the Values of the OptionSet instead of the Text Labels –
- Let’s say this is the OptionSet in Dynamics
- And when you pick the OptionSet field from CDS either from an Action or a Trigger like this
Let’s say I’m capturing this in a variable to show you

I’m storing this in a variable for this example to show you
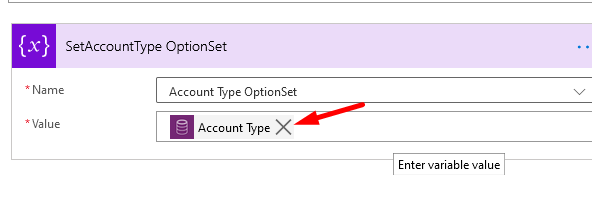
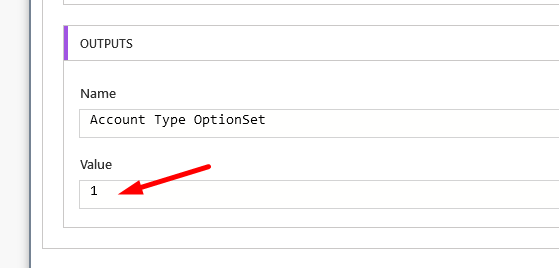
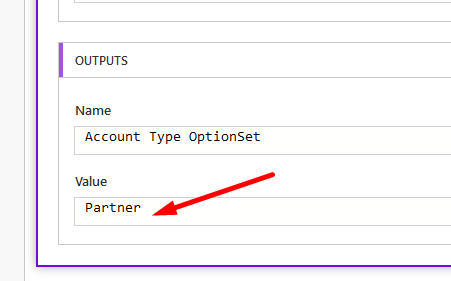
- I’ll capture the Value of the OptionSet i.e. the Value part
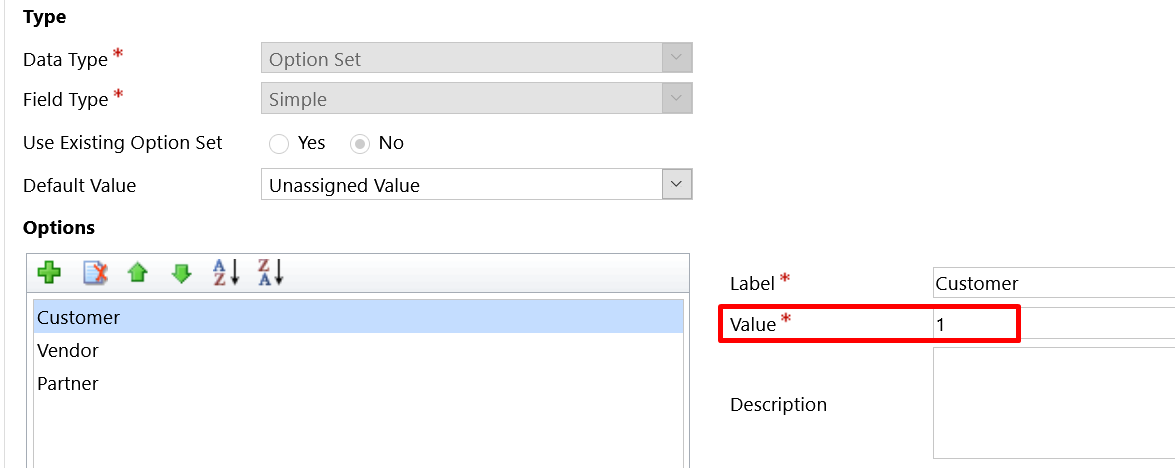
Result –
- What needs to be displayed is the Label of the OptionSet! Let’s see how we can do this –
- Triggers
- Actions – List records (Inside Loops)
- Actions – Get record (Single record)
triggerOutputs() / triggerBody() to read the OptionSet values from Triggers
Let’s see how to read the OptionSet values from CDS Triggers, Create or Update –
- When a Flow is triggered using CDS/Dataverse Triggers (I’m using Common Data Service Environment(Current Environment) trigger), you can read the OptionSet value by using triggerOutputs() / triggerBody() function –
Here’s a triggerBody() example
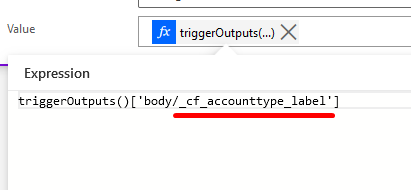
Now, notice that the name of the field is cf_accounttype. So, the label in Triggers can be retrieved as _cf_accounttype_label and NOT cf_accounttype.
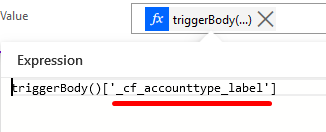
Same way, you can also use triggerBody() function instead as well to yield the same result
Here’s a post on triggerBody() / triggerOutputs() for your reference – Using triggerBody() / triggerOutput() to read CDS trigger metadata attributes in a Flow | Power Automate
items() to read the OptionSet values from Action Step – List Records (Multiple Records)
Let’s look at this example where you are retrieving multiple records using List Records and now, you apply a loop on each of those to read individual records.
- Assuming you are using List Records and you loop through the outputs of each of these records
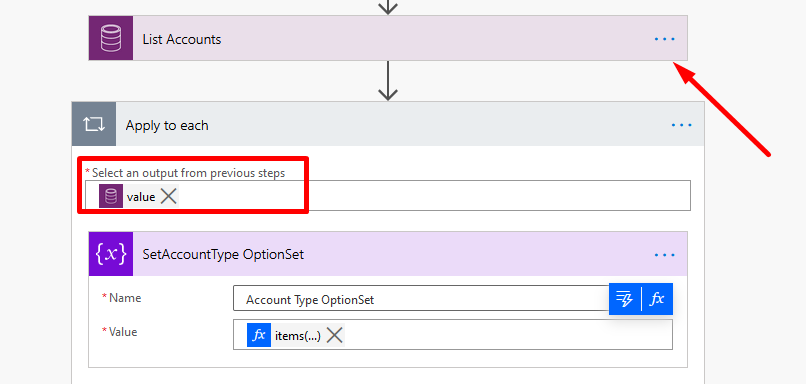
- Now, the value is represented by items() function on the Loop that you are in i.e. Apply to each.
Hence, the function is
items('Apply_to_each')?['cf_accounttype@OData.Community.Display.V1.FormattedValue']
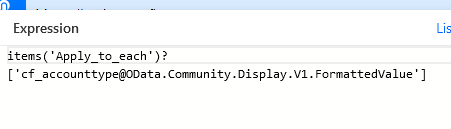
This will show the label of the OptionSet in the results
outputs() to read the OptionSet values from Action Step – Get a record (Single Record)
Similar to items() function, we can use outputs() function to read from the Output’s of the Get a Record Action from Common Data Service (Current Environment)
- Get an Account is a ‘Get a record’ Action in CDS/Dataverse Current Environment connector. It’ll only fetch a single record.
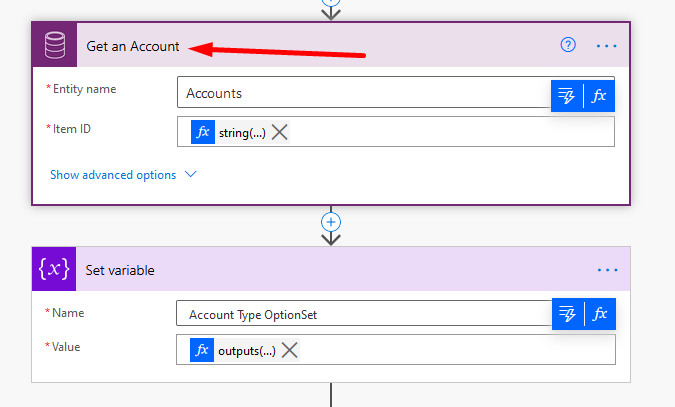
- Now, let’s look at how outputs() function, similar to items() function used in case of Loops is used.
Formula is –
outputs('Get_an_Account')?['body/cf_accounttype@OData.Community.Display.V1.FormattedValue']
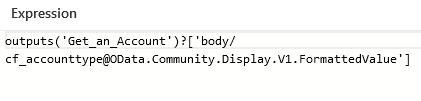
In the above scenario, I’m reading under body hierarchy for cf_accounttype@OData.Community.Display.V1.FormattedValue
Hope this helps!
Here are some Power Automate / Cloud Flow posts you might find helpful –
- InvalidWorkflowTriggerName or InvalidWorkflowRunActionName error in saving Cloud Flows | Power Automate Quick Tip
- Create a Team, add Members in Microsoft Teams upon Project and Team Members creation in PSA / Project Operations | Power Automate
- Setting Lookup in a Flow CDS Connector: Classic vs. Current Environment connector | Power Automate Quick Tip
- Adaptive Cards for Outlook Actionable Messages using Power Automate | Power Platform
- ChildFlowUnsupportedForInvokerConnections error while using Child Flows [SOLVED] | Power Automate
- Run As context in CDS (Current Environment) Flow Trigger | Power Automate
- Using outputs() function and JSON Parse to read data from missing dynamic value in a Flow | Power Automate
- Setting Retry Policy for an HTTP request in a Flow | Power Automate
- Make On-Demand Flow to show up in Dynamics 365 | Power Automate
- Task Completion reminder using Flow Bot in Microsoft Teams | Power Automate
- BPF Flow Step as a Trigger in CDS (Current Environment) connector | Power Automate
- Pause a Flow using Delay and Delay Until | Power Automate
Thank you!!
Brought to you by Dr. Ware, Microsoft Office 365 Silver Partner, Charleston SC.

by Contributed | Dec 24, 2020 | Technology
This article is contributed. See the original author and article here.
Assume you have a Existing Cluster
Resource Group: oldsf-rg
Cluster name: oldsfcluster
Step 1:
Go to Resource Group(oldsf-rg)- > Public IP address resource ->Configuration
Ensure you have static assignment, if not yet (If its Dynamic, when you associate old Public IP address to new Sf cluster, the IP address will get changed)
Step 2:
Please delete all the resources from the resource group (oldsf-rg) except your Public-Ip address resource.
Note: Do not delete the resource group directly, rather I would suggest you to delete the each resources separately in below order one by one( Since some resource will have dependency)
Order:
- Virtual machine scale set
- Service Fabric cluster
- Storage account (both)
- Virtual network
- Network security group
- Load Balancer
Now you will be having only Public IP address resource under your resource group (oldsf-rg)
Step 3:
Please create the new SF cluster with your desired configurations
Assume New SF name : newsfcluster
Please Note: Both Old and New Cluster has to be in Same region.
Once successful.
Step 4:
Go to New Resource group -> Load balancer resource-> Frontend IP configuration( left pane)
You will be able to see a dropdown as shown below, where your old Public IP address will be listed.

Associate the New LB to Old IP address and click on “Save”
Deployment Starts, please wait till the Deployment succeeded.
Step 5:
Once successful, Please verify below:
Old Public IP address is associated with New LB resource

Old Public IP address with New VMSS

Now you should be able to RDP into new node using old Public IP address (IPaddress:3389 )
Try Accessing the SFX with Public IP address:
https://XX.XXX.XXX.XXX:19080/Explorer/index.html#/
However when you click on SFX/Management Endpoint the one in Portal, you may get below Error:

Reason: Management Endpoint Domain is still pointing to Old DNS name which is no more resolving to Old public IP.
Step 6:
To map Management Endpoint Domain to New DNS name.
Go to new Public IP address resource -> Configuration
Copy the DNS value and Change the DNS name to some random value

And paste on Old Public IP address -> Configuration -> DNS name label

Now Azure-Portal-> SF cluster should point to new DNS name and SFX link should be accessible:

by Contributed | Dec 23, 2020 | Technology
This article is contributed. See the original author and article here.
“Fill down” is an operation common in data prep and data cleansing meant to solve the problem with data sets when you want to replace NULL values with the value from the previous non-NULL value in the sequence. Here is how to implement this in ADF and Synapse data flows.
Note that this operation can have negative performance implications because you must create a synthetic window across your entire data set with a “dummy” category value. Additionally, you must sort by a value to create the proper data sequence to find the previous non-NULL value.
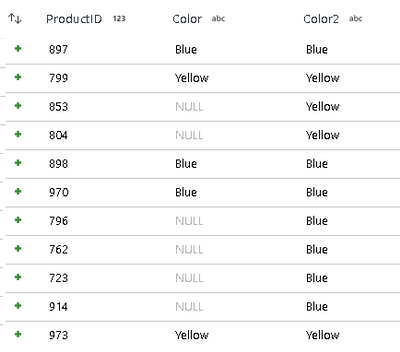
In this case, my products data is missing the Color value in several rows. To fix this, I applied the fill down pattern in the Window transformation to fill in the NULL values:
To achieve this, I used the coalesce formula in the Window transformation:
coalesce(Color, last(Color, true()))
The key to make this work is to first set the Window “over” clause to your entire data set. If you do not already have a value that is the same across all rows, you can set a synthetic window value in a Derived Column. In my case, I set an integer value of 1 to a column called “dummy”.
Next, the Window sorting should be sorted by the column that sets the proper ordering such that the previous non-NULL value will be your fill value. In my case, I used the Surrogate Key transformation to create an incrementing key to sort by.
The final fill-down pattern looks something like this:

To make this easy to add to your data flow pipelines, I added the script-behind as a data flow snippet to our online recipes here.
I’ve also included this snippet below. This creates the synthetic category as “dummy” and sorts by a surrogate key. You can remove the surrogate key and use your own data-specific sort key. This code snippet assumes you’ve already added a Source transformation to your data flow called source1.
source1 derive(dummy = 1) ~> DerivedColumn

DerivedColumn keyGenerate(output(sk as long),

	startAt: 1L) ~> SurrogateKey

SurrogateKey window(over(dummy),

	asc(sk, true),

	Rating2 = coalesce(Color, last(Color, true()))) ~> Window1

by Contributed | Dec 23, 2020 | Technology
This article is contributed. See the original author and article here.
Join us January 11th at 12 noon eastern for the Kickoff of Mid-Day Café as we feature Microsoft’s Raj Gopalakrishnan, Sr. Director and Principal Program Manager, Enterprise Engineering, Microsoft Teams. Raj will be presenting on Microsoft Teams Voice and taking your questions. Additionally, Microsoft’s Samantha Brown, Mark Litwin, Pete Anello, and Patrick Miller, will be joining me to bring you the latest in Microsoft News, Events, and more.
Mid-Day Café is a new, weekly, fast paced, live web series by the HLS Group. Join us each Monday at 12 noon eastern.
September 11th Lineup:
- Welcome and Introductions.
- Mid-Day Café News in 2!
- Upcoming HLS Events in 1!
- Microsoft Teams Voice featuring Raj Gopalakrishnan.
- Open Q&A
- Wrap Up
How to join:
Thanks for visiting – Michael Gannotti LinkedIn | Twitter
 Michael Gannotti

Recent Comments