by Contributed | Jan 20, 2021 | Technology
This article is contributed. See the original author and article here.
As Community Lead for the Microsoft Teams Engineering team, I want to THANK YOU for being part of the Community. I think we can all agree that 2020 was a challenging year for all of us, and Microsoft Teams played an enormous role in staying connected to family and friends, and for enabling us to stay productive at work. With the sudden spike in usage and the quick need to pivot on existing roadmap items due to changing demands, it would have been impossible without all of you working together as a community to share experiences, best practices, and to help us shape the product based on your real-world needs.
As a team, we are proud of the interaction we have with customers, partners, MVPs, and community leaders worldwide. Through attending community events, reading blogs, listening to UserVoice and having discussions at events like Ignite, we are constantly learning from you. I wanted to take a moment to share some of the exciting things going on with the Microsoft Teams Community and invite you to be involved.
New for 2021 is the Microsoft Teams Community Star Award. This monthly award is presented to someone who has made a significant one-time or on-going contribution to the Microsoft Teams Community making impact on the product. Anyone can nominate an individual for the Microsoft Teams Community Star Award.
We would like to congratulate @Mark Vale who has been named our first Microsoft Teams Community Star Award winner for the month of January. An active member of the community, Mark runs the Microsoft Teams Community Event out of the UK, Commsverse. During the start of Covid-19, he was one of the first event organizers who was forced to move his event to a virtual environment. He did so with creative ideas, pushing the limits as a creative problem-solver. Mark worked very close with the Microsoft Teams product group to share real-world feedback around the virtual event scenario to help drive relevant, timely product feedback. He pulled off a successful virtual event with only a few weeks of planning and shared his experience with other event organizers to help ensure their success. Mark is an expert on Microsoft Teams and has a strong background in telephony. We look forward to participating in Commsverse June 29-30, 2021 and the many learning opportunities leading up to the big event. Follow Mark Vale on Twitter @MarkVale83 or find him on LinkedIn.
Several members of the Microsoft Teams Community have come together to organize a Women in Microsoft Teams Community with the purpose of collaborating, sharing ideas and learning from each other in a virtual setting. All are welcome and monthly gatherings will kick-off February 2nd. If you’re passionate about Microsoft Teams and interested in being part of this group, please join. Register here and you’ll be added to the team to start collaborating!
Since we aren’t able to travel and be in-person like we’ve done in the past, the community has gotten very creative with ideas to keep attendees engaged and continue delivering rich content across a variety of topics with audiences, worldwide. One of the benefits to virtual events is the ability to attend and engage with different people in places you may not have been able to visit, otherwise. We urge you to take advantage of the wealth of knowledge and global experiences the community is sharing. You can find a list of regional and worldwide User Groups and Events in the Microsoft Technical Community Event Listings. If you have a UG or Event to share, please add it to the Event Listing!
Here are a few I have on my personal list; I hope you’ll join!
Commsverse, Weybridge, UK: June 29-30, 2021
CommsvNext, Denver, CO, USA: August 19-20, 2021
European Collaboration Summit, Wiesbaden, Germany: June 14-16, 2021
Get-CSLatam, Mexico City, MX: TBD
Microsoft 365 Collaboration Conference, Las Vegas, NV, USA: December 7-9, 2021 + Spring 2021 Announced Soon!
TeamsCommunityDay 2021, Virtual from Germany: January 28, 2021
Teams Nation, Virtual from UK: May 26, 2021
Thrive Conference, Slovenia: April 13-14, 2021
If you haven’t already been monitoring this blog space, I hope you will take time to check out the many articles written by members of the community for the community. Not only do we hope you’ll share your own experiences and knowledge in the discussion board, we do hope you’ll consider authoring your own blog. There’s so much knowledge and we can learn so much from each other and our different experiences. If you have something to write about, please submit your topic at aka.ms/teamscommunityblogger for consideration.
Until next month…Be well! #CommunityRocks
by Contributed | Jan 20, 2021 | Technology
This article is contributed. See the original author and article here.
Azure Sentinel provides multiple ways to import threat intelligence into the product. The threat intelligence imported into Azure Sentinel makes it to the ThreatIntelligenceIndicator log analytics table and is also made available on the Threat Intelligence Blade. The imported threat intelligence can then be used in various parts of the product like hunting, investigation, analytics, workbooks, etc.
One of the ways to bring threat intelligence into Azure Sentinel is using the Threat Intelligence – TAXII Data connectors. This data connector uses the TAXII protocol for sharing data in STIX format and enables a built-in TAXII client in Azure Sentinel to import threat intelligence from TAXII 2.x servers.
Today we are announcing the availability of the IntSights TAXII Server, which allows you to get threat data from IntSights into Azure Sentinel using the Threat Intelligence – TAXII Data connector.
IntSights + Microsoft Azure Sentinel Solution
The IntSights and Azure Sentinel integration allows customers to gain visibility on indicators of compromise that directly target their unique digital footprints based on monitoring of thousands of sources across the clear, deep, and dark web to identify threats. With the IntSights intelligence feed, users can proactively block threats before they impact their environments and get instant visibility on those threats within Azure Sentinel.
In addition, users can leverage this integration to get enriched IOCs with additional context about the IOC like threat actor, malware, and campaign information. Users can further pivot to the IntSights Investigation module to gain additional visibility and context to protect their organizations.
Microsoft Azure Sentinel benefits with IntSights feed
The Azure Sentinel and IntSights integration enables analysts in the Security Operation Center (SOC) to gain visibility into thousands of indicators of compromise with contextual information. This integration also provisions dashboards in the form of Azure Sentinel workbooks detailing event data associated with the IOCs found in your environment.
This blog will walk you through the process of connecting the IntSights TAXII Server to Azure Sentinel.
Connecting Azure Sentinel to the IntSights TAXII Server:
To connect Azure Sentinel to the IntSights TAXII Server, obtain the API Root, Collection ID, Username and Password from the IntSights portal after you configure a policy of the data you wish to send to Azure Sentinel.
Enable the Threat Intelligence – TAXII data connector in Azure Sentinel
To import threat intelligence indicators into Azure Sentinel from the IntSights TAXII Server, follow these steps:
- Open the Azure Portal and navigate to the Azure Sentinel service.
- Choose the workspace where you want to import threat intelligence indicators from the IntSights TAXII Server.
- Select Data Connectors from the Configuration menu.
- Select Threat Intelligence – TAXII from the list of the data connectors and click the Open Connector page button.
- Now enter a Friendly name for the TAXII Server collection. This will be stamped on all the indicators as the Source of the indicator.
- Now enter the API Root, Collection ID, Username and Password that you obtained from IntSights.
- Click the Add button.

You should now see a confirmation on the notification dialog that the connection was established successfully. The TAXII Server will now show up in the List of the configured TAXII Servers.

View imported indicators from IntSights TAXII Server in Azure Sentinel
Now that threat intelligence indicators from the IntSights TAXII Server are being imported into Azure Sentinel, you can view them in one of the two below mentioned ways in Azure Sentinel:
a. The ThreatIntelligenceIndicators table in Log analytics
- Open the Azure portal and navigate to the Azure Sentinel service.
- Choose the workspace where you imported threat indicators from IntSights using the Threat Intelligence – TAXII Data connector.
- Select Logs from the General section of Azure Sentinel.
- The ThreatIntelligenceIndicator table is located under the SecurityInsights group.
- Use the following query to find indicators from IntSights:
ThreatIntelligenceIndicator
| where SourceSystem == “Friendly name of the TAXII Server”
b. Threat Intelligence blade under the Threat Management menu
- Open the Azure portal and navigate to the Azure Sentinel service.
- Choose the workspace where you imported threat indicators from IntSights using the Threat Intelligence – TAXII Data connector.
- Select Threat Intelligence from the Threat management section of Azure Sentinel.
- You can filter the indicators according to the Source to view the ones that you imported from IntSights. To do so, select the friendly name of the IntSights TAXII Sever you used from the Source pill filter.
Use imported indicators from IntSights TAXII Server in Azure Sentinel
Now that you have imported the indicators into Azure Sentinel, you can use them for matching against log sources. This can be done using the Azure Sentinel out-of-the-box analytics rules by modifying them or by creating new rules from scratch. The set of out-of-the-box analytics rules used to match threat indicators with your event data all have names beginning with, ‘TI map’ under the Analytics section in the Configuration menu. All these rule templates operate similarly with the only difference being what type of threat indicators are used (domain, email, file hash, IP address, or URL) and which event type to match against.

Get insights about your threat intelligence using the new IntSights Workbook
You can use the IntSights Workbook to visualize important information about the threat intelligence you have imported from the IntSights TAXII Server. This workbook provides an interactive dashboard about the threat intelligence you have imported from IntSights. The IntSights Workbook is available on the Azure Sentinel GitHub page. The name of the workbook is “IntsightsIOCWorkbook”.
You can follow the below mentioned steps to get the IntSights Workbook:
- Open the Azure portal and navigate to the Azure Sentinel service.
- Choose the workspace where you imported threat indicators from the IntSights TAXII Server.
- Select Workbooks from the Threat management menu.
- Navigate to the Templates tab and search for the workbook titled IntSights IOC Workbook.
- Select the Save button and choose an Azure location to store the workbook.
- Now select the View saved workbook button to open the workbook for viewing.

Send tags for indicators back to IntSights
You can send a tag to your IntSights account for every IOC that was sent by IntSights and seen in your environment so that you can further analyze the data in the IntSights platform. This can be done simply by deploying a Playbook from the Azure Sentinel GitHub.
Conclusion
With the IntSights and Azure Sentinel integration, you can now gain visibility on indicators of compromise from thousands of sources across the clear, deep, and dark web for advanced detection and hunting threats. You can also receive additional context about the IOCs from the IntSights feed to protect your organization against targeted threats.
by Contributed | Jan 20, 2021 | Technology
This article is contributed. See the original author and article here.
One of the most used non-Microsoft app that Microsoft Cloud App Security can help protect is Box.
You may ask: “Why would I connect Box to MCAS? What benefits will I gain?”
Continuing on our series on how to use MCAS to protect your non-Microsoft apps, we’ll discuss leveraging MCAS to detect threat impacting your Box environment and to protect your data in the cloud.
Why connect Box?
In short: for the exact same reasons you would want to connect Office 365 and more, as described here:
Benefit
|
Description
|
Policy or template
|
Compromised account or insider threat
|
The built-in Threat Detection policies in Microsoft Cloud app Security will apply to Box as soon as you have connected it. No additional configuration is necessary: by simply connecting you will start seeing new alerts when applicable.
|
“Potential Ransomware Activity”, or any of the built in detections.
|
Enforce Data Compliance
|
By enabling content inspection, you can control the type of data stored in Box, just like you could in Office 365.
You are then able to take actions, such as quarantining or removing a file. You can also simply notify the users of their non-compliant files.
|
“File containing PII detected in the cloud (built-in DLP engine)”, or simple generic file policies.
|
Prevent data leakage
|
Content inspection, in conjunction with restricting file sharing helps prevent data from leaking to unwanted parties.
|
“File shared with unauthorized domain”, “Stale externally shared files”.
|
Azure Information Protection integration
|
Leverage the AIP integration with MCAS to add automatic AIP labeling capabilities to your files stored in Box
|
(no template available, using generic file policies).
|
How to connect Box?
First thing first, let’s discuss how to connect Box to Cloud App Security.
The process is as straightforward as can be, and is fully described in our Official documentation.
If you would rather see it in action, check out the video below:
Configure MCAS for Box
By simply connecting box you already gain value: not only the default threat detection policies will apply automatically, but any File Policy you have created to support another app, such as Office 365, will also apply by default to Box (only governance actions require editing existing policies).
Therefore, you would be able to start enforcing compliance requirements right after the connection is established.
Of course, each app being unique, there are a number of Box specific configurations and policies that can be leveraged. Let’s start here with best practices that apply to most customers.
Quick config – Quick value!
Enabling Box policy templates
With regards to Box specifically, we created the following templates to help you handle the specificities of the app, and we recommend most customers to enable them as Box is connected to your MCAS environment.
Template
|
Description
|
Identify Box shared links without a password
|
Box can make it very easy to share files with internal or external parties. Sometimes even too easy, and we have seen a number of our customers accidentally leaking data. To help limit this risk, we created this File Policy template in MCAS that allows you to identify non-password protected shared links.
If this policy triggers too many results, it can edited to add additional matching criteria, or content inspection.
|
Detecting unauthorized Watermark Label changes
|
Box allows watermarking documents to indicate a level of confidentiality to the reader. One may want to control when these are modified, and for that purpose we created this activity policy template.
It can be tweaked to filter results per user, group, file type and more.
|
Unauthorized account updating shared link expiration dates
|
Box allows placing expiration dates on shared links. Thanks to this Activity policy template, MCAS can alert when an expiration date is extended or changed, avoid potential policy violation. As for the other templates, it can be tweaked to better fit your needs.
|
The video below illustrates how to use these templates in your environment:
Generic templates
On top of these specific Box use cases, you can use all the generic features and policy templates offered in MCAS. Here are a few easy examples to deploy.
Template
|
Description
|
Mass Download by a single user
|
Alerts when a single user performs more than 50 downloads within 1 minute (these thresholds can be changed)
|
Potential Ransomware Activity
|
Alerts when a user uploads files to the cloud that might be infected with ransomware.
|
Logon from a Risky IP address
|
Alert when a user logs on from a risky IP address to your sanctioned services.
‘Risky’ IP category contains by default anonymous proxies and TOR exits point. You can add more IP addresses to this category through the ‘IP addresses range’ settings page.
|
File Shared with Unauthorized domain
|
This policy can help you detect file sharing with domains that may represent a certain risk, such as personal email domains (outlook.com, gmail.com) or competitor’s organization.
|
Configure your own policy
Of course, these pre-canned templates are only the tip of the iceberg of what can be done to protect your Box environment.
Two main types of policies would apply to your Box deployment.
First, Activity Policies can be configured to detect virtually any activity that you deem suspicious for your environment. These are particularly useful if you are concerned about a specific threat in your environment.
One of the most common use cases we see for Box users is the ability to apply Data Loss Prevention (DLP) policies.
For that, one can use MCAS File Policies. They allow the admin to detect files with specific properties, sharing level, and even do content inspection to detect sensitive data.
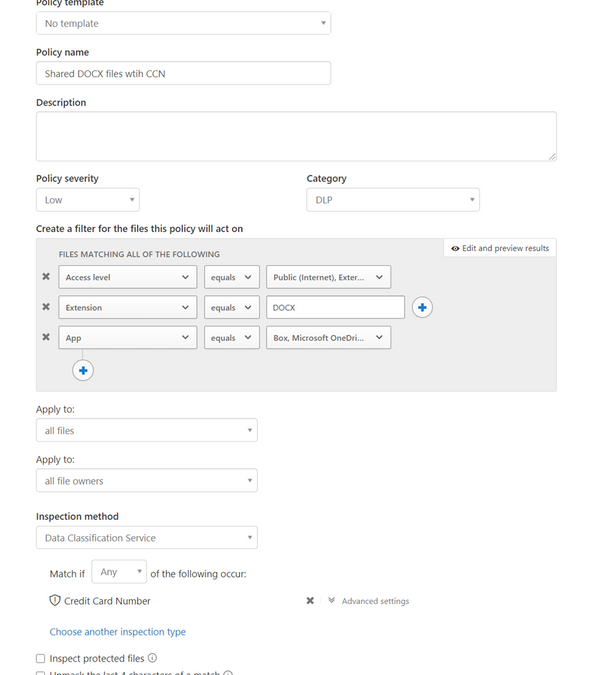
One of the key benefits of these File Policies is that they can apply equally to all apps. For instance, if you are using Office 365 and Box, a single policy can be applied to detect your sensitive data shared in the cloud (should you decide to have separate policies for each of your apps it is also possible using the “App” filter). See the capture below for an example of a policy detecting Credit Card Numbers in DOC files stored in OneDrive, SharePoint or Box:

Governance Actions
The last part of the File policy creation page is dedicated to Governance actions. These allow you to define actions that will be executed automatically when a policy is triggered. These can be different for each app. For Box the list is quite extensive as displayed here:

Let’s discuss a few of these.
Box Governance action
|
Description
|
Remove External User
|
This will remove permissions to any user that is not part of the organization from all matching files. Users are recognized as being part of the org based on their email address domain name.
|
Remove Direct Shared link
|
Completely unshare any file that matches the policy.
|
Set an expiration date on a shared link
|
Forces a shared link to expire at a specific date. This can be very valuable to limit cases where files are shared and often forgotten, even when not used anymore.
|
Admin Quarantine
|
After defining a target folder, this action will move any file that matches the policy to the folder. There, the file can be reviewed, and the admin can decide if it should be authorized or removed.
|
Trash
|
As clear as can be. This action can be useful when some data must never be found in cloud storage.
|
Notify the last file editor
|
The policy digest would notify the owner of the file. If a file is shared and multiple users can edit it, the last editor may be the one adding the non-compliant data.
|
Apply Classification label
|
This action will automatically apply an AIP label to a file. It extends Box capabilities by adding automatic classification of supported document. More info here.
|
Real time control
The policies and controls we have discussed above are all relying on Box’s APIs to query activities and data. While this allows monitoring activities very specific to Box and data already stored, it is an out of band connection (cloud to cloud, users are never aware of this connection) and as such, data is received by MCAS in Near Real Time.
For use-cases where real time controls are required, we can leverage another component of MCAS: Conditional Access App Control.
This feature allows MCAS to act as a reverse proxy in the cloud, and allows for a real time control of several activities, for Box or any other Cloud App:
- Control file downloads
- Control file Uploads (including malware detection)
- Control or prevent Cut/Copy/Paste/Print
Some of the most common scenario used with Conditional access app Control with Box are:
- Block download of sensitive data to unmanaged devices
- Prevent upload of malware.
- Prevent copying or printing data from an unmanaged device.
- Prevent file sharing: clicking on the share button would be blocked.
- Read-only mode: prevent file editing or file creation/upload
More info on how to use Conditional Access App control is available here:
You can also learn about how to deploy Conditional Access App Control in the videos here:
Share your thoughts!
We hope this will help you get the best value out of MCAS and secure your environment.
Have you found a scenario that we haven’t covered here? Please share with our community and let us know in the comments below.
(By Idan Basre and @Yoann Mallet)
by Contributed | Jan 20, 2021 | Technology
This article is contributed. See the original author and article here.
There is a growing need for virtual meetings, consults, and appointments but also an increase in the amount of time people are dedicating to try to schedule those appointments. Back and forth phone calls, emails, text messages. Bookings can make it easier, so you can spend more time talking to customers rather than trying to schedule them, and it does it in a secure and integrated way with Microsoft 365.
Microsoft Bookings helps making scheduling and managing appointments easy and seamless. It does this through a web-based booking tool where people have the flexibility to see and book services when it’s convenient for them, it makes it easier to manage staff’s time by integrating with Outlook’s calendar and keeps everyone updated with timely and automatic email confirmations and reminders to reduce no-shows, all these also helps organizations reduce repetitive scheduling tasks.
Bookings is flexible, customizable, secure as it uses a mailbox in Exchange Online, and can be designed to fit scenarios and needs of different parts of an organization.
We have worked with various industries to enable different scenarios. Tele-Health by virtual consultations with doctors through Microsoft Teams, educational classrooms, financial consulting, organizations internal services like legal/IT/HR provided to their employees, candidate interviews, assisted shopping in retail, and government services. To read more on how customers are using Bookings for these scenarios, please click here.
These scenarios demand high scale, to help make sure Bookings works well for you and scale to your needs, we have prepared these best practices.
1. Planning for scale
Each Bookings calendar is currently designed to handle a maximum of 2,500 bookings across all services in that calendar per day, along with a creation limit of 10 booking requests per second, this will work for common scenarios.
If your requirements exceed this, you should plan to distribute the load using the steps below.
- Create a Bookings calendar with just one service.
- Clone this calendar to multiple calendars.
- You can opt-in to the Bookings preview to use a clone option and optout of the preview anytime you want to.
- Limit each calendar for specific audiences, like:
By buildings or operating group
By booking period (mornings only vs afternoons)
- Dividing the load across different Bookings calendars will help ensure none of them will reach the 2,500 limit.
2. Set how far in advance your customers can book an appointment
Finding the optimal value for the maximum advance appointment time your customers can book can help prioritize the daily limits for appointments that are closer to “today”. We have attached a simple Excel spreadsheet where you can enter the values to help you estimate the number of appointments and forward-looking time you can have in your Bookings calendar.
Follow the instructions below to use the attached spreadsheet.
- Calculating the maximum advance appointment time in which those 2,500 appointments could be achieved.
- Open the booking availability timeframe only for that period of time.
- Keep updating the timeframe once the slots are full or a day has passed, so people will always have the option to book up to the same timeframe in advance.
If you got confused (don’t worry, we did too), below is an example. This example is calculated at the calendar level, not at the service level.
- If the appointment duration is 10 minutes, and the maximum number of working hours are 8, then the possible number of appointments/day will be 8*60/10. This means up to 48 appointments per staff member, assuming you don’t need buffer time between appointments.
- If we consider 5 staff members per booking calendar, the max number of appointments you can have in a workday will be 240.
- Considering that opening more than 2,500 slots will throttle the system, then the ability to book a service shouldn’t be opened for more than 2500/240 = ~10.5 days
- Assuming a 5-day week, do not let your customers book appointments 2 weeks before the current date (I.e. today). This will ensure that your customers can always book an appointment
- You can choose to move the booking timeframe every day to always have a 2 week pre-booking time or do it when your bookings are filling up.
We are actively working to increase the scaling limits as you read this and we will post a new communication as soon as our systems are updated.
As always, please let us know if you have any feedback in our UserVoice channel.
Thank you!
Gabriel on behalf of the Bookings team
by Contributed | Jan 20, 2021 | Technology
This article is contributed. See the original author and article here.
Built-In Service Bus Trigger: batched message processing and session handling
Logic App Refresh preview provides us with the option to create a built-in S trigger to receive messages from Service Bus topic or queue.
In this blog post two advanced Service Bus message processing are discussed:
- Azure Service Bus batch processing and how to configure the max batch count of messages.
- Messages processing in Logic App for the session-aware Service Bus queues or subscriptions.
Service Bus queue batch processing:
To improve the message retrieval performance for Service Bus queue, it is highly recommended to receive the messages in batch. The Logic App Service Bus trigger for queue by default supports array of Service Bus messages as output.
The prefetchCount is used to specify how many messages should be retrieved in a “batch” to save the roundtrips from Logic Apps back to the Azure Service Bus. Prefetching messages increases the overall throughput for a queue by reducing the overall number of message operations, or round trips.
The prefetchCount can be configured in the global configuration settings in host.json, the Azure function trigger requests these many messages for the Azure Function.
{
    "version": "2.0",
    "extensions": {
        "serviceBus": {
            "prefetchCount": 20,
            "messageHandlerOptions": {
                "autoComplete": true,
                "maxConcurrentCalls": 32,
                "maxAutoRenewDuration": "00:05:00"
            }
The host.json can be edited using Kudu Advance tool (in case the Logic App is created in Azure Portal).

Message processing for session-aware service bus queue/subscriptions:
You can enable the session by selecting the Enable sessions checkbox while creating the Service Bus queue in UI :

In the session-aware Service Bus queue the built-in Service Bus trigger cannot receive the message by default. The sessions are not enabled for Service Bus trigger by default.
The Azure Service Bus trigger is based upon Azure Function ServiceBusTrigger binding configuration of Azure function, the isSessionsEnabled configuration needs to set for it to enable the session processing. This option can be handled in the logic app code definition as given below:
        "triggers": {
            "When_messages_are_available_in_Service_Bus_queue": {
                "inputs": {
                    "parameters": {
                        "isSessionsEnabled": true,
                        "queueName": "psrivassbq5"
                    }
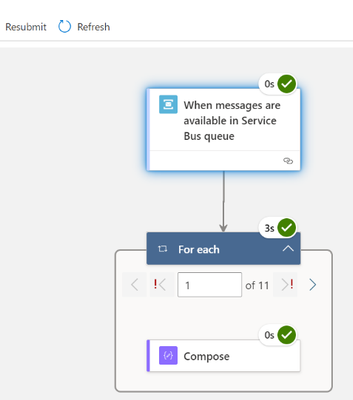
Once you update the Logic App definition you can view this in the designer as shown below. However, the isSessionsEnabled trigger input option cannot be configured on the designer surface. The input option IsSessionEnabled in UI will be provided in the Logic App Refresh future release.

When the messages are queued in Service Bus session queue, it will trigger the Service Bus trigger based upon sessions in Service Bus queue. You can use the SessionId property from Service Bus trigger output.


Recent Comments