
by Contributed | Jan 19, 2021 | Technology
This article is contributed. See the original author and article here.
Voices of #HealthcareCloud is a webinar series hosted by Shelly Avery (Microsoft Teams Technical Specialist – Health & Life Sciences) and Vasu Sharma (Customer Success Manager, Microsoft 365 – Health & Life Sciences).
The goal of this webinar series is to showcase how Healthcare is seeing positive business and clinical outcomes with cloud technology.
We will be bringing new and creative solutions to you at least once a month, so we hope you tune in live or catch the on-demand series after the session is completed.
For this session we are excited to bring you a solution for huge need NOW, which is options to help with Vaccine distribution for employees and options for public facing distribution.
Please click here to join live on Tuesday January 26th at 10:00 PT / 11:00 MT / 12:00 CT / 1:00 ET to hear from our presenters! Or to download a calendar invite here!
If you are not able to join us live, just check back here after the event we will post the recording and any assets that where shared during the session.
Our presenters for this session are:
 Josh Thompson, Customer Success Manager

Maria Kurian, Sr. Customer Engineer
by Contributed | Jan 19, 2021 | Technology
This article is contributed. See the original author and article here.
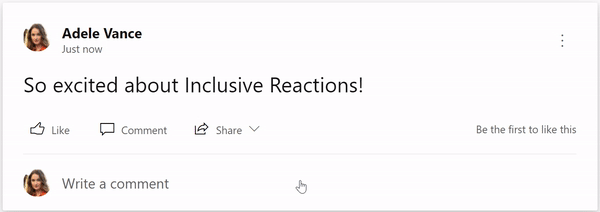
We believe that Yammer, a tool that connects people and helps build communities, has an important role to play for a sense of belonging and inclusion. And when we build Yammer, we don’t want to simply build for inclusivity, we want to celebrate it.
Recently Yammer introduced reactions, and coming next, we want to bring diverse skin tones to Yammer reactions. We want users to feel a deeper sense of representation when interacting with the new Yammer. Once you select your skin tone (settings available both on web and mobile!), you can easily react quickly without having to decide every time you reply!
We aim to have inclusivity at the front and center of everything we do. Yammer will be the first of the Microsoft 365 products to offer inclusive reactions. We are excited to lead the charge with other product groups.
Inclusive for all
Being able to select your skin tones for reactions that you use to interact in conversations is just the first step in seeking inclusivity for Yammer. We want to build features that help all our users feel included and empowered. When designing this feature, reactions with skin-tones work on both light and dark mode, so users with varying abilities can use this feature as expected. Additionally, we gathered feedback from employee groups to help ensure our proposals were reviewed from many perspectives.
Steps in the journey of inclusivity
Inclusivity is a process, in life and in products. We can take small steps in the right direction today, to build a more inclusive world for tomorrow. And I feel such a deep sense of pride, to know that we are committed to making inclusivity a way of life, through everything we do and everything we build at Yammer.
General availability starts now!
Inclusive reactions are starting to roll out and will be available to all users globally soon.
Here’s how to select a skin tone:
- Go to Yammer Settings (click on the gear icon on the suite header while in Yammer web; click on your avatar at the top left corner if you are on mobile).

- Click Choose your skin tone for reactions.

- Select a skin tone and click OK to save your preferences.
- Find a conversation and hover on the like button! And voila! See your skin tone preferences the next time you select a reaction!
Learn more about this via our support page.
– Trisharti Ghosh
Trisharti Ghosh is a Product Manager at Microsoft, and is focusing on conversations in Yammer.

by Contributed | Jan 19, 2021 | Dynamics 365, Microsoft 365, Technology
This article is contributed. See the original author and article here.
Truly engaged, always connected
The events of 2020 have left a lasting impact on the retail industry and retailers are fueling rapid innovation with development and rollout of new technologies. The global pandemic has shifted how customers buy, as well as renewed recognition of the critical value of technology to customers. Convenience, flexibility, and personalization will continue to dominate customer choices. The retailers who continue to thrive will be those that let customers engage on their terms while simultaneously connecting with customers in more meaningful ways.
Retailers today are collecting data from every customer interactionfrom websites and apps to helpdesk chats and support calls, to physical store visits. But is all the data really being utilized and what is the impact on customer relationships? The ability to deliver a personalized customer experience relies heavily on a retailer’s customer understanding. This is where customer data platforms (CDP) can help retailers gain a holistic view of customers, deepen relationships, and build ongoing trust with the customers who are vital to their bottom line.
Read additional details about how Microsoft Dynamics 365 is reimagining retail in our recent blog, “NRF 2021: enabling retailers to reimagine the road ahead with Microsoft Business Applications.”
Customers demand and respond to personalized experiences
Customers today expect personalization from the organizations they interact with. According to Forrester, 80 percent of U.S. online users feel comfortable sharing some personal information with retailers in order to personalize their experience. Every customer is unique and has a unique path to purchase, and personalization helps retailers guide customers on the right path based on their needs and behaviors. CDPs provide the crucial foundation for enabling personalized customer interactions by bringing together transactional, behavioral, and demographic data from across channels to create multidimensional customer profiles. They enable activation on realtime insights across the customer journey and on destinations including analytics, marketing, advertising, and engagement platforms.
Customers reward businesses they trust
While virtually every interaction is being tracked, nearly 67 percent of customers have little to no understanding about how their data is being used by companies, according to Microsoft research in partnership with iProspect. This is an opportunity for retailers by showing transparency and showcasing the value they can provide in exchange for dataorganizations can ultimately earn customers’ trust and loyalty.
How it’s done
A number of organizations have found unique ways to combine deep customer understanding with innovative experiences to achieve growth and set themselves apart from the competition. One such organization is Chipotle Mexican Grill, a chain of more than 2,700 restaurants with multiple sources of customer data including a loyalty program, point-of-sale data, a customer care center, and digital platforms. They turned to Microsoft Dynamics 365 Customer Insights to unify data and better understand their customers.
Getting personal, at scale
Chipotle has millions of customers each year across its thousands of locations, but with Dynamics 365 Customer Insights the company has a deep understanding of individual customer preferences. They now know whether customers typically order for lunch or dinner, what their favorite meals are and which channel they use to make their purchase. These insights have allowed Chipotle to target customers with promotions and messages that appeal to them.
Using the map, match, and merge logic at the heart of Dynamics 365 Customer Insights, Chipotle can standardize and reconcile conflicting data and then set up business rules and act on them. The result is unified profiles with detailed views of each guest. Chipotle also uses Dynamics 365 Customer Insights to grow its customer base by converting more guests into loyalty program members. Using rich demographic data, they were able to gain insights on guests who made purchases but weren’t members of their loyalty program, which added up to 30 percent more unified customer profiles.
“Every customer is different. Customer Insights allows us to understand each customer’s differences and market to them as a unique individual.”Sashi Kommineni, Director of Enterprise Analytics, Chipotle Mexican Grill
The ability to personalize has been particularly important during the COVID-19 pandemic, as many customers have become hesitant to visit restaurants. Dynamics 36 Customer Insights helped Chipotle understand customer concerns and provide appropriate messaging, such as information about delivery and pick-up options. Though this highly specific targeting, Chipotle was able to increase conversations and use of these services.
Take the next step
By leveraging customer data to provide elevated, personalized experiences, retailers can build lasting relationships with customers, increase brand trust, and grow customer loyalty.
Dynamics 365 Customer Insights is a secure and flexible customer data platform with built-in AI to unify customer data and generate insights that power personalized experiences. Using prebuilt connectors, the solution brings together first- and third-party data sources including interactions with the web, mobile apps, and connected products. Dynamics 365 Customer Insights proactively identifies segments and generates predictive insights such as churn rates, lifetime value, and recommended products. Real-time integration with business applications and business processes ensure that marketing, sales, and service efforts are tailored for each customer. Brands see results faster with Dynamics 365 Customer Insights, an intuitive and ready-to-go customer data platform that requires minimal training and IT assistance.
Take a guided tour to see how your organization can use Dynamics 365 Customer Insights to unlock insights and drive personalized customer experiences, and learn more about our Microsoft Dynamics 365 Retail offerings.
The post The power of CDPs: building customer trust and loyalty in retail appeared first on Microsoft Dynamics 365 Blog.
Brought to you by Dr. Ware, Microsoft Office 365 Silver Partner, Charleston SC.
by Contributed | Jan 19, 2021 | Technology
This article is contributed. See the original author and article here.
Welcome to the third and final blog post in our series on how to use tagging effectively in Microsoft Defender for Endpoint. We hope you’ve enjoyed this series and look forward to your feedback on this topic and what you’d like to see in the future.
Tagging using the API
Microsoft Defender for Endpoint APIs allow you to do many things through scripting to both query and change elements within your Microsoft Defender for Endpoint instance. As part of this blog on tagging we wanted cover how you can use scripting to apply tags to machines directly using an API.
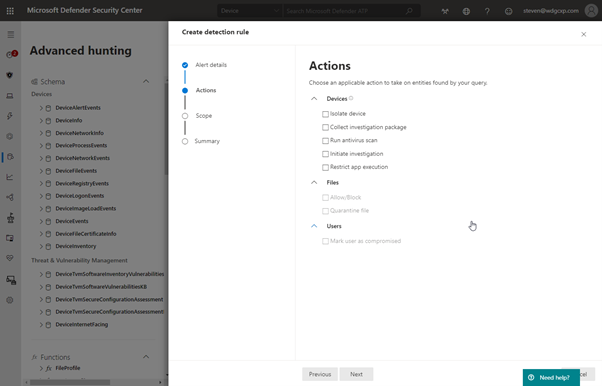
Within Advanced Hunting you can create a custom detection that runs the query on a regular basis to generate an alert. You can also enable response actions as a result of this detection to affect the machines contained in the results:
You will notice however that tagging the resultant machines is not one of the options available. Instead, it is possible to take the advanced hunting query and use it as an input to the script that applies the tag through the API.
Setting up API access
Before you can use PowerShell to query against the API you need to set up the API application in Azure.
In the Azure Active Directory section of https://portal.azure.com you need to click on new App Registration and create a new app:

Once you have completed this part you will be presented with the following screen:

Take a note of the Application ID and the Directory ID, you will need these for your script. Then click on “View API permissions”. It is here that you define how the API can be accessed.
- Select “Add a permission”
- Click “APIs my organization uses”
- Type “Windows” into the search box and then select the “WindowsDefenderATP” API

When accessing the API, it is possible to use either user permissions or application permissions. Using application permissions means that it doesn’t matter who is logged in to run the script and instead utilises the client secret to authenticate against the application.
For the purposes of what we are enabling we need specific permissions set. We are running an Advance Hunting query so we need the “AdvanceQuery.Read.All” permission and we are also applying a tag to the machine so we need the “Machine.ReadWrite.All”

If you are using this scripting method for other actions, i.e. isolating a machine, then you would need to apply the appropriate permissions.
The final stage of the application registration is to create the client secret that will be used for authenticating.
In the app properties, click onto “Certificates & secrets” and create a new secret:

Then take note of the client secret that is created as you will need this alongside your Application ID and Directory ID for your script:

Now that you have your application created you can use PowerShell scripting to query against it and then write a tag back on the devices in the results.
Using an Advanced Hunting query for your tagging criteria
Advanced Hunting in Microsoft Defender for Endpoint is a powerful query tool that allows you to create complex queries based upon the telemetry that is gathered from the managed endpoints. When writing these queries, it is possible to enable them as a custom detection, meaning they run at a regular interval and can apply actions against any device presented in the results. However, there are only certain actions that can be applied against these devices and tagging isn’t one of them:

Therefore, if you want to tag a device based upon a query then you need to utilise the API. Let’s say for example if you want to tag all devices in a certain subnet, the first step is to create the Advanced Hunting script:
DeviceNetworkInfo
| mvexpand parse_json(IPAddresses)
//| Subnet=IPAddresses.SubnetPrefix
| where IPAddresses contains “192.168.254” and IPAddresses.SubnetPrefix contains “24”
| summarize by DeviceId
| project DeviceId
Obviously, you can use pretty much any Advanced Hunting query in this test file, but it does need to return DeviceID in the results in order for it to be used in the next step.
Run the script first in the portal just to verify it is finding the correct data for you then copy the query into a text file to use as input to your API script.
The script below takes the query text file and then applies a tag of “DataCenter” against the DeviceIDs that are found by the query:
#Script to take a file containing an Advanced Hunting query and then apply a tag to the DeviceID shown in the results
#Replace ‘XXXXXXXXXXXXXXXXXXXX’ with the appropriate IDs relevant to your tenant/application (quotes required)
$tenantId = ‘ XXXXXXXXXXXXXXXXXXXX’
$appId = ‘XXXXXXXXXXXXXXXXXXXX’
$appSecret = ‘ XXXXXXXXXXXXXXXXXXXX’
$resourceAppIdUri = ‘https://api.securitycenter.windows.com‘
$oAuthUri = “https://login.windows.net/$TenantId/oauth2/token“
$body = [Ordered] @{
resource = “$resourceAppIdUri”
client_id = “$appId”
client_secret = “$appSecret”
grant_type = ‘client_credentials’
}
$response = Invoke-RestMethod -Method Post -Uri $oAuthUri -Body $body -ErrorAction Stop
$aadToken = $response.access_token
$query = [IO.File]::ReadAllText(“c:tempQuery3.txt”); # Replace with the path to your file
$url = “https://api.securitycenter.windows.com/api/advancedqueries/run“
$headers = @{
‘Content-Type’ = ‘application/json’
Accept = ‘application/json’
Authorization = “Bearer $aadToken”
}
$body2 = ConvertTo-Json -InputObject @{ ‘Query’ = $query }
$webResponse = Invoke-WebRequest -Method Post -Uri $url -Headers $headers -Body $body2 -ErrorAction Stop
$response2 = $webResponse | ConvertFrom-Json
$results = $response2.Results
$machine = $results.DeviceId
#Take the results from the query and parse through them to apply a tag to each DeviceID
Foreach ($machine in $machine)
{
#Comment sleep statement out if only planning to modify a small number of devices
Start-Sleep -Seconds 3
$url = “https://api.securitycenter.windows.com/api/machines/” +$machine+ “/tags”
$headers = @{
‘Content-Type’ = ‘application/json’
Accept = ‘application/json’
Authorization = “Bearer $aadToken”
}
$tag= @{
‘Value’ = ‘Datacenter’
‘Action’ = ‘Add’
}
#Output
$body3 = ConvertTo-Json -InputObject $tag
$webResponse = Invoke-WebRequest -Method Post -Uri $url -Headers $headers -Body $body3 -ErrorAction Stop
}
We have used the “add” action in this script, but you could just as easily delete tags through this method as well (assuming they haven’t been set via the registry). Simply replace ‘Add’ with ‘Remove’.
The other thing to watch out for is API limits. Due to resource constraints, we limit the amount of API calls that can be made to 100 per minute and 1500 per hour. To avoid this, a sleep value has been applied to the script to put a pause in after each API call. Obviously, this can be removed to speed things up if the number of machines you are modifying does not hit this limit.
I have talked to you in this part of the blog about how to use scripting against the API, but there is also a great article by Tomer Brand talking about how to achieve this using Microsoft Flow (or Power Automate as it is now), where the same concepts can also be applied to Logic Apps.
We hope you’ve gotten value from this blog series on how to use tags effectively in Microsoft Defender for Endpoint. Make sure to check out Part 1 and Part 2 in the series. We welcome your feedback and questions and look forward to hearing from you.
Steve Newby (@steve_newby) and Miriam Wiesner (@miriamxyra)
Program Managers @ Microsoft Defender for Endpoint Product Group
(Credit also to Thorsten Henking for some of the API scripting input)
by Contributed | Jan 19, 2021 | Technology
This article is contributed. See the original author and article here.
We realize that many customers have genuine business requirements to configure automatic email forwarding. On the other hand, email forwarding may lead to data leakage. For example, if we have a compromised account, the attacker might create a forwarding rule for a particular mailbox, and the user might be unaware that their mail is being forwarded. This is a very common tactic used when accounts are compromised.
It is therefore important for administrators to know all mailboxes that have forwarding enabled and where the mail is been forwarded to. We have various insights and alerts that help administrators monitor such activities, but prevention is always better than the cure. In this blog post, we thought to revisit (and update) various auto forward controls, how they work together and how they can help you achieve a requirement of allowing automatic forwarding for users who really need this feature.
Various ways to set up forwarding
Before discussing how to control automatic forwarding, let’s review a few different ways in which automatic forwarding can be setup:
- A forwarding rule can be setup within the Rules wizard in Outlook on the desktop. User can set this Automatic forwarding from Outlook > File > Manage Rules and Alerts. Using Outlook on the web, this can be done using Inbox rules.
- Using Outlook on the web (OWA) the user can also set the ForwardingSmtpAddress parameter on the mailbox. This option is available via Settings > Mail > Forwarding.
- Users can also set auto forward using Power Automate (used to be called Microsoft Flow).
- Administrators can configure forwarding from the properties of the mailbox from Exchange Admin Center. This option is available under “Manage Mail flow settings” in classic EAC, or user properties in the preview version of EAC. Configuring automatic forwarding from the properties of the mailbox will populate the ForwardingAddress parameter on the mailbox.
- Administrators can also configure forwarding from Microsoft 365 Admin Center. Configuring forwarding from Microsoft 365 Admin Center will set the ForwardingSmtpAddress parameter on the mailbox (but will show if ForwardingAddress is populated).
Controlling automatic forwarding
Administrators have several methods to prevent and regulate automatic forwarding of emails outside the organization:
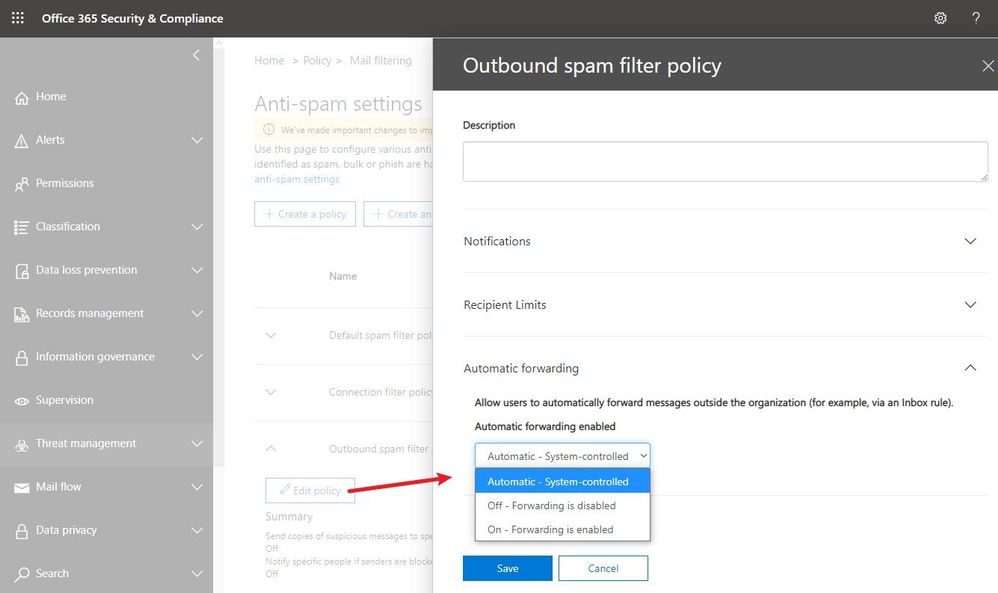
External email forward control using Outbound spam filter policy
Recently released, this feature is available in Security & Compliance portal under Outbound spam filter policy (to get the exact portal page, go here). As you see in the following screenshot, there are three possible options. The default configuration is “Automatic system-controlled.” Other options are Off and On. “Off” means auto forward is disabled and “On” means auto forward is enabled.
Note: If you see the option is set as “Automatic system-controlled”, most probably you have not configured the setting at all. For tenants where the setting is left at “Automatic system-controlled”, as we continue to move the service toward being more secure by default, this setting will be enforced and behave as “Off” (forwarding disabled). This enforcement process has started in phases and very soon, all tenants will get this setting enforced. Therefore, “Automatic system-controlled” will behave as “Off” and automatic forwarding will not work. Our recommendation is that all customers should configure the policy as appropriate for their organization and enable external auto forwarding only for the users who really need it (by leaving the default policy in disabled state, creating a different policy that allows forwarding and then assigning it to specific mailboxes only). If for your tenant, “Automatic system-controlled” still does not block email forwarding, you should make this change as soon as possible (as soon, it will).
Advantages of this method:
- It blocks all types of auto forwarding including ForwardingAddress and ForwardingSmtpAddress mailbox parameters.
- Blocks redirect rules configured using Outlook.
- A NDR is sent back to the mailbox that configured auto forwarding to external user if the policy is set to block automatic forwarding for that mailbox. The NDR will contain the following diagnostic information:
Remote Server returned ‘550 5.7.520 Access denied, Your organization does not allow external forwarding. Please contact your administrator for further assistance. AS(7550)’
- Easier to configure and administrators can selectively allow/block external auto forwarding for a few or all mailboxes.
Disadvantages of this method:
- Forwarding using Power Automate (Flow) is not covered as of now. To block external forwarding which is setup using Power Automate, follow the steps mentioned in our Email exfiltration controls for connectors article.
Block automatic forwarding using Remote Domains
This option is available under the Mail flow tab in the new Exchange Admin Center preview:


Advantages of this method:
- This setting can block auto forward rules configured using Outlook inbox rules as well as Outlook on the web options (ForwardingSmtpAddress parameter)
Disadvantages of this method:
- Does not block forwarding set from the properties of the mailbox by the administrator using EAC (ForwardingAddress parameter)
- This blocks auto forward to the specific remote domain. There is no granular control – cannot allow forwarding for certain users, and block for others.
- The user is not notified that their auto forwarded message is dropped, no rejection (NDR) is sent.
Block auto forward using a transport rule
You can create a transport rule from Exchange Admin Center > Mail Flow > Rules to block automatic forward:

Advantages of this method:
- Allows granular control on conditions and actions.
- Admins have the option to send rejection message (NDR).
Disadvantages of this method:
- Matches auto forward messages based on message class (IPM.note.forward). The Outlook web app forwarding (ForwardingSmtpAddress) or forwarding set by the admins on the properties of the mailbox (ForwardingAddress) have normal message class (IPM.Note), so transport rules won’t block them.
- Difficult to manage at times when too many transport rules are configured.
While this is not really a method of blocking forwarding, it is related in a way that it can help remove forwarding options from users if they are using Outlook on the web.
Advantages of this method:
- In OWA, users simply do not see the option to setup forwarding in their mail options
Disadvantages of this method:
- Does not remove the option in Outlook desktop.
- Any forwarding that was already configured will continue to work.
Overview
If you want to quickly compare various methods, you can refer to the following table:
Automatic forwarding option
|
Remote domain
|
Transport rule
|
Outbound spam filter policy
|
Block Outlook forwarding using inbox rules
|
Yes
|
Yes
|
Yes
|
Block OWA forwarding setting (ForwardingSmtpAddress)
|
Yes
|
No
|
Yes
|
Block forwarding set by the admin using EAC (ForwardingAddress)
|
No
|
No
|
Yes
|
Block forwarding using Power Automate / Flow
|
No
|
No
|
No
|
Does the sender get NDR when auto forward is blocked?
|
No
|
Yes
|
Yes
|
Customization and granular control
|
No
|
Yes
|
Yes
|
What happens if auto forward is controlled in multiple places mentioned above?
One question we encounter frequently is, how all these techniques work together? What if auto forward is blocked in one of the above methods but allowed in another? For example, auto forward is blocked by a remote domain setting or a transport rule but allowed in Outbound spam filter policy; what happens? The answer to that is that a restriction in one place will restrict auto forward for all.
For example:
- Automatic forwarding is On (allowed) in the Outbound spam filter policy.
- Automatic forwarding is disabled for the remote domain.
Will the automatically forwarded message be blocked by the remote domain? Yes, remote domain would block automatic forward as would an Exchange transport rule.
Depending on what you want to achieve, you can use combination of above features. There’s no one size fits all option. You can implement all four options if you really want, depending on your requirement. For example, the remote domain option controls the recipient domain and comes handy if you want to restrict auto forwarding for all except a few external domains. Outbound spam filter policies on the other hand can control the sender. If you want to allow external auto forwarding for only a few mailboxes (users with genuine business requirements to configure automatic forwarding) and block external auto forwarding for everyone else, Outbound spam filter policy is most preferred. Or you can use combination of these two options if you want to allow auto forwarding only for few mailboxes and to only a few external domains. Here is another example which is slightly more complex:
Let’s say you have the following requirements:
- By default, automatic forwarding should be blocked.
- Automatic forwarding to an external domain contoso.com should be allowed for all users.
- Allow users Jack and Jill to also be able to forward to northwindtraders.com, but no one else.
There are multiple methods to achieve this, the following is one such solution:
- Keep the new external forwarding control under Outbound spam filter policy setting to “On”.
- Disable automatic forward for default * domain in remote domain setting.
- Create a new remote domain for contoso.com and northwindtraders.com and allow automatic forward for these remote domains.
- Create a transport rule to block auto forward from all to northwindtraders.com but put an exception for users Jack and Jill.
- As transport rule will not block forwarding set using Outlook on the web (ForwardingSMTPAddress parameter) you can use RBAC rule to stop users from creating auto forward setting from OWA.
But wait, there is more!
To protect you further from attackers if a user mailbox is compromised (and for whom external automatic forward could be enabled without their knowledge), a new Email Forward Alert Policy has been released recently which is available under Alert Policies of our Security & Compliance portal. It is called “Suspicious Email Forwarding Activity.” This new alert will track all “forwarding scenarios” and detects when a user has automated the sending of messages external to the organization. Once we find any suspicious activity, we will alert the tenant administrator once per day as long as the user continues to forward to that external recipient. This policy has a Medium severity setting. Although it is rare, an alert generated by this policy may be an anomaly. Administrators should always check to confirm whether the user account is compromised. A screenshot of the policy:

A sample alert sent to the administrator:

That’s it for now! Hope you find this helpful. I also want to take a moment to thank Mike Brown, Nino Bilic for reviewing this.
Arindam Thokder

Recent Comments