by Contributed | Jan 19, 2021 | Technology
This article is contributed. See the original author and article here.
Purpose:
The purpose of this post is to demonstrate how to automate the deployment of Azure Firewall to be used as an Network Virtual Appliance (NVA) in a Hub & Spoke architecture. Our previous post on this subject (Using Azure Firewall as a Network Virtual Appliance (NVA) (microsoft.com) walked through this process as it would be done in the Azure Portal. In this post we will show how to deploy this entire solution with one Powershell script.
Assumptions: Knowledge of creating Azure virtual machines and Azure virtual networks, as well as user-defined routes and peering is assumed. The firewall rules described in this writing will allow all outbound traffic from resources in Spoke1 and Spoke2. This configuration is for demonstration purposes only. Depending on the security posture needed for a production environment, this configuration would likely be more tightly controlled from the firewall. For our demonstration purposes, this configuration is being used for functionality and convenience.
Here are the items that are deployed with this automated solution:
Resource Group:
Virtual Networks:
Vnet
|
Address Space
|
Hub
|
10.200.0.0/16
|
Spoke1
|
10.201.0.0/16
|
Spoke2
|
10.020.0.0/16
|
Subnets:
Subnet
|
CIDR
|
Hub-Subnet
|
10.200.0.0/24
|
AzureFirewallSubnet
|
10.200.1.0/24
|
Spoke1-Subnet
|
10.201.0.0/24
|
Spoke2-Subnet
|
20.202.0.0/24
|
Virtual Network Peering:
- Hub peers with Spoke1 (bi-directional)
- Forwarding must be enabled
- Hub peers with Spoke2 (bi-directional)
- Forwarding must be enabled
Route Tables:
- RT-Spoke1
- Attached to default subnet in Spoke1-Vnet.
- Routes:
- 0.0.0.0/0: Next Hop: <<Azure Firewall Private IP>>
- RT-Spoke2
- Attached to default subnet in Spoke2-Vnet.
- Routes:
- 0.0.0.0/0: Next Hop: <<Azure Firewall Private IP>>
Azure Firewall:
- NAT Rule Collection:
- Rule 1, priority 1000 allow:
- Spoke1-RDP, allow traffic from any source to destination firewall public IP address on port 3389 which is translated to Spoke1 VM private IP address on port 3389
- Network Rule Collections:
- Rule 1, priority 2000, allow:
- Spoke1-Outbound, allow all traffic from source 10.201.0.0/24 to any destination, all ports
- Spoke2-Outbound, allow all traffic from source 10.202.0.0/24 to any destination, all ports
Virtual Machines:
- (3) Windows VM’s
- (1) VM in Hub VNet, hub-subnet
- (1) VM in Spoke1 VNet, spoke1-subnet
- (1) VM in Spoke2 Vnet, spoke2-subnet
Powershell Code Parameters/Notes:
The Powershell code used to deploy this solution can be easily modified to suit your needs. This sample code was written to deploy the solution as a lab environment meant for testing. Here are a few of the parameters that can be input or modified.
Param
|
Default
|
Options
|
Note
|
SubscriptionName
|
My-Subscription
|
|
|
RGBase
|
AzureFw
|
|
Base of Resource Group Name
|
AzureEnvironment
|
MAC
|
MAC, MAG, *Any*
|
Feeds a function to translate Azure Env
|
RG
|
$RGBase-RG
|
|
Adds “-RG” to RGBase for Resource Group Name
|
Location
|
EastUS
|
|
Azure Location
|
Script
|
c:tempDisable-WindowsFW.ps1
|
|
Temp location of script created to disable Windows Firewall on all VM’s after creation
|
VMUser
|
AzureAdmin
|
|
Admin user for VM’s if not using VMPWPrompt flag
|
VMPw
|
My@zurePW010203
|
|
Admin user password for VM’s if not using VMPWPrompt
|
VMPwPrompt
|
$false
|
$true,$false
|
Flag if you want to use VM admin name/password from variables or if you want to be prompted to enter for each VM
|
HubNvetName
|
Hub-Vnet
|
|
Name of Hub Vnet
|
Spoke1VnetName
|
Spoke1-Vnet
|
|
Name Spoke1 Vnet
|
Spoke2VnetName
|
Spoke2-Vnet
|
|
Name of Spoke2 Vnet
|
HubSubnetName
|
HubSubnet
|
|
Name of Hub Subnet
|
Spoke1SubnetName
|
Spoke1Subnet
|
|
Name of Spoke1 Subnet
|
Spoke2SubnetName
|
Spoke2Subnet
|
|
Name of Spoke2 Subnet
|
HubVnetAddSpace
|
10.200.0.0/16
|
|
Hub Vnet Address Space
|
Spoke1VnetAddSpace
|
10.201.0.0/16
|
|
Spoke1 Vnet Address Space
|
Spoke2VnetAddSpace
|
10.202.0.0/16
|
|
Spoke2 Vnet Address Space
|
HubSubnetCIDR
|
10.200.0.0/24
|
|
Hub Subnet CIDR
|
HubAzFwSubnetCIDR
|
10.200.1.0/24
|
|
Azure Firewall Subnet CIDR
|
Spoke1SubnetCIDR
|
10.201.0.0/24
|
|
Spoke1 Subnet CIDR
|
Spoke2SubnetCIDR
|
10.202.0.0/24
|
|
Spoke2 Subnet CIDR
|
HubVMName
|
Hub-VM-01
|
|
Hub VM Name
|
Spoke1VMName
|
Spoke1-VM-01
|
|
Spoke1 VM Name
|
Spoke2VMName
|
Spoke2-VM-01
|
|
Spoke2 VM Name
|
HubVMIP
|
10.200.0.10
|
|
Hub VM IP
|
Spoke1VMIP
|
10.201.0.10
|
|
Spoke1 VM IP
|
Spoke2VMIP
|
10.202.0.10
|
|
Spoke2 VM IP
|
VMSize
|
Standard_B2ms
|
|
VM Sku Family (VM Size)
|
ConvertStorage
|
$true
|
$true, $false
|
Flag to run convert storage function. Function that converts from Premium SSD disks to Standard SSD disks on all created VM’s
|
VMPIP
|
$false
|
$true, $false
|
Flag for assigning Public IP to each VM created
|
OutFile
|
c:tempCreate-AzureFW-As-NVA-FINAL_LOG.log
|
|
Path to output log file
|
VMStorageType
|
StandardSSD_LRS
|
|
Disk storage type used if $ConvertStorage is set to $true
|
Powershell Code:
param (
    [string]$SubscriptionName = "My-Subscription",
    [string]$RGBase = "AzureFW",
    [string]$AzureEnvironment = "MAC",
    [string]$RG = "$RGBase-RG",
    [string]$Location="EastUS",
    [string]$Script = "C:tempDisable-WindowsFW.ps1",
    [string]$VMUser = "AzureAdmin",
    [string]$VMPW = 'Azure@dmin010203',
    [switch]$VMPWPrompt = $false,
    [string]$HubVnetName = "Hub-vnet",
    [string]$Spoke1VnetName = "Spoke1-vnet",
    [string]$Spoke2VnetName = "Spoke2-vnet",
    [string]$HubSubnetName = "HubSubnet",
    [string]$Spoke1SubnetName = "Spoke1Subnet",
    [string]$Spoke2SubnetName = "Spoke2Subnet",
    [string]$HubVnetAddSpace = "10.200.0.0/16",
    [string]$Spoke1VnetAddSpace = "10.201.0.0/16",
    [string]$Spoke2VnetAddSpace = "10.202.0.0/16",
    [string]$HubSubnetCIDR = "10.200.0.0/24",
    [string]$HubAzFWSubnetCIDR = "10.200.1.0/24",
    [string]$Spoke1SubnetCIDR = "10.201.0.0/24",
    [string]$Spoke2SubnetCIDR = "10.202.0.0/24",
    [string]$HubVMName = "Hub-VM-01",
    [string]$Spoke1VMName = "Spoke1-VM-01",
    [string]$Spoke2VMName = "Spoke2-VM-01",
    [string]$HubVMIP = "10.200.0.10",
    [string]$Spoke1VMIP = "10.201.0.10",
    [string]$Spoke2VMIP = "10.202.0.10",
    [string]$VMSize = "Standard_B2ms",
    [switch]$ConvertStorage = $false,
    [switch]$VMPIP = $false,
    [string]$Outputfile = "c:tempCreate-Azure-Firewall-As-NVA_Final_LOG.log",
    [string]$VMStorageType = "StandardSSD_LRS"
)

#Logging/Output Function

Function Log($out) {
    $t = [System.DateTime]::Now.ToString("yyyy.MM.dd hh:mm:ss")
    set-variable -Name Now -Value $t -scope Script
    $Out = $Now +" ---- "+$out
    $Out | add-content $Outputfile
    Write-Host $Out -ForegroundColor "Green"
}

#Begin Processing
$Start = Get-Date
Log "Starting Process:  $Start"

#Convert necessary parts for MAG
Switch ($AzureEnvironment)
{
    "MAG" {$AzureEnvironment = "AzureUSGovernment"}
    "MAC" {$AzureEnvironment = "AzureCloud"}
    "AzureUSGovernment" {$AzureEnvironment = "AzureUSGovernment"}
    "AzureCloud" {$AzureEnvironment = "AzureCloud"}
    Default {$AzureEnvironment = "AzureCloud"}
}

#Connect to Azure
Connect-AzAccount -Environment $AzureEnvironment
Select-AzSubscription -SubscriptionName $SubscriptionName

#Validate Locations
$AzLocations = ((Get-AzLocation).Location)
If ($AzLocations -inotcontains $Location)
{
    Log "Creating error because Location: $Location is not found in Connected Environment: $AzureEnvironment Locations: $AzLocations"
    Log "Stopping Script"
    Log "ERROR: Selected Azure Environment and Selected Azure Region Do Not Match.  Change Region or Azure Environment.  (eg MAG vs MAC in the -AzureEnvironment Parameter)"
    Write-Error "Selected Azure Environment and Selected Azure Region Do Not Match.  Change Region or Azure Environment.  (eg MAG vs MAC in the -AzureEnvironment Parameter)" -ErrorAction Stop
}

#Create new RG
Log "Creating Resource Group"
New-AzResourceGroup -Name $RG -Location $Location

#Create Virtual Network and Subnets
Log "Creating VNets"
$s1 = New-AzVirtualNetworkSubnetConfig -Name $HubSubnetName -AddressPrefix $HubSubnetCIDR
$s2 = New-AzVirtualNetworkSubnetConfig -Name "AzureFirewallSubnet" -AddressPrefix $HubAzFWSubnetCIDR
$s3 = New-AzVirtualNetworkSubnetConfig -Name $Spoke1SubnetName -AddressPrefix "$Spoke1SubnetCIDR"
$s4 = New-AzVirtualNetworkSubnetConfig -Name $Spoke2SubnetName -AddressPrefix "$Spoke2SubnetCIDR"
$Hubvnet = New-AzVirtualNetwork -Name $HubVnetName -Location $Location -ResourceGroupName $RG -AddressPrefix "$HubVnetAddSpace" -Subnet $s1,$s2
$Spoke1vnet = New-AzVirtualNetwork -Name $Spoke1VnetName -Location $Location -ResourceGroupName $RG -AddressPrefix "$Spoke1VnetAddSpace" -Subnet $s3
$Spoke2vnet = New-AzVirtualNetwork -Name $Spoke2VnetName -Location $Location -ResourceGroupName $RG -AddressPrefix "$Spoke2VnetAddSpace" -Subnet $s4

#Setup Peering Between Hub and Each Spoke
Log "Setting Up Peering"
Add-AzVirtualNetworkPeering -Name Hub-Spoke1 -VirtualNetwork $Hubvnet -RemoteVirtualNetworkId $Spoke1vnet.Id -AllowForwardedTraffic
Add-AzVirtualNetworkPeering -Name Spoke1-Hub -VirtualNetwork $Spoke1vnet -RemoteVirtualNetworkId $Hubvnet.Id -AllowForwardedTraffic
Add-AzVirtualNetworkPeering -Name Hub-Spoke2 -VirtualNetwork $Hubvnet -RemoteVirtualNetworkId $Spoke2vnet.Id -AllowForwardedTraffic
Add-AzVirtualNetworkPeering -Name Spoke2-Hub -VirtualNetwork $Spoke2vnet -RemoteVirtualNetworkId $Hubvnet.Id -AllowForwardedTraffic

#create Public IP for Firewall
Log "Setting up PIP for FW"
$FWPipName = $RGBase + "-FW-PIP"
$FWPip = New-AzPublicIpAddress -Name $FWPipName -ResourceGroupName $RG -Location $Location -AllocationMethod Static -Sku Standard

#Create AZFW
Log "Creating Firewall"
$FWName = $RGBase + "-AzFW"
$Azfw = New-AzFirewall -Name $FWName -ResourceGroupName $RG -Location $Location -VirtualNetwork $Hubvnet -PublicIpAddress $FWPip

#Add a rule to allow internal traffic
Log "Creating Rules to Firewall"
$Azfw = Get-AzFirewall -ResourceGroupName $RG
$FWPrivIP = $Azfw.IpConfigurations[0].PrivateIPAddress
$FWAssignedPIP = $FWPip.IPAddress
$NetRule3 = New-AzFirewallNetworkRule -Name "Spoke1-All" -Protocol "Any" -SourceAddress $Spoke1SubnetCIDR -DestinationAddress "*" -DestinationPort "*"
$NetRule4 = New-AzFirewallNetworkRule -Name "Spoke2-All" -Protocol "Any" -SourceAddress $Spoke2SubnetCIDR -DestinationAddress "*" -DestinationPort "*"
$NatRule1 = New-AzFirewallNatRule -Name "RDP-In" -Protocol "TCP" -SourceAddress "*" -DestinationAddress $FWAssignedPIP -DestinationPort "3389" -TranslatedAddress $Spoke1VMIP -TranslatedPort "3389"
Log "Creating Rule Collections for FW"
$NetRuleCollection2 = New-AzFirewallNetworkRuleCollection -Name "Allow-Outbound" -Priority 2000 -Rule $NetRule3,$NetRule4 -ActionType "Allow"
$NatRuleCollection1 = New-AzFirewallNatRuleCollection -Name "Inbound-RDP-Nat" -Priority 1000 -Rule $NatRule1
Log "Assigning Rule Collections to FW and Saving"
$Azfw.NetworkRuleCollections.Add($NetRuleCollection2)
$Azfw.NatRuleCollections.Add($NatRuleCollection1)
Set-AzFirewall -AzureFirewall $Azfw

#Create Route Tables and Routes
Log "Creating Route Tables"

#Spoke1 to Spoke2
$Spoke1RouteName = $RGBase + "Spoke1-AllTraffic"
$Spoke1RouteTableName = $RGBase + "Spoke1-RT"
$Spoke1Route = New-AzRouteConfig -Name $Spoke1RouteName -AddressPrefix "0.0.0.0/0" -NextHopType VirtualAppliance -NextHopIpAddress $FWPrivIP
$Spoke1RouteTable = New-AzRouteTable -Name $Spoke1RouteTableName -ResourceGroupName $RG -location $Location -Route $Spoke1Route -DisableBgpRoutePropagation

#Spoke2 to Spoke1
$Spoke2RouteName = $RGBase + "Spoke2-AllTraffic"
$Spoke2RouteTableName = $RGBase + "Spoke2-RT"
$Spoke2Route = New-AzRouteConfig -Name $Spoke2RouteName -AddressPrefix "0.0.0.0/0" -NextHopType VirtualAppliance -NextHopIpAddress $FWPrivIP
$Spoke2RouteTable = New-AzRouteTable -Name $Spoke2RouteTableName -ResourceGroupName $RG -location $Location -Route $Spoke2Route -DisableBgpRoutePropagation

#Associate route tables to Subnets
Log "Associating Route Tables to Subnets"
Set-AzVirtualNetworkSubnetConfig -VirtualNetwork $Spoke1Vnet -Name $Spoke1SubnetName -AddressPrefix $Spoke1SubnetCIDR -RouteTable $Spoke1RouteTable | Set-AzVirtualNetwork
Set-AzVirtualNetworkSubnetConfig -VirtualNetwork $Spoke2Vnet -Name $Spoke2SubnetName -AddressPrefix $Spoke2SubnetCIDR -RouteTable $Spoke2RouteTable | Set-AzVirtualNetwork

#Create an IP configuration with a static private IP address
Log "Creating IP Configs with Private IP for VMs"
$HubIpConfigName = "Hub-IPConfig"
$HubSubnet = Get-AzVirtualNetworkSubnetConfig -VirtualNetwork $Hubvnet -Name $HubSubnetName
$Spoke1IpConfigName = "Spoke1-IPConfig"
$Spoke1Subnet = Get-AzVirtualNetworkSubnetConfig -VirtualNetwork $Spoke1vnet -Name $Spoke1SubnetName
$Spoke2IpConfigName = "Spoke2-IPConfig"
$Spoke2Subnet = Get-AzVirtualNetworkSubnetConfig -VirtualNetwork $Spoke2vnet -Name $Spoke2SubnetName

#Check if PIP is required, get PIP, and set Ip Configurations accordingly
If ($VMPIP){
    #PIP Required.  Create new and set Ip Configs
    Log "VMPIP Flag Found.  Creating PIP and Adding to Each VM"
    $HubPIP1 = New-AzPublicIpAddress -Name "$HubVMName-NIC-PIP" -ResourceGroupName $RG -Location $Location -AllocationMethod Static -Sku Standard
    $Spoke1PIP1 = New-AzPublicIpAddress -Name "$Spoke1VMName-NIC-PIP" -ResourceGroupName $RG -Location $Location -AllocationMethod Static -Sku Standard
    $Spoke2PIP1 = New-AzPublicIpAddress -Name "$SPoke2VMName-NIC-PIP" -ResourceGroupName $RG -Location $Location -AllocationMethod Static -Sku Standard
    $HubIpConfig = New-AzNetworkInterfaceIpConfig -Name $HubIpConfigName -Subnet $HubSubnet -PrivateIpAddress $HubVMIP -PublicIpAddress $HubPIP1 -Primary
    $Spoke1IpConfig = New-AzNetworkInterfaceIpConfig -Name $Spoke1IpConfigName -Subnet $Spoke1Subnet -PrivateIpAddress $Spoke1VMIP -PublicIpAddress $Spoke1PIP1 -Primary
    $Spoke2IpConfig = New-AzNetworkInterfaceIpConfig -Name $Spoke2IpConfigName -Subnet $Spoke2Subnet -PrivateIpAddress $SPoke2VMIP -PublicIpAddress $Spoke2PIP1 -Primary
}
Else
{
    #PIP NOT Required.  Set IP Config without PIP
    Log "VMPIP is NOT Found.  Creating IPConfig with NO PIP"
    $HubIpConfig = New-AzNetworkInterfaceIpConfig -Name $HubIpConfigName -Subnet $HubSubnet -PrivateIpAddress $HubVMIP -Primary
    $Spoke1IpConfig = New-AzNetworkInterfaceIpConfig -Name $Spoke1IpConfigName -Subnet $Spoke1Subnet -PrivateIpAddress $Spoke1VMIP -Primary
    $Spoke2IpConfig = New-AzNetworkInterfaceIpConfig -Name $Spoke2IpConfigName -Subnet $Spoke2Subnet -PrivateIpAddress $SPoke2VMIP -Primary
}

#Create & Configure NSG's for the NIC's
Log "Create NSG Rules"
$NSGRule = New-AzNetworkSecurityRuleConfig -Name "Allow-RDP" -Protocol Tcp -Direction Inbound -Priority 1000 -SourceAddressPrefix * -SourcePortRange * -DestinationAddressPrefix * -DestinationPortRange 3389 -Access Allow

# Create a network security group
Log "Create NSGs for VMs"
$HubNSG = New-AzNetworkSecurityGroup -ResourceGroupName $RG -Location $Location -Name "HubNetworkSecurityGroup" -SecurityRules $NSGRule
$Spoke1NSG = New-AzNetworkSecurityGroup -ResourceGroupName $RG -Location $Location -Name "Spoke1NetworkSecurityGroup" -SecurityRules $NSGRule
$Spoke2NSG = New-AzNetworkSecurityGroup -ResourceGroupName $RG -Location $Location -Name "Spoke2NetworkSecurityGroup" -SecurityRules $NSGRule

#Create the NICs
Log "Create NICs for VMs"
$HubNIC = New-AzNetworkInterface -Name "$HubVMName-NIC" -ResourceGroupName $RG -Location $Location -IpConfiguration $HubIpConfig -NetworkSecurityGroupId $HubNSG.Id
$Spoke1NIC = New-AzNetworkInterface -Name "$Spoke1VMName-NIC" -ResourceGroupName $RG -Location $Location -IpConfiguration $Spoke1IpConfig -NetworkSecurityGroupId $Spoke1NSG.Id
$Spoke2NIC = New-AzNetworkInterface -Name "$Spoke2VMName-NIC" -ResourceGroupName $RG -Location $Location -IpConfiguration $Spoke2IpConfig -NetworkSecurityGroupId $Spoke2NSG.Id

#Setup Credentials for VM's
If ($VMPWPrompt)
{
    Log "VMPWPrompt Found.  Prompting for VM Name/PW"
    $Cred = Get-Credential -UserName $VMUser -Message "Specify Credentials for VM OS"
} Else
{
    Log "NO VMPWPrompt Found.  Using Specified Creds for VMs"
    $SecurePassword = ConvertTo-SecureString $VMPW -AsPlainText -Force
    $Cred = New-Object System.Management.Automation.PSCredential ($VMUser, $securePassword)
}

#Define the virtual machines
Log "Building Config for VMs"
$HubVirtualMachine = New-AzVMConfig -VMName $HubVMName -VMSize $VMSize
$HubVirtualMachine = Set-AzVMOperatingSystem -VM $HubVirtualMachine -Windows -ComputerName $HubVMName -ProvisionVMAgent -EnableAutoUpdate -Credential $Cred
$HubVirtualMachine = Add-AzVMNetworkInterface -VM $HubVirtualMachine -Id $HUbNIC.Id
$HubVirtualMachine = Set-AzVMSourceImage -VM $HubVirtualMachine -PublisherName 'MicrosoftWindowsServer' -Offer 'WindowsServer' -Skus '2016-Datacenter' -Version latest
$Spoke1VirtualMachine = New-AzVMConfig -VMName $Spoke1VMName -VMSize $VMSize
$Spoke1VirtualMachine = Set-AzVMOperatingSystem -VM $Spoke1VirtualMachine -Windows -ComputerName $Spoke1VMName -ProvisionVMAgent -EnableAutoUpdate -Credential $Cred
$Spoke1VirtualMachine = Add-AzVMNetworkInterface -VM $Spoke1VirtualMachine -Id $Spoke1NIC.Id
$Spoke1VirtualMachine = Set-AzVMSourceImage -VM $Spoke1VirtualMachine -PublisherName 'MicrosoftWindowsServer' -Offer 'WindowsServer' -Skus '2016-Datacenter' -Version latest
$Spoke2VirtualMachine = New-AzVMConfig -VMName $Spoke2VMName -VMSize $VMSize
$Spoke2VirtualMachine = Set-AzVMOperatingSystem -VM $Spoke2VirtualMachine -Windows -ComputerName $Spoke2VMName -ProvisionVMAgent -EnableAutoUpdate -Credential $Cred
$Spoke2VirtualMachine = Add-AzVMNetworkInterface -VM $Spoke2VirtualMachine -Id $Spoke2NIC.Id
$Spoke2VirtualMachine = Set-AzVMSourceImage -VM $Spoke2VirtualMachine -PublisherName 'MicrosoftWindowsServer' -Offer 'WindowsServer' -Skus '2016-Datacenter' -Version latest

#Create the virtual machine
Log "Creating VMs"
New-AzVM -ResourceGroupName $RG -Location $Location -VM $HubVirtualMachine -Verbose
New-AzVM -ResourceGroupName $RG -Location $Location -VM $Spoke1VirtualMachine -Verbose
New-AzVM -ResourceGroupName $RG -Location $Location -VM $Spoke2VirtualMachine -Verbose
Start-Sleep -Seconds 15

#Create Script to Disable Windows Firewall
Log "Creating Script to Disable Windows FW in VM OS"
'Get-netfirewallprofile | Set-netfirewallprofile -enabled "false"' | out-file -FilePath $Script -Force

#Run Script Inside VM's to Disable Windows Firewall
Log "Execute Script to Disable Windows FW Inside VMs"

Invoke-AzVMRunCommand -ResourceGroupName $RG -Name $HubVMName -CommandId "RunPowerShellScript" -ScriptPath $Script

Invoke-AzVMRunCommand -ResourceGroupName $RG -Name $Spoke1VMName -CommandId "RunPowerShellScript" -ScriptPath $Script

Invoke-AzVMRunCommand -ResourceGroupName $RG -Name $Spoke2VMName -CommandId "RunPowerShellScript" -ScriptPath $Script

#Remove Script to Disable Windows Firewall
Log "Remove Generated Script"
Remove-Item -Path $Script -Force

#If ConvertSTorage is $True, convert storage of all VM's in RG.  Includes Shutdown and Startup.
If ($ConvertStorage)
{

    #Get the VM's in the RG, Stop the VM's, Get the Disks for the VM's, Set the Disk to SSD Standard, Start the VM's
    Log "ConvertStorage Flag Found.  Changing Storage to $StorageType"
    $VMs = Get-AzVM -ResourceGroupName $RG
    Foreach ($VM in $VMs)
    {
        #Wait for VM's to Finish Provisioning
        $Count = 0
        Do
        {
            $Count++
            Log "Sleeping for VM Provisioning...Trying to Convert Storage for $($VM.Name)"
            Log "Loop Iteration Count: $Count"
            Start-Sleep -Seconds 10
            $V = $null
            $V = Get-AzVM -ResourceGroupName $RG -Name $VM.Name
            Log "VM: $($V.Name) is in Provisioning State: $($V.ProvisioningState)"
        } Until ($V.ProvisioningState -eq "Succeeded")
        Log "Stopping VM $($VM.Name) for Storage Conversion"
        Stop-AzVM -ResourceGroupName $RG -Name $VM.name -Force
        Start-Sleep -Seconds 15
        $VMID = $null
        $VMID = $VM.Id
        $vmDisks = $null
        $vmDisks = Get-azDisk -ResourceGroupName $RG | Where-Object {$_.managedby -eq $VMID}

        Foreach ($Disk in $vmDisks)
        {
            Log "Converting Storage for Disk"
            $disk.Sku = [Microsoft.Azure.Management.Compute.Models.DiskSku]::new($VMStorageType)
           $disk | Update-AzDisk
        }
    }

#Start VMs
    Foreach ($VM in $VMs)
    {
        Log "Starting VM $($VM.Name) After Disk Conversion"
        Start-AzVM -ResourceGroupName $RG -Name $VM.name -NoWait
    }
}

$Stop = Get-Date
Log "Output Log File Stored to: $Outputfile"
Log "Total Duration: $(($Stop-$Start).Minutes) Minutes"
by Contributed | Jan 19, 2021 | Technology
This article is contributed. See the original author and article here.
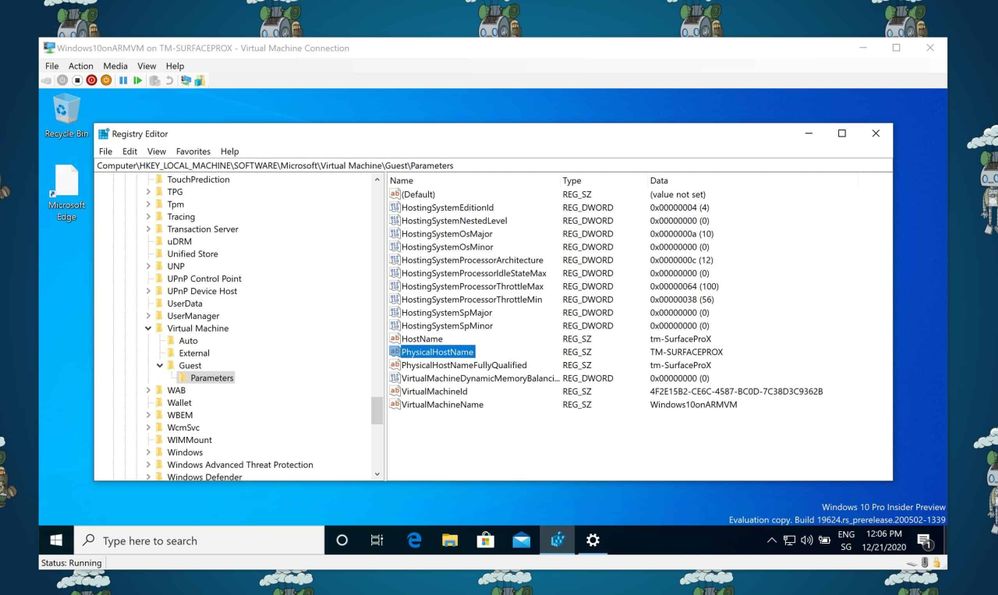
If you are running a virtual machine (VM) on Hyper-V, sometimes you want to know on which Hyper-V host this VM is running. If you don’t have access to the Hyper-V host, you need to find that information from within the virtual machines operating system. Luckily, the hostname of the physical Hyper-V server the virtual machine is running on can be found in the virtual machines registry.
You can find that information under the following registry key:
ComputerHKEY_LOCAL_MACHINESOFTWAREMicrosoftVirtual MachineGuestParameters
You will get some additional information about the Hyper-V host as well as the physical Hyper-V Hostname of the VM.
Find the Hostname of a Hyper-V VM in Registry
You could also run the following PowerShell command to get the Hyper-V hostname inside the VM:
Get-ItemProperty -Path “HKLM:SOFTWAREMicrosoftVirtual MachineGuestParameters” | Select-Object HostName
Since we run a version of Hyper-V in our Microsoft Azure datacenters, this also works with Azure VMs.
 Get physical hostname of a Hyper-V VM using PowerShell (Azure VM)
I hope this post was helpful and shows you how you can find the hostname the physical Hyper-V host of a VM. if you have any questions feel free to leave a comment below.
And yes, the first screenshot was taken on a Surface Pro X running Hyper-V on Windows 10 on ARM.
by Contributed | Jan 19, 2021 | Technology
This article is contributed. See the original author and article here.
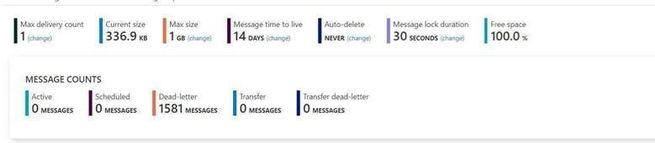
Test Entities:
I use a same Queue to do this test. The Max delivery count is 1. If you are interested about the usage of “Max delivery count” please check from here Service Bus exceeding MaxDeliveryCount.
Message lock duration time is 30s.
My Program:
Here I use different function in .Net for receive messages. All the functions have “Async” like ReceiveBatchAsync means the functions are working Asynchronously.
To simulate the situation by sending a large number of messages, I received 5000 messages at one operation.
- Here is the program that complete messages in Asynchronous patterns.
using Microsoft.ServiceBus.Messaging;
using System;
using System.Collections.Generic;
using System.Linq;
using System.Text;
using System.Threading.Tasks;
namespace SendReceiveQueue
{
class Program
{
static string connectionString = “<your connection string>“;
static string queueName = “<queue name>“;
static void Main(string[] args)
{
MainAsync().GetAwaiter().GetResult();
}
public static async Task MainAsync()
{
QueueClient receiveClient = QueueClient.CreateFromConnectionString(connectionString, queueName);
//create a sender on the queue
var Timestamp2 = new DateTimeOffset(DateTime.UtcNow).ToUnixTimeMilliseconds();
Console.WriteLine(“Receiving message -, timestamp:{0}”, Timestamp2);
IEnumerable<BrokeredMessage> messageList = await receiveClient.ReceiveBatchAsync(5000);
foreach (BrokeredMessage message in messageList)
{
try
{
var Timestamp0 = new DateTimeOffset(DateTime.UtcNow).ToUnixTimeMilliseconds();
Console.WriteLine(“Message”+message.GetBody<string>() +“time”+Timestamp0);
message.CompleteAsync();
}
catch (Exception ex)
{
var Timestamp3 = new DateTimeOffset(DateTime.UtcNow).ToUnixTimeMilliseconds();
Console.WriteLine(“abandon message – timestamp:{0},errorr message {1}”, Timestamp3,ex.Message);
await message.AbandonAsync();
}
}
await receiveClient.CloseAsync();
}
}
}
This is the result. The average time of receiving message is in 200ms to 300ms.

- And this is the Code for receiving messages with Synchronous messaging patterns.
using Microsoft.ServiceBus.Messaging;
using System;
using System.Collections.Generic;
using System.Linq;
using System.Text;
namespace SendReceiveQueue
{
class Program
{
static string connectionString = “<your connection string>“;
static string queueName = “<queue name>“;
static void Main(string[] args)
{
MainTest();
}
static void MainTest()
{
QueueClient receiveClient = QueueClient.CreateFromConnectionString(connectionString, queueName);
//create a sender on the queue
var Timestamp2 = new DateTimeOffset(DateTime.UtcNow).ToUnixTimeMilliseconds();
Console.WriteLine(“Receiving message -, timestamp:{0}”, Timestamp2);
IEnumerable<BrokeredMessage> messageList = receiveClient.ReceiveBatch(5000);
foreach (BrokeredMessage message in messageList)
{
try
{
var Timestamp0 = new DateTimeOffset(DateTime.UtcNow).ToUnixTimeMilliseconds();
Console.WriteLine(“Message” + message.GetBody<string>() + “time” + Timestamp0);
message.Complete();
}
catch (Exception ex)
{
var Timestamp3 = new DateTimeOffset(DateTime.UtcNow).ToUnixTimeMilliseconds();
Console.WriteLine(“abandon message – timestamp:{0},errorr message {1}”, Timestamp3, ex.Message);
message.Abandon();
}
}
receiveClient.Close();
Console.Read();
}
}
}
This is the result. At first time the messages can also finish in 200ms to 300ms. But after a while It shows error for “lock expired”.

Why didn’t we get any errors while using the Async pattern in this program? Why we got “Lock expired” exception while using Sync pattern?
This exception is highly possible in receiving messages in one operation. Using Peeklock receive mode, Service Bus locked all the 5000 messages at the same time. And then complete messages in Asynchronous pattern, Messages can be completed without blocking.
But using Synchronous pattern, all the Messages was completed one by one, the waiting time exceeds 30s. So, it shows “lock expired” error.
You can get detailed information on how the asynchronous C# backend works from this document. Asynchronous programming in C# | Microsoft Docs
Test Result Summary
- From the test result, it indicates that Asynchronous Messaging pattern is more efficient since it will return immediately. We recommend using Asynchronous over than Synchronous.
- As mentioned before this “Lock expired” exception may be due to many reasons. That also the reason Service Bus have Dead Lettering Queue to prevent Service Bus message being lost. If you are interested in this topic, you are welcome to provide your comments.

by Contributed | Jan 19, 2021 | Technology
This article is contributed. See the original author and article here.
We are excited to announce the public preview of Azure Data Explorer Insights!
ADX Insights (Azure Monitor for Azure Data Explorer) provides comprehensive monitoring of your clusters by delivering a unified view of your cluster performance, operations, and usage.
Built on the Azure Monitor Workbooks platform, ADX insights offers:
- At scale perspective: showing a snapshot view of the clusters’ primary metrics to easily track performance, ingestion, and export operations. Unsustainable values are highlighted in orange. You can drill down to the “at-resource” view by clicking on the cluster name.
- At-resource perspective: drill-down analysis of a particular Azure Data Explorer cluster based on metrics and platform usage logs.
With this view, you can:
- Identify query lookback patterns per table and compare them to the table’s cache policy.
 The Cache tab
- Identify tables that are used by the most queries.
- Identify unused tables or redundant cache policy periods.
- Find which tables are consuming the most space in the cluster
- Track data growth history by table size, hot data, and the number of rows over time.
 The Tables tab
- Identify which users and applications are sending the most queries or consuming the most CPU and memory.
- Find changes in the number of queries by user and track the number of unique users over time.
- See top users by command and query count and identify top users by the number of failed queries.
- See the query count, CPU, and memory consumption over time.
 The Usage tab
- Get a summary of active Advisor recommendations and resource health status.
 The Overview tab
- Explore multiple key metrics on one page and discover correlations between them.
 The Key Metrics tab
Azure Monitor for Azure Data Explorer is now available in the Azure Monitor and Azure Data Explorer blades in the Azure portal. We look forward to hearing your feedback on the new experience.
To learn more, see the ADX Insights documentation.
by Contributed | Jan 18, 2021 | Technology
This article is contributed. See the original author and article here.
There are lots of different ways you can deploy and configure your Azure resources. When customers are first starting their cloud journey it’s common to provision resources manually, deploying and configuring them in the Azure portal. However, this quickly becomes difficult to manage and scale. Infrastructure as Code (IaC) techniques and tools are designed to help you make use of your skills with coding and DevOps practices when working with your cloud infrastructure. However, I frequently work with customers who aren’t completely convinced that IaC is going to help them, or be worth the investment. It can be helpful to have some insight into the benefits that many other customers have seen when using IaC approaches. This post outlines the main reason I think IaC is an essential part of a modern solution for Azure. We won’t get much into the technical details of how you use IaC – this is just a high-level overview of why you should use it.
What is Infrastructure as Code?
The Azure Well-Architected Framework has a great definition of IaC:
Infrastructure as code (IaC) is the management of infrastructure – such as networks, virtual machines, load balancers, and connection topology – in a descriptive model, using a versioning system that is similar to what is used for source code. When you are creating an application, the same source code will generate the same binary every time it is compiled. In a similar manner, an IaC model generates the same environment every time it is applied. IaC is a key DevOps practice, and it is often used in conjunction with continuous delivery.
Ultimately, IaC allows you and your team to develop and release changes faster, but with much higher confidence in your deployments.
Gain higher confidence
One of the biggest benefits of IaC is the level of confidence you can have in your deployments, and in your understanding of the infrastructure and its configuration.
Integrate with your process. If you have a process by which code changes gets peer reviewed, you can use the exact same process for your infrastructure. This can be very helpful when a team member might be proposing a change to a resource, but they don’t realise that the change might not work, could cause issues elsewhere in the solution, or may not meet the requirements. If these changes are made directly in the portal then you may not have the opportunity for your team to review the changes before they are made.
Consistency. Following an IaC process ensures that the whole team is following a standard, well-established process – regardless of who on the team has initiated it. I often work with customers who have a single designated person who is permitted to deploy to production; if this person is unavailable then deployments can be very difficult to complete, since that person will maintain all the knowledge in their head. By following a fully automated process you can move the knowledge of the deployment process into the automation tooling, and then you can broaden the number of people on your team who can initiate deployments while still maintaining the same quality level – and without giving broad administrative access to your environment. Not only does this help with your operational efficiency, it also has security benefits too.
Automated scanning. Many types of IaC assets can be scanned by automated tooling. One such type of tooling is linting, to check for errors in the code. Another type will scan the proposed changes to your Azure infrastructure to make sure they follow security and performance best practices – for example, ensuring that storage accounts are configured to block unsecured connections. This can be an important part of a Continuous Security approach.
Secret management. Every solution requires some secrets to be maintained and managed. These include connection strings, API keys, client secrets, and certificates. Following an IaC approach means that you need to also adopt some best-practice approaches to managing these secrets. For example, Azure has the Key Vault service to maintain these types of data. Key Vault can be easily integrated with many IaC tools and assets to ensure that the person conducting the deployment doesn’t need access to your production secrets, which means you’re adhering to the security principle of least privilege.
Access control. A fully automated IaC deployment pipeline means that all changes to your Azure resources should be done by an automated procedure. By doing this, you can be confident that all changes that are deployed to your Azure environment have followed the correct procedure, and it’s much harder for bad configuration to make its way through to production accidentally. Ideally, you would remove the ability for humans to modify your resources at all – although you may allow for this to be overridden in an emergency, by using a ‘break glass’ account or Privileged Identity Management.
Avoid configuration drift. When I work with customers to adopt IaC approaches, I recommend redeploying all of the assets on every release. IaC tooling is generally built to be idempotent (i.e. to be able to be run over and over again without any bad effects). Usually, the first deployment of an asset will actually deploy the asset, while subsequent redeployments will essentially act as ‘no-ops’ and have no effect. This practice helps in a few ways:
- It ensures that your IaC assets are regularly exercised. If they are only deployed occasionally, it’s much more likely they will become stale and you won’t notice until it’s too late. This is particularly important if you need to rely on your IaC assets as part of a disaster recovery plan.
- It ensures that your application code and infrastructure won’t get out of sync. For example, if you have an application update that needs an IaC asset to be deployed first (such as to deploy a new database), you want to make sure you won’t accidentally forget to do this in the right order. Deploying the two together in one pipeline means you are less likely to encounter these kinds of ‘race conditions’.
- It helps to avoid configuration drift. If someone does accidentally make a change to a resource without following your IaC pipeline, then you want to correct this as quickly as possible and get the resource back to the correct state. By following an IaC approach, the source of truth for your environment’s configuration is in code.
Manage multiple environments
IaC can help with managing your environments. Pretty much every customer has to maintain some non-production environments as well as production. Some customers also maintain multiple production environments, such as for multitenanted solutions or for geographically distributed applications.
Manage non-production environments. A common pain point for customers is when their non-production environments are not the same as their production. This slows down testing of changes and reduces the team’s confidence that they fully understand and what’s happening in production. This configuration drift will often happen when the environments are all created manually, and someone forgets to apply a change somewhere. If you follow an IaC approach then this problem goes away, because the same UaC definition is used to create and deploy all of your environments – both non-production and production. You can specify different configuration for each environment, of course, but the core definition will be the same.
Dynamically provision environments. Once you have your IaC assets, you can then use them to provision new environments very easily. This can be enormously helpful when you’re testing your solution. For example, you could quickly provision a duplicate of your production environment that can then be used for security penetration tests, for load testing, or to help a developer track down a bug.
Scale production environments. Some customers have the requirement to provision multiple production environments. For example, you might be following the deployment stamps pattern, or you might need to create a new instance of your solution in another geographical region. IaC assets can be used to quickly provision all of the components of your solution again, and keep them consistent with the existing environment.
Disaster recovery. In some situations, IaC assets can be used as part of a disaster recovery plan. If you don’t need to keep copies of all of your infrastructure ready for a potential disaster, and can cope with a bit of downtime while you wait for your IaC assets to provision resources in another Azure region, then this can be worth considering. You’ll need to be careful to plan out how you handle disaster recovery for your databases, storage accounts, and other resources that store state, though. You also need to make sure that you fully test your disaster recovery plans and that they meet your requirements for how much downtime you can experience in a disaster scenario (which is often called your Recovery Time Objective).
Better understand your cloud resources
IaC can also help you better understand the state of your resources.
Audit changes. Changes to your IaC assets will be version-controlled. This means you can review each change that has happened, as well as who made it, and when. This can be very helpful if you’re trying to understand why a resource is configured a specific way.
Metadata. Many types of IaC assets let you add metadata, like code comments, to help explain why something is done a particular way. If your organisation has a culture of documenting your code, you can apply the same principles to your infrastructure.
Keep everything together. It’s pretty common for a developer to work on a feature that will require both code changes and infrastructure changes. By keeping your infrastructure defined as code, you’ll be able to group these together and see the relationship. For example, if you see a change to an IaC asset on a feature branch or in a pull request, you’ll have a clearer understanding of what that change relates to.
Better understand Azure itself. The Azure portal is a great way to easily provision and configure resources, but it often simplifies the underlying resource model used. Using IaC will mean that you gain a much deeper understanding of what is happening in Azure and how to troubleshoot it if something isn’t working correctly. For example, if you provision a set of virtual machines manually in the Azure portal, you may not realise that there are actually lots of separate Azure resources provisioned – and that some of these can potentially be shared, which can help to simplify your ongoing operations. Another example is that when you provision a Key Vault instance through the portal, the person creating it will be given access to the vault automatically – which may not necessarily be what you want. Using IaC means you have explicit control.
Declarative and imperative IaC
Broadly speaking, there are two different models for IaC. Imperative IaC involves writing scripts, in a language like Bash, PowerShell, C# script files, or Python. These programmatically execute a series of steps to create or modify your resources. Declarative IaC instead involves writing a definition of how you want your environment to look; the tooling then figures out how to make this happen by inspecting your current state, comparing it to the target state you’ve requested, and applying the differences. There’s a good discussion of imperative and declarative IaC here.
There are great Azure tooling options for both models. For imperative IaC you can use the Azure CLI or PowerShell cmdlets. For declarative IaC you can use Azure Resource Manager (ARM) templates – or, in the near future, the new ARM template language called Bicep, which is my personal favourite option. Another popular choice is Terraform – there’s a good comparison of ARM templates and Terraform in the Azure Well-Architected Framework. There are plenty of other community and commercial tools around too, including Pulumi.
I prefer using declarative IaC approaches – it can sometimes be a little tricky to write imperative scripts that will work consistently and will do exactly what you expect every time. I also feel like you get the most benefit out of IaC when you use declarative tooling. My personal choice is to use ARM templates (or soon, Bicep) for my IaC. However, the choice is yours.
How to get started with IaC
Hopefully these reasons are enough to convince you that IaC is worth the initial upfront investment in time – you’ll need to be prepared to create your IaC assets, and to create a good process for your release and the necessary pipelines to support it.
First, explore and try out a few tools to see which will work best for your team. If you don’t have any experience with IaC already then I recommend you start using Bicep – there’s a great tutorial on how to get started. Try creating a simple dummy solution to see how the end-to-end process works.
Next, try creating some IaC assets for your actual solution. How do this will depend a little on your situation:
- If you’re working on a brand new solution then try to adopt the discipline of only deploying through IaC assets, and consider using the ARM template ‘complete’ deployment mode to help to maintain this discipline.
- If you’ve got existing Azure resources then I recommend following a hybrid approach and slowly migrating to IaC assets. Start by creating IaC assets for a few small pieces of your solution, get those working, and then add more and more until you have are deploying everything in code. At first, make sure you are doing incremental deployments so that you don’t accidentally destroy any existing production resources that you haven’t yet added to your IaC assets.
You’ll also need to build a pipeline to deploy the IaC assets. If you use ARM templates or Bicep, you can integrate these with Azure Pipelines. Make sure that any new resources are created and managed completely within your IaC assets and deployed using your pipelines.
You should also remember to use good coding practices in your IaC assets. Use elements like Bicep modules to help you organise your assets into separate, composable files. Make sure you follow the best practices for ARM templates.
Keep iterating and improving your IaC workflow, adding more and more of your solution to your IaC assets and deployment pipeline. Pretty soon you will start to see all of the benefits of IaC in your own team.

Recent Comments