by Contributed | Jan 18, 2021 | Technology
This article is contributed. See the original author and article here.
Steps to recreate/rebuild SF cluster by retaining others resources(Eg: Load balancer, Public IP, Vnet and So on…) in the Resource Group when cluster state is lost due to some unsupported operations.
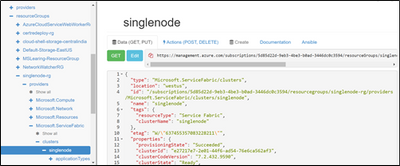
Step 1: Go to Resource Explorer, navigate to SF resource and copy the configuration content of SF resource from the right plane
Step 2: Delete the SF resource in the Resource group:

Step 3: Deploy a Custom Template:
Paste the copied SF configuration in Step 1 under the “resource : [ // Please copy here]
Remove below properties:
Add the API version under the type and modify the UpgradeMode to “Manual”
- “apiVersion”: “2018-02-01”,
- “upgradeMode”: “Manual”

Save and Create the Resource, Post which SF resource gets created under Resource group.

Step 4: Copy the new Cluster Id from Resource Explorer -> SF resource:

Navigate to VMSS resource -> Replace the Cluster ID in ClusterEndpoint

However VMSS update may result in below failure, Please ignore the Error.
If you go to Resource Group- > VMSS -> ClusterEndpoint will be updated with new Cluster ID

Step 5: Scale the instance count by + 1( In case of Reliability is None, +3 if bronze , +5 if Silver and so on)

Once Instance is created, SF Status would show as “Deploying” and newly added instances will start showing under Nodes.

Step 6: Delete the old instance:

by Contributed | Jan 17, 2021 | Technology
This article is contributed. See the original author and article here.
Export and Import Bacpac file is one of the options available to migrate your database or to create a copy of it, like when you move your data from Azure SQL or Azure managed instance to on prem server, where backupRestore is not supported.
This Article is an illustration of one of the issues when importing a bacpac file, if you face error similar to:
User, group, or role ‘XXX’ already exists in the current database.
Or There is already an object named ‘xxx’ in the database.
Here is the example for same scenario:
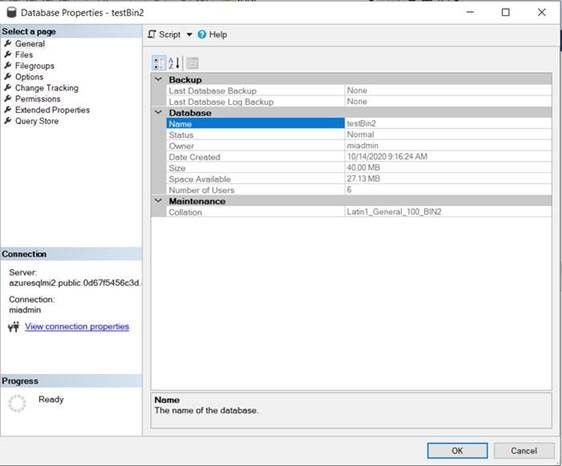
- The bacpac file was exported from a managed instance. the collation of the source database is Latin1_General_100_BIN2:
- I created two logins on Master database with different names (because the managed instance’s Master database has the default Case insensitive collation CI):
use master
go
create login testbin2_1 with password = 'P@ssW0rd123'
go
create login TestBin2_2 with password = 'P@ssW0rd123'
- I mapped the logins with a new users: two users with the same name on my database (creation completed successfully):
use testBin2
go
create user testbin2 for login testbin2_1
go
create user testBin2 for login testbin2_2
- If I create another database with another case sensitive collation like Latin1_General_CS_AI, I also can create the users and the same error will appear during the import process.
.
- I created the bacpac file from the Managed instance (for both databases it was succeeded):

- But if I try to import the file on Azure SQL, it will fail after creation of the destination database, even if it has been created with same case sensitive collation:

Conclusion
- On SQL Server, if you have a database with case sensitive collation, you can create objects like tables or users with the same name but with different letter case, this default behavior is not including Azure SQL Server,. Because Azure SQL is configured with other setting called “Catalog Collation”:
Catalog collation on Managed instance:

Catalog collation on Azure SQL:

For more information about Catalog collation:
https://docs.microsoft.com/en-us/sql/relational-databases/databases/contained-database-collations?view=sql-server-ver15#contained-databases
https://docs.microsoft.com/en-us/sql/relational-databases/databases/contained-database-collations?view=sql-server-ver15
- Also,you can create a new database with catalog collation on on-prem SQL 2019 Server using the following:
CREATE DATABASE [testdb]   COLLATE Latin1_General_100_CS_AS_SC
WITH CATALOG_COLLATION = SQL_Latin1_General_CP1_CI_AS;
But if you try the same on managed instance, creation of the database will fail with Error:
‘CATALOG_COLLATION’ is not supported in this version of SQL Server.
- If you import a Bacpac file to Azure SQL and there were errors like user or table with same name already exists, then you need to check the collation of the source database on on-prem or Managed instance servers.

by Contributed | Jan 17, 2021 | Technology
This article is contributed. See the original author and article here.
Now available: Grant permissions directly to a playbook to operate on Azure Sentinel, instead of creating additional identities.
Azure Sentinel Logic Apps connector is the bridge between Sentinel and Playbooks, serving as the basis for incident automation scenarios. The connector requires an identity on whose behalf it will operate on Azure Sentinel. Until now, you could do one of the following: use an Azure AD user which has been assigned an Azure Sentinel RBAC role, or create a Service Principal (for example, in form of an Azure AD registered application) and grant it the Azure Sentinel RBAC role.
Each one of these options has its advantages, but also limitations: Many would prefer not to authenticate with a user to a tool that generates automated actions. It is harder to audit (for example, using the incident table) which actions have been taken on behalf of a user and which are made by the playbook. It also makes less sense to see, for example, new comments that were generated by a playbook, but appear as if a user is their author. Also, if a user leaves the organization, you need to update all the connections that use its identity.
The service principal connection type allows us to create a registered application and use it as the identity behind the connector. You can define what this app can do, who can access it and what resources can this app access. It’s easy to delete it or replace its credentials if it’s suspected to have been compromised. For these reasons it’s great from a security perspective, but it still requires managing as another identity in the cloud that has credentials and permissions which potentially others can use.
Now, with the availability of Managed Identity for the Azure Sentinel connector, you can give permissions directly to the playbook (Logic App workflow resource), so Sentinel connector actions will operate on its behalf, as if it were an independent object which has permissions on Azure Sentinel. This lowers the number of identities you have to manage and gives the power to give access directly to the resource that operates.
How does it work?
When you turn on this feature in the Logic App, it is registered with Azure Active Directory and represented by an object ID. This identity can be assigned an Azure RBAC role on your Sentinel Workspace. The Azure Sentinel connector is configured to operate on its behalf as the selected API connection referenced by this connector.
How to use it?
To start using this new capability:
Turn on managed Identity in the Logic Apps resource
- In the Logic apps resource page, go to Identity.
- In System assigned tab, turn the status toggle to on.

Click on Save.
You will get a notification that this playbook was registered with Azure Active Directory:
Also, object ID will appear:

Grant permission
- In Azure Sentinel, go to Settings -> workspace settings -> Access Control (IAM)
- Click on Add -> Add role assignment

- Choose Azure Sentinel Responder role, and search for the playbook name. Select it and click save.

Authenticate to Azure Sentinel Connector
- In Logic Apps designer, in any of the Azure Sentinel connector steps, select Connect with managed identity

- Choose a name that will be affiliated with this connection, and click on Create

Other connectors supporting managed identity
Thanks to new Azure Logic Apps feature, more Azure AD–based connectors allow this as well. Currently, the following connectors support this feature:
Azure API Management, Azure App Services, Azure Functions, HTTP, HTTP Webhook, Azure Automation, Azure Container Instance, Azure Data Explorer, Azure Data Factory, Azure Data Lake, Azure Event Grid, Azure IoT Central V3, Azure Key Vault, Azure Log Analytics, Azure Monitor Logs, Azure Resource Manager, Azure Sentinel, HTTP with Azure AD.
Learn More
by Contributed | Jan 17, 2021 | Technology
This article is contributed. See the original author and article here.
We are excited to announce that we are about to increase our customers’ protection by upgrading the default automation level of our Microsoft Defender for Endpoint customers who have opted into public previews from Semi – require approval for any remediation to Full – remediate threats automatically.
Auto investigation and remediation overview
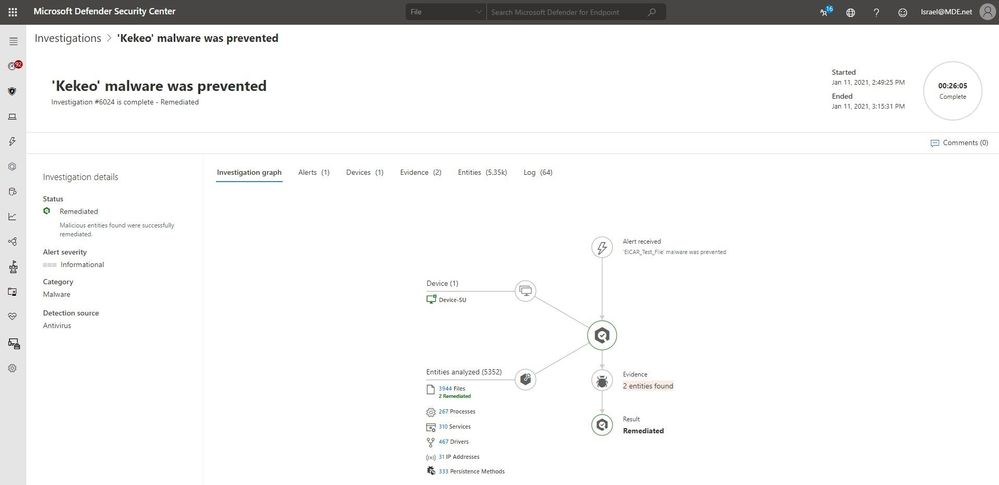
When an alert is raised in Microsoft Defender for Endpoint, an automated investigation immediately starts running on the machine where the suspicious activity was detected. It begins with an analysis of the malicious entities that are part of the alert and continues with collection and examination of other entities associated with it. The automated investigation inspects files, processes, services, registry keys, and any area that may contain threat-related evidence.
The result of an automated investigation started by an alert is a list of related entities found on a device and their verdicts (malicious, suspicious, or clean). For any malicious entity, the investigation will create a remediation action, an action that, when approved, will remove or contain a malicious entity that was found in the investigation. These actions are defined, managed, and executed by Microsoft Defender for Endpoint without the security operations team having to remotely connect to the device.
Remediation actions are approved or declined according to the device automation level. When it is set to ‘Full’, the remediation action will be approved automatically, without further waiting. When it is set to ‘Semi’, the action will wait for manual approval, which may lead to losing valuable time in which the malware may cause damage and spread to other devices.

Automated investigation and remediation supports queuing of remediation actions for devices that are not available, so that when they become available, the actions will be triggered immediately. All remediation actions, whether pending, running, or completed, can be viewed in the Action Center. If you’ve determined that a detected device or a file is not actually a threat, you can undo remediation actions that were taken for a specific device or across the entire organization.
Empowering defenders with automation by default
When our automated investigation and remediation capabilities were first introduced, the default automation level was set to semi – require approval for any remediation. Since then, we have increased our malware detection accuracy, added the option to undo remediation actions, and improved our automated investigation infrastructure. Throughout this time, we have seen thousands of cases where organizations with fully automated tenants have successfully contained and remediated threats, while other companies, left with the default ‘semi’ level, have remained at high risk due to lengthy pending time for approval of actions.
Data collected and analysed over the past year shows that organizations who are using full automation have had 40% more high-confidence malware samples removed than customers using lower levels of automation. Full automation also frees up our customers’ critical security resources so they can focus more on their strategic initiatives.
In light of the significant benefits of using automatic approval of remediation actions, and after changing the default automation level for new customers, starting February 16, 2021, tenants who have opted in for public previews in the Microsoft Defender for Endpoint will be automatically upgraded to the new default automation level: Full-remediate threats automatically.
The new default automation level can be kept (this is recommended) or changed according to your organizational needs. This change does not impact or override device group definitions that were previously set to control automation level.
To get started with Microsoft Defender for Endpoint public preview capabilities, we encourage customers to turn on preview features in Microsoft Defender Security Center.
If you’re not yet taking advantage of Microsoft’s industry leading optics and detection capabilities, sign up for a free trial of Microsoft Defender for Endpoint today.
Additional resources:
Create and manage device groups
Automation levels in automated investigation and remediation capabilities
Review and approve remediation actions following an automated investigation
by Contributed | Jan 17, 2021 | Technology
This article is contributed. See the original author and article here.
Hey there…
Whilst 2009 fixed many issues, we discovered there was a couple of issues affecting OneDrive and CCD. Pleased to say these have now been addressed.
You can find the HF at this location :
FSLogix Apps 2009 HF_01 (2.9.7654.46150)
You should no longer use FSLogix 2009 (2.9.7621.30127)


Recent Comments