Data Validation at Scale with Azure Synapse

Data Validation at Scale with Azure Synapse

This article is contributed. See the original author and article here.

Overview


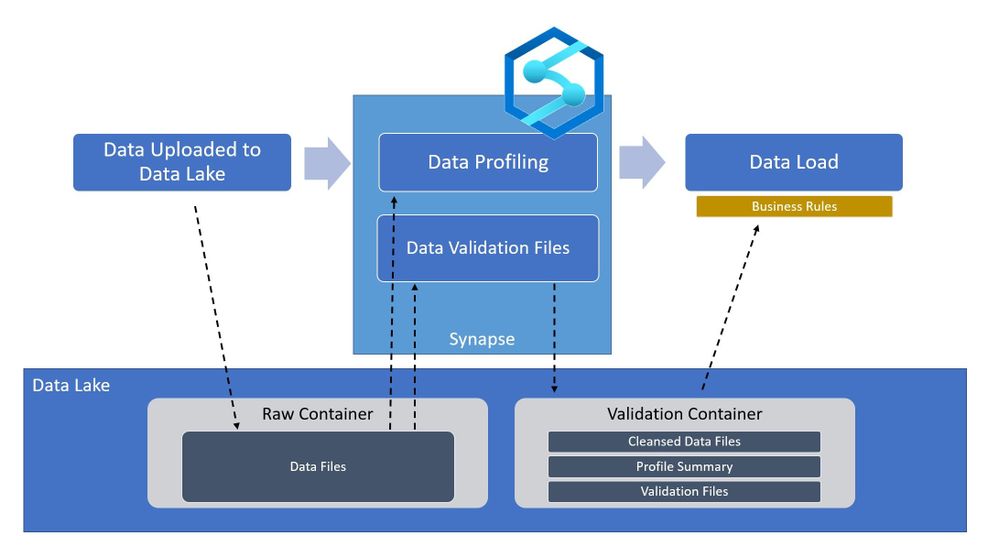
In the world of Artificial Intelligence and Machine Learning, data quality is paramount in ensuring our models and algorithms perform correctly.  By leveraging the power of Spark on Azure Synapse, we can perform detailed data validation at a tremendous scale for your data science workloads.


high-level-arch-hddata.jpg


What is Azure Synapse?


Azure Synapse is a Data Analytics Service that provides tools for end-to-end processing of data within Azure.  The Azure Synapse Studio provides an interface for developing and deploying data extraction, transformation, and loading workflows within your environment.  All of these workflows are built on scalable cloud infrastructure and can handle tremendous amounts of data if needed.  For data validation within Azure Synapse, we will be using Apache Spark as the processing engine.  Apache Spark is an industry-standard tool that has been integrated into Azure Synapse in the form of a SparkPool, this is an on-demand Spark engine that can be used to perform complex processes of your data.


Pre-requisites


Without getting into too much detail, the main requirements you will need for running this code is an Azure Synapse Workspace and a data set on which you would like to perform some validations loaded to Azure Storage.  The technique shown here provides a starting point for performing these types of data validations within your own use case.


For demonstration purposes, I have loaded a data set of hard drive sensor data (link below) to an Azure Storage account and linked the storage account in Synapse (https://docs.microsoft.com/en-us/azure/synapse-analytics/get-started)


hddata.jpg


I have also set up a SparkPool (link) for developing in PySpark Notebooks within Azure Synapse, I can read the data by connecting to the data source and using some simple PySpark commands:


from  pyspark.sql.functions import input_file_name
import os

df = spark.read.load('abfss://[container]@[storage_account].dfs.core.windows.net/[path]/*.csv', format='csv', header=True).withColumn('file', input_file_name())

display(df)


hddata1.jpg


One key part to take note of is the command .withColumn(‘file’, input_file_name()), this adds a column to your dataset named file with the name of the source data file.  Very helpful when trying to find malformed rows.


Let’s start validating


After loading the data you can begin by calculating some high-level statistics for simple validations.


df_desc = df.describe()
display(df_desc)


hddata2.jpg


the describe() function calculates simple statistics (mean, standard deviation, min, max) that can be compared across data sets to make sure values are in the expected range.  This is a built-in data function that can be used on any data.  You can save these data sets back to your data lake for downstream processes using:


df_desc.write.parquet("[path][file].parquet")


But we can get much more complex by using spark queries to further validate the data.  


We can count how many rows were contained in each file using this code:


validation_count_by_date = df.groupBy('file','date').count()


hddata3.jpg


This count can be useful in ensuring each file contains a complete dataset.  If file sizes are outside of the expected range, it may mean that the file is either incomplete or contains excess data.


Furthermore, we can even look at the specific values within the data at a row-level granularity.  The code below uses the named columns “file” and “date” to the group missing values across all files in your data set.  Missing values are defined as Null or NaN values in the dataset. 


from pyspark.sql.functions import isnull, isnan, when, count, col

cols = [count(when(isnan(c) | col(c).isNull(), c)).alias(c) if c not in ['file', 'date'] else count(col(c)).alias('count_{}'.format(c)) for c in df.columns]
missing_by_file = df.groupBy('file', 'date').agg(*cols)

display(missing_by_file)


hddata4.jpg


Don’t be intimidated by the above code.  I am essentially using some python loops to generate a list of columns cols, and then using the * (star) operator to pass those columns to the select function.  I encourage you to try running these commands on your data to become familiar with the power of python.


We can go a step further in calculating the ratio of missing values for each column within a file:


missing_by_file_pct = missing_by_file.select(['date', 'file', *[(col(c)/col('count_file')).alias('{}_pct'.format(c)) for c in df.columns]])
display(missing_by_file_pct)


hddata5.jpg


 Now instead of looking at total values, we can identify incomplete data by looking at the percentage of filled-in values in a file.  Again, this technique accompanied by business rules can be very powerful in validating raw data sources and ensuring data quality in a scalable method.


Up until this point, I have only defined the column names of “file” and “date”, all other columns have been derived from the source file header/schema so there is no need to maintain column lists as part of the validation rules.  If you do require checking for specific values within a file, you can easily extend these examples such as this:


from pyspark.sql.functions import countDistinct
validation_modelcount_by_date = df.groupBy('file','date').agg(countDistinct('model'))
display(validation_modelcount_by_date)


hddata6.jpg


 The query above identifies all the distinct values for the column “model” which are present in each file.   As you can see the count of distinct models varies slightly from file to file, we can establish an acceptable range fairly easily by looking at this data. 


How can I use this in my processes?


Going back to the high-level architecture diagram shown at the beginning of the blog.  This technique can be applied during the ingestion of your data to certify whether the raw files are qualified to be in the data lake.  By using Synapse Spark we can perform the row-level checks fast and efficiently, and output the results back into the data lake.  Downstream processes such as Machine Learning Models and/or Business Applications can then read the validation data to determine whether or not to use the raw data without having to re-validate it.  With Azure Synapse and Spark, you can perform powerful validations on very large data sources with minimal coding effort.


Data reference: Backblaze Hard Drive Stats


Github Link: AzureSynapseDataValidation/Validation-Sample.ipynb

The January 15th Weekly Roundup is Posted!

This article is contributed. See the original author and article here.

Surface Pro 7+ brings next level performance and versatility to the enterprise


It’s now easier for you to store, sync, and share large files in Microsoft 365. This latest improvement will help increase the upload file size limit for Microsoft 365 from 100 GB to 250 GB—which includes uploads of files into SharePoint, Teams, and OneDrive.


News for Frontline workers
Push tasks from corporate to frontline workers with task publishing in Teams
Empower your frontline workers with these Azure AD capabilities that just went GA
Approvals in Microsoft Teams, Now Generally Available


Riny van Eekelen is the Member of the Week. Riny is very active in the Excel discussion space, starting topics and replying to members with help.


View the Weekly Roundup for Jan 11-15th in Sway and attached PDF document.


https://sway.office.com/s/E2obAPPpUN0nAblc/embed

NSA Releases Guidance on Encrypted DNS in Enterprise Environments  

This article is contributed. See the original author and article here.

The National Security Agency (NSA) has released an information sheet with guidance on adopting encrypted Domain Name System (DNS) over Hypertext Transfer Protocol over Transport Layer Security (HTTPS), referred to as DNS over HTTPS (DoH). When configured appropriately, strong enterprise DNS controls can help prevent many initial access, command and control, and exfiltration techniques used by threat actors.

CISA encourages enterprise owners and administrators to review the NSA Info Sheet: Adopting Encrypted DNS in Enterprise Environments and consider implementing the recommendations to enhance DNS security.

Azure Governance for ISVs

This article is contributed. See the original author and article here.

permalink: https://aka.ms/FTAISVGovernance


Microsoft Azure includes many governance features that can help an independent software vendor (ISV) with resource and subscription management.  In this set of three video presentations, I present your options and features.


Although these are not talking about any ISV-only features, they are ISV-focused – so while this content would certainly be helpful for you if you’re not an ISV, you should be aware that is the lens through which I am presenting the content.


These videos include a English closed-caption-file reference, and are best viewed full-screen.  


Please let us know in the comments what you think, and if you have questions!  Also, this is the first of a set of ISV-oriented Azure videos.  If you have an ISV-specific topic that you feel would be good for a 15-20 minute video or a small set of them, let us know… we already have videos on logging and monitoring and on multi-tenant databases under development…


Session 01: Organizing Resources


Sorry, your browser doesn’t appear to support embedded videos.


Session 02: Policies, Initiatives, and Blueprints


Sorry, your browser doesn’t appear to support embedded videos.


Session 03: ISV Summary


Sorry, your browser doesn’t appear to support embedded videos.


Configuration Manager – Collect Client Logs

Configuration Manager – Collect Client Logs

This article is contributed. See the original author and article here.


Hi Folks! I am Naveen kanneganti and welcome to my blog post.


You can now send client notification action from the Configuration Manager to trigger a client device to upload its client logs to the site server. In order access collected log files you have several options available.  the following are some of the options in resource explorer to access collected log files


  • Open Support Center: Launches Support Center. from support centre you can open the logs in the viewer.

  • View file: Opens the folder where the zip file is located with File Explorer.

  • Save: Opens a Save File popup box.


Prerequisites


  Administrative user needs Notify resource permission on the Collection


  • The following built-in roles have this permission by default:

    • Full Administrator

    • Infrastructure Administrator


Collect client logs


  • Launch ConfigMgr Console, In the Assets and Compliance workspace, go to either the Devices or Device Collections node.


         Naveen_Kanneganti_0-1610737735456.png


  • Right-click on a device, or a device collection.


         Naveen_Kanneganti_1-1610737772112.png


  • Choose Client Diagnostics and then Click Collect Client Logs.    


          Naveen_Kanneganti_2-1610737804727.png


  • Click OK on the prompt


         Naveen_Kanneganti_3-1610737832362.png


  • On the client computer, you can check Diagnostics.log under C:WindowsCCMlogs .


         Naveen_Kanneganti_17-1610739225459.png


  • On the Management point, you can monitor from MP_SinvCollFile.log


         Naveen_Kanneganti_5-1610737225380.png


  • On the site server you can monitor Sinvproc.log for the SIC file, processed Successfully as shown below


         Naveen_Kanneganti_6-1610737334789.png


  • Capture Resid and time stamp from Sinvproc.log.  You can check whether Zip file is collected to the location:[site server]SMS_CS1inboxessinv.boxFileCol[Resid]


          (ex: svrcm01.css.intSMS_CS1inboxessinv.boxFileCol16777228 )


          Naveen_Kanneganti_4-1610738023462.png


View collected Client Logs


  1.  Open Support Center


      Follow the below steps to view collected logs, using this option


  • Launch ConfigMgr Console, In the Assets and Compliance workspace go to devices and right click on the Device     


         Naveen_Kanneganti_5-1610738088526.png


  • Choose Start and then click on Resource explorer


        Naveen_Kanneganti_6-1610738117696.png


  • In the resource explorer, choose Diagnostic files and then right click on latest files. Click on open Support Center


        Naveen_Kanneganti_7-1610738165891.png


  • Support Center open logs automatically as shown below


         Naveen_Kanneganti_8-1610738228791.png


  • Click on any log you interested and click Open from top ribbon


         Naveen_Kanneganti_9-1610738321035.png


  • Log viewer automatically open and display the log information


         Naveen_Kanneganti_10-1610738372352.png


2. View Files


     Follow the below steps to view collected logs, using this option


  • In the resource explorer, choose Diagnostic files and then right click on latest files. Click on View File


          Naveen_Kanneganti_11-1610738631103.png


  • The zip file will be open with File explorer


        Naveen_Kanneganti_12-1610738661473.png


  • You can browse to ccmLogDataCollectorlogs folder and view the Collected Logs     


         Naveen_Kanneganti_13-1610738697051.png


3. Save


      Follow the below steps to view collected logs using this option


  • In the resource explorer, choose Diagnostic files and then right click on latest files. Click on Save


         Naveen_Kanneganti_14-1610738725701.png


  • It automatically opens Save popup Box to Save  the files to your desired location     


         Naveen_Kanneganti_15-1610738766286.png


  • After logs are saved to your desired destination folder, you can browse to .CcmLogDataCollectorlogs and view collected log files.


         Naveen_Kanneganti_16-1610738802591.png


Hope this step-by-step process helps to start using Collect Client logs!


If you are looking to collect extensive list of logs, registry settings, and diagnostic data from a device or collection of devices please check URL:https://github.com/russrimm/CollectAllLogs


Best Regards


Naveen Kanneganti
Customer Engineer 


Microsoft Services