by Contributed | Jan 29, 2021 | Technology
This article is contributed. See the original author and article here.
It’s the Friday before ITOps Talks: All Things Hybrid and there is a ton of news to discuss. Highlights this week include: ARM Template Specs is now Public Preview, MFA methods changes for hybrid customers, Resource instance rules for access to Azure Storage now in public preview, IoT Hub IP filter upgrade and the Microsoft Learn Module of the week.
ARM Template Specs now Public Preview

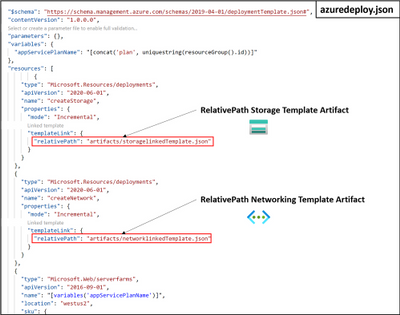
Is sharing ARM templates across an org challenging? Angel Perez shares how Template Specs, new resource type for storing ARM templates in resource groups, enables faster sharing, deployment, and role-based access control on ARM templates. As a native solution, ARM Template Specs will enable users to bring all their ARM templates to Azure as a resource and securely store and share them within an Azure tenant.
Further information and the ability to provide feedback can be found here: ARM Template Specs Announcement
MFA methods changes for hybrid customers
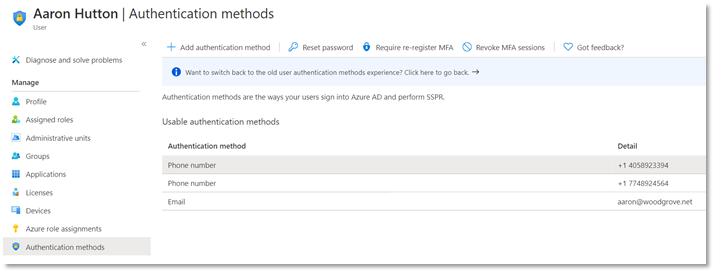
The previous announcement made in November shared that Microsoft was working towards simplifying the MFA management experience to manage all authentication methods directly in Azure AD. The change was successfully rolled out to cloud-only customers and work has begun to make this transition smooth for hybrid customers. Starting February 1, 2021, Microsoft will be updating the authentication numbers of synced users to accurately reflect the phone numbers used for MFA.
If your organization uses Azure AD Connect to synchronize user phone numbers, the following post will be important for you: Changes to managing MFA methods for hybrid customers
Resource instance rules for access to Azure Storage now in public preview
You can now configure your storage accounts to allow access to only specific resource instances of select Azure services by creating a resource instance rule. Resource instances must be in the same tenant as your storage account, but they may belong any resource group or subscription in the tenant.
Learn more reguarding the public preview here: Configure Azure Storage firewalls and virtual networks
Action Required: Upgrade IoT Hub IP filter before 1 February 2022
The upgraded IP filter for IoT Hub protects the built-in endpoint, blocks all IP ranges by default, and is easier to configure. With the new enhancement, Microsoft has announce the retirement of classic IP Filter which will take place on February 1, 2022. To avoid service disruption, you must perform the guided upgrade before the migration deadline, at which point the upgrade will be performed automatically.
Learn more about our secure capabilities here and upgrade steps here: IoT Hub classic IP filter and how to upgrade
Community Events
- ITOps Talks: All Things Hybrid – A new type of event that allows you to watch sessions on your time. Focusing on “All Things Hybrid” the event, the sessions will focus on hybrid based cloud strategies and resources at a 300 level.
- Microsoft Ignite – Few details available on the upcoming event. Stay tuned for more details as they become available.
MS Learn Module of the Week

Windows Server deployment, configuration, and administration
Learn how to configure and administer Windows Server 2019 securely using the appropriate management tool. Learn to deploy Windows Server and perform post-installation configuration
This learning path can be completed here: Windows Server deployment, configuration, and administration
Let us know in the comments below if there are any news items you would like to see covered in the next show. Be sure to catch the next AzUpdate episode and join us in the live chat.
by Contributed | Jan 29, 2021 | Technology
This article is contributed. See the original author and article here.
v:* {behavior:url(#default#VML);}
o:* {behavior:url(#default#VML);}
w:* {behavior:url(#default#VML);}
.shape {behavior:url(#default#VML);}
Joel Vickery
Joel Vickery
2
0
2021-01-28T20:04:00Z
2021-01-28T20:04:00Z
1
902
5146
42
12
6036
16.00
true
2020-12-08T01:54:26Z
Standard
Internal
72f988bf-86f1-41af-91ab-2d7cd011db47
19523986-82a6-469c-9e83-5a2a80add554
0
Clean
Clean
false
false
false
false
EN-US
X-NONE
<w:LidThemeComplexscript>X-NONE</w:LidThemeComplexscript>
Some things today you just take for granted. We can download an entire movie in the time it took to download a low-resolution .jpg file back in the dial-up days. I guess I’m feeling nostalgic since I just found and AOL 3.5-inch floppy while cleaning out the basement over the weekend. Yes, you read that correctly, a floppy….not a CD…a 3.5-inch floppy. Back then, 1.44 Mb and a good phone line were the only thing standing between you and the awesomeness of the 14.4 kb internet…of course you had to wait for the squawks and screeches of the modem handshakes which were audible back then, almost like they were proud of it (we even had volume control for it).
It’s funny to think about that era and fast forward to today, where DHCP assignments and 3-way handshakes happen in milliseconds and we don’t see or hear any of it…unless something goes wrong. The Microsoft team recently put a DHCP issue to bed that brought to mind how blazing fast the world is today and how little we appreciate the minutia going on under the covers of that speed.
The Problem
Our story starts with a report that client machines are not receiving DHCP assignments from the DHCP server on a very wide scale. This is also where DORA comes into our adventure…minus the backpack. Any sort of troubleshooting DHCP requires an understanding of the DORA negotiation: Discover -> Offer -> Request -> Acknowledge. Prior to calling us in to assist, the customer had taken network captures and noticed that the “A” in DORA (the ACK or Acknowledgement) was not arriving quickly enough to prevent the DHCP negotiation from timing out.
The Troubleshooting
First rule of troubleshooting. Trust but verify. Until this point, no one was capturing traffic from the DHCP server, so we needed to see if the traffic was leaving the server. A quick analysis of the network capture from the DHCP server confirmed two things: DHCP ACKS were being sent, and that DHCP ACKS were being sent on an extremely delayed cycle. The network administrators verified that the network for this site had no strange load-balancing/split route or routing loop problems, so we turned the focus to the performance of the DHCP Server.
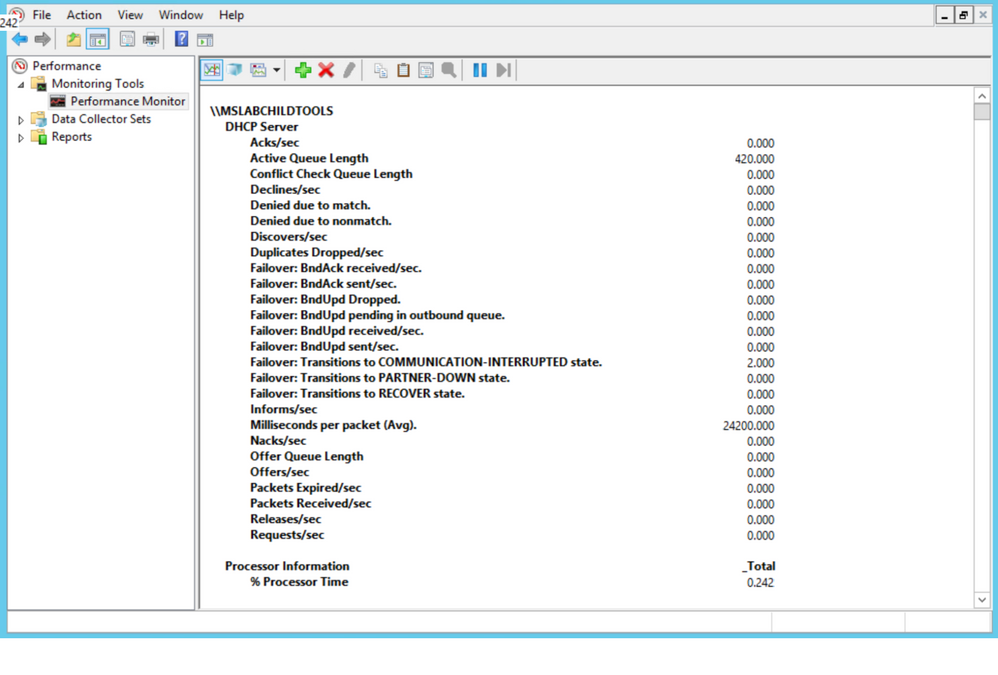
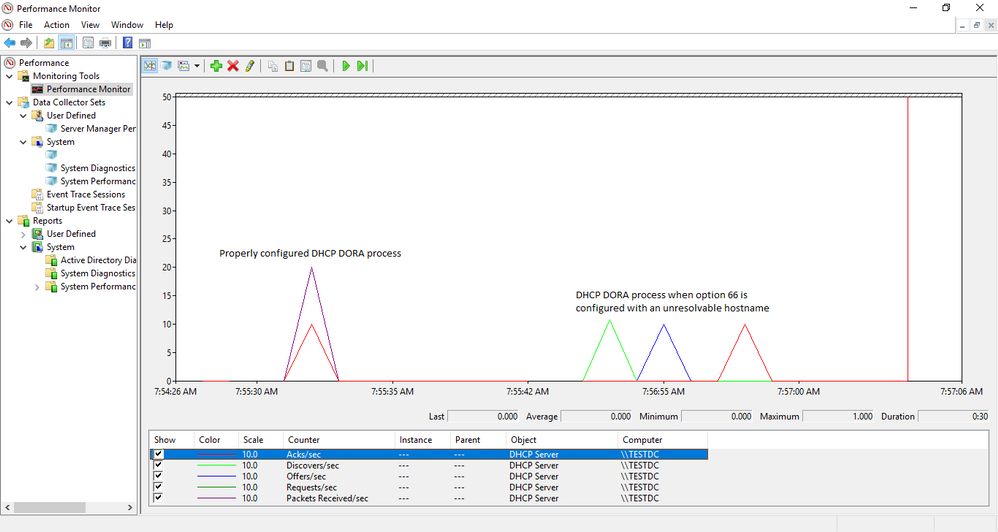
We checked all the usual suspects for performance and no issues were present to lead us to suspect that CPU/Memory/Disk/Network were bottlenecked. Performance counters are available for DHCP Server, so we took a quick look there. Below are the counters for our DHCP Server, the first thing that jumped out was that the Acks/Sec was abnormally low, just sporadically jumping above zero. Also, note the Active Queue Length, that is not normal. Finally, the counter for Milliseconds per packet (Avg) was very high. So, now we are starting to see a queue form on the server, but the real question is why?
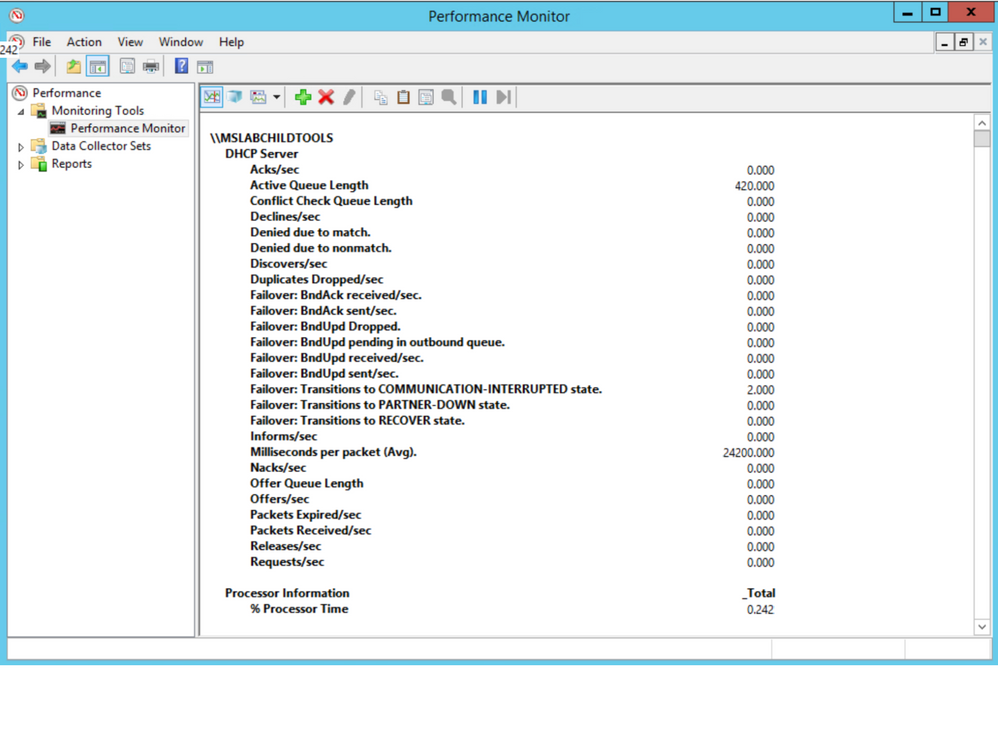
Next, we did some testing to move about half of the DHCP scopes to another server to see if it was something with that server. Half of the scopes were moved to a partner server in site via an ad-hoc failover relationship, with the failover removed leaving the scopes and their configuration on the partner server. We checked Perfmon and we see the same two counters running at elevated levels. So, the issue followed the scopes. Scopes were moved back to the original server in blocks until the counters finally returned to normal to isolate the groups that had the offending configuration.
With perfmon running as the bad scope goes into place, you can see the Acks/Sec counter reflect the timing delay we are seeing in graph view:
The next step was to look at the scopes and the configured scope options to see of anything looked out of place. This environment has a well-defined policy for configuration, so anything out of the ordinary tends to stand out. Using some PowerShell Fu, the scope options for a user workstation scope were found to have a TFTP server configured and the thing that caught our eye was that the name of the server was specified, not the IP address. Below is the command and output for the search:
Get-DhcpServerV4Scope | %{Write-Host “`r`n$($_.name)” –ForegroundColor Red; Get-DHCPServerV4OptionValue –ScopeId $_.ScopeId –OptionId 66 –ErrorAction SilentlyContinue}
The text in the “Value” column is what you would be looking for. The screenshot below is just an example and the “Value” displays the actual string values that were entered into Option 66 for the TFTP server.
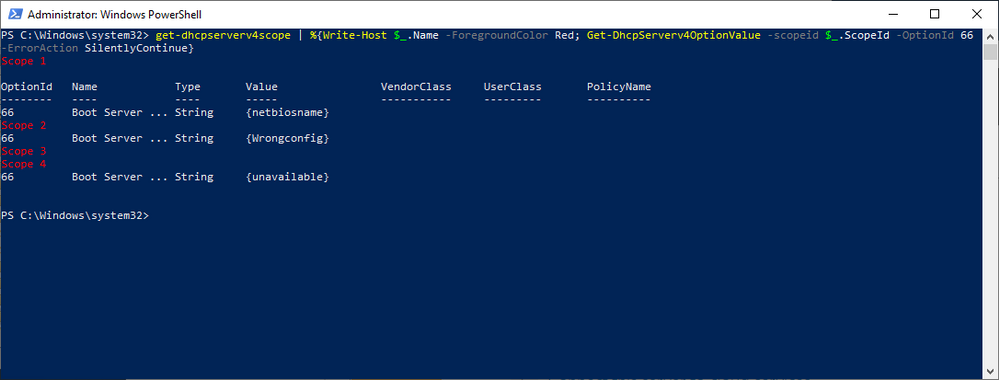
In our case, we found one single-label name, which was out of the ordinary for their normal configuration. A quick check of the server name revealed that it could neither be resolved via DNS nor contacted on the network. The defunct option was removed from the server and the DHCP service restarted on the server and, what do you know…the server’s Perfmon counts for Active Queue Length and Milliseconds Per Packet (Avg) returned to normal. Loosely translated, DORA is happy again.
The Takeaway
Keep it simple…when configuring this sort of thing, it is always a good idea to use IP addresses instead of building in a reliance on name resolution, especially when you factor in how early in the network configuration this process resides. In our case we also had a nonexistent server problem but assuming it was still available, using the IP address takes one link out of the complexity chain in getting to that TFTP server. RFC5859 for TFTP Server Address even specifies using the IP address to eliminate this complexity. Follow their advice and keep things as simple as possible.
The Outcome
In the IT field, you rarely hear the accolades when things return to normal, the silence of the content has to be music to your ears to know that you have fixed things. In this case the lightning fast exchange of DORA, 3-way handshakes, TLS negotiations, etc. are back in the background where they belong, with the users focusing on their work duties/web browsing/social media, whatever normal users do in your case.
Take care and stay safe!
by Contributed | Jan 29, 2021 | Technology
This article is contributed. See the original author and article here.
While helping Windows Enterprise customers deploy and realize the benefits of Windows 10, I’ve observed there’s still a lot of confusion regarding the security features of the operating system. However, the key benefits of Windows 10 involve these deep security features. This post serves to detail the Device Guard and Credential Guard feature sets, and their relationship to each other.
First, let’s set the foundation by thinking about the purpose of each feature:
Device Guard is a group of key features, designed to harden a computer system against malware. Its focus is preventing malicious code from running by ensuring only known good code can run.
Credential Guard is a specific feature that is not part of Device Guard that aims to isolate and harden key system and user secrets against compromise, helping to minimize the impact and breadth of a Pass the Hash style attack in the event that malicious code is already running via a local or network based vector.
The two are different, but complimentary as they offer different protections against different types of threats. Let’s dive in and take a logical approach to understanding each.
It’s worth noting here that these are enterprise features, and as such are included only in the Windows Enterprise client.
Virtual Secure Mode
The first technology you’ll need to understand before we can really dig into either Device Guard or Credential Guard, is Virtual Secure Mode (VSM). VSM is a feature that leverages the virtualization extensions of the CPU to provide added security of data in memory. We call this class of technology Virtualization Based Security (VBS), and you may have heard that term used elsewhere. Anytime we’re using virtualization extensions to provide security, we’re essentially talking about a VBS feature.
VSM leverages the on chip virtualization extensions of the CPU to sequester critical processes and their memory against tampering from malicious entities.
The way this works is the Hyper-V hypervisor is installed – the same way it gets added in when you install the Hyper-V role. Only the hypervisor itself is required, the Hyper-V services (that handle shared networking and the management of VMs themselves) and management tools aren’t required, but are optional if you’re using the machine for ‘real’ Hyper-V duties. As part of boot, the hypervisor loads and later calls the real ‘guest’ OS loaders.
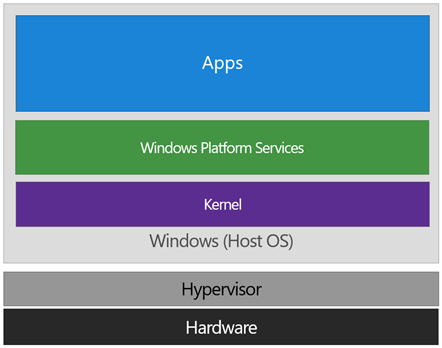
The diagram below illustrates the relationship of the hypervisor with the installed operating system (usually referred to as the host operating system)

The difference between this and a traditional architecture is that the hypervisor sits directly on top of the hardware, rather than the host OS (Windows) directly interacting at that layer. The hypervisor serves to abstract the host OS (and any guest OS or processes) from the underlying hardware itself, providing control and scheduling functions that allow the hardware to be shared.
In VSM, we’re able to extend this by tagging specific processes and their associated memory as actually belonging to a separate operating system, creating a ‘bubble’ sitting on top of the hypervisor where security sensitive operations can occur, independent of the host OS:
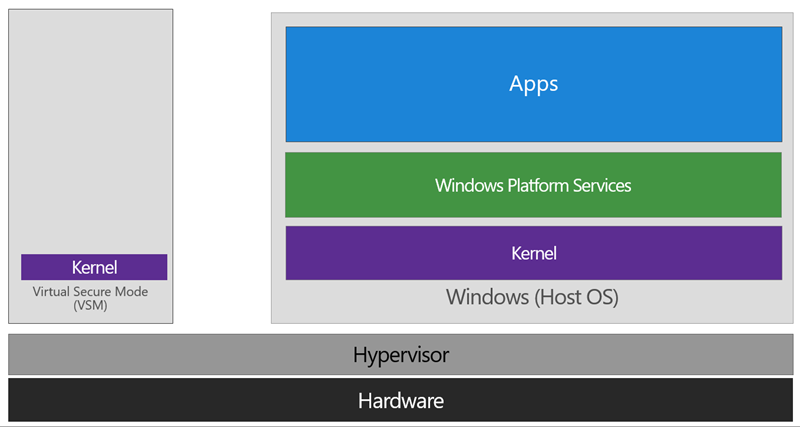
In this way, the VSM instance is segregated from the normal operating system functions and is protected by attempts to read information in that mode. The protections are hardware assisted, since the hypervisor is requesting the hardware treat those memory pages differently. This is the same way to two virtual machines on the same host cannot interact with each other; their memory is independent and hardware regulated to ensure each VM can only access it’s own data.
From here, we now have a protected mode where we can run security sensitive operations. At the time of writing, we support three capabilities that can reside here: the Local Security Authority (LSA), and Code Integrity control functions in the form of Kernel Mode Code Integrity (KMCI) and the hypervisor code integrity control itself, which is called Hypervisor Code Integrity (HVCI).
Each of these capabilities (called Trustlets) are illustrated below:
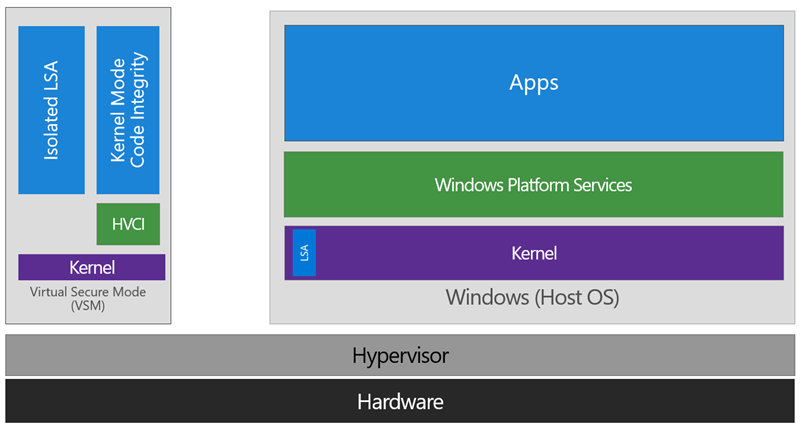
When these capabilities are handled by Trustlets in VSM, the Host OS simply communicates with them through standard channels and capabilities inside of the OS. While this Trustlet-specific communication is allowed, having malicious code or users in the Host OS attempt to read or manipulate the data in VSM will be significantly harder than on a system without this configured, providing the security benefit.
Running LSA in VSM, causes the LSA process itself (LSASS) to remain in the Host OS, and a special, additional instance of LSA (called LSAIso – which stands for LSA Isolated) is created. This is to allow all of the standard calls to LSA to still succeed, offering excellent legacy and backwards compatibility, even for services or capabilities that require direct communication with LSA. In this respect, you can think of the remaining LSA instance in the Host OS as a ‘proxy’ or ‘stub’ instance that simply communicates with the isolated version in prescribed ways.
Deploying VSM is fairly straightforward. You simply need to verify you have the appropriate hardware configuration, install certain Windows features, and configure VSM via Group Policy.
Step One: Configure Hardware
In order to use VSM, you’ll need a number of hardware features to be present and enabled in the firmware of the machine:
- UEFI running in Native Mode (not Compatibility/CSM/Legacy mode)
- Windows 64bit and it’s associated requirements
- Second Layer Address Translation (SLAT) and Virtualization Extensions (Eg, Intel VT or AMD V)
- A Trusted Platform Module (TPM) is recommended.
Step Two: Enable Windows Features
The Windows features you’ll need to make VSM work are called Hyper-V Hypervisor (you don’t need the other Hyper-V components) and Isolated User Mode:
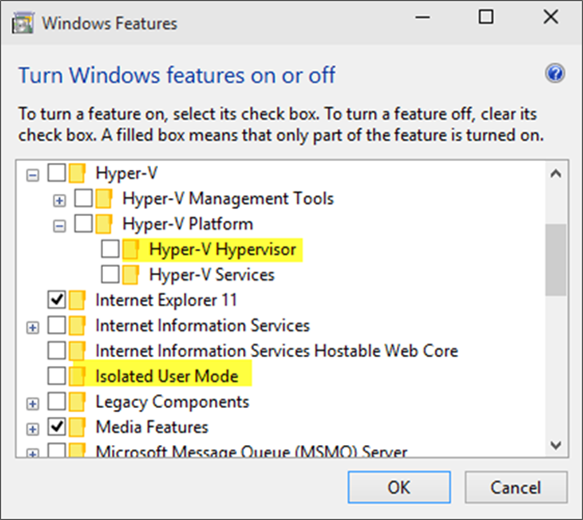
If these options are greyed out or unavailable for install, it will typically indicate that the hardware requirements in step one haven’t been met.
You’ll notice the name of the feature is called Isolated User Mode in here. It actually is the Virtual Secure Mode feature – you can thank a last minute name change for that. In order to not confuse people, this isn’t planned to change to reflect the VSM name at this time, and may look to being integrated as a standard Windows feature at a later stage.
Update: In Windows 10, Version 1607 this is indeed an integrated feature and no longer needs to be explicitly enabled.
Step Three: Configure VSM
VSM and the Trustlets loaded within are controlled via either Mobile Device Management (MDM) or Group Policy (GP).
For the purposes of this article, I’ll cover the Group Policy method as that’s the most commonly used option, but the same configuration is possible with MDM.
The GP setting you need to know about is called Turn On Virtualization Based Security, located under Computer Configuration Administrative Templates System Device Guard in the Group Policy Object Editor:
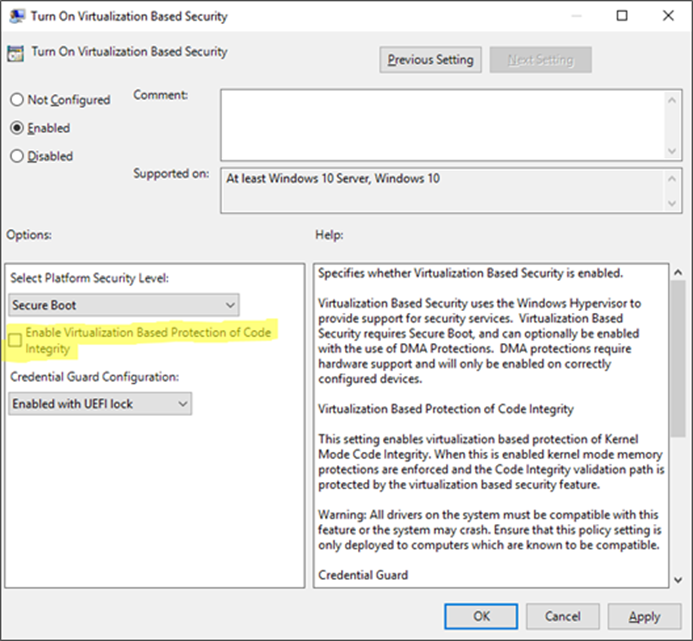
Enabling this setting, and leaving all the settings blank or at their defaults will turn on VSM, ready for the steps below for Device Guard and Credential Guard. In this default state, only the Hypervisor Code Integrity (HVCI) runs in VSM until you enable the features below (protected KMCI and LSA).
Device Guard
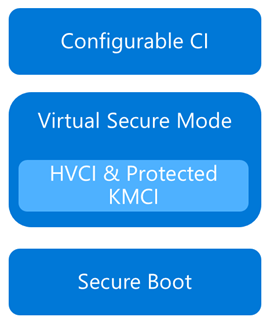 Now that we have an understanding of Virtual Secure Mode, we can begin to discuss Device Guard. The most important thing to realize is that Device Guard is not a feature; rather it is a set of features designed to work together to prevent and eliminate untrusted code from running on a Windows 10 system.
Device Guard consists of three primary components:
- Configurable Code Integrity (CCI) – Ensures that only trusted code runs from the boot loader onwards.
- VSM Protected Code Integrity – Moves Kernel Mode Code Integrity (KMCI) and Hypervisor Code Integrity (HVCI) components into VSM, hardening them from attack.
- Platform and UEFI Secure Boot – Ensuring the boot binaries and UEFI firmware are signed and have not been tampered with.
When these features are enabled together, the system is protected by Device Guard, providing class leading malware resistance in Windows 10.
Configurable Code Integrity (CCI)
CCI dramatically changes the trust model of the system to require that code is signed and trusted for it to run. Other code simply cannot execute. While this is extremely effective from a security perspective, it provides some challenges in ensuring that code is signed.
Your existing applications will likely be a combination of code that is signed by the vendor, and code that is not. For code that is signed by the vendor, the easiest option is just to use a tool called signtool.exe to generate security catalogs (signatures) for just about any application.
More detail on this in an upcoming post.
The high level steps to configure code integrity for your organization is:
- Group devices into similar roles – some systems might require different policies (or you may wish to enable CCI for only select systems such as Point of Sale systems or Kiosks.
- Use PowerShell to create integrity policies from “golden” PCs
(use the New-CIPolicy Cmdlet)
- After auditing, merge code integrity policies using PowerShell (if needed)
(Merge-CIPolicy Cmdlet)
- Discover unsigned LOB apps and generate security catalogs as needed (Package Inspector & signtool.exe – more info on this in a subsequent post)
- Deploy code integrity policies and catalog files
(GP Setting Below + Copying .cat files to catroot – C:WindowsSystem32{F750E6C3-38EE-11D1-85E5-00C04FC295EE})
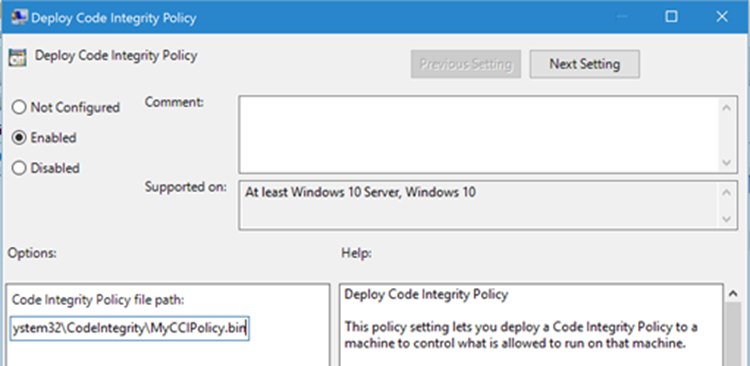
The Group Policy setting in question is Computer Configuration Administrative Templates System Device Guard Deploy Code Integrity Policy:
VSM Protected Code Integrity
The next component of Device Guard we’ll cover is VSM hosted Kernel Mode Code Integrity (KMCI). KMCI is the component that handles the control aspects of enforcing code integrity for kernel mode code. When you use Configurable Code Integrity (CCI) to enforce a Code Integrity policy, it is KMCI and it’s User-Mode cousin, UMCI – that actually enforces the policy.
Moving KMCI to being protected by VSM ensures that it is hardened to tampering by malware and malicious users.
Platform & UEFI Secure Boot
While not a new feature (introduced in Windows 8), Secure Boot provides a high-value security benefit by ensuring that firmware and boot loader code is protected from tampering using signatures and measurements.
To deploy this feature you must be UEFI booting (not legacy), and the Secure Boot option (if supported) must be enabled in the UEFI. Once this is done, you can build the machine (you’ll have to wipe & reload if you’re switching from legacy to UEFI) and it will utilize Secure Boot automatically.
For more information about the specifics of deploying Device Guard, start with the deployment guide.
Credential Guard
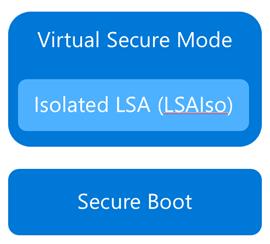 Although separate from Device Guard, the Credential Guard feature also leverages Virtual Secure Mode by placing an isolated version of the Local Security Authority (LSA – or LSASS) under it’s protection.
The LSA performs a number of security sensitive operations, the main one being the storage and management of user and system credentials (hence the name – Credential Guard)
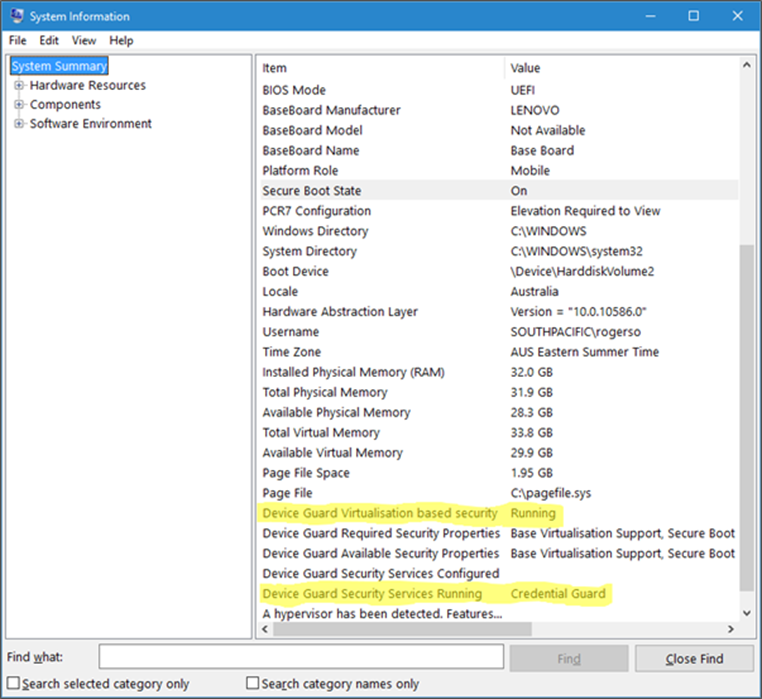
Credential guard is enabled by configuring VSM (steps above) and configuring the Virtualization Based Security Group Policy setting with Credential Guard configured to be enabled.
Once this is done, you can easily check if Credential Guard (or many of the other features from this article) is enabled by launching MSINFO32.EXE and viewing the following information:
You can also check for the presence of the LSAIso process, which is running in VSM:

I hope this article has been useful for you and answered at least some of your questions about Device Guard and Credential Guard.
If your thirst for knowledge is not yet quenched and you need more information while you wait for the follow up posts, check out the following Channel9 videos that cover this topic:
https://channel9.msdn.com/Blogs/Seth-Juarez/Isolated-User-Mode-in-Windows-10-with-Dave-Probert
https://channel9.msdn.com/Blogs/Seth-Juarez/Isolated-User-Mode-Processes-and-Features-in-Windows-10-with-Logan-Gabriel
https://channel9.msdn.com/Blogs/Seth-Juarez/Isolated-User-Mode-in-Windows-10-with-Dave-Probert
Stay tuned for further posts about this and other Windows 10 features. Hey, why not subscribe?
Author: Ash

by Contributed | Jan 28, 2021 | Technology
This article is contributed. See the original author and article here.

Over the course of 8 weeks, developers gathered virtually to participate in the Microsoft Azure Hack for Social Justice event. The hackathon challenge statement was straightforward: design and build an application prototype that uses Azure to address a social justice issue. Participants were given access to Microsoft technical mentors, dedicated Azure environment, and self-paced learning resources. Although technology alone cannot solve complex societal issues, our hope is that participants will develop solutions that can help empower communities and drive change.
Over 500 participants registered for the hack, 300+ were from the U.S., and 6 winning projects were selected. Check out these creations:
1st Place : Equitable Restroom Access for Gender Non-Conforming
Created by: Mahesh Babu (@smaheshbabu)
Provides safe restroom access for transgender, gender non-conforming, disabled individuals, and parents traveling with kids to find restrooms per their needs.
Azure Services Used: Azure Functions, Azure SendGrid
2nd Place: GetPro
Created by: Amina Fong (@fongamina), William Broniec (@1345613864), Zechen Lu (@tommylu123)
Web app that centralizes information and professional resources for underrepresented populations to help even the playing field in educational and career opportunities.
Azure Services Used: Azure App Services, Azure SQL Database
3rd Place: Legal Helper Bot
Created by: Murtada Ahmed
Not knowing the law and ones rights can expose already vulnerable groups to more discrimination and abuse. Legal Helper Bot was created to change that.
Azure Services Used: Azure Bot Services, Azure Storage
Honorable Mentions
Racial Bias and Score Prediction of COMPAS Score
Created by: Yuki Ao (@aoyingxue)
Inform people of the racial bias in the U.S. Justice system and give the offenders a chance to know their score level beforehand.
TutorFirst
Created by: Farhan Mashud (@fm1539), Isfar Oshir (@iao233), Mohammed Uddin (@msu227)
App for low income students to receive free, high quality tutoring from tutor volunteers.
Feminist Action Board
Created by: Aroma Rodrigues (@AromaRodrigues)
Subscribes to a news API to provide real time news on gender violence and tracks organizations, petitions, and initiatives
On behalf of the Microsoft U.S. Azure team, I’d like to sincerely thank all of the participants, and congratulate the winners on a job well done. Also, thank you to the mentors and judges who volunteered their time to give back to the community.
Next up: check out these new hackathons that are open for registration
by Contributed | Jan 28, 2021 | Technology
This article is contributed. See the original author and article here.
We are excited to announce that the Update Baseline is now a part of the Security Compliance Toolkit! If you’re not yet familiar with this great tool, the Update Baseline offers Microsoft’s set of recommended policy configurations for Windows Updates to help you:
- Ensure that the devices on your network receive the latest monthly security updates in a timely manner.
- Provide a great end user experience throughout the update process.
The Update Baseline includes Windows Update policies as well as power and Delivery Optimization policies—all designed to streamline the update process, improve patch compliance, and help ensure your devices stay secure. In fact, devices that are configured using the Update Baseline reach, on average, a compliance rate between 80-90% within 28 days.
What is included in the Update Baseline?
For Windows Update policies, the Update Baseline offers recommendations around:
- Deadlines, the most powerful tool in the IT administrator’s arsenal for ensuring devices get updated on time.
- Downloading and installing updates in the background without disturbing end users. This also removes bottlenecks from the update process.
- A great end user experience. Users don’t have to approve updates, but they get notified when an update requires a restart.
- Accommodating low activity devices (which tend to be some of the hardest to update) to ensure the best-possible user experience while respecting compliance goals.
How do I apply the Update Baseline?
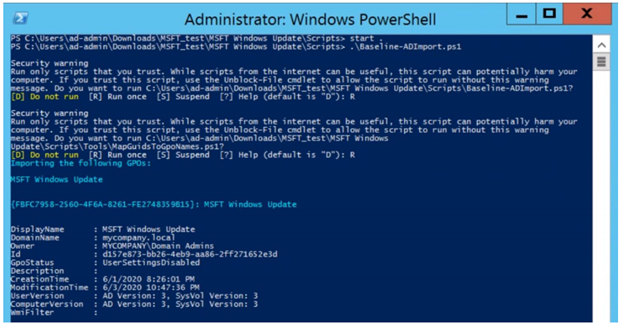
If you manage your devices via Group Policy, you can apply the Update Baseline using the familiar Security Compliance Toolkit framework. With a single PowerShell command, the Update Baseline Group Policy Object (GPO) can be loaded into Group Policy Management Center (GPMC) as shown below:
 You can add the MSFT Windows Update GPO that adds the Update Baseline to GPMC with a single command.
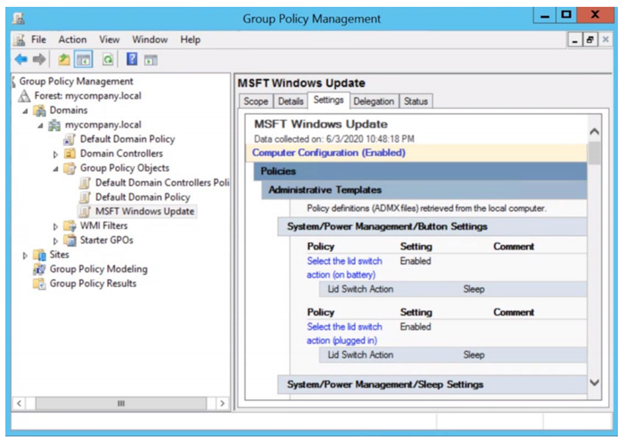 You can then view the Update Baseline GPO (MSFT Windows Update) in the GPMC.
That’s it! Simple and easy.
Download the updated Security Compliance Toolkit today to start applying security configuration baselines for Windows and other Microsoft products.
I also encourage you to learn more about common policy configuration mistakes for managing Windows updates and what you can do to avoid them to improve update adoption and provide a great user experience.
Other cool tidbits? The Update Baseline will continue to be updated and improved as needed, and an Intune solution to apply the Update Baseline is coming soon! Let us know your thoughts and leave a comment below.


Recent Comments