by Contributed | Jan 12, 2021 | Technology
This article is contributed. See the original author and article here.
We have been delighted to hear that educators around the globe are using Microsoft Forms to create surveys and quizzes for their students’ learning. Whether it is your first time adding branching to create personalized formative assessments or you have been adding quizzes as Teams assignments for a long time, we want to share some best practices on how to use the auto-grading feature in your Forms quizzes.
What is auto-grading?
We designed the auto-grading feature both to save educators’ time and to provide students with immediate feedback. Auto-grading kicks in for any multiple-choice, text, or ranking question if you have marked or entered the correct answer to a question.
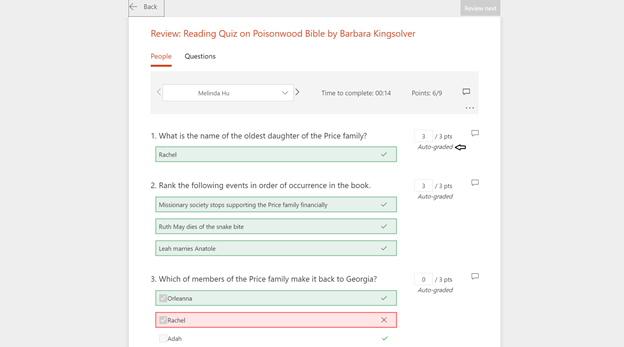
Teacher’s View After Student Submits Quiz
By default, your quiz settings will “Show results automatically,” which means that after students submit the quiz, they can click a button to view their results. On this “View Results” page, they can see which questions they answered correctly or incorrectly, given you marked the correct answer when creating the quiz.
 Student View of “View Results” Page
Tip #1: Provide automatic feedback on answer choices
You can automatically give students specific feedback based on the answers they picked in response to multiple choice questions. You can do so by hovering to the right side of a multiple-choice answer, clicking the speech bubble icon, and typing your comment.

If you use the “Show results automatically” setting, your students can view the comment for the answers they chose on the “View Results” page after they submit the quiz. If you decide not to use “Show results automatically,” students will see the comments only after you “Post Scores” for the quiz. They can do so by visiting the original link of the quiz. This “auto-feedback” feature is a great way for you to offer positive comments on a correct answer or constructive explanations on why an answer was incorrect.
Tip #2: Inform your students that their initial score under “View Results” might not be final
Because auto-grading currently only supports multiple-choice, text, and ranking questions, other types of questions you include in your quiz will require manual grading later. Thus, if you use “Show results automatically,” students will seemingly get zero points for non-auto-graded questions, as those questions have not been graded yet.
Therefore, the overall score they see at the top of their results page will be artificially low. Only after you finish manually grading and post scores will the score on the results page be final.
An important tip is to inform your students that the score they immediately see on the “View Results” page are not final until you have officially posted scores. Then, students can visit the quiz at the original link to find their final scores.
Tip #3: Take an extra step to ensure auto-grading works for your text and ranking questions
If you plan to use auto-grading for questions that require a text response, a best practice is to add all possible correct answers. The auto-grading is not case sensitive, but it looks for an exact match in terms of spelling and punctuation. Thus, you might want to add all acceptable answers, including ones with misspellings, to save time manually grading later.

If you plan to use auto-grading for ranking questions, a best practice is either to mark the question as “required” or to make a note in the description of the question for your students to click on the ranking choices. The auto-grading kicks in only if the student engages with the question; otherwise, it assumes that the student left the question unanswered. Even if the ranking order looks correct at first sight, to ensure they have answered the question, your students still need to click on the answer choices, so that the order numbers appear.

Tip #4: Use “Show Results Automatically” only if you want to provide instant feedback to your students
 Show Results Automatically Option in Quiz Settings
“Show Results Automatically” is a powerful feature, as students can see both automatically graded questions and automatic feedback to their answer choices, which we will discuss in the next tip. With this feature, you could be more efficient in your teaching, but you will want to keep the following in mind:
- “Show Results Automatically” might be more appropriate for lower stakes or normal check-in quizzes, rather than for higher stakes exams.
- If your quiz includes several questions that will require manual grading, either due to the question type or the need to offer partial credit, or if you plan to offer manual feedback on students’ answers, you might want to avoid using “Show Results Automatically.”
- If you want to have higher control with ensuring integrity during quiz-taking, we suggest that you not use this setting.
Nonetheless, even if you do not use “Show Results Automatically”, you are still able to use the auto-grading feature of Forms to assist you in quicker grading.
Tip #5: Consider turning off “Show Results Automatically” and using “Shuffle Options” or “Shuffle Questions” to promote academic integrity
However, regardless of whether “Show Results Automatically” is turned on or off, students will not be able to find answers anywhere in the source code before submitting the quiz. If you still plan to use “Show Results Automatically,” your students can see the answers after they submit the quiz. Given that the “View Results” page reveals the auto-graded correct answers, it will be challenging to prevent students from taking a screenshot or copy-pasting this information somewhere else.
For further assurance, a good tip is to turn on the “Shuffle questions” feature in your Forms quiz settings. For multiple-choice questions, you can also turn on “Shuffle Options.”
 Shuffle Questions Option in Quiz Settings

Shuffle Options for Multiple Choice Question
We hope these five tips are helpful to you as you begin teaching again in 2021. You can find resources on Forms for educators specifically here and watch our session for the ISTE 2020 Conference, “Remote Teaching Simplified with Microsoft Forms”, here.
For more questions you might have, please visit our support page. If you have additional feedback on Forms’ surveys, quizzes, or polls, please visit our Forms UserVoice site.
Mike Tholfsen
Microsoft Education Product Manager
@mtholfsen
by Contributed | Jan 12, 2021 | Technology
This article is contributed. See the original author and article here.
To help prevent man-in-the-middle attacks, the January 2021 cumulative update for Windows 10 further improves security for devices that scan Windows Server Update Services (WSUS) for updates. These improvements build on the security changes for Windows devices scanning WSUS we introduced on September 8, 2020 and can be combined with certificate pinning for greater security. I’ll now explain these changes in more detail.
Scanning behavior changes
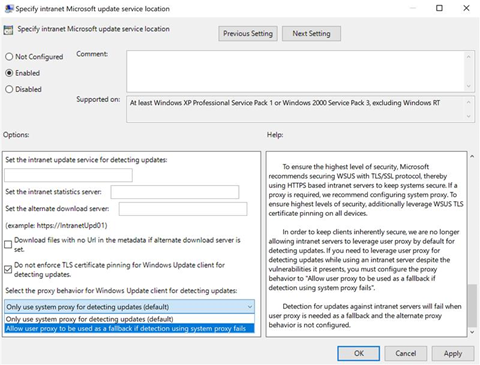
For devices scanning HTTPS-configured WSUS servers
For those using proxies, we have switched to using system proxy first, rather than user proxy. This ensures that we are first trying the most secure proxy path if a proxy is needed. We will no longer fall back to user proxy for scanning WSUS servers if the policy to allow user proxy as a fall back is not enabled. This ensures that admins must consciously enable a less secure method for scanning as doing so will put them at higher risk of attack.
If you need to allow devices to scan utilizing user proxy as a fallback method, you can do so by configuring one of the following policies:
- Group Policy – GPEDIT > Computer Configuration > Administrative Templates > Windows Components > Windows Update > Specify intranet Microsoft update service location > Select the proxy behavior for Windows Update client for detecting updates > “Allow user proxy to be used as fallback if detection using system proxy fails”.
- Configuration Service Provider (CSP) policy – Update/SetProxyBehaviorForUpdateDetection to 1 Allow user proxy to be used as a fallback if detection using system proxy fails.
- Configuration Manager Setting – You can also configure the new Allow User Proxy for software update scans setting to Yes to allow user proxy in Microsoft Endpoint Configuration Manager, version 2010 and later.
To further increase security, we have added the capability for customers to pin certificates (cert-pinning) and not allow scans, even with system proxy, if cert-pinning fails. This provides the highest level of security for devices but will require more overhead for the admin in order to ensure that certificate stores are properly configured.
Note: This capability is only available to those who have secured their WSUS servers with TLS protocol/HTTPS.
|
To enable cert-pinning, simply add the correct certificates to the new WSUS certificate store. Devices will then automatically begin enforcing cert-pinning when scanning your WSUS server. If no certificates are in your WSUS certificate store, cert-pinning will not be enforced. Further, if you do not wish devices to have this extra layer of security upon scan, you can ensure that cert-pinning is not enforced by configuring one of the following policies:
- Group Policy – GPEDIT > Computer Configuration > Administrative Templates > Windows Components > Windows Update > Specify intranet Microsoft update service location > “Do not enforce TLS certificate pinning for Windows Update client for detecting updates”
- Configuration Service Provider (CSP) policy: Update/DoNotEnforceEnterpriseTLSCertPinningForUpdateDetection to 1 – Do not enforce certificate pinning.
For devices scanning HTTP-configured WSUS servers
For those devices scanning HTTP-configured WSUS servers, there have been no additional changes since those we introduced with the September 2020 cumulative update.
For online scans
The order of proxy selection for online scans, if a proxy is needed, has changed:
Old behavior:
- Scan with user proxy.
- If user proxy fails, attempt scan with system proxy.
New behavior as of the January 2021 cumulative update:
- Scan with system proxy.
- If system proxy fails, attempt scan with user proxy.
This change ensures that we first try the most secure proxy path if a proxy is needed.
Note: For user-driven, interactive scenarios, we always use the user proxy, if one is available, regardless of policy configuration.
|
Next steps
To prevent scan failures and ensure the highest level of security, please follow these recommendations:
- Don’t enable user proxy.
- If you require user proxy, enable user proxy via “Select the proxy behavior for Windows Update client for detecting updates” to ensure that devices do not encounter scan issues.
Note: While this will allow you to fallback to use user proxy for scans against your WSUS server, you should be leveraging this process only as a stop gap to continue getting updates while transitioning to system proxy or no proxy.
|
- Secure your WSUS server with TLS protocol/HTTP. This is pivotal to maintain the chain of trust and prevent attacks on your client computers, see Recommendations for greater security in the previous Changes to improve security for Windows devices scanning WSUS blog.
- When scanning against a TLS/HTTPS-configured WSUS server, leverage cert-pinning to get the highest level of security and keep your devices protected. (Reminder that this requires populating the device’s certificate store.)
by Contributed | Jan 12, 2021 | Technology
This article is contributed. See the original author and article here.
Announcing FastTrack remote guidance for Microsoft Cloud App Security and Microsoft 365 Defender solutions for endpoints, identities, cloud apps, email, and docs
Microsoft FastTrack is committed to helping you realize the value of your Microsoft 365 security solutions by providing remote deployment guidance. FastTrack for Microsoft 365 provides remote deployment guidance at no additional cost for customers with 150 or more licenses of eligible plans.
In addition to the baseline security assistance we already offer, FastTrack has expanded the benefit in threat protection to now include Microsoft Defender for Identity and Microsoft Cloud App Security, and guidance to leverage Microsoft 365 Defender. FastTrack will provide remote deployment guidance to help eligible customers configure and deploy these Microsoft security products:
- Microsoft Cloud App Security discovers and controls Shadow IT, helps ensure secure access to your apps and resources, protects your sensitive information, and detects threats in the cloud for you to take action on, surfacing valuable insights and recommendations to help improve your cloud security posture.
- Microsoft Defender for Endpoint (formerly Microsoft Defender Advanced Threat Protection) delivers preventative protection, post-breach detection, automated investigation, and response for your endpoints.
- Microsoft Defender for Office 365 (formerly Office 365 Advanced Threat Protection) helps protect all of Office 365 against advanced threats like business email compromise and credential phishing, and automatically investigates and remediates attacks.
- Microsoft Defender for Identity (formerly Azure Advanced Threat Protection) helps secure on-premises identities across your organization by leveraging Active Directory signals to identify, detect, and investigate advanced threats, compromised identities, and malicious insider actions directed at your organization.
In addition, Microsoft FastTrack will show you how to leverage the capabilities of Microsoft 365 Defender (formerly Microsoft Threat Protection), which protects against attacks with automated cross-domain security. You can use your security data to prevent and detect threats, heal affected assets, and proactively hunt across your Microsoft 365 data.
FastTrack for Microsoft 365 provides remote guidance for customers with 150 or more licenses, at no additional cost with your eligible Microsoft 365 subscription. This is an ongoing benefit throughout the duration of your eligible subscription, delivered by Microsoft and approved FastTrack Ready Partners.
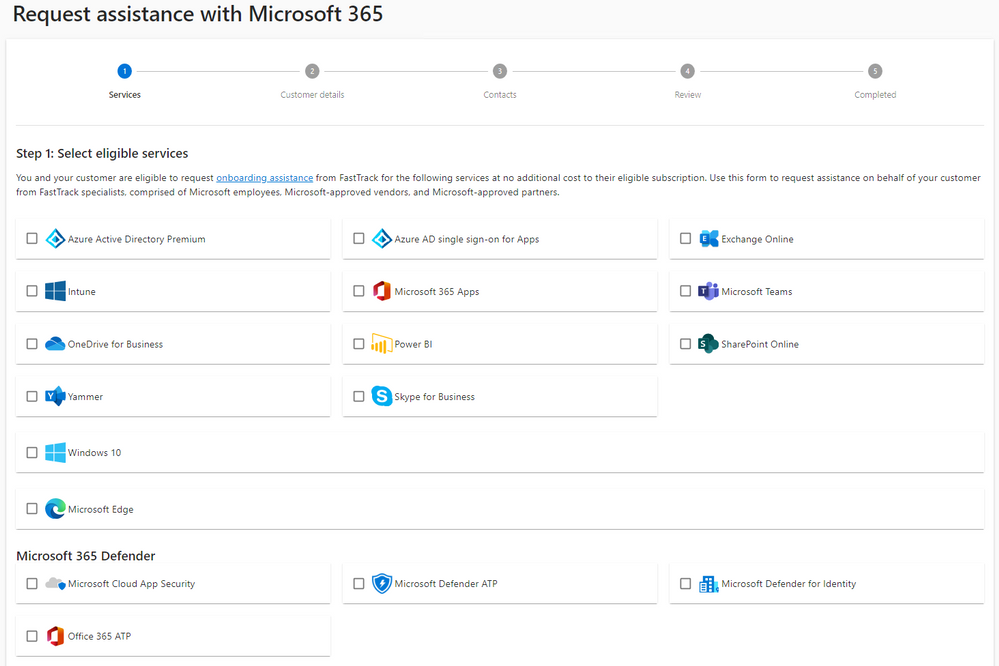
If you want to learn more, review eligibility and the service description here. If you’re ready to get started, request assistance at microsoft.com/FastTrack (sign in required). When you request assistance from FastTrack, you’ll select which product you want guidance on, and Microsoft 365 Defender assistance will also be included with that product. Here is a screen shot of the Request for Assistance page on the FastTrack site:
Interested in deploying Azure services to improve your security posture? FastTrack for Azure is a technical enablement program that works directly with customers and partners to help you build Azure solutions quickly and confidently. FastTrack for Azure brings together best practices and tools from engineering and real customer experiences, including business continuity and disaster recovery, security and management, and many more to guide customers from design, configuration, and development to production of Azure solutions. Learn more and check your eligibility at azure.microsoft.com/programs/azure-fasttrack/.
We’d love to hear from you on our Tech Community channel. Give us feedback in comments or tell us what we should write about in the future.
by Contributed | Jan 12, 2021 | Technology
This article is contributed. See the original author and article here.
When communicating with teammates over chat, nothing can slow you down like having to pause your conversation and open up a new window to find the answer to a question or the right piece of information to share. The context-switching involved in jumping between applications to access the information you need to do your job can cost you and your teammates productive time. Complementing real-time communication with a collaborative knowledge base is key to keeping teams aligned and productive even when distributed.
Guru’s app for Microsoft Teams can make both real-time and asynchronous collaboration easier by bringing your team’s collective knowledge right to Microsoft Teams. With the updated integration for Teams, you can now access and share verified knowledge from Guru in the same place that you chat and collaborate with your teammates – within your Teams workflow.
The Guru app for Teams makes the transition from office to remote (and back again) seamless, and employees won’t feel like they’re missing information by not being in the office. Complement your real-time collaboration in Teams with expert-verified information so that regardless of where – or when – your teammates work, they are connected and aligned.
Share Guru cards within conversations
Here are some of the ways customers can connect Teams with Guru:
Streamline your internal communications
Sometimes, amidst conversations and collaboration, critical information can get lost or overlooked. By integrating Guru into Teams, you can capture updates and announcements that are shared in a Teams channel to create visibility and accountability for the entire team and make it easier for them to revisit and act upon them later.
With notifications integration, a Guru bot will deliver select notifications and allow you to take action on them directly within the Teams workflow:
- Card Comments: Receive and reply to mentions on any comments made on Guru Cards
- Knowledge Alerts: Receive and read Knowledge Alerts on important knowledge that has been pushed to you and requires attention (including an in-app “I Read It” action)
 Notifications and updates from Guru within Microsoft Teams
With Guru and Teams, you can improve your internal communications with notifications on real-time releases, company updates, and more by bringing information directly to employees where they’re already working, and giving them a way to let you know that they’ve seen it.
Enable every team with the product information they need
Because product information can change rapidly, employees need access to up-to-date information as the product changes. Guru’s app for Teams makes product information accessible and shareable in the same place that employees would go to ask questions about it: in Teams chat and channels. You can save time for your frontline employees and your product experts by integrating your product delivery process into your communication workflow. When those frontline employees are empowered to find product information and answers themselves, they’ll spend less time pinging your internal subject matter experts (SMEs) with repeat questions, resulting in more focused time for everyone involved.
Ramp up new hires faster
Effectively onboarding new employees is critical to their long-term success and that of your company. Teams is a great way for new employees to meet their teammates and ask questions as they get acquainted with the culture, team, and product. Guru gives these new employees a single place to find all the company knowledge they need to thrive, while you lower your costs of administrative support.
Help new hires feel autonomous by allowing them to turn to Guru with all of their onboarding questions instead of having to interrupt another employee. With Guru and Teams, you can keep your new teammates productive in Teams, help existing employees stay focused on their own work, and reduce your new hire onboarding costs.
Improve collaboration with Guru and Teams
With Guru’s Teams integration, your teams have access to more of the information they need to stay productive within the Teams console. By bringing knowledge directly to the place where people already work, you can help make sure that important updates don’t go unnoticed and that teams spend less time searching for information and more time delivering value. Help keep your company connected, engaged, and aligned, both in real-time and asynchronously, with Guru in Teams.
To get started with Guru’s Teams integration, log in to your Teams account and add Guru.
To learn more about the benefits of collaborative knowledge management, visit Guru’s site.
by Contributed | Jan 12, 2021 | Technology
This article is contributed. See the original author and article here.
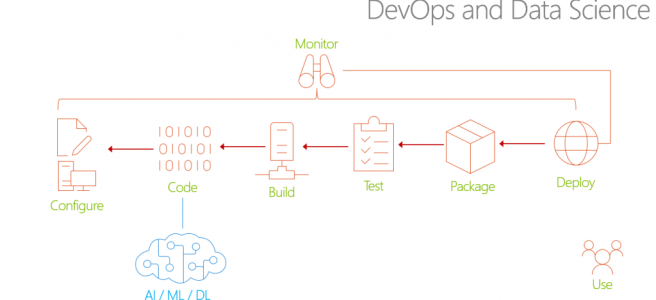
In this series on DevOps for Data Science, I explained what DevOps is, and given you lots of resources to go learn more about it. Now we can get to the details of implementing DevOps in your Data Science Projects .
Consider that the standard Software Development Lifecycle (SDLC) with Data Science algorithms or API’s added in looks something like this:
In traditional DevOps, each phase of the SDLC is aware of the “downstream” phases – that’s the People (discussions and meetings), Process (procedures and frameworks), and Products (Tools and software) part of DevOps. Also note that Monitoring is not just monitoring the performance of the end-released applications, it’s also now monitoring the SDLC itself. All of this awareness is the “Shift-Left” mentality, essential to DevOps for Data Science.
But let’s dig into that a bit. The “Configure” phase is easy enough to think about for the Data Science team. They want to be involved in the design of the solution anyway, so that they ensure the right questions are being asked, the right data is available (or can be obtained), and all the rest of the project parameters. And of course the Data Science team is part of the “Code” phase, so that’s just built-in.
But “build”? What does that even mean to the Data Scientist? Testing? How does one build a unit test, functional test, security test, and other tests, into a Data Science algorithm? And how do you use Continuous Integration (CI) and Continuous Delivery (CD) into a Data Science deployment? Packaging, Deployment – these are all things that a Data Scientist doesn’t normally have to consider in their day-to-day work.
Not to worry – we’ll get to all these phases. In fact, many shops still struggle with DevOps, even where there are no Data Science aspects. What I have found that helps the most is not to try and do everything at once. Develop a “Maturity Model” that you can aspire to, and take it one step at a time. Let that settle into your regular SDLC, and then move on.
For Data Science, I find this progression works best – taking these one step at a time, and building on the previous step – the entire series is listed here that I’ll develop in this series – updated links to follow as I write them:
- Infrastructure as Code (IaC)
- Continuous Integration (CI) and Automated Testing
- Continuous Delivery (CD)
- Release Management (RM)
- Application Performance Monitoring
- Load Testing and Auto-Scale
In the articles in this series that follows, I’ll help you implement each of these in turn.
(If you’d like to implement DevOps, Microsoft has a site to assist. You can even get a free offering for Open-Source and other projects: https://azure.microsoft.com/en-us/pricing/details/devops/azure-devops-services/ )

Recent Comments