![[Customer Story] Sharepoint Online Team leverages DevTest Labs to create Testing Environments](https://www.drware.com/wp-content/uploads/2021/01/large-518)
by Contributed | Jan 11, 2021 | Technology
This article is contributed. See the original author and article here.
There are several teams within Microsoft which use Azure DevTest Labs (DTL). SharePoint Online (SPO) team at Microsoft has created a solution, built on DTL, to solve the problem of making SPO testing environments readily available to SharePoint engineers – securely, at scale and with high availability – leveraging the strengths of DevTest Labs and Azure.
This blog post is the first in a series of posts that highlights key parts of this solution. The series enables anyone to build, configure and run a similar system on DTL. Each post will cover one core aspect of the SharePoint Online solution, with a brief description of the scenarios involved, and the strategies applied to solve them. Each comes equipped with architecture diagrams, walk-throughs and code samples, presented in a generic and reusable way. It is hoped that customers in the Azure community, desiring to solve similar problems for their users, can benefit from the content herein to create their own DTL solutions.
About SharePoint Online
For background, SharePoint Online is Microsoft’s document storage service for Microsoft365. It is a massive enterprise business. In addition to providing enterprise-class document management, it has team collaboration, portal sites and content management. It forms the document storage backbone for Exchange Online, Teams and Office applications such as Word and Excel. As one example, when you save a document in Teams, it is stored in SPO under the hood. Fortune 500 companies, schools, governments and non-profits critically depend on SharePoint Online for their business, storing over 480 terabytes of their data in it.
If you would like to learn more about SharePoint Online and its potential application to your business, start here. There are Microsoft365 subscriptions tailored for home, business, and institutional use.
SharePoint Online Scenario
With over 1000 engineers working on an ever-evolving 140 MLOC codebase in SharePoint Online, integration testing is a critical part of the engineering workflow. At its core, SharePoint is a three-tier web application, featuring a web tier, a business logic tier and a data layer, each working in conjunction as a single service in data centers across the globe. Engineers working on it require safe, isolated simulation environments that function like scaled-down three-tier data center deployments so that they can deeply test their code before it goes worldwide.
The SharePoint Online team has shrunk the core SPO components and services so that they all fit on a single, interactive virtual machine (VM) that simulates the full data center, but is stripped down to its essence. It is therefore much easier to deploy. These single-VM environments are well-suited to testing most SPO scenarios – of course core document storage and team collaboration, but notably scenarios involving interaction with Office or Teams. Using these VMs, code changes can be deployed, poked and prodded, and debugged as it interacts with these components and services – all well before the code is ultimately deployed for enterprise customers in production data centers.
Use of DevTest Labs
DevTest Labs provides “labs” of machines, intended to host pre-configured testing environments at scale. The SPO team has built a solution in DevTest Labs to host these single-VM SPO environments, giving engineers a private, isolated, safe, simulated data center in which to test their code.
Breaking it down step-by-step, the scenario for SharePoint Online engineers is as follows:
- An engineer wishes to test their code. They fetch a virtual machine (VM) from the DevTest Lab.
- The VM hosts a pre-configured single-VM SPO environment with a stable build.
- They log in, interact with the environment, and patch a new code change into place to do testing.
- When they are finished, they throw away their VM – they can always fetch a fresh one for their next iteration.
The complexity of building these single-VM SPO environments, with all services and components wired up correctly, is hidden from the lab user. The work is done before the VM is assigned to the engineer, saving them the time and effort. Environments are ready to use as they are. Engineers have the option to simply use them as-is, or optionally patch their private changes and onto the VM to see how it behaves. These single-VM environments are the heart of their inner loop debugging and integration testing.
Today, about 500 engineers use the SPO integration lab on a monthly basis, with plans to grow this to 750 or more. Typically about 2,500 VMs are allocated at any one point in time, running in three different Azure regions around the world. Azure allows the solution to easily scale to meet growing demand.
Why DevTest Labs?
Certainly a solution of this nature can be created without DevTest Labs, using Azure VMs directly. However, DevTest Labs provides out-of-box features that save time and money in implementation and maintenance. These include:
- Standard service grouping and administration
- Flexible and extensible networking and user connectivity
- Ability for lab users to claim pre-created VMs without going through the full creation process
- Policies and thresholds to manage costs by shutting unused machines down
- DTL Artifacts to reduce the time required to set up and configure virtual machines once created
The full feature set of Azure is also available to extend DevTest Labs where needed, but leveraging the native capabilities of DevTest Labs reduces the cost to build, maintain and extend the solution. It also sets the solution up for future improvements planned by the Azure team at Microsoft. In short, DevTest Labs is a quite natural fit for this use case, rather than reinventing the wheel.
If you haven’t tried DevTest Labs yet, click here to create your first lab. DevTest Labs is a free service!
Solution Architecture
The solution builds on DevTest Labs as its basis. It is an event-driven architecture, using Azure EventGrid and an Azure Function app. It uses Shared Image Gallery to host VM images and employs a Point-to-Site VPN for secure access to the network hosting the VMs. It has an easy-to-use interface for checkin/checkout that is hosted outside the Azure portal. It extends DevTest Labs policy and allows users to manage when machines are shut down, and even postpone shutting machines down, above the times assigned by Azure DevTest Labs policy.
Below is a diagram covering the architecture. Starting from the left, we have an Image Service which is responsible for creating Azure Compute images with SPO pre-configured. Image Service pulls the latest build available, triggers the deployment, waits for success, and publishes the result to Azure Shared Image Gallery for general consumption by DevTest Labs. It then fires an event that, by way of Event Grid, triggers an Azure Function App.
The Function App contains the business logic for the SPO solution, which extends the core functionality DevTest Labs natively provides. The Function App responds to the event by triggering VM creation in DevTest Labs, in accordance with desired VM pool targets. A VPN Gateway is configured to provide point-to-site VPN connectivity for end users, who use Azure VPN Client to ensure the communication between the lab user and the VMs is authenticated and secure.
The solution created has potential application to a broad set of scenarios. The designs and architecture described should be beneficial to Azure customers wanting to build similar solutions on DevTest Labs, including what code to build and what components to configure for their applications.
Introducing This Blog Series
In several upcoming blog posts, we’ll cover the following topics:
- Overview: How the Sharepoint team leverages DevTest Labs (Current Blog Post)
- Enabling an Event-Driven Architecture with DevTest Labs
- Leveraging Point-to-Site VPN with DevTest Labs
- Maintaining a Pool of Claimable VMs
- Building a Simple User Interface for DevTest Labs
- Enabling Shutdown notifications via Teams
Each blog post borrows the concepts and architecture from the SPO solution, boiled down and made generally accessible for re-use by the Azure community. The content of this blog series forms a set of templates for others to build the same types of solutions for their applications as the SharePoint Online team did for their engineers.
What’s Next?
In forthcoming blog posts, the rest of the topics will be covered, starting with how to enable an event-driven architecture with DevTest Labs similar to the one described above. Please stay tuned!
If you run into any problems with the content, or have any questions, please feel free to drop a comment below this post and we will respond. Your feedback is always welcome!
– Pete Harwood, Principal Engineering Manager, OneDrive and SharePoint Engineering Fundamentals at Microsoft
by Contributed | Jan 11, 2021 | Technology
This article is contributed. See the original author and article here.
When your public folder content migration to Exchange Online is complete or you create public folders for the very first time, you do not have to worry about managing many aspects of public folders. As you previously read, Modern public folders starting with Exchange Server 2013 are stored within a new mailbox type in the mailbox database. Our on-premises customers have to create public folder mailboxes, monitor their usage, create new public folder mailboxes when necessary, and split content to different public folder mailboxes as their content grows over time. In Exchange Online we automatically perform the public folder mailbox management so you may focus your time managing the actual public folders and their content. This is what we refer to as ‘AutoSplit’. If we were to peek behind the Exchange Online curtain, we would see two automated processes always running to make this happen:
- Automatic public folder moves based on public folder mailbox quota usage
- Automatic public folder mailbox creation based on active hierarchy connection count
Let’s go through each one of them, shall we?
Automatic public folder moves based on public folder mailbox quota usage
This process actively monitors your public folder mailbox quota usage. The goal is to ensure you do not inadvertently overfill a public folder mailbox and stop it from being able to accept new content for any public folder within it.
How does it work?
We have a time-based assistant (known as PublicFolderSplitProcessor) actively monitoring the public folder mailbox quota usage. The assistant scans each public folder mailbox every hour to ensure we do not inadvertently overfill a public folder mailbox and stop it from being able to accept new content for any public folder within it.

Public folder mailbox’s quota for any new mailboxes has been set to the following (regardless of a mailbox plan or policy which may apply to user mailboxes):
- ProhibitSendQuota = 99GB
- ProhibitSendReceiveQuota = 100GB
For public folder mailboxes to undergo a split, the size should exceed the following percentage of the ProhibitSendQuota:
- Primary mailbox = 40%
- Secondary mailboxes = 80%
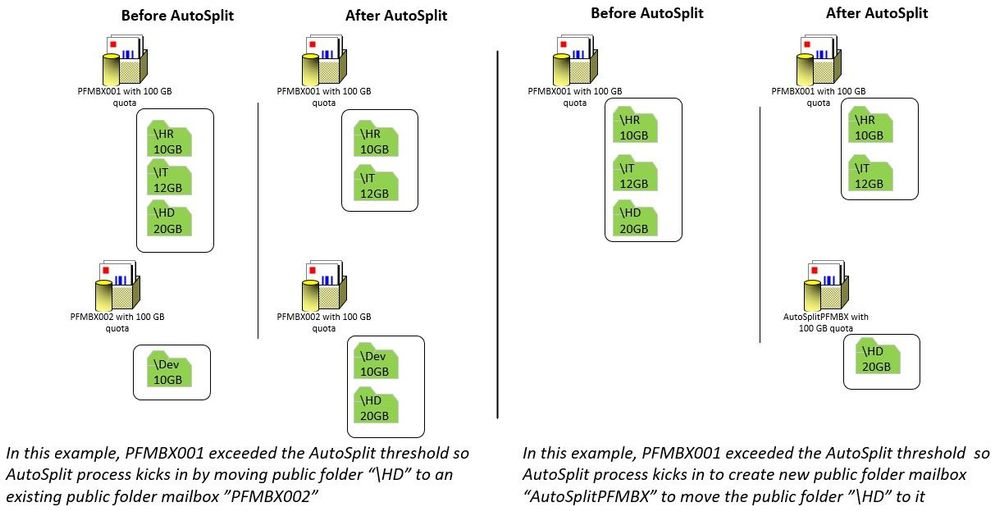
During the split, public folders from source PF mailbox (the one that is reaching its size limit) are moved to either a new target PF mailbox (which is created automatically by the system) or an existing PF mailbox that still has space to accommodate new content.


In the above example from tenant audit logs, the system created a new public folder mailbox “AutoSplit_GUID” and initiated a new public folder move request for public folder data to move to the newly created target AutoSplit mailbox.
When creating a new mailbox, Exchange online will always exclude it from serving hierarchy since a newly created public folder mailbox would not have the folder hierarchy synced yet.
If the total mailbox count is > 90% of the PublicFolderMailboxCountQuota (count > 900, with current Exchange Online limits), the system randomly chooses an existing mailbox (if any exist) with < 50% of the quota used where there is no moveRequest (by AutoSplit) to/from this mailbox. Else, we proceed to AutoSplit a mailbox with name: AutoSplit_<random guid (without “–“ in between)> until PublicFolderMailboxCountQuota ”1000” has been reached.
Naming of the new target mailbox
The system created new public folder mailbox has the following naming convention. The guid has some information regarding the source mailbox from which the split happened.

In this example, public folder mailbox “PFMBX” had crossed the split threshold; the Exchange guid of this source mailbox is 3a40f5da-0e0a-42f3-910f-1849580ff25d, the first part of the guid is always shared with the name of the target AutoSplit mailboxes.
If we had to find out the AutoSplit targets of a source mailbox, we can use following command in EXO PowerShell:
Get-Mailbox -PublicFolder “AutoSplit_3a40f5da*”
Example:

In a single move, a maximum of 20GB (in total size) or 2000 (+2000 dumpster) folders are moved (whichever is lower in size). There can be multiple moves to the same target mailbox if the target mailbox’s size is still lower than 30 GB, else the system would choose a new target mailbox. Public folders are chosen with consideration of their subtree structure, so there is no guarantee that 20GB or 2000 folders will be moved every time.
To help illustrate this, here is an example; let’s say we have 4 PFs in the public folder mailbox where AutoSplit process is taking place:
PF1 = 13 GB
PF2 = 1 GB
PF3 = 3 GB
PF4 = 4 GB
Here, PF1,PF2 & PF3 are going to be chosen as they are up to the limit of 20GB and were chosen while considering folder hierarchy.
In another scenario, let’s say we have 4 PFs in the public folder mailbox where AutoSplit process is taking place:
PF1 = 13 GB
PF1PF4 = 7 GB (PF4 is a subfolder of PF1 and the size of PF4 content is 7 GB)
PF2 = 1 GB
PF3 = 3 GB
Here, PF1 and PF1PF4 are going to be chosen as they are up to the limit of 20GB and were chosen with consideration of subtree structure.
Note that the AutoSplit process will drain the source mailbox entirely, moving the contents completely to other mailboxes.
For example: 80GB public folder mailbox might copy the contents inside to 4 or more new target AutoSplit mailboxes (providing we are not above 900 mailboxes total). The source mailbox will eventually become empty once the moved folders are deleted after the item retention. Then our empty mailbox removal processor may remove it, if it is not serving hierarchy and no new public folder was added to it.
Automatic public folder mailbox creation based on active hierarchy connection count
This is the second automated process to help maintain the most optimal user experience accessing public folders in Exchange Online. Exchange Online will actively monitor how many hierarchy connections are being spread across all of your public folder mailboxes. If this value goes over a pre-determined number (2000), we will automatically create a new public folder mailbox. Creating the additional public folder mailbox will reduce the number of hierarchy connections accessing each public folder mailbox by spreading user connections across a larger number of public folder mailboxes. If you have a small amount of public folder content in Exchange Online, yet you have an extremely large number of active users, then you may see the system create additional public folder mailboxes regardless of your public folder content size.

In the above example, public folder mailbox “PFMBX-005” was created by the service to overcome the measured high load of user connections to existing PF mailboxes serving hierarchy.
The public folder mailboxes created by the system for balancing hierarchy connections will be named “PublicFolderMailbox_(Date)”.

In this example, public folder mailbox “PublicFolderMailbox_2020_05_25” was created by the service on the date of 25th May 2020 to address the user connection load.
Daily auto-generated public folder mailboxes
If there is a user traffic spike, or if you have a tenant with recently migrated public folders, the system might create multiple hierarchy sync mailboxes. We do not create all mailboxes that might be needed in a single day; the system creates these mailboxes once per day, to avoid provisioning lots of auto-generated mailboxes together. The creation would stop once we have enough mailboxes to serve hierarchy to users.

In this example, multiple public folder mailboxes with naming convention “PublicFolderMailbox_Date” were created by the service to overcome the user spike on 25th May 2020 till 12th June 2020 to maintain the optimal user experience accessing public folders in Exchange Online.
Common issues with AutoSplit
The following are some of the scenarios under which the AutoSplit process may encounter issues and also tips on how to deal with these scenarios.
Giant folder and auto-split:
A single public folder occupying more than 40-80% space of the public folder mailbox could be called a “Giant folder”. The AutoSplit process is not helpful in giant public folder scenarios, since it can only distribute the folders into multiple mailboxes. If a single folder taking up all the space, the problem (the folder size) remains the same wherever that folder goes. Remember, a single folder cannot span multiple public folder mailboxes.
When there is only a single resident giant folder+dumpster residing in a mailbox, and total mailbox size has exceeded split threshold (size/quota>=80%), system checks to see if the ratio of the (resident giant folder size/total mailbox size) exceeds 99% and will split only if it is less. This is to ensure that large amounts of mailbox data which is under move retention does not cause the mailbox to hit quota, and cause a data loss for the giant folder.
Action for tenant administrators:
In such a scenario, tenant admin must advise affected public folder owners to either delete or move items from that giant folder to reduce the size of that public folder to an appropriate size. A general recommendation is that individual public folder size shouldn’t exceed 20GB.
MRS related issues causing AutoSplit failure
AutoSplit uses Mailbox Replication Service (MRS) framework to move the public folders from source PF mailbox (mailbox that is getting full) to target PF mailbox (new empty PF mailbox). If MRS issues are transient in nature, the AutoSplit will be delayed but will complete.
Tenant administrators can track the MRS related failures using Get-PublicFolderMailboxDiagnostics command under AutoSplitInfo section.
In the following example, MRF:0 reads Move Requested Failed 0 times (other example could be like MRF: 2 means Move Request Failed 2 times), and can be seen in get-publicfoldermailboxdiagnostics under AutoSplitInfo section:

When something fails in AutoSplit, we handle the exception and increment the bucket counter with the hope that AutoSplit auto recovers in the next attempt. When these bucket counts hit certain thresholds, the AutoSplit state becomes Halted. This is temporarily stopping AutoSplit attempts, as they failed too many times.

Action for tenant administrators:
In such cases, please raise a support request with Microsoft and include Get-PublicFolderMailboxDiagnostics output for the affected public folder mailbox.
Moveditemretention and AutoSplit
We have seen some support tickets where users might complain to Admins that they are not able to post new items to a public folder or send an email to it (folder was mail-enabled). We found the ProhibitSendQuota was reached and by checking publicfoldermailboxdiagnostics, also saw that ReducedStateProgressState “auto-split process status” was SplitCompleted and ReducedStateTargetMailboxWhenCreatedUTC “date of creation of target public folder mailbox where the data of source public folder mailbox was split to it” was recent.
Action for tenant administrators:
First, find out PF mailbox that is at full quota:
$PFmbx = Get-Mailbox -PublicFolder
$PFmbx | ft Name,Prohibit*Quota*

The public folder mailbox PFMBX1 where ProhibitQuota values were modified to smaller values
$PFmbxstats = $PFmbx | Get-MailboxStatistics
$PFmbxstats | fl DisplayName,TotalItemSize

PFMBX1 total item size has exceeded ProhibitSendQuota value
If TotalItemSize is less than a quota, there is no further action since AutoSplit completed successfully and data is moving. Otherwise, proceed to next step.
Then, Check if MovedItemRetention is keeping the mailbox full. Even though AutoSplit completed successfully, you might reduce DefaultPublicFolderMovedItemRetention to be 1 day and then invoke mailbox assistant to process the mailbox.
Run:
Set-OrganizationConfig -DefaultPublicFolderMovedItemRetention 1.00:00:00

Update-PublicFolderMailbox <AffectedPFMailbox>

After a few hours, check again:
$PFmbxstats = $PFmbx | Get-MailboxStatistics
$PFmbxstats | fl DisplayName,TotalItemSize

PFMBX1 total item size has been reduced
Finally, check if this TotalItemSize has now reduced. If the size is reduced, then the issue is fixed, and you may set the MovedItemRetention back to default value of 7.00:00:00. Otherwise, please raise a support request with us for further investigation.
Public folder content not accessible during AutoSplit
During the move, the source mailbox will continue to serve the content; however, as PublicFolderMoves are auto-complete in nature, the cut-over (copying the delta, updating content mailbox info on primary, source and target, directory updates in case of mail enabled public folders, etc.) may cause temporary service interruptions. The content access will be resumed as soon as the move completes.
In closing
We hope this has been a useful view into processes that we have that will help you manage your public folder content! In most cases, we hope that you never have to do anything with this. But if you see some public folder mailboxes that you do not recognize, this post hopefully explains why!
Special thanks to the public folder experts who reviewed and contributed to this post: Bhalchandra Atre, Dheeraj Ram, Deepak Sadan, Nino Bilic.
Hazem Embaby
by Contributed | Jan 11, 2021 | Technology
This article is contributed. See the original author and article here.
IoT Device management at scale is achieved in Azure IoT Central using the Jobs feature. Jobs provides device operators and developers the ability to group, streamline, orchestrate, and monitor updates to tens of thousands to millions of IoT devices and edge devices with an intuitive user experience & API.
Operators and developers can choose to submit jobs to:
- Update device twin writeable properties and receive reported properties as a response from the device.
- Update cloud properties.
- Run commands, both direct methods and offline (C2D) commands.
Jobs feature in Azure IoT Central addresses many business needs including:
- Group & Update: Device groups in IoT Central helps you group a fleet of devices which could have similar capabilities or characteristics and using device groups in Jobs helps you harness device management to a fleet of devices.
- Apply advanced delivery options: Delivery options helps stagger how and when a job is executed for large numbers of devices. This is achieved through batching and cancellation thresholds. Each batch will be completed before the next queued batch starts. The job will be automatically cancelled if the number of device errors hits the cancellation threshold set by the operator is met as devices error out.
- Automation & Scale: Automate routine tasks to enable thousands and millions of devices using the scheduling feature and/or APIs with the ability to run jobs in the future and in a repeated fashion.
- Heterogeneity & Compatibility: Device management across IoT devices and edge devices, platform types, operating systems, and protocol standards.
- Filter, Search & Export: Operators will have the ability to filter, search and export results based on job results and pinpoint devices with errors. Export results as a CSV file to be able to distribute the results.
- Ease of Use: A wizard experience guides new job creation with an intuitive user experience, copy jobs for reuse, stop and restart jobs, and rerun jobs on failed devices.
Common Scenarios
Here are some of the common scenarios’ operators can use the Jobs feature of IoT Central to do device management at scale.
1. Submit a Job for immediate execution.
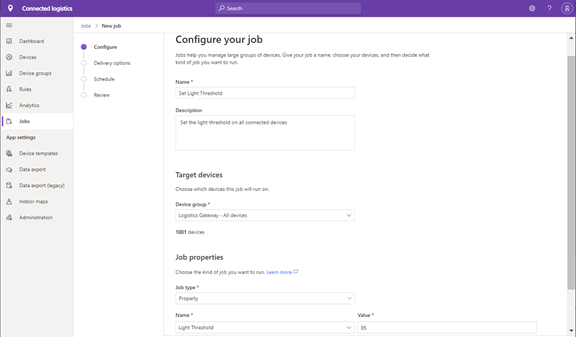
Operators and developers can choose to run a job for immediate execution. This is available through IoT Central app using the New Job wizard experience or using the Jobs APIs. Selecting delivery options is optional.

Operators will have the ability to monitor jobs using the jobs details.

Jobs submission can be automated with APIs. Using the Jobs Set API developers can submit jobs for immediate execution. Jobs – Set (Azure IoT Central) | Microsoft Docs

2. Submit a Job for immediate execution with Delivery Options.
Operators and developers can choose to run a job for immediate execution with delivery options. This is available through IoT Central app using the New Job wizard experience. Delivery options helps stagger how and when a job is executed for large numbers of devices. This is achieved through batching. Each batch will complete before the next queued batch starts. Job will be automatically cancelled if the cancellation threshold set by the operator is met as devices error out.
Batches & Cancellation Threshold Examples
If you have 1000 devices and enter 10%, there will be 10 batches and 100 devices qualify for each batch. Batches will be executed in sequence.
You can choose to cancel the job if a threshold is met on number of devices which have failed during job execution. For 1000 devices if you select a 20% threshold to be applied on the total devices, the job is cancelled when 200 devices fail during job execution.
If you choose to apply the threshold on a batch when 40 devices fail on a batch the job will be cancelled.
3. Schedule a Job for future execution and repeat execution
Operators and developers can choose to run a job to schedule a job for future execution and the ability to repeat the execution on a daily, weekly, or monthly basis. This is available through IoT Central app using the New Job wizard experience. Automate routine tasks to enable thousands and millions of devices using the scheduling feature with the ability to run jobs in the future and in a repeated fashion. Scheduled jobs can be setup to run: Once on a future date, Daily, Weekly or Monthly.


4. Stop & Resume a Job
Operators and developers can choose to stop a Job in progress and choose to resume the execution of a stopped job using IoT Central app and APIs.


5. Rerun a Job on failed devices.
Operators and developers can choose to rerun a Job on failed devices using IoT Central app and APIs. Job will pick up all devices which failed in the previous run and submit a new job for execution.

Summary
Device management at scale can be achieved in Azure IoT Central using the Jobs feature giving you the flexibility of advanced delivery options and ability to schedule jobs on a regular basis taking you through a wizard experience, rerun jobs on failed devices.
Additional Resources
Following are learning resources.
- IoT Central Docs (Jobs)
- Create your IoT Central App
- Mock Devices Tool
- IoT Central GitHub Page
by Contributed | Jan 11, 2021 | Technology
This article is contributed. See the original author and article here.
Happy 2021! The Yammer team has been busy over the past several weeks and we wanted to take a moment to share some updates on previously announced features and experiences that are in the process of rolling out.
Share to Yammer from SharePoint
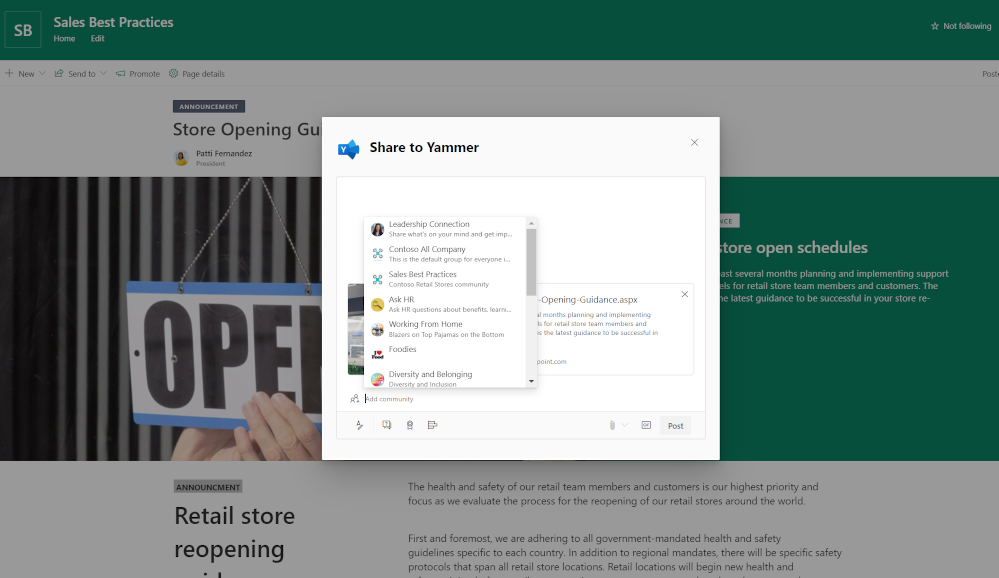
Soon, you’ll be able to send SharePoint pages directly to Yammer communities. This new capability makes it easy to start Yammer posts, questions, polls, and praises right from SharePoint pages. The new Send to dialog box includes the full fidelity Yammer publishing experiences with the ability to style questions, praise, and polls as well as add rich text and images.
New Yammer Embed
Bring the new Yammer styling and functionality to any webpage using the new Embed. If you are using the classic embed experience, no action is needed. Learn more.

New Yammer tab for Microsoft Teams
Get the modern styling and features of the new Yammer in your Yammer tab within Microsoft Teams. Rolling out now!

Immersive Virtual Event Styling
New Yammer virtual event improvements are here to optimize your viewing experience! These changes include:
- a side-by-side viewer so that you can engage in the conversation while keeping the video player front and center.
- the ability to collapse pinned conversations to focus on new conversations
- a new feed that showcases conversation threads

Hashtags and Topics
We shared the future of hashtags and topics in this blog. Now, the visual updates have been made to topics and clicking a hashtag now opens a page of community search results on that tag. Another change, that allows users to post a hashtag without automatically adding a topic is now underway and should be widely available by mid-January. Other changes noted in the blog are coming soon.
Continuing Improvements
We’ve also tightened up whitespace and padding, and brought additional administrative features and navigation to the mobile experiences. In the coming weeks and months, we’ll be rolling out additional insights for conversations and events, tightening the integration between Yammer, Microsoft Teams, and SharePoint, and shipping new features relating to knowledge, corporate communications and more– so keep an eye on our blog and Twitter!
-Mike Holste
Mike Holste is a Senior Product Marketing Manager for Yammer and Employee Experience at Microsoft


Recent Comments