by Contributed | Jan 11, 2021 | Technology
This article is contributed. See the original author and article here.
In Part 1 of this blog series, we learnt about why tags are useful and how to maximise their potential for administration of Microsoft Defender for Endpoint. In the next two parts of this blog series, we wanted to cover some advanced scenarios for applying tags, starting with…
Tagging your Microsoft Defender for Endpoint devices by OU path
Sometimes when working with Microsoft Defender for Endpoint you might want to display your Organizational Unit (OU) structure within Defender for Endpoint to build device groups to get better transparency for reporting.
To realize this scenario with Group Policies, we will create one script file in the process:
Create this script file and copy it to a location where you have access from a Domain Controller.
Contents of MSDETagging.ps1
$DN = (Get-ItemProperty -Path  "HKLM:SOFTWAREMicrosoftWindowsCurrentVersionGroup PolicyStateMachine" -Name Distinguished-Name)."Distinguished-Name"
$OU = $DN.Substring($DN.IndexOf('OU='))

$registryPath = "HKLM:SOFTWAREPoliciesMicrosoftWindows Advanced Threat ProtectionDeviceTagging"
$name = "Group"

IF(!(Test-Path $registryPath))
  {
    New-Item -Path $registryPath -Force | Out-Null
    Set-ItemProperty -Path $registryPath -Name $name -Value $OU
  }
 ELSE {
    Set-ItemProperty -Path $registryPath -Name $name -Value $OU
  }
Depending on how many OUs your environment contains, you might want to fine grain the $OU selection done by this script: configuring too many tags could impact the performance when working in the Microsoft Defender Security Center.
Getting our scripts to run: Execution Policy
The Execution Policy restricts the execution of PowerShell Scripts on the system. On newer systems the default setting is “Restricted”. Having this setting configured, the system does not run scripts at all, therefore this setting needs to be changed before we can run the tagging script.
Execution Policy is not a real security feature, although some documentation states so. It is rather a feature that keeps you from running scripts unintentionally.
To maintain protection from running scripts unintentionally, but to have the ability to run scripts nevertheless, the setting “RemoteSigned” is a good approach:
Only local scripts (scripts within the local domain and signed scripts) can be run, unsigned scripts from the internet will be blocked from running.
You can either configure this option manually using the following PowerShell command:
Set-ExecutionPolicy RemoteSigned
Or since configuring it manually can take quite some effort, you can also configure it via Group Policy.
Getting started with the Group Policy
Create a new Group Policy Object which is linked to the root folder in which all your Defender protected devices are located.
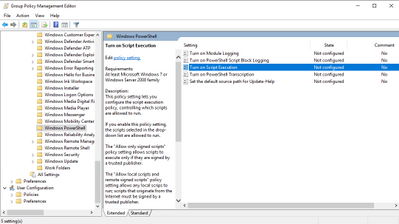
Then navigate to Computer Configuration > Administrative Templates > Windows Components > Windows PowerShell.
Configure the Setting “Turn on Script Execution” and choose the option “Allow local scripts and remote signed scripts”, which configures the Execution Policy to “RemoteSigned”.
This setting is the foundation that our PowerShell script will be executed on the systems on which you want to configure your custom tagging.

Configuring the script in your Group Policy
In the Group Policy Object, navigate to Computer Configuration > Policies > Windows Settings > Scripts (Startup/Shutdown) and open the properties of “Startup”.

Once the properties window opens, navigate to the tab PowerShell Scripts, and click on “Add”. The “Edit Script” window will open. Click on “Browse…” which opens a file browser window.


Per default, the location that is opened is already the right location within your Group Policy Object folder.
Now copy your DefenderTagging.ps1 script inside this folder and select the script and confirm with “Open”.


Confirm with OK and apply the changes to your Group Policy Object. Your tagging Group Policy is now configured.

Verify that your tagging was successful
The next time that your device applies the Group Policy, the settings will be configured, and you can also find your properly tagged machines in the Microsoft Defender Security Center.
Note:
If the Execution Policy needs to be configured first, you might find the new tag after the GPO was applied to your device for the second time. If you want to apply both settings at the same time, you can create two Group Policies and let the one that sets the Execution Policy run before the GP containing the startup script is executed.

Finding your devices in Defender for Endpoint can take up one day for the devices to sync.

Find your tagged device’s events via advanced hunting:
To find your tagged device, you can use an advanced hunting query such as the one below. Simply replace “DC=xyra,DC=local” with the distinguished name of your Active Directory domain.
DeviceInfo | where RegistryDeviceTag contains “DC=xyra,DC=local”

This concludes Part 2 of the blog series on how to use tagging effectively. Please join us for Part 3 where Steve Newby will guide you through scripting against the Defender for Endpoint API to apply tags based upon advanced hunting queries.
We welcome your feedback and questions on this or any of the other parts of this tagging blog and look forward to hearing from you.
Miriam Wiesner (@miriamxyra) and Steve Newby (@steve_newby)
Program Managers @ Microsoft Defender for Endpoint Product Group

by Contributed | Jan 11, 2021 | Dynamics 365, Microsoft 365, Technology
This article is contributed. See the original author and article here.
With NRF Chapter 1 starting this week, many retailers are looking to 2021 with one prominent thought: what’s next? Microsoft Dynamics 365 will again play a prominent role in Retail’s Big Show with new announcements and showcasing customer agility and innovation amidst a very disrupted market.
It’s clear that 2020 was a year where the retail industry went through rapid transformation; it’s less clear which of these changes are permanent and how retailers should prepare for 2021 and beyond. In a recent study by Forrester, commissioned by Microsoft, over 83 percent of executives agreed that connected and unified experiences were key to business success and digital commerce was a core ingredient. Of the 600 consumer-facing businesses surveyed, over 75 percent of companies said that improving digital commerce capabilities is their most urgent business priority.
Digital commerce is now the face of retail
The global pandemic has shifted how we buy, pushing more people to shop online than ever before. Fifty-nine percent of American consumers reported shopping online more often since the pandemic, according to CouponFollow, and data from the U.S. Department of Commerce shows that e-commerce sales grew as much from mid-June to mid-August as they did over the previous ten yearsa staggering increase. And in 2020, 71 percent of holiday shoppers planned to do most of their shopping online, up from 51 percent in 2019, according to CreditCards.com.
While we anticipate in-store sales will rebound as the pandemic subsideswe’ve already seen comfort with in-store shopping increase 65 percent since April, from 34 percent to 56 percent, according to Deloitteit’s also clear that digital commerce has seen tremendous growth during the pandemic, and this trend is expected to continue. Sixty-six percent of consumers stated they’d likely continue to purchase items online that they’d previously bought in-store prior to the pandemic, according to CouponFollow. And according to a recent report by Ipsos by 2023, e-commerce will represent 22 percent of global retail sales, amounting to $6.5 trillion USD. By 2021, it projects that 2.14 billion people worldwide will be buying goods and services online.
No matter the size of your business, digital commerce can no longer be an afterthought. Where brick-and-mortar locations were once the face of many companies, digital storefronts and online experiences now define many retail brands and will be key to unlocking growth and new opportunities.
Online shopper demographics have shifted
Younger shoppersMillennials and Gen-Zhave long been the primary users of online shopping, but the pandemic has caused major changes to who is shopping online. While Millennials and Gen-Z continue to shop online at high rates, we’ve seen 60 percent of Gen Xers and 47 percent of Boomers report increasing their online shopping from before the pandemic, according to CouponFollow. Also, according to eMarketer more than 30 percent of Boomers tried or were considering online grocery shopping, with some planning to continue doing so long-term, while 70 percent of both Gen Xers and Boomers plan on doing most of their holiday shopping online this year.
While shutdowns and safety concerns were the likely drivers of this adoption, they may not be the reason these groups are continuing to shop online. In a September poll by CreditCards.com, convenience was the top-cited reason older shoppers purchased online, with 76 percent of Boomers and 83 percent of Silent Generation shoppers agreeing. Other top-cited reasons include finding better deals (46 percent) and a bigger selection (44 percent). Interestingly, “avoiding human contact” was conversely correlated to age, with the youngest shoppers demonstrating the highest degree of caution, 59 percent of Gen-Zers, and only 48 percent and 47 percent of Boomers and Silent Generation shoppers, respectively.
The increase in online shopping among older users, in conjunction with their motivations for doing so, suggests that these changes may have been caused by the pandemic, but they are not being upheld by the pandemic. And therefore, we anticipate this shift will continue after the pandemic. Businesses need to consider these new users when developing digital retail strategies, including user experiences for customers who may be less tech-savvy than many younger users.
Customer experience means maximum flexibility
As we’ve discussed, the pandemic has driven more shoppers online. But it has done more than that; it has pushed retailers to offer maximum flexibility for their customers, both online, offline, and in bridging the gap between the two.
This started with changes to return policies, which became an important tool for retailers to help customers feel comfortable making the types of purchases that they were accustomed to making in-person, such as apparel, where fit is essential. In an April survey published by eMarketer, 40 percent of U.S. retailers had adjusted their return policies due to the coronavirus pandemic, while 27 percent were considering doing so.
To help ensure the safety of their employees and patrons, many brick-and-mortar stores made changes to their in-store environments. For many, plexiglass dividers have become commonplace at checkout. Contactless payments and mobile point of sale have also seen a surge of adoption during the pandemic. According to the State of Retail Payments study conducted by NRF and Forrester, 67 percent of retailers surveyed now accept some form of no-touch payment, with 56 percent accepting digital wallet payments on mobile phones, up from 44 percent from last year. No-touch payments have increased 69 percent since January 2020, according to retailers surveyed.
Another significant change has been the adoption of buy online, pick up in-store (BOPIS), both by retailers and consumers, especially older shoppers. Over 60 percent of Boomers are aware of BOPISmore than any of their younger counterparts, and two-thirds have tried BOPIS, with 63 percent saying it has improved their shopping experience, according to the National Retail Federation.
Flexibility has been a growing trend in retail and fulfillment, but many of the things that were once requests are now requirements. And post-pandemic, these requirements will become the expectation. Customers want and need maximum flexibility with how they engage with customerswhether through personalization, social media engagement, or omnichannel purchasingand the retailers who continue to thrive will be those that let shoppers engage on their terms.
The future of retail engagement
As we look forward to 2021, digital engagement will continue to unlock new opportunities for those retailers who choose to embrace it. For many, online has become their new norm. Others have bridged the gap between online and in-store experiences, like with BOPIS or curbside collection. And when more physical retail environments open, retailers will have to contend with the new reality that in-store shopping is less about purchasing and more about delivering a richer shopping experience.
This week at NRF 2021, the Microsoft Business Applications team will demonstrate how Dynamics 365 makes it possible for retail businesses to quickly launch and enhance their digital commerce platform, deliver secure and personalized service, and modernize their in-store experiences.
If you are a registered for NRF 2021, we invite you to join Shelley Bransten, Microsoft’s Corporate Vice President, Consumer Goods and Retail Industries, to learn how Microsoft is empowering retailers from across the globe to build more intelligent, resilient, and sustainable retail operations. Tune in on Wednesday, January 13, 2021 at 1:00 PM Eastern Time.
Also, continue to visit the Dynamics 365 blog this week to learn more about how Microsoft Dynamics 365 and Microsoft Power Platform are helping retailers reimagine the road ahead with truly engaged, always connected solutions.
The post Microsoft at NRF: the changing landscape of retail appeared first on Microsoft Dynamics 365 Blog.
Brought to you by Dr. Ware, Microsoft Office 365 Silver Partner, Charleston SC.
by Contributed | Jan 11, 2021 | Technology
This article is contributed. See the original author and article here.
Over the past few years, it has become increasingly easier to create powerful chatbots with little to no code. Now almost anyone can quickly create a deploy a chatbot with ease. Power Virtual Agents is a premium add-on to the Power Platform that allows you to create and deploy such bots.
However, as part of Dataverse (previously called Project Oakdale) many Microsoft 365 subscribers have access to Power Virtual Agents for Microsoft Teams. These chatbots are covered under their Microsoft 365 licensing and require no premium licensing to develop, deploy, or use.
There are limitations with the Power Virtual Agents for Microsoft Teams. Unless you upgrade to a full Power Virtual Agents subscription you will not be able to:
- Deploy chatbots to a specific Channel or specific Team.
- Utilize premium connectors in Power Automate
- Access and Update the source code for the bot using the Bot Framework
You can find out more about licensing for Power Virtual Agents at https://docs.microsoft.com/en-us/power-virtual-agents/requirements-licensing-subscriptions
Don’t let this dissuade you though! Even with these limitations, users can build exceptionally powerful chatbots with little to no effort with an intuitive interface. Using Power Virtual Agents for Microsoft Teams users can:
- Create and deploy bots to the left rail in Teams that other users in your organization can take advantage of
- Use Power Automate flows to connect to other systems, send emails, and perform other business logic
- Create bots that prompt users with follow up questions, use conditional logic, and help guide the user to perform their tasks
- Review and analyze the performance of the bot, such as what questions are being asked the most, and how effective the bot is at understanding and answering questions
It’s really amazing what you can accomplish. Check out the following video to show you how quickly and easily you can get started building chatbots with Power Virtual Agents for Microsoft Teams.
To recap some of features I show you in the video:
- Users create Power Virtual Agents by using the “Power Virtual Agents” application located in Teams
- A “Topic” is a specific job or conversation thread that bot executes. Topics have “trigger” phrases to determine if a user is wanting to perform a certain task. For example, “Hello” and “Hi” would trigger the “Greeting” Topic.
- There are a handful of default topics already created that users can customize as needed (ie: Greeting)
- You can create actions (Power Automate Flows) where data can be passed into the flow and returned back to the Power Virtual Agent.
- Using the Authoring Canvas, you can create conditional branches and prompt users for more information (check out the pre-baked “Lesson 3” Topic when you create a bot for good example).
- You can pass the Azure ID of the user interacting with the bot to Power Automate in order to retrieve specific information about the user (in the video I retrieve the current user’s Manager)
- If you run into issues while testing, be sure to “Reset” your bot.
- When you update your bot, it may be necessary to start a conversation with “Start over” to get your updated changes.
All in all, Power Virtual Agents for Microsoft Teams is one of my new favorite things and I look forward to digging into it more. Check it out! You might surprise yourself with what you can build!
To find out more about Power Virtual Agents for Microsoft Teams you can visit: https://docs.microsoft.com/en-us/power-virtual-agents/teams/fundamentals-what-is-power-virtual-agents-teams
I’d love to hear your thoughts on Power Virtual Agents for Microsoft Teams and how you are taking advantage of them in your organization!
by Contributed | Jan 11, 2021 | Technology
This article is contributed. See the original author and article here.
The following is the third on a series of articles by @Ali Youssefi that we will be cross-posting into this Test Community Blog. These articles were first published by Ali in the Dynamics community but since the topic is very related with Testing it makes sense to publish here as well.
If you didn’t get a chance to catch the first one of the series, please have a look here:
Otherwise, please read ahead!
Summary
EasyRepro is an open source framework built upon Selenium allowing automated UI tests to be performed on a specific Dynamics 365 organization. This article will focus on reviewing how EasyRepro works with the Document Object Model otherwise known as the DOM. This will help us understand how we can extend the EasyRepro code for use with custom objects or areas of the platform not included in the framework at this time. We will wrap with a brief look at XPath and referencing elements from the DOM.
Getting Started
If you haven’t already, check out the first article which covers getting familiar with EasyRepro and working with the source code locally. It covers cloning from GitHub to Azure DevOps then from Azure DevOps Git repository to a development machine. and reviews setting up dependencies and test settings to run a simple test. The second article goes into common actions performed by users when interacting with Dynamics 365 and the correlating EasyRepro commands. It wraps with covering common troubleshooting and debugging scenarios.
The EasyRepro framework contains an abundance of commands that should suit most of your needs. However you’ll find that at times either these commands will need to be modified per your customizations or you may need to create your own custom commands for reuse among tests.
Some example scenarios for modifying or creating custom commands may include:
Using an ADFS Redirect Login
Working with custom components and resources
Working with strongly typed entity attributes
Including navigation and functionality not present natively in the framework
These scenarios require an understanding of how EasyRepro interacts with Selenium to simulate user actions in a browser. This article will focus on a typical use case for extension: the Login process. We will describe common Selenium functionality and how to reference elements on the Document Object Model in a way to increase maintainability.
Sample Scenarios for Extending
Working with the Browser Driver
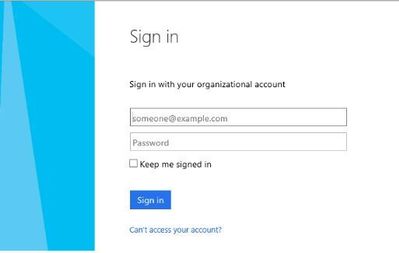
As we discussed earlier, your organization’s login process may have a sign on page that a user will get redirected to once they input their username. This is where we begin our journey into extending the framework and utilizing Selenium.
Typical Single Sign On Page:
Custom method for a Single Sign On Page:

The image above shows a method designed to search through a sign in page DOM for input fields for credentials and submission. You will notice that we are working with the browser driver natively (args.Driver) and using methods not found in the sample EasyRepro unit tests. These include FindElement which is part of Selenium and WaitForPageToLoad which is part of EasyRepro’s extension of Selenium. I’ll touch on these at a high level now.
FindElement
FindElement is part of the Selenium.WebDriver assembly and is used to find an element in the DOM. I’ll cover how to search through the DOM in the next section Extending and Working with XPath but I wanted to take this time to show how we will begin extending unit tests using Selenium natively.
The method returns an IWebElement object that represents the element you want to work with. For instance if you want to work with the username textbox you can use FindElement to locate and return the username textbox. Once returned the framework can interact with it and perform actions such as input text or click.

Reference:
https://www.toolsqa.com/selenium-webdriver/c-sharp/findelement-and-findelements-commands-in-c/
WaitForPageToLoad
WaitForPageToLoad is part of the EasyRepro framework as a Selenium extension. This is key to point out that we are leveraging both EasyRepro and Selenium natively to achieve our desired result to login. This method waits a specific amount of time and checks for the document ready state. The time interval used to check can be adjusted if needed.
SendKeys and Clear
SendKeys is used to send keystrokes to an element on the page. This can be a complete string such as an email or a single keypress. This can be used to send the username and password to your sign in page. It also can be used to send the Enter or Tab keypress to move to the next field or submit.
Clear as it sounds is used to remove any sort of input that may already exist in an element. This is useful if your sign in page attempts to automatically input credentials.
Both of these methods are part of the IWebElement shown above. Other useful properties of IWebElement include Text, Selected and GetAttribute.
Understanding how to extend element references
Considerations need to be made when designing unit tests to help reduce the maintenance work needed if something changes. For instance when referencing custom HTML web resources or even the ADFS Redirect from above, think how a change to an element in the DOM could propagate across some of all of your unit tests. One way to control maintenance is to centralize commonly used references into proxy objects that can hide the underlying mechanics from the test designer. This is exactly how the EasyRepro framework handles references and when extending can leverage the same approach. In this section we will cover the files used by the framework to reference DOM elements and show how to extend them to include references to our custom login page.
The App Element Reference File
The Microsoft.Dynamics365.UIAutomation.Api.UCI project uses the ElementReference.cs file as well as another file called AppElementReference.cs. The ElementReference file looks to have been brought over from the classic interface. What’s unique about each is how they reference elements in the DOM which I’ll cover in the next section. For now let’s focus on reviewing the AppElementReference.cs file which is located in the DTO folder of the Microsoft.Dynamics365.UIAutomation.Api.UCI project.

Inside of the AppElementReference file are two objects used by EasyRepro to represent and locate elements: The AppReference and AppElements classes.
The AppReference class
The AppReference class includes sub classes that represent the objects used by EasyRepro, specifically the WebClient object, to connect to DOM elements. This allows the framework to standardize how the search for a particular container or element is performed. Centralizing the reference to the DOM elements will allow the test designer to focus on writing commands against common objects and not specifying the precise location of an element in the DOM.
The AppElement class
The AppElement class is a comma delimited key value pair consisting of the reference object property as a key and the XPath command as the value. The key represents the property name in the class object inside of AppReference while the value is the XPath location of the element in the DOM.
I highly suggest reviewing the AppElement class when extending EasyRepro as it shows recommended ways to locate and reference elements on the DOM. In the next section we will discuss the different ways you can locate elements including XPath.
Referencing elements in the Document Object Model
References to objects generally fall into four patterns:
Resolving via Control Name
Resolving via XPath
Resolving by Element ID
Resolving by CSS Class
In this article we will focus on XPath which is what is primarily used by the EasyRepro framework for the Dynamics 365 platform. However its key to understand each of the approaches for referencing as they can be used for customizations such as web resources, custom controls, etc.
Resolve with Control Name
This will search the DOM for elements with a specific name which is an attribute on the element node. This is not used by EasyRepro to my knowledge. Elements can be found by their name by using By.TagName with the FindElement method.
Resolve with Element ID
This will attempt to find an element by its unique identifier. For instance a textbox on the login form maybe identified as ‘txtUserName’. Assuming this element ID is unique we could search for this particular element by an ID and return an IWebElement representation. An example from the Microsoft.Dynamics365.UIAutomation.Api.UCI project is shown below showing usage with the timeline control.
Definition:

Usage by WebClient:

Elements can be found by their ID by using By.Id with the FindElement method.
Resolve with CSS Class
This allows the ability to search by the CSS class defined on the element. Be aware that this can return multiple elements due to the nature of CSS class. There is no usage of this in EasyRepro but again this could be helpful for customizations. Elements can be found by their CSS class name by using By.Class with the FindElement method.
Resolve with XPath
XPath allows us to work quickly and efficiently to search for a known element or path within the DOM. Key functions include the contains method which allow to search node attributes or values. For instance when you review the DOM of a form you’ll notice attributes such as data-id or static text housed within a span element. Coupling this attribute with the html tag can result in a surprisingly accurate way to locate an element. I suggest leveraging the current element class as well as this link from W3 Schools that goes into the schema of XPath.
Going back to an earlier section let’s review how XPath along with the AppElementReference.cs file can help standardize element location.
Using XPath in the ADFS Redirect Login Method
Going back to our original example for the ADFS login method below you’ll see an example of referencing the DOM elements using XPath directly with the Selenium objects driver and By.XPath. Consider the below two images:
Without a static representation of XPath:

Using static classes to represent XPath queries:

Both of these methods work and perform exactly the same. However the second method provides increased supportability if and when the login page goes through changes. For instance consider if the id of the textbox to input your username changes from txtUserName to txtLoginId. Also what if this txtUserName XPath query is propagated across hundreds or more unit tests?
Creating custom reference objects
Let’s put what we have learned to use by creating a reference to our custom login page. Start by adding a class to the AppReference object and title it AdfsLogin. Inside this class declare string properties that will be used as input for your organization’s login page. Typical inputs include username, password and a submit button. Here is an example:

NOTE: While this document demonstrates how to add to the AppElementReference.cs file I would suggest extending this outside of the core files as customizations will have to be merged with any updates from the framework.
Once the static class we want to use in our unit tests has been created we now need to add the XPath references to the AppElement class. Below is an image showing the key value pair discussed in the AppElement section above. The key correlates to the string value of the AdfsLogin class while the value is the XPath directive for our elements.

As shown in the image for Login_UserId we are searching the DOM for an input element with the id attribute of ‘txtUserName’. XPath can be used to search for any attribute on the DOM element and can return a single value or multiple depending on what you’re searching for.
Next Steps
Custom Components and Web Resources
PowerApps Control Framework controls and web resources are customizations that represent great options to learn and extend the EasyRepro framework. Try locating the container for the PCF controls and HTML web resources and work towards creating custom objects representing the elements for each as described above.
Conclusion
In this article we discussed reasons why we will may need to extend the EasyRepro framework and some techniques in doing so. We explored working with Selenium objects and creating references to help us when creating unit tests. Finally we put this in an example for working with a ADFS Redirect page on login.
Thank you again for reading! Please let me know in the comments how your journey is going!


.png")


.png")
.png")


.png")
.png")


Recent Comments