by Contributed | Jan 11, 2021 | Technology
This article is contributed. See the original author and article here.
For people new to networking, creating Azure Virtual Network subnets can be tricky. Learn how CIDR notation works to segment ranges of IP addresses.
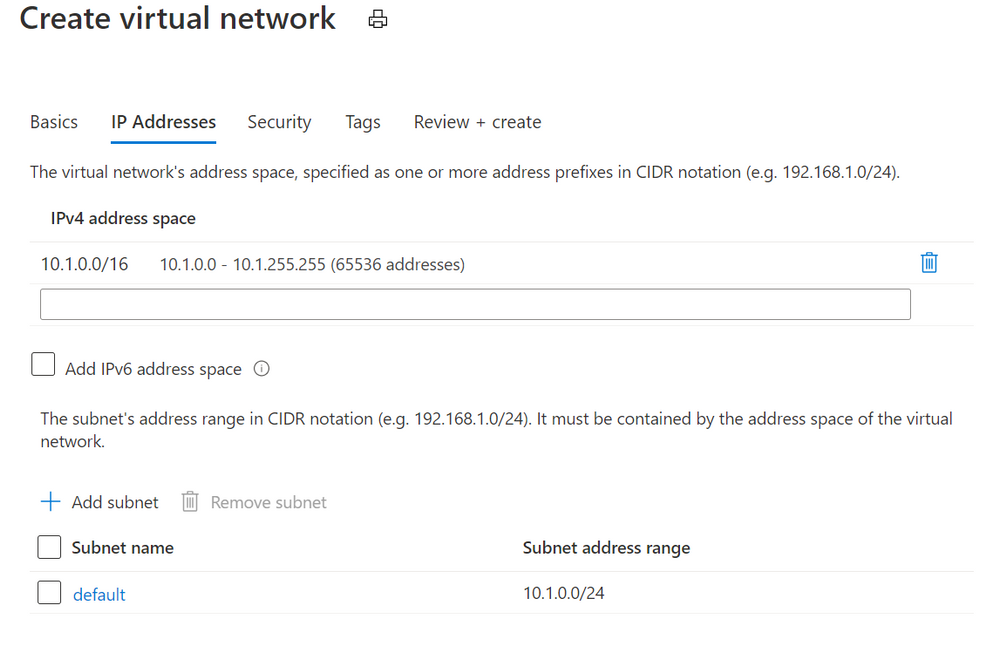
When you create an Azure virtual network, you’ll get default IP addresses that look something like this:
Azure Virtual Networks add dialog
This gives you a private address space at 10.1.0.0 with 65,536 addresses to use. Great!
(Note: These private IP addresses are not routable across the internet. If your devices need to be accessible on the public internet, visit Public IP addresses).
Now it’s not recommended to put all of your resources into that same address space. It’s inefficient from a network routing perspective, and it makes it harder to secure traffic and limit it between devices. A good security principle that applies to networking is to limit “lateral movement”, that is the ability for a hacker or infected device to easily communicate with other systems in your network. If we left this without any subnets, one compromised device could talk to the other 65,535 devices in our network.
Azure suggests that we add a subnet called default, with a Subnet address range of 10.1.0.0/24. What does that mean?
Well, subnets (literally sub networks) carve up or segment a bigger address space into smaller sections. We can then limit traffic in and out of this subnet (to the devices in this address space segment) by configuring a network security group. We can also add a network security group to the network interface of a specific virtual machine, to gives us another layer of network security control. To learn how this works, visit How network security groups filter network traffic.
Imagine your virtual network is a round, decorated birthday cake. You’ve carved out one segment of that birthday cake as a subnet, so it contains a smaller amount of those 65,536 addresses. How many does it contain? That depends on what CIDR notation you’ve used!
CIDR (Classless Inter-Domain Routing) is a method for allocating IP addresses. It’s the /x number, and that number determines how many IP addresses will be available in that subnet.
Stay with me if you want to go down the math rabbit hole of IP addressing for a moment, or skip to the next part. IP addresses (v4) are written as a set of four numbers, like 192.168.1.0.
These are converted to binary (the ones and zeroes that computers use), to look like this:
11000000 10101000 00000001 00000000.
We create a subnet by adding a “mask” to this number, telling the computer how many of the digits we want to read and keep the same (left to right).
With a /24, we’re saying “grab the first 24 digits” for this subnet, so that keeps the 192.168.1 and leaves us the “.0” on the end as a pool of addresses we can use in this subnet.
Those last 8 binary digits can only add up to 255 (with binary being a base 2 system) AND including zero as a possible value, that has defined our available 256 addresses we can use in this subnet – 0 to 255.
If we’d used a /29, keeping the first 29 digits, we’d only have 8 available IP addresses in this subnet, because 11000000 10101000 00000001 00000xxx leaves us just 000 left – a maximum binary value of 7 plus our zero value equals 8 IP addresses.
If you’re old school and are used to specifying subnet masks like 255.255.255.0, that’s a /24 CIDR notation, with its range of 256 IP addresses (255.255.255.0 to 255.255.255.255).
Skipped to here? Let’s continue!
The CIDR number is like specifying how large you want the slices of cake to be. Fortunately you don’t have to do the math, because there are a ton of free CIDR notation tables and calculators on the internet that will tell you how many addresses you’ll have in your subnet if you use a /28 or a /18 for example. When you add a subnet to your Azure virtual network, you’ll also get a note as you create it, telling you how many addresses will be available with the values you have entered.
Just remember, a subnet segments those address from the pool of your total available addresses. Segment two large subnets and you may not have room to add any more subnets.
In our example, the recommended default 10.1.0.0/24 gives us a subnet of 256 IP addresses EXCEPT Azure reserves 5 of these (the first and last address in each subnet for protocol conformance and 3 additional addresses for Azure service usage), so we have 251 available in Azure. This bundles up addresses 10.1.0.0-10.1.0.255.
So what if we want to add another subnet to this virtual network? Now we have to make sure we don’t overlap that subnet we already have!
Azure will suggest we use 10.1.1.0/24. Generally /24 is a good size for a subnet, and now we’d have:
Default 10.1.0.0 to 10.1.0.255
Subnet2 10.1.1.0 to 10.1.1.255
Again, keeping the first 3 parts of the IP address (24 digits in binary) the same.
Now we can keep on carving up our virtual network into different subnets, within the original 10.1.0.0 to 10.1.255.255 addresses (our 10.1.0.0/16 address space). Or, on reflection, we could have used a smaller CIDR notation for the original Azure Virtual Network, and created multiple different Vnets, each with their own subnets. There are just a couple of extra things to note …
Azure Virtual Network disallowed address spaces
The following address spaces cannot be used:
224.0.0.0/4 (Multicast)
255.255.255.255/32 (Broadcast)
127.0.0.0/8 (Loopback)
169.254.0.0/16 (Link-local)
168.63.129.16/32 (Internal DNS, DHCP, and Azure Load Balancer health probe)
Learn more at Create a virtual network
On-premises networks
IP addressing has to be unique – you can’t have two resources with the same IP address. If you’ve configured a Site-to-Site VPN to allow connectivity to/from an on-premises network, consider which private IP address spaces are in use in that on-prem environment, so your Azure vnets and subnets don’t conflict.
Gateway subnet
Speaking of VPN connections, if you’re using an Azure VPN Gateway it also needs gateway subnet of IP addresses. There are some rules around the configuration of this particular type of subnet – it must only contain your virtual network gateway resources, it must be named GatewaySubnet and it must be sized appropriately. You can’t change this sizing once you’ve deployed it, so Microsoft recommends a CIDR notation of /27 or “larger” (e.g. /26) to give you room for growth.
For more information on VPN Gateways, visit About VPN Gateway configuration settings
Want to learn more?
Secure and govern workloads with network level segmentation
Plan virtual networks – subnets
Add, change or delete a virtual network subnet
Gateway subnet guidance – About VPN gateway configuration settings
Azure Virtual Network and Azure VPN Gateway modules on Microsoft Learn
by Contributed | Jan 11, 2021 | Technology
This article is contributed. See the original author and article here.
There might be scenarios noticed where recurrence trigger did not fire at specified frequency. This blog tries to consolidate these recurrence behaviors.
Recurrence trigger:
In some scenarios the start times of recurrences might drift due to factors such as latency during storage calls. The options that can be made use of to make sure that your logic app doesn’t miss a recurrence are documented here .
Connection-based trigger:
In addition to the factors explained above for recurrence trigger, recurrences for connection-based triggers like SFTP-SSH, Service Bus etc. the recurrence schedule isn’t the only driver that controls execution, and the time zone only determines the initial start time. Subsequent runs depend on the recurrence schedule, the last trigger execution, and other factors that might cause run times to drift or produce unexpected behavior. For more information, see Recurrence for connection-based triggers.
Recurrences for connection-based triggers might also drift due to long polling nature of the trigger. If suppose, SFTP-SSH recurrence trigger ‘When a file is added or modified’ fires as per schedule and finds a file, another trigger will run again after 15 seconds to check if there are any more files present. The subsequent next trigger execution time is calculated from the last trigger execution time plus Recurrence interval. Hence, whenever trigger is fired, the immediate 15 seconds trigger is getting executed and altering the subsequent trigger executions.
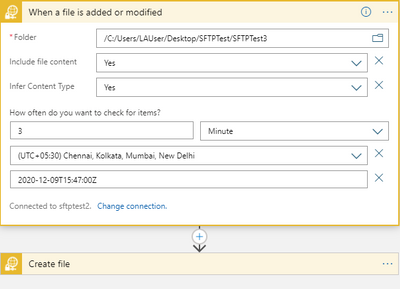
In the below example, we have a simple logic app where the recurrence trigger checks if a file is added or modified every 3 minutes.
Let’s consider the below 3 trigger runs.

Here, the trigger fired at 6:52:14 PM and found a file.

And then the trigger executed another run in roughly 15 seconds to check for any other pending files.

The subsequent next trigger which you would assume to run at 6:55:14 PM as per schedule has actually run at 6:55:33 PM i.e. 3 minutes after the follow-up trigger run that ended at 6:52:33 PM.

This is by design, contrary to normal assumption. So, every time the trigger fires and finds a file, the next subsequent would drift by roughly 15 seconds and in the long run the trigger recurrence would drift by hours or days from the expected schedule.
If this a concern, you can workaround this behavior by using a the normal recurrence trigger instead of the SFTP-SSH recurrence trigger as shown in the below sample.

by Contributed | Jan 11, 2021 | Technology
This article is contributed. See the original author and article here.
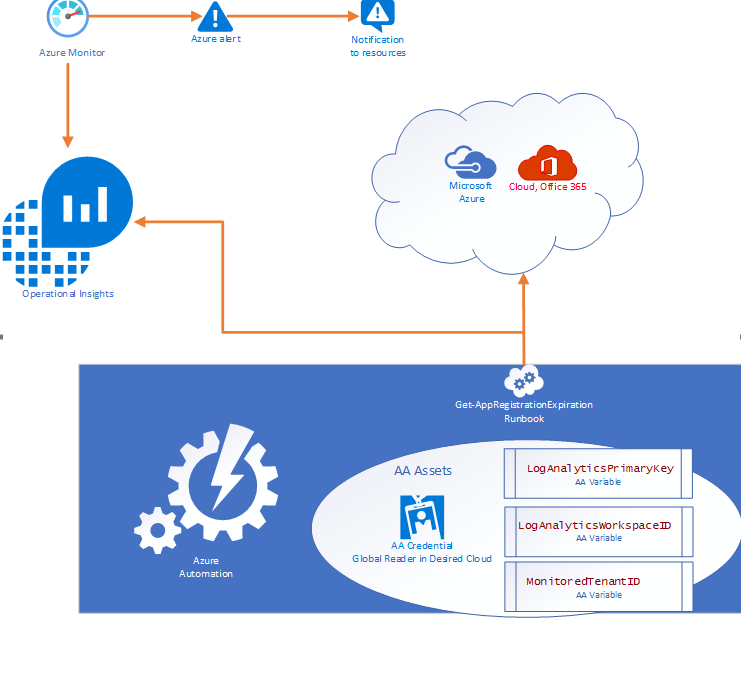
App Registration Expiration Monitoring and Notifications

Problem Statement
Azure services do not have a native feature to report on expiring App registrations. Without a solution in place to monitor and notify on expiration of these SPN’s solutions ranging from Custom Apps, and DevOps CICD Pipelines too orchestration engines like Azure Automation and Logic Apps, can and will cease to function without notice.
- Purpose of this solution: To provide an automated mechanism of calculating and ingesting the expiration dates into Log Analytics and automatically notify resources when expiration is within threshold.
- Requisites: This solution consists of:
- 1 Runbook consisting of the PowerShell script in this document.
- 2 Automation Variables containing the Log Analytics Workspace ID and the Log Analytics Primary Key.
- 1 SPN in the monitored cloud environment with Global Reader role.
Solution Overview
The solution is designed to be cross tenant and requires an App RegistrationSPN in the desired environment with Global Reader rights. Utilizing Azure Automation (AA) and AA resources like Variables and Credentials our runbook pulls an array of SPN’s from the environment and calculates the time until expiration before using our custom function to send the data to a Log Analytics Workspace. Finally, Azure Monitor alerts can be triggered based on a Kusto query to notify resources that there are SPN’s within the threshold for expiration.
Where can I get this solution?
The solution is documented in detail on my GitHub repo and available for consumption immediately.
https://github.com/Cj-Scott/Get-AppRegistrationExpiration
by Contributed | Jan 10, 2021 | Technology
This article is contributed. See the original author and article here.
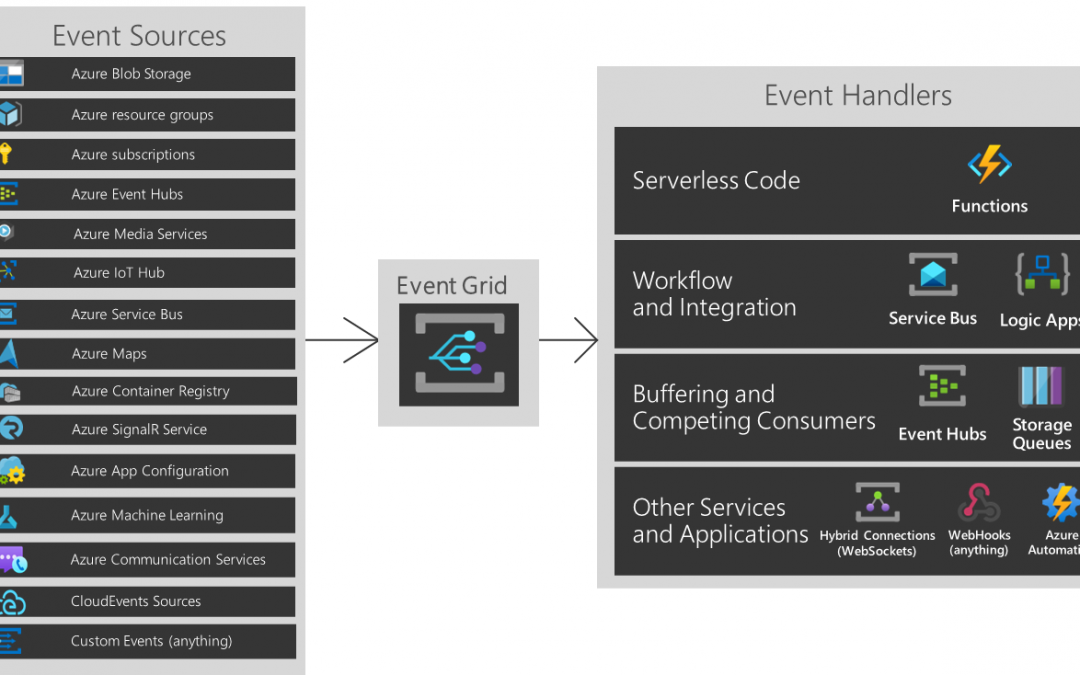
You are about to build an event-driven architecture, primarily to integrate existing enterprise applications. In that case, an event broker like Azure EventGrid takes a vital role. The following diagram introduces how Azure EventGrid plays on the Azure Platform.
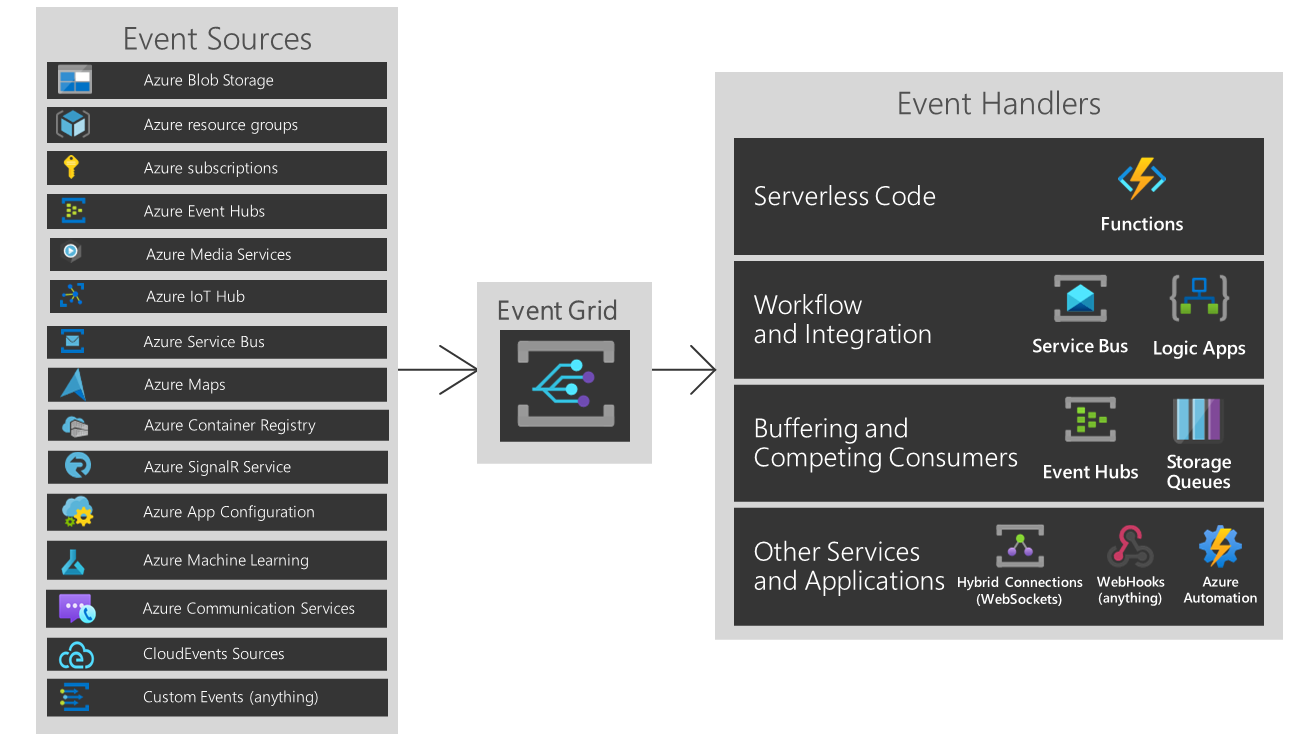
But As you can see, if you are running hybrid or heterogeneous cloud, either “Custom Events” or “CloudEvents” is your choice.
Three Pillars of Event-Driven Architecture
There are three major players of the event-driven architecture. I’ve taken the screenshots below from my talk about CloudEvents at Open Infra Days Korea back in 2018.
Event Publisher
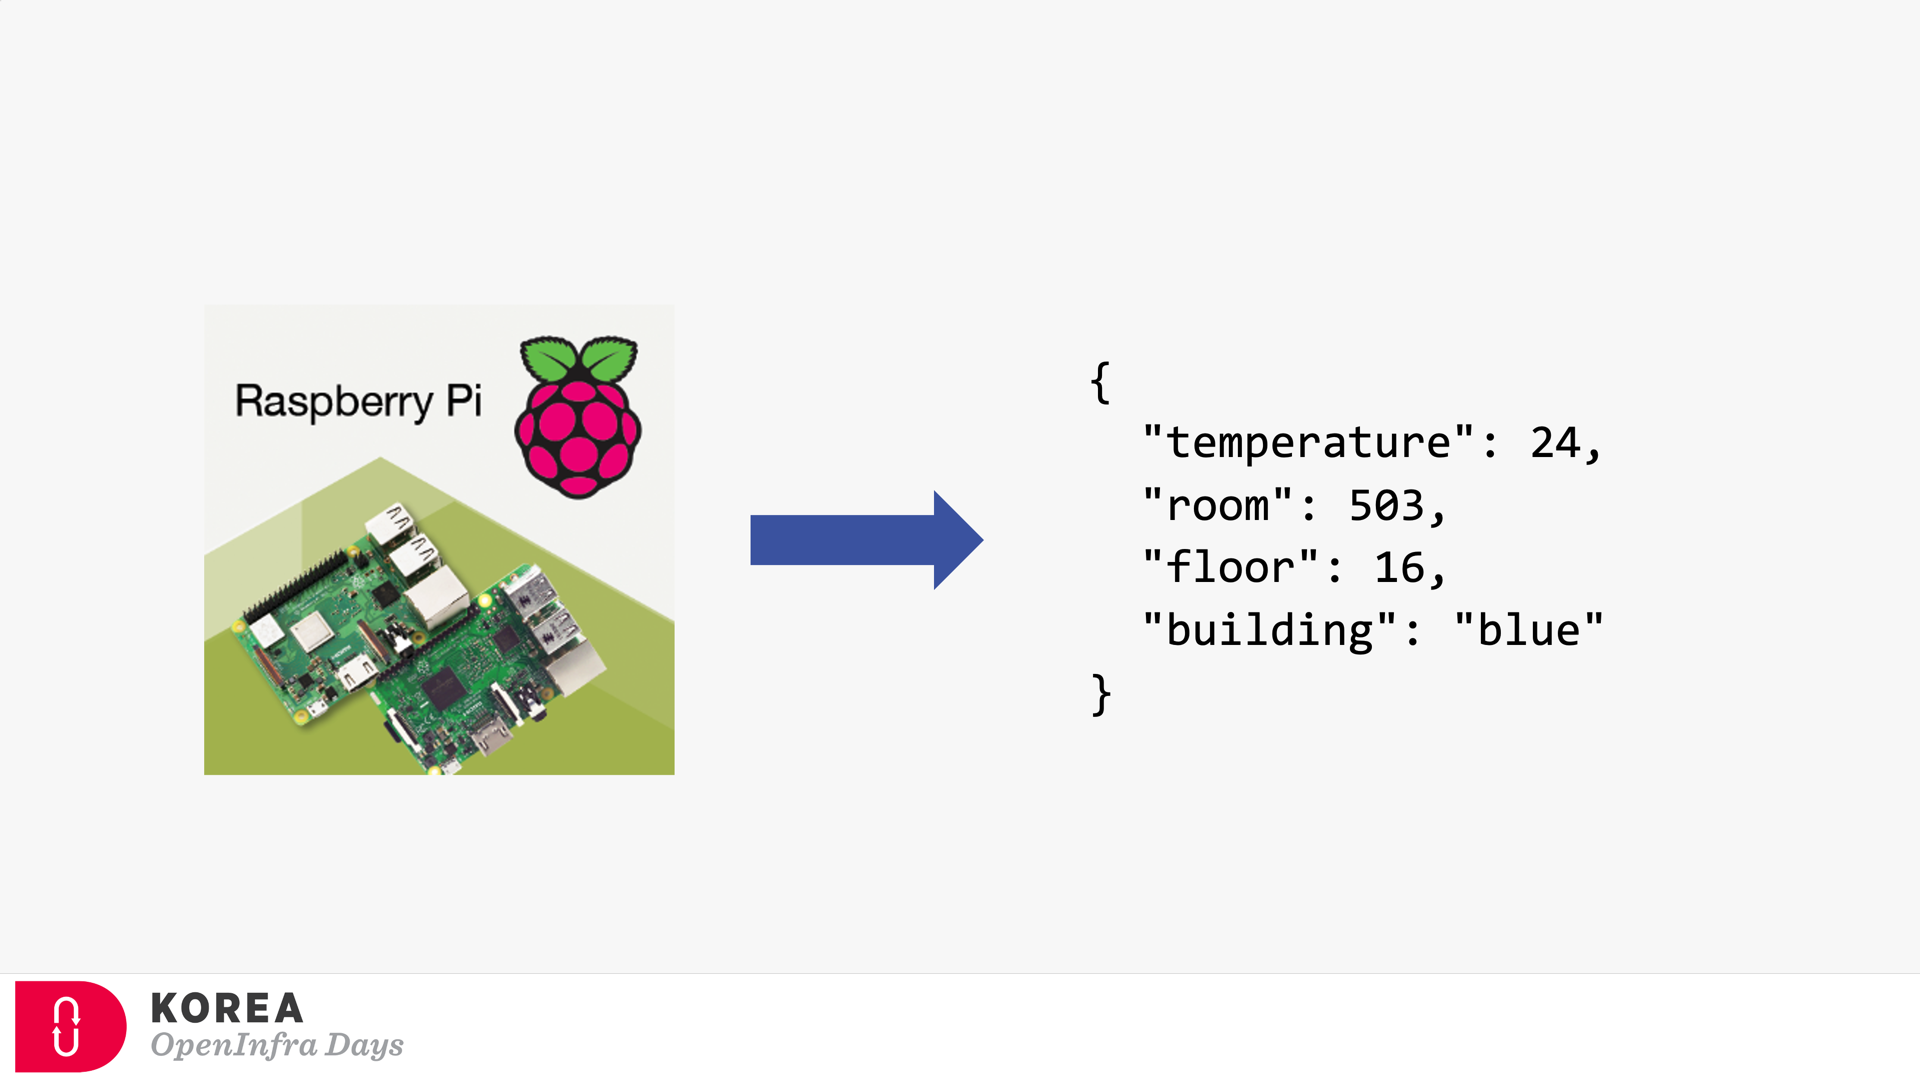
It’s the source of the event. Any device can be the event publisher as long as it can raise events—the picture below depicted Raspberry Pi as the event publisher.
Event Subscriber / Event Handler
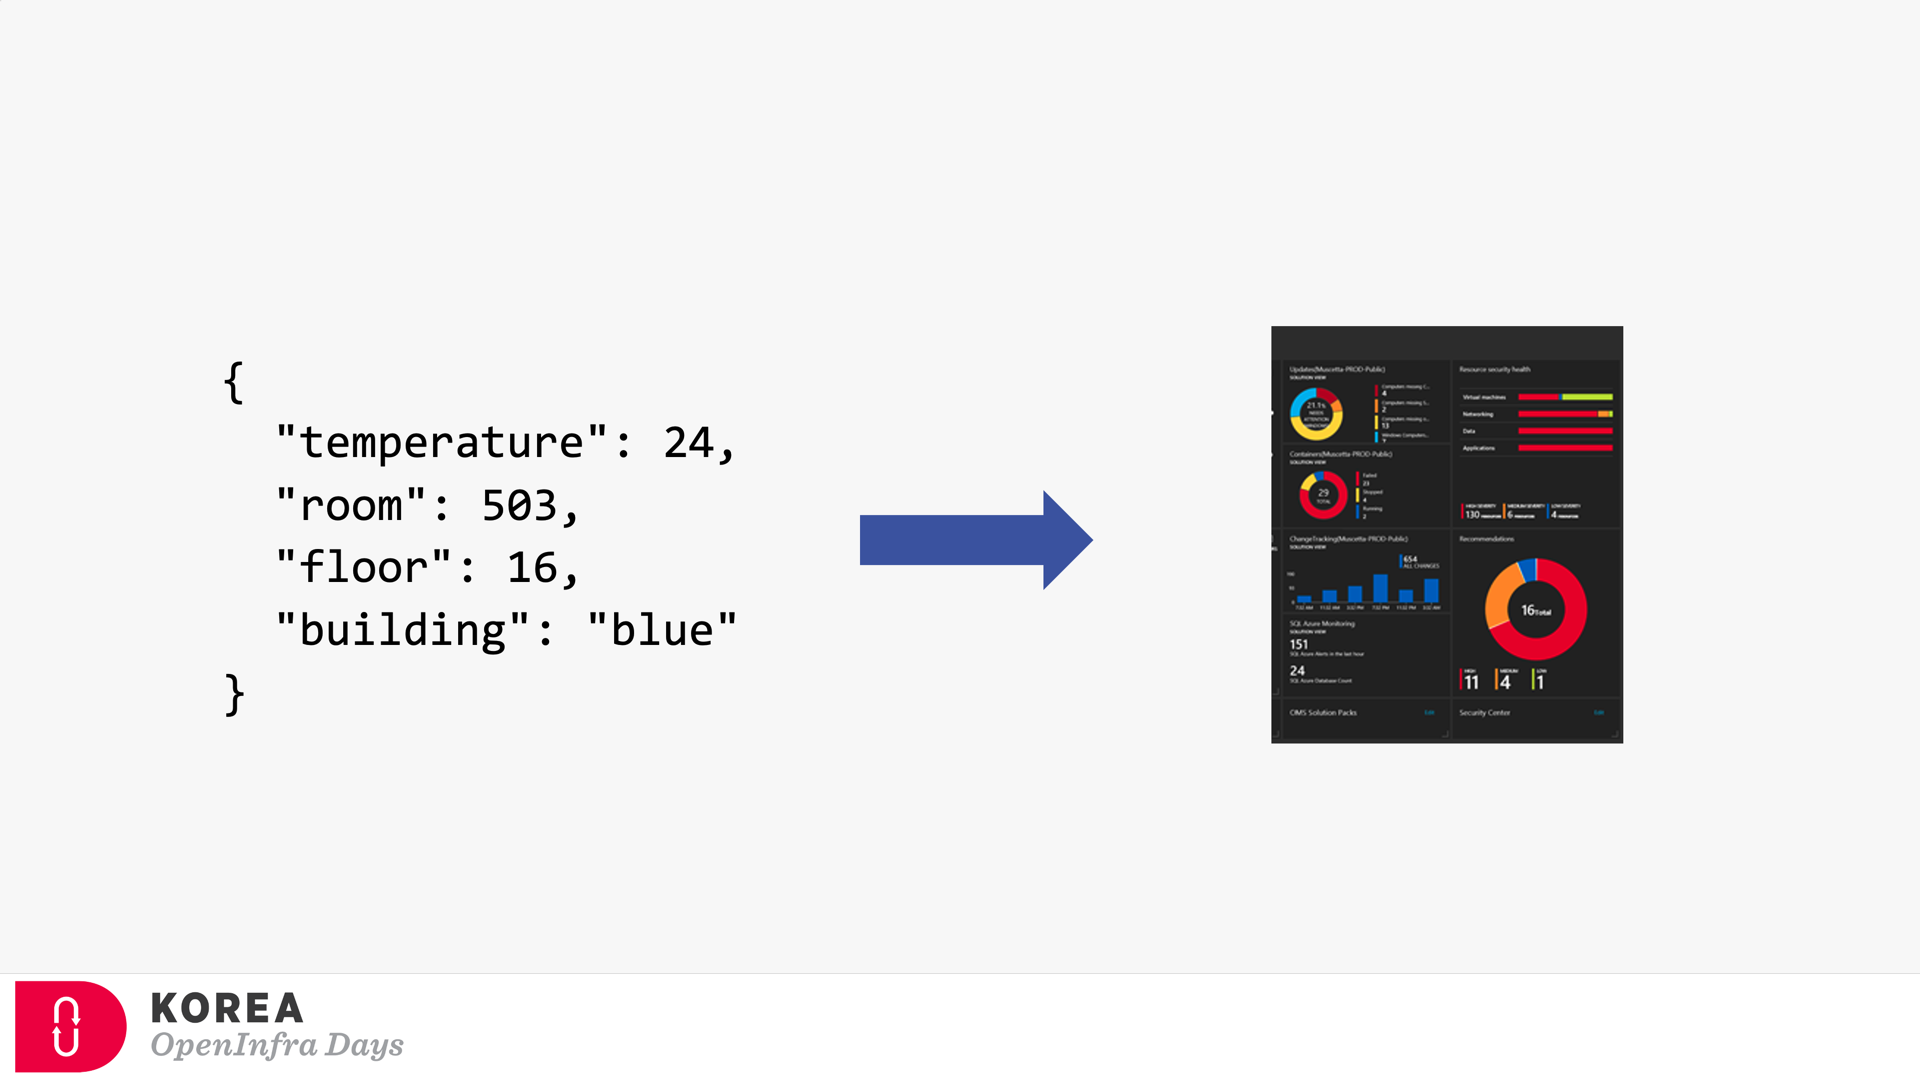
Strictly speaking, the event subscriber should be distinguished from the event handler. But in general, the event subscriber takes care of the events including processing them, so both terms are often interchangeable. The screenshot below describes how the event subscriber handles the events and processes them for visualising.
Event Broker
Because of the events’ nature, both event publisher and subscriber can’t be directly integrated. Therefore, the event broker should be placed in between. Azure EventGrid is the very player as the event broker. Here’s the screenshot showing how Azure EventGrid works between the publisher and subscriber.

If you’re OK with Korean language, you can check my talk video and slides about CloudEvents. There are no English subtitles provided, unfortunately.
Provisioning Azure EventGrid Subscription in ARM Template
It’s OK to provision the Azure EventGrid Custom Topic through ARM Template. However, provisioning the Azure EventGrid Subscription using ARM Template only corresponds with the System Topic, not the Custom Topic you just created, unless properly scoping it. Therefore, instead of the ARM template, you should consider Azure CLI to create the subscription.
But, before deep diving into Azure CLI, let’s have a look how we can provision Azure EventGrid Subscription resource specific to the Custom Topic.
Providing Scope (Recommended)
To use the ARM Template mentioned above, the scope attribute is the key. (line #7). Here’s the ARM Template written in Bicep:
    resource evtgrdtopic ‘Microsoft.EventGrid/topics@2020-06-01’ = {

        name: ‘my-eventgrid-topic’

    }
    resource evtgrdsub ‘Microsoft.EventGrid/eventSubscriptions@2020-06-01’ = {

        name: ‘my-eventgrid-sub’

        scope: evtgrdtopic

        …

    }
Providing Nested Resource Type (Doable but NOT Recommended)
Alternatively, you can provide the nested resource type like below. In this case, you don’t need the scope attribute, but as you can see the resource type and name looks more verbose (line #6-7).
    resource evtgrdtopic ‘Microsoft.EventGrid/topics@2020-06-01’ = {

        name: ‘my-eventgrid-topic’

        …

    }
    resource evtgrdsub ‘Microsoft.EventGrid/topics/providers/eventSubscriptions@2020-06-01’ = {

        name: ‘${evtgrdtopic.name}/Microsoft.EventGrid/my-eventgrid-sub’

        …

    }
Therefore, you can provision Azure EventGrid Subscription resource like above. Let’s move onto the Azure CLI part.
Azure CLI Extensions
To provision Azure EventGrid Subscription using Azure CLI, a couple of extensions are required to install beforehand. The Logic extension is to handle Azure Logic Apps, which will be used as the event handler.
Both extensions are currently in preview and will be changed at any time without notice.
Azure CLI Commands
As I would use Azure Logic App as the event handler, I need to get its endpoint URL. To call the Logic App endpoint, we must know a SAS token for it. As the first step, we should get the resource ID of the Logic App by running the following command, az logic workflow show:
    logicAppResourceId=$(az logic workflow show

    -g [resource_group_name]

    -n [logic_app_name]

    –query “id” -o tsv)
With this resource Id, use the az rest command to get the endpoint containing the SAS token.
    logicAppEndpoint=$(az rest

    -m POST

    -u “https://management.azure.com$logicAppResourceId/triggers/manual/listCallbackUrl?api-version=2016-06-01”

    –query “value” -o tsv)
Now, we got the Logic App endpoint to be added as the event handler. The next step would be to get the resource ID for the EventGrid Topic, by running the following command, az eventgrid topic show:
    eventGridTopicId=$(az eventgrid topic show

    -g [resource_group_name]

    -n [eventgrid_topic_name]

    –query “id” -o tsv)
We got all information we need. Run the az eventgrid event-subscription create command to provision the EventGrid Subscription. Let’s use the event schema type of CloudEvents, which is an incubating project of CNCF (line #4).
    az eventgrid event-subscription create

    -n [eventgrid_subscription_name]

    –source-resource-id $eventGridTopicId

    –event-delivery-schema cloudeventschemav1_0

    –endpoint-type webhook

    –endpoint $logicAppEndpoint
So, we finally got the EventGrid Subscription instance towards the EventGrid Custom Topic! And here’s the one-liner of all commands above:
    az eventgrid event-subscription create

    -n [eventgrid_subscription_name]

    –source-resource-id $(az eventgrid topic show

      -g [resource_group_name]

      -n [eventgrid_topic_name]

      –query “id” -o tsv)

    –event-delivery-schema cloudeventschemav1_0

    –endpoint-type webhook

    –endpoint $(az rest

      -m POST

      -u “https://management.azure.com$(az logic workflow show

        -g [resource_group_name]

        -n [logic_app_name]

        –query “id” -o tsv)/triggers/manual/listCallbackUrl?api-version=2016-06-01″

      –query “value” -o tsv)
So far, we have walked through how to provision the EventGrid Subscription to EventGrid Custom Topic, using Azure CLI. As this is command-line friendly, you can easily integrate it with any CI/CD pipeline like GitHub Actions.
This article was originally published on Dev Kimchi.
by Contributed | Jan 9, 2021 | Technology
This article is contributed. See the original author and article here.
We can use Azure DevOps to perform all the policy operations – Create and Assign Policy and Initiatives, Remediate non-compliant resources,
and check compliance status.
Steps to setup the environment for policy operations
- Login to your Azure DevOps Organization and select Releases as shown below and click on New. Select New Release Pipeline.
- This will open a pop-up window and will ask to select a template.

- Select Azure Policy Deployment and Click on Apply

- Post template selection, We will get a small pop-up window to show us the stage details of this pipeline release. Close this window and proceed with next step.

- Before configuring the different Tasks of the stage, please make sure you have setup a Service connection to integrate your Azure DevOps organization with your Azure Subscription. We need to connect to our Microsoft Azure subscription, to a different build server or file server, to an online continuous integration environment, or to services you install on remote computers.
Please refer the below Microsoft article for step-by-step process to setup the service connection.
https://docs.microsoft.com/en-us/azure/devops/pipelines/library/service-endpoints?view=azure-devops&tabs=yaml
Once we setup the service connection, we can get to see/update them as below-

- We need to click on Stage1- Tasks option as highlighted below. Here, we do not need to add/update artifacts as we are not using any GitHub repository for policy operations in this article. Leave it as it is.
We can update the name of pipeline, stage, Agent and Tasks as per our convenience.

- Once We click, we will get to see the Stage Details and the Tasks in the hierarchy. Like here in the below snippet-
Stage Name – Stage 1
Tasks – Create Azure Policy and Assign Azure Policy

- Select any Task. Here we have selected the first task – Create Azure Policy. Please note that since here we are using Azure PowerShell as the backend script, please select the appropriate Task Versions. Here Task version represents the PowerShell version, and the versions may vary depending upon the cmdlets we will be using. It is always recommended to use the latest version.
Choose Azure Resource Manager as Azure Connection Type. If you have access to multiple Azure subscriptions linked through Service connection, you may choose any one of them and that will be used as scope for this policy assignment and creation.
Choose Script Type as Inline Script as we are providing the PowerShell script as inline content. We can use Script File Path as well in case we are using any repository like GitHub as the source for files.

- Copy below PowerShell code into the Inline Script block. We need to update the highlighted/bold values as per our requirement and add our policy in Json format like below
$definition = New-AzPolicyDefinition -Name 'denyCoolTiering2' -DisplayName 'denyCoolTiering2' -Description
'Deny cool access tiering for storage' -Policy '{

    "if": {
 "allOf": [{
"field": "type",
"equals": "Microsoft.Storage/storageAccounts"
},
{
 "field": "kind",
"equals": "BlobStorage"

            },

            {
"field": "Microsoft.Storage/storageAccounts/accessTier",
"equals": "cool"
}
 ]
},

    "then": {
"effect": "deny"
}

}'

- Similarly update the Inline Script of second Task- Assign Azure Policy. Please use the below code as reference and update the bold/highlighted values with your own policy details that is there defined in the target subscriptions.
$definition = Get-AzPolicyDefinition | Where-Object { $_.Properties.DisplayName -eq 'denyCoolTiering2'}

New-AzPolicyAssignment -Name "denyCoolTiering2" -DisplayName "denyCoolTiering2" -PolicyDefinition $definition

- Post updating both the Tasks, Click on Save and a new pop-up window will come up. Select the folder (if you have any hierarchy) with your comments (optional) and click OK.

- Now click on “Create a New Release” and another window will pop-up, click on “Create” and proceed.


Once you click on create, you will get to see a message like in the below snippet that “Release has been created”.

- Click on the message link – “Release has been created” and it will show the progress of all the Tasks in the stage
It will start from Queued and will go into in Progress and then Succeeded. If there is some syntax or runtime error, the task will fail with Failed message. We can click on the status and see the error/failure reason.


If we click on Succeeded link in the Stage, you will get to see the status of each step that was performed by the agent and further we can click on the succeeded status of each step to see the operation logs(Refer below snippet).


- Likewise, we can create either other Stages in the same release or Tasks in the same stage or a new Release for other policy operations like Compliance Check and Remediate. Please refer the below snippets. The steps will remain the same and only Inline Script needs to be updated.


Notes:
- In case of assigning a DINE policy, please make sure that managed identity must complete replication through Azure Active Directory before it can be granted the needed roles as per the documentation here: Remediate non-compliant resources – Azure Policy | Microsoft Docs. Else, the remediation tasks will fail due to missing permissions.
- You may encounter below errors while executing the script in the pipeline.
- The Service Principal (SPN) used by Azure DevOps to connect to your Azure subscription requires the Owner role and you may get this error while SPN has the less than the owner role.

By default, the SPN created by Azure DevOps to connect to your Azure subscription is assigned the Contributor role. For updating the assignment of security roles on a resource group requires the Owner role. You need to ensure that the SPN used by Azure DevOps has the Owner role assigned at the subscription level. This is accomplished through the Access control (IAM) blade for the subscription –

- The same SPN also requires Read directory data permissions to your Azure AD.

Steps to Grant Azure AD permissions:
By default, the SPN created by Azure DevOps is only granted sign in and read user profile permissions against Azure AD. We now need to grant the SPN the additional read directory data permission.
- Go to Azure AD -> App Registrations.
- Select the SPN that Azure DevOps uses

- Select API permission and then click on ‘Add a permission’

- Select Azure Active Directory Graph from the list

- Select Application permissions.

- Select Directory.Read.All permission from the list and click on Add permissions.

- Click on ‘Grant admin consent for Directory’.

Once permission is granted and the status shows as Green, Try running the deploying the Policy through Azure DevOps, it should work.
- Creating and Assigning Policy Initiatives:
In case of creating and assigning policy Initiatives, the above steps from 1-13 will remain the same except the sample code in steps 9 and 10. Please update the script as below:
Creating Policy Initiative : (Replace the code at Step 9)
$jsonPolicysetdefinition = @"

[ {
"policyDefinitionId": "/providers/Microsoft.Authorization/policyDefinitions/ea3f2387-9b95-492a-a190-fcdc54f7b070",

        "parameters": {
"tagName": {
"value": "[parameters('tags')]"
}
}
},
{
"policyDefinitionId": "/providers/Microsoft.Authorization/policyDefinitions/a08ec900-254a-4555-9bf5-e42af04b5c5c",

        "parameters": {
"listOfResourceTypesAllowed": {
"value": "[parameters('resourceTypes')]"
}
}
}
]"@

$jsonPolicydefinitionparameter = @"

{
"tags": {
"type": "String"
},
"resourceTypes": {
"type": "Array"
}
}"@

$Initiative= New-AzPolicySetDefinition -Name 'PolicyInitiativeTest' -PolicyDefinition $jsonPolicysetdefinition -Parameter $jsonPolicydefinitionparameter -SubscriptionId ‘abcd-e44e-4a99-a89c-45be63c6a8ad'

Write-Host $Initiative.PolicySetDefinitionId
Write-Host "##vso[task.setvariable variable=Initiative;isSecret=false;isOutput=true;]$Initiative.PolicySetDefinitionId"
Assign Policy Initiative: (Replace the code at Step 10)
$jsonPolicyassignmentparameter = @"

{

    "tags": {

        "value": "AnotherTag"

    },

    "resourceTypes": {

        "value": [

            "microsoft.devtestlab/labs/costs",

            "microsoft.media/mediaservices/streamingpolicies",

            "microsoft.security/iotsecuritysolutions/iotalerts",

            "microsoft.security/iotsecuritysolutions/analyticsmodels/aggregatedrecommendations",

            "microsoft.sql/managedinstances/metricdefinitions",

            "microsoft.sql/managedinstances/databases/vulnerabilityassessments/rules/baselines",

            "microsoft.sql/managedinstances/databases/backupshorttermretentionpolicies"

        ]

    }

}"@

$Policy = Get-AzPolicySetDefinition -Name 'PolicyInitiativeTest'

$remediationID = New-AzPolicyAssignment -Name 'PolicyInitiativeAssignment' -Scope '/subscriptions/abcd-e44e-4a99-a89c-45be63c6a8ad' -PolicySetDefinition $Policy -PolicyParameter $jsonPolicyassignmentparameter -Location 'eastus' -AssignIdentity

$roleDefId = Get-AzRoleDefinition 'Contributor'

New-AzRoleAssignment -Scope '/subscriptions/abcd-e44e-4a99-a89c-45be63c6a8ad' -ObjectId $remediationID.Identity.PrincipalId -RoleDefinitionId $roleDefId.Id

for($i=0; $i -lt $initative.Properties.policyDefinitions.Length; $i++){

    Start-AzPolicyRemediation -Name '$i Initiative' -PolicyAssignmentId $remediationID.PolicyAssignmentId -PolicyDefinitionReferenceId $initative.Properties.policyDefinitions[$i].policyDefinitionReferenceId }

Recent Comments