by Contributed | Feb 23, 2021 | Technology
This article is contributed. See the original author and article here.
This blog is part one of a three-part series focused on business email compromise.
Business email compromise (BEC) is a type of phishing attack that targets organizations, with the goal of stealing money or critical information. BEC has become a top-of-mind concern for CISOs – according to the Federal Bureau of Investigation, in 2019, BEC was the costliest type of cybercrime, accounting for 50% of all losses worldwide. Since 2016, BEC has accounted for more than 26 billion dollars in losses. Large corporations to small businesses, all have fallen victim to these attacks.
At Microsoft we have been actively working to block these attacks and working to disrupt attacker networks that look to propagate such crime. Microsoft Defender for Office 365 provides industry leading capabilities to protect against these sorts of attacks.
So how do these attacks work? How can organizations best protect themselves? In this blog series, we will explore the evolution of BEC attack tactics, provide a refresher on existing and new capabilities in Defender for Office 365 that help detect these attacks, and best practices that customers should follow to secure themselves against BEC attacks.
Anatomy of Business Email Compromise Attacks
The classic form of business email compromise involves targeting a set of employees through emails that seem to come from an email address that visually looks like someone the employee should trust. Once the trust is established, unsuspecting employees can be asked to execute fraudulent wire transfers or asked to reply with critical information. Unlike other email-based threats, these attacks do not rely on malicious files or links and instead rely on deception of trust and can be highly effective.
Here’s an example of a BEC attack we have observed recently.
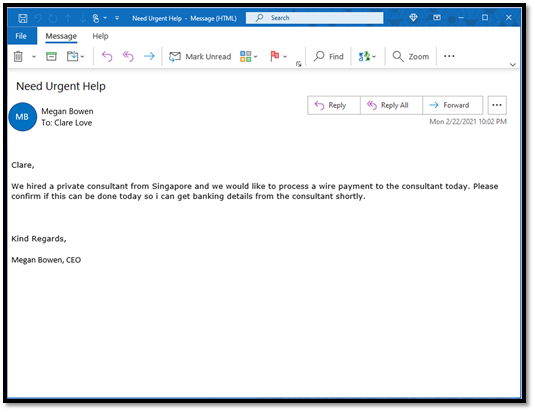
 Figure 1: A real-world BEC attack
At first glance, the email appears to come from the CEO to her employee and looks like a legitimate business email request for a payment. But upon further examination we detect that the sender is not the real CEO. The attackers use different techniques to make the email address look convincing.
Display name or From address look-alike (user impersonation)
Email clients use email properties like “Display Name” and “From Address” to show the sender of the email. Attackers forge these properties to make it visually look like a real sender. When we take a closer look at the below example, we see the mail came from a look-alike email address with a slightly different spelling.
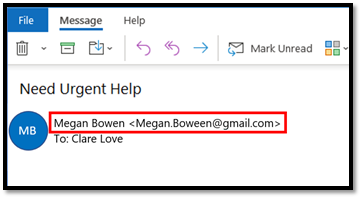 Figure 2: User impersonation using a look-alike email addresses
Attackers often use spelling tricks or special characters to make the email name look convincing, and detecting these large number of possible combinations through naked eye or basic regular expressions (regex) can be quite challenging.
Domain address look-alike (domain impersonation)
In this technique, the attacker forges the email domain that visually looks like the domain of the victim’s organization or like the domain of one of their business partners. For example, in the below example, the email seems to come from a domain that looks like contoso.com but is spelled with a “zero” instead of an “o”.
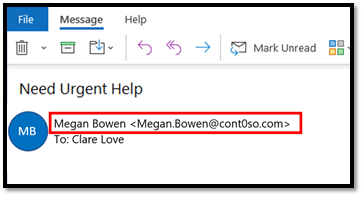 Figure 3: Domain impersonation using a look-alike domain
Exact Domain Spoofing
In this technique, the attacker forges the domain to look exactly like the domain of the victim’s organization or like the domain of one of their business partners. Since they are exactly same, they make for a more convincing attack. Email protocols rely on email authentication standards such as SPF, DKIM, and DMARC to enable domain owners to “authenticate” their mails. If the domain does not configure these settings, they can be spoofed by the attacker to make an email look legitimate but will instead come from the attacker’s email server. In the example below, when we inspect the mail, the domain that the victim sees is contoso.com, but the actual sender is different.
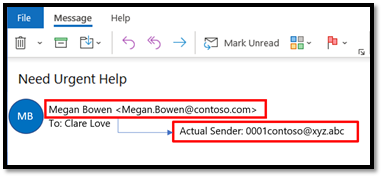 Figure 4: Domain spoofing achieved through forgery
We refer to these classic attacks as single stage attacks. We see attackers leverage one or more of the above techniques to impersonate/spoof executives, business partners, IT/HR staff and more. The email content can contain a basic request to purchase gift cards, request HR or financial data, or request to process an invoice with updated payment details.
 Figure 5: Single stage BEC attacks
Now that we have reviewed the attack techniques, let’s take a closer look at how we can protect against them.
User & Domain Impersonation Protection in Defender for Office 365
Detecting user and domain impersonation at scale and in a fast-evolving attack landscape requires systems that can quickly understand relationships between senders and recipients, detect anomalies in those relationships and detect “visual similarity” across many possible combinations.
Configuring AI-powered and policy-based protections
Microsoft Defender for Office 365 does this by employing a capability called Mailbox Intelligence, an AI-powered technology that builds a communication graph of every user. Once enabled, this system continuously learns about a user’s email patterns and their communication graph. When a BEC email is received, the system automatically detects an anomaly against the user’s graph. It then runs a powerful multi-pass algorithm to detect “visual similarity” across a large combination of user and domain names.
Security administrators can configure user, domain, and mailbox intelligence-based protection settings in the Anti-Phishing Policy within the Security Center. Once configured, these capabilities protect all users in the organization from attacks looking to impersonate any of their communication contacts. In an environment where anyone in an organization can be targeted by impersonation attacks, organizations need this capability to protect all users in the organization.
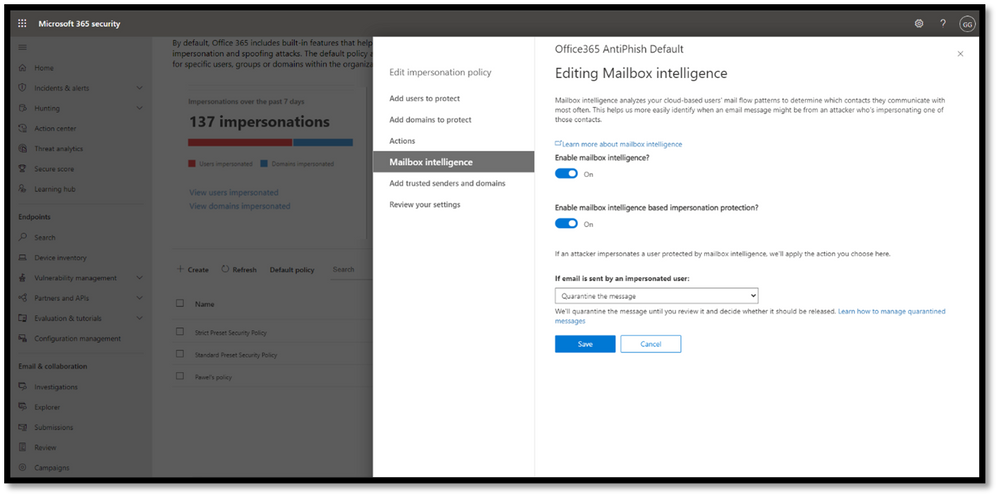 Figure 6: Mailbox Intelligence uses AI to build a communication graph for every user.
We introduced these capabilities in Defender for Office 365 in 2018 and we are constantly updating them based on the latest threat patterns.
Hunting for BEC Attacks (Coming Soon!)
Given the targeted nature of BEC attacks, security analysts are looking for additional ways to analyze and hunt for information about these attacks in their environment.
To further increase the efficiency of the response of SecOps teams to impersonation-based attacks, we are rolling out new pivots in Threat Explorer to enable your security analysts to hunt for user and domain impersonation attempts in your organization. Threat Explorer helps security teams investigate and respond to threats efficiently, and these new capabilities allow analysts to dive deeper into potential BEC attacks. The new pivots will help security analysts answer questions like “Who is impersonating my CEO?”, “who is being targeted?”, “is a protected domain of my organization being impersonated?” and “are we seeing any false positives?” Admins can also configure alerts to be notified and Threat Tracker queries to quickly discover new attacks.
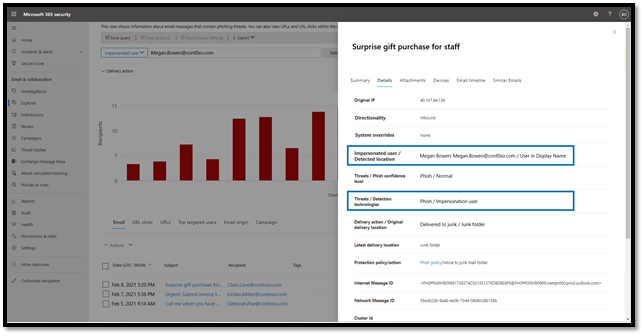 Figure 7: Use Threat Explorer to hunt for impersonated users.
Domain Spoofing Protection & Email Authentication Checks in Defender for Office 365
Preventing spoofing with email authentication standards
To identify spoofing attempts, email standards like SPF, DKIM, and DMARC are evaluated on every incoming message. Office 365 honors these standards for domains that have properly configured these settings. Emails that fail DMARC checks will be sent to quarantine or routed to junk mail. You can learn more about email authentication in Office 365, and its implications on spoofing here.
Spoof Intelligence to prevent spoofing attacks
While DMARC is a useful tool in the email ecosystem, despite its value, our service-wide telemetry indicates that a large number of the domains that send email into your organization have not implemented DMARC or may not enforce it. This leaves your organization vulnerable as these domains can still be spoofed leaving the door open to business email compromise. This is important – If your partners and vendors have not enforced DMARC on their domains, their domains can be spoofed by attackers in deceptive emails to your users.
To address this challenge, Defender for Office 365 and Exchange Online Protection (EOP) use an industry-first technology called Spoof Intelligence. It uses advanced algorithms to learn about a domain’s email sending patterns and can flag anomalies. And most importantly, through this approach using Spoof Intelligence, Defender for Office 365 and EOP also extend spoofing protections to domains that might not have implemented DMARC yet.
Both spoof protection capabilities are enabled by default and are being constantly updated to learn from latest attacks.
Coming up in Part 2….
BEC attacks can be fairly complex and look extremely convincing. And they can result in a lot of damage to organizations that don’t have the appropriate protection. In this blog, we’ve looked at one flavor of BEC attacks – single stage attacks. We have also seen how capabilities in Defender for Office 365, described above, prevent the core components of business email compromise. In the next blog post, we’ll dive into more advanced flavors of BEC attacks, and talk about the different capabilities in Microsoft Defender for Office 365 that help you prevent, detect, and respond to multi-stage BEC attacks. Stay tuned!
To learn more about Microsoft Defender for Office 365, or to get started today, visit aka.ms/DefenderO365.
by Contributed | Feb 23, 2021 | Technology
This article is contributed. See the original author and article here.

Looking forward to another virtual Microsoft Ignite this spring? We are thrilled to highlight the four Mixed Reality stories to watch! These sessions will enable you to understand the blend between our physical and digital worlds, learn the basics of Mixed Reality Business Apps, and discover how Mixed Reality empowers humanity.
Reminder that Microsoft Ignite Spring 2021 is happening on March 2-4! Here’s your handy guide to the 4 sessions we’ve lined up for you this year. Microsoft Ignite is free to attend, so what are you waiting for? Register today!
Accelerate your journey in mixed reality with these 4 sessions!
Click to learn more about each Mixed Reality session below, and discover ways to immerse yourself (and meet your fellow technologists!) in this fast-growing space during the event:
So You Want to Switch to a Mixed Reality Career | 3/2/21 1:00 pm – 1:30 pm PT
Speakers: Amara Anigbo, April Speight, Archana Iyer, Catherine Diaz
Want to pursue a career in mixed reality but not sure where to start? Interested in mixed reality but feeling intimidated about what you currently don’t know (yet!) about the technology? Fret not! Join this session and hear #RealTalk from our speakers on how they took a leap of faith and achieved their dream of working in mixed reality. Learn how to acquire and build on core mixed reality skills so you can unlock your tech superpowers and create positive impact in the blend of our physical and digital worlds.
 So You Want to Switch to a Mixed Reality Career Panel @ Microsoft Ignite 2021
Intro to Mixed Reality Business Apps | 3/3/2021 12-12:30PM PT
Speakers: Payge Winfield and Katie Glerum (Mt Sinai Hospital)
Believe it or not, ANYONE can get started with infusing mixed reality into their daily lives. Join us at this session to build your confidence with Mixed Reality Business Apps like Remote Assist! Hear from Mt Sinai Hospital about practical use cases of mixed reality in healthcare and learn about deployment best practices so you can empower your organization with mixed reality today!
 Intro to Mixed Reality Business Applications with Payge Winfield and Katie Glerum (Mt Sinai Hospital)
Blending Worlds: Empowering Humans through Mixed Reality | 3/2/21 9:15 – 9:45 PM PT
Speakers: Xerxes Beharry, Alexandra Petty, Alexander Meijers, Niels Broekhaus
The power and potential of mixed reality in changing the world is tremendous, and we are only at the tip of the iceberg as we navigate the new normal of a distributed, remote workforce. Join this session to hear from our speakers on how they are leveraging mixed reality to solve complex problems, create positive social impact and empower ALL humans. Learn about where they believe the future of mixed reality is headed and the role you can play in driving this transformation.
 Blending Worlds – Humans of IT Panel
Table Talk: Mixed Reality Business Applications (Dynamics 365 and Power Platform) | 3/2/21 9:30-10PM PT | Speakers: Anj Cerbolles, Daniel Christian, Aditya Setyonugroho, Guest appearance by April Speight
Join this table talk to interact with your peers and share ideas on how mixed reality business applications across Dynamics 365 and Power Platform are transforming workplaces everywhere! Hear from our Business Applications MVPs as Anj Cerbolles and Daniel Christian, and Azure Ranger consultant Adityo Setyonugroho as they guide you through various common use case scenarios and inspire you to unlock the power of mixed reality in your organization.

Ready to dig in? Add these sessions to your Schedule Builder now!
We hope you’re as excited as we are about Microsoft Ignite Spring 2021 and all the featured Mixed Reality sessions we’ve lined up for you. Register online to secure your virtual seat now, and we’ll see you there!
#MSIgnite #MixedReality

by Contributed | Feb 23, 2021 | Technology
This article is contributed. See the original author and article here.
Power Automate is a super cool tool, which gives us a lot of options. But sometimes, the built-in connectors, are not enough. In one of previous posts, I showed you how to send HTTP requests to Microsoft Graph API. This time, I will show you how to connect to APIs outside of Microsoft 365 in Power Automate and even use an IOT button to trigger your flow.

Use case
To make things more approachable, here is a little use case for you:
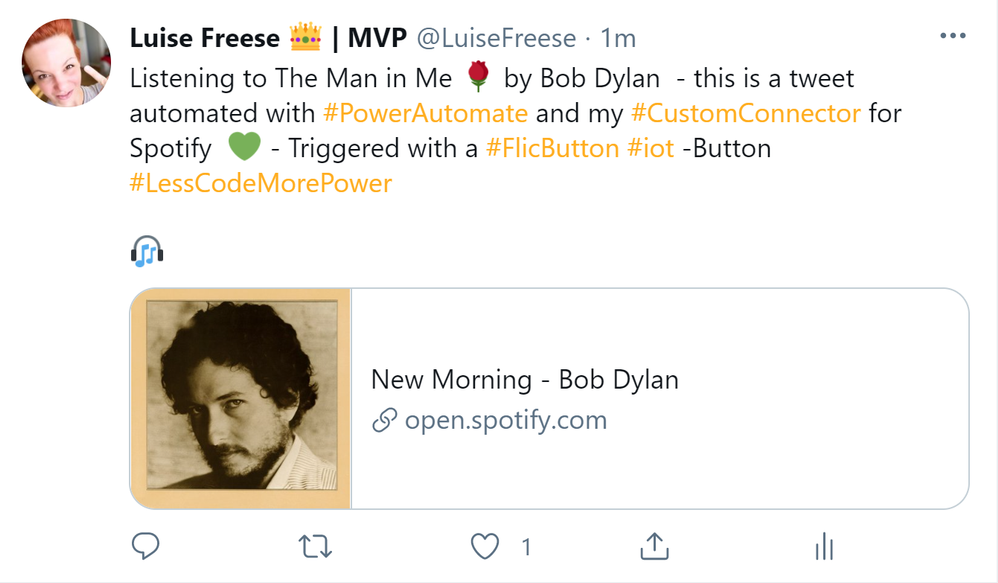
I want to click an IOT button and this shall trigger a flow which tweets about the music I currently listen to on Spotify.
The result will look like this:
What we need
To achieve this, we will need a couple of things:
- an IOT button – I use a Flic Smart button for that- that triggers my flow
- a flow that connects to our Spotify and to twitter
So lets have a look at
IOT button
I use a Flic IOT button to trigger my flow. This button works with Bluetooth, which means that we will need a Bluetooth enabled device to work with this button- either a smartphone or an IOT Hub.
Set up your IOT button
- download the app from your app store
- install the app
- register a new account
- connect your folic button by pressing it for ~10 seconds
If you like to, rename this button – please keep in mind, that one button can be used to trigger several flows, as we have three different event types: Click, Double-Click and Hold.
Spotify
In this flow we want to trigger by one or any event of the flic button and then tweet the song we are currently listening to on Spotify. Turns out, that there is no connector for Spotify, so why not building our own custom connector?
To be able to build custom actions, you will need an API for this service. Lucky us, that Spotify provides us with that API so that we can use this to build our custom connector.
Of course we need to have at least a free Spotify account so that we can listen to music that then shall be tweeted about.
Before we can build the connector, we will need to register for Spotify’s Developer program – Once this is done, we can retrieve Spotify content such as album data, playlists and more though Spotify Web API. To get user-related data (like the song our user is playing right now) we need to authorize our application so that we are allowed to retrieve this information.
Register our application on Spotify
- Copy the
Client ID and the Client Secret
Build the custom Connector
- Go to flow.microsoft.com
- Click Data
- Click Custom connectors
- Click New Custom connector, Create from blank
- Add a name for your connector
- Click Continue
- If you like to, you can upload a connector icon, this step is optional
- enter
api.spotify.com as Host
You can find the values you need to fill in here in the Spotify for developers documentation, but to make things easier for you, I will provide them for you.
- Click on Security
- Select OAuth2.0
- Select Generic Oath 2 as Identity Provider
- Paste in your Client ID and Client secret
- enter
https://accounts.spotify.com/authorize as Authorization URL
- enter
https://accounts.spotify.com/api/token as Token URL and Refresh URL
- enter
user-read-currently-playing as scope
- Click **Create connector
- Copy the Redirect URL
- go to your Spotify app
- Click Edit settings
- past the Redirect URI into the field for Redirect URIs
- Click Add
- Click Save
Now go back to your Custom connector
- Click on Definition
- Click New action
- enter something like
GetSong in Summary
- enter a description
- enter an operation ID like
getssong – please note, that this ID shouldn’t start with an upper case letter
(For reference: https://developer.spotify.com/console/get-users-currently-playing-track/)
- Click Import
- Click Update connector
- Click Test
To test our new connector, we need to select from an existing connection or create a new connection.
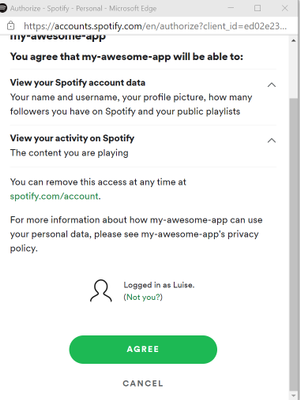
A new pop up window will appear and promt us to Agree – you as a user authorize your Spotify app to retrieve data related to your user account – such as the song currently playing.
Use the custom connector in our flow
Now it’s time to build our flow
Trigger flic
As already said, we want the flic button to be our trigger

You can choose, if you want this flow to be triggered by any event type or if you want to save the two other event types for other flows.
Now we want to get the current song from our shiny new Custom connector:
Get current song
- Click on Insert a new Step
- Click on Custom
- Select the new custom connector for Spotify
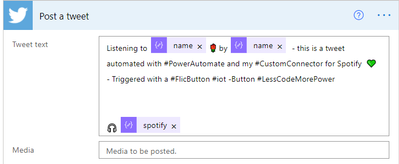
Our intention now is to tweet something like “I am currently listenintg to {songname} by {artistname}, check it out {spotify URL}.” But from our custom connector, we don’t get the name of song and artist per se, we will need to first parse the JSON output. If you never heard of that before, don’t worry, go read this article about how to parse JSON in Power Automate, I will just wait here for you and drink a coffee.
Back again? Cool!
- Let your flow run
- Go to your run history
- Copy the output of the Get current song action
- Insert a Parse JSON action
- Click Generate from sample
- Paste into the new field
- Click done
Magic – Now we can see all the output from our custom action as Dynamic content. Next thing up is to send the tweet. We can use the twitter connector for it, but Buffer works fine as well.
- Add the post a tweet action
provide your tweet text with Dynamic content as you wish from your Parse JSON action. Don’t be afraid when the flow adds Apply to each loops! Unfortunately, both artist-name and -song-name are named name, so you will need to figure out which is which.
Run your flow
Open your flic app and select the new button, set the action that is triggered by the click event to Microsoft Flow (watch out, this is the old name of Power Automate, which is not reflected in the Flic app). When you now click the button, this will trigger our flow, that listens to the Click event of that button, get the current song and tweet about it!
Conclusion and what’s next
In this post I explained, how you can create a custom connector and call an API outside of Microsoft 365. You learned how to define actions and how to authorize your application so that you can retrieve the requested data. Which use cases do you have in mind? What would you like to build a custom connector for? Please share!
.


Recent Comments