by Contributed | Feb 21, 2021 | Technology
This article is contributed. See the original author and article here.
There was an announcement that you could refer to Azure Key Vault secrets from either Azure App Service or Azure Functions, without having to put their versions explicitly. Therefore, the second approach mentioned in my previous post has become now the most effective way to access Azure Key Vault Secrets.
@Microsoft.KeyVault(SecretUri=https://<keyvault_name>.vault.azure.net/secrets/<secret_name>)
With this approach, the reference always returns the latest version of the secret. Make sure that, when a newer version of the secret is created, it takes up to one day to get synced. Therefore, if your new version of the secret is less than one day old, you should consider the rotation. For the rotation, the ideal number of versions of each secret could be two. If there are more than two versions in one secret, it’s better to disable all the older ones for the sake of security.
As there’s no maximum number of secrets defined in Azure Key Vault, sometimes there are too many secrets stored in one Key Vault instance. In this case, finding old versions of secrets and disable them by hand should consider automation; otherwise, it needs too many hands. This sort of automation can be done by Azure Functions with the Azure Key Vault SDK. Let me show how to do so in this post.
You can find the sample code used in this post at this GitHub repository.
Azure Key Vault SDK
There are currently two SDKs taking care of Azure Key Vault.
As the first one has been deprecated, you should use the second one. In addition to that, use Azure.Identity SDK for authentication and authorisation. Once you create a new Azure Functions project, run the following commands to install these two NuGet packages.
    dotnet add package Azure.Security.KeyVault.Secrets –version 4.2.0-beta.4

    dotnet add package Azure.Identity –version 1.4.0-beta.3
The Key Vault package uses the IAsyncEnumerable interface. Therefore, also install this System.Linq.Async package.
dotnet add package System.Linq.Async –version 4.1.1
NOTE: As of this writing, Azure Functions doesn’t support .NET 5 yet. Therefore avoid installing 5.0.0 version of the System.Linq.Async package.
We’ve got all the libraries necessary. Let’s build a Functions app.
Building Functions Code to Disable Old Versions of Each Secret
Run the following command that creates a new HTTP Trigger function.
func new –name BulkDisableSecretsHttpTrigger –template HttpTrigger –language C#
You’ve got the basic function endpoint with default settings. Change the HttpTrigger binding values. Leave the POST method only and enter the routing URL of secrets/all/disable (line #5).
    public static class BulkDisableSecretsHttpTrigger

    {

        [FunctionName(“BulkDisableSecretsHttpTrigger”)]

        public static async Task<IActionResult> Run(

            [HttpTrigger(AuthorizationLevel.Function, “POST”, Route = “secrets/all/disable”)] HttpRequest req,

            ILogger log)

        {
Populate two values from the environment variables. One is the URL of the Key Vault instance, and the other is the tenant ID where the Key Vault instance is currently hosted.
            // Get the KeyVault URI

            var uri = Environment.GetEnvironmentVariable(“KeyVault__Uri”);
            // Get the tenant ID where the KeyVault lives

            var tenantId = Environment.GetEnvironmentVariable(“KeyVault__TenantId”);
Then, create the SecretClient that accesses the Key Vault instance. While instantiating the client, you should provide the DefaultAzureCredentialOptions instance as well. If the account logged into Azure is able to access multiple tenants, you should explicitly provide the tenant ID; otherwise, it throws the authentication error (line #4-6).
It happens more frequently on your local machine than on Azure.
            // Set the tenant ID, in case your account has multiple tenants logged in

            var options = new DefaultAzureCredentialOptions()

            {

                SharedTokenCacheTenantId = tenantId,

                VisualStudioTenantId = tenantId,

                VisualStudioCodeTenantId = tenantId,

            };

            var client = new SecretClient(new Uri(uri), new DefaultAzureCredential(options));
Once logged in, get all secrets, iterate them and process each one of them. First things first, let’s get all the secrets (line #2-4).
            // Get the all secrets

            var secrets = await client.GetPropertiesOfSecretsAsync()

                                      .ToListAsync()

                                      .ConfigureAwait(false);
            var utcNow = DateTimeOffset.UtcNow;

            var results = new Dictionary<string, object>();
Now, iterate all the secrets and process them. But we don’t need all the versions of each secret but need only Enabled versions. Therefore use WhereAwait for filtering out (line #7). Then, sort them in the reverse-chronological order by using OrderByDescendingAwait (line #8). Now, you’ll have got the latest version at first.
            foreach (var secret in secrets)

            {

                // Get the all versions of the given secret

                // Filter only enabled versions

                // Sort by the created date in a reverse order

                var versions = await client.GetPropertiesOfSecretVersionsAsync(secret.Name)

                                           .WhereAwait(p => new ValueTask<bool>(p.Enabled.GetValueOrDefault() == true))

                                           .OrderByDescendingAwait(p => new ValueTask<DateTimeOffset>(p.CreatedOn.GetValueOrDefault()))

                                           .ToListAsync()

                                           .ConfigureAwait(false);
If there is no active version in the secret, stop processing and continue to the next one.
                // Do nothing if there is no version enabled

                if (!versions.Any())

                {

                    continue;

                }
If there is only one active version in the secret, stop processing and continue to the next.
                // Do nothing if there is only one version enabled

                if (versions.Count < 2)

                {

                    continue;

                }
If the latest version of the secret is less than one day old, the rotation is still necessary. Therefore, stop processing and continue to the next one.
                // Do nothing if the latest version was generated less than a day ago

                if (versions.First().CreatedOn.GetValueOrDefault() <= utcNow.AddDays(-1))

                {

                    continue;

                }
Now, the secret has more than two versions and needs to disable the old ones. Skip the first (latest) one process the next one (line #2), set the Enabled to false (line #6), and update it (line #8).
                // Disable all versions except the first (latest) one

                var candidates = versions.Skip(1).ToList();

                var result = new List<SecretProperties>() { versions.First() };

                foreach (var candidate in candidates)

                {

                    candidate.Enabled = false;
                    var response = await client.UpdateSecretPropertiesAsync(candidate).ConfigureAwait(false);
                    result.Add(response.Value);

                }
                results.Add(secret.Name, result);

            }
And finally, store the processed result into the response object, and return it.
            var res = new ContentResult()

            {

                Content = JsonConvert.SerializeObject(results, Formatting.Indented),

                ContentType = “application/json”,

            };
            return res;

        }

    }
You’ve got the logic ready! Run the Function app, and you will see that all the secrets have been updated with the desired status. Suppose you change the trigger from HTTP to Timer, or integrate the current HTTP trigger with Azure Logic App with scheduling. In that case, you won’t have to worry about older versions of each secret to being disabled.
So far, we’ve walked through how an Azure Functions app can manage older versions of each secret of Azure Key Vault while Azure App Service and Azure Functions are referencing the ones in Azure Key Vault. I hope that this sort of implementation can reduce the amount of management overhead.
This article was originally published on Dev Kimchi.

by Contributed | Feb 21, 2021 | Technology
This article is contributed. See the original author and article here.
Hi,
Recently, I built the Azure Solution Architect Map , the Azure Security Architect Map and the Azure Infrastructure Architect Map aimed at helping Architects finding their way in Azure. Here are all the maps in my series of Architecture Maps:
I’m now coming with the next map in this series, namely: the Cloud-native Azure Application Architect Map.
As usual, this map is by no means the holy grail and is just there to highlight some good fit between Azure Services and Design Patterns. This map is certainly subject to controversy as they are thousands of ways to design and develop and application. My goal is only to highlight some possibilities.
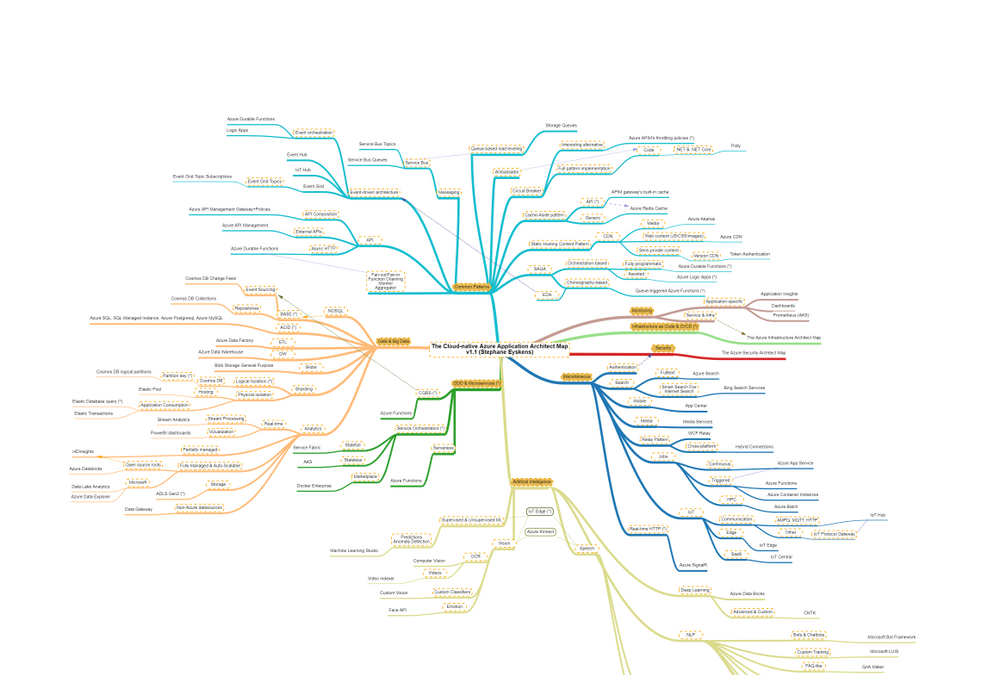
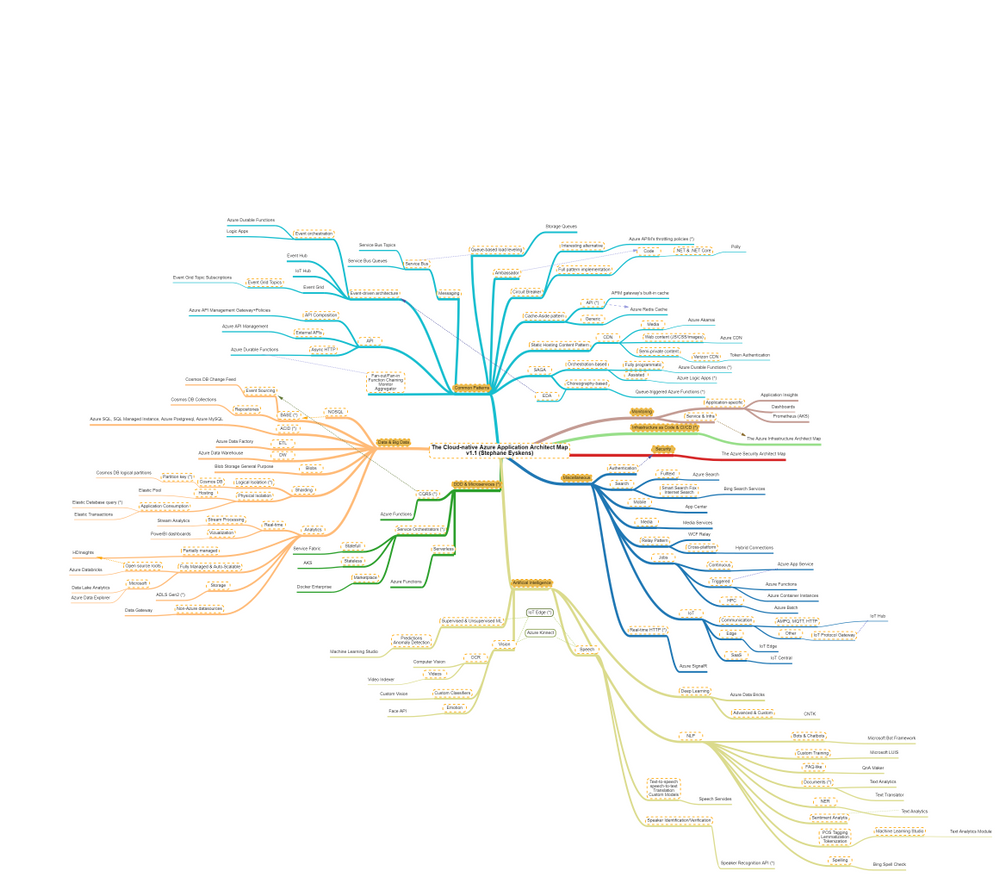
As usual, here is a screenshot of the map:

The map focuses on the following areas:
- Data & Big Data
- Common Design Patterns: SAGA, Circuit Breaker, Event-driven Architecture, etc.
- Domain-driven Design & Microservices: yes I clubbed them together :)
- Artificial Intelligence: NLP, Supervised & Unsupervised ML etc.
- Miscellaneous: things that come back regularly when developing applications such as real-time HTTP, search, job scheduling etc.
How to read this map?
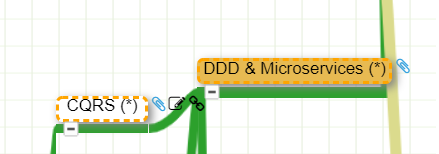
Whenever you see the attachment icon  , it means that I have attached an explanation on a given rationale or service. If you see a (*) next to a node, it is kind of a must read information. So for instance, in the following screenshot:

I want to catch your attention on why I make an association between DDD and Microservices:

as well as why I make an association between CQRS and DDD:

You might of course disagree with this but at least, you understand my rationale.
The link icon  is a pointer to the corresponding Microsoft documentation.
Note that I haven’t dived into AKS or Service Fabric since this guys would deserve a dedicated map and are not Azure services like others, they are a universe by themselves.
With this tool, any Cloud-native Application Architect should quickly grasp the application landscape of Azure.
Update: the online MindMapMaker tool deletes maps that are older than a year, therefore, just visit the last version.
Here are all the maps in my series of Architecture Maps:

by Contributed | Feb 20, 2021 | Technology
This article is contributed. See the original author and article here.
In my day to day, I get to work with many customers migrating their data to Postgres. I work with customers migrating from homogenous sources (PostgreSQL), and also from heterogenous database sources such as Oracle and Redshift. Why do people pick Postgres? Because of the richness of PostgreSQL—and features like stored procedures, JSONB, PostGIS for geospatial workloads, and the many useful Postgres extensions, including my personal favorite: Citus.
A large chunk of the migrations that I help people with are homogenous Postgres-to-Postgres data migrations to the cloud. As Azure Database for PostgreSQL runs open source Postgres, in many cases the application migration can be drop-in and doesn’t require a ton effort. The majority of the effort usually goes into deciding on and implementing the right strategy for performing the data migration. For those of you who cannot afford any downtime during the Postgres migration process, there are of course data migration services that can help. But if you can afford some downtime for the migration during a specific maintenance window (e.g. during weekends, nights, etc.), then simple Postgres utilities such as pg_dump and pg_restore can be used.
In this post, let’s walk through the tradeoffs to consider while using pg_dump and pg_restore for your Postgres database migrations—and how you can optimize your migrations for speed, too. Let’s also explore scenarios in which you need to migrate very large Postgres tables. With large tables, using pg_dump and pg_restore to migrate your database might not be the most optimal approach. The good news is we’ll walk through a nifty Python tool for migrating large database tables in Postgres. With this tool we observed the migration of a large Postgres table (~1.4TB) complete in 7 hrs. 45 minutes vs. more than 1 day with pg_dump/pg_restore.

Faster migrations with pg_dump & pg_restore
pg_dump is a standard and traditional utility for backing up a PostgreSQL database. pg_dump takes a consistent snapshot of your Postgres database, even if the database is being actively used. pg_dump gives you multiple command-line options (I call them flags) that you can use to control the format and the content of the data you’re backing up. Some of the common and most useful command-line options for pg_dump enable you to do things like:
- Fine-grained control of dumping specific schemas, specific tables, just the data, etc.
- Control of the format of the dump; options include plain-text or the custom or directory formats, which are compressed by default.
- Using the
–jobs/-j command line option, which provides the ability to specify the number of concurrent threads to use for the dump. Each thread dumps a specific table, and this command line option controls how many tables to dump simultaneously.
You can use the pg_restore utility to restore a PostgreSQL database from an archive created by pg_dump. Similar to pg_dump, pg_restore also provides a lot of control over how you restore the archive. For example, you can restrict the restore to specific database objects/entities, specify parallel jobs for the restore, and so on.
TIP: Place the client machine on which you perform pg_dump/pg_restore as close as possible to the source and the target database, to avoid performance issues with bad network latency. If only one of the two is possible, you can choose either. Just be sure to place the client machine as close as possible to the target database, or the source database, or both.
In summary, pg_dump and pg_restore are the most commonly used, native, robust, and proven utilities for homogenous (Postgres to Postgres) database migrations. Using these utilities is the default way to perform data migrations when you can afford downtime (within some acceptable maintenance window).
With the wealth of command-line options that pg_dump and pg_restore provide, it is important to use those options in an optimal way based on the scenario at hand. Let’s walk through some of the scenarios you may face, to understand how best to use pg_dump and pg_restore.
What if you need to migrate more than 5 large Postgres tables?
Suppose your Postgres database has multiple (say, more than 5) decently-sized (greater than 5GB) tables. You can use the -j flag to specify the number of threads to use when performing a pg_dump and pg_restore. Doing so not only maximizes resource (compute/memory/disk) utilization on the source and target servers, but it also scales the available network bandwidth. (However you should be cautious that pg_dump and pg_restore don’t become network hogs and don’t affect your other workloads.) Thus, using pg_dump and pg_restore can provide significant performance gains.
If you’re performing an offline migration with no other load on the Postgres servers, you can specify that the number of jobs is a multiple of the number of cores in the system, which will maximize compute utilization on servers. However, if you’re performing a dump/restore just for backup/restore reasons on servers that have production load, be sure to specify a number of jobs that doesn’t affect the performance on the existing load.
You can use directory format (-Fd), which would inherently provide a compressed dump (using gzip). We have sometimes seen over 5X compression while using the -Fd flag. For larger databases (e.g. over 1 TB), compressing the dump can reduce the impact of disk IOPs getting bottlenecked on the server from which you are capturing a dump.
Below are sample pg_dump and pg_restore commands that use 5 jobs for the dump and restore respectively:
pg_dump -d 'postgres://username:password@hostname:port/database' -Fd -j 5 -f dump_dir

pg_restore --no-acl --no-owner -d 'postgres://username:password@hostname:port/database' --data-only -Fd -j5 dump_dir
How to migrate if most of your tables are small, but one of your tables is very large?
Suppose your database has a single large table (over 5GB) while the rest of the tables are small (less than 1 GB). You can pipe the output of pg_dump into pg_restore so you needn’t wait for the dump to finish before starting restore; the two can run simultaneously. This avoids storing the dump on client which is a good thing, since avoiding storing the dump on the client can significantly reduce the overhead of IOPs needed to write the dump to the disk.
In this scenario, the -j flag might not help because pg_dump/pg_restore run only a single thread per table. The utilities will be throttled on dumping and restoring the largest table. Also, unfortunately, when you use the -j flag, you cannot pipe the output of pg_dump to pg_restore. Below is an example command showing the usage:
pg_dump -d 'postgres://username:password@hostname:port/source_database' -Fc | pg_restore --no-acl --no-owner -d 'postgres://username:password@hostname:port/target_database' --data-only
The techniques in the above 2 sections can drastically improve your data migration times with pg_dump and pg_restore, particularly when one or more large tables are involved. In addition, this post about speeding up Postgres restores walks through similar techniques and gives you step-by-step guidance on how to achieve ~100% performance gains with pg_dump/pg_restore. This is one of my favorite Postgres blogs on pg_dump and pg_restore, hence sharing for reference. 
pg_dump/pg_restore is single threaded at a single table level, which can slow down migrations
Even when you use the above optimizations, since pg_dump and pg_restore can use only a single thread each when migrating a single table, the entire migration can get bottlenecked on a specific set of very large tables. For databases over 1 TB with a couple of tables representing majority of the data, we’ve seen pg_dump and pg_restore take multiple days, which leads to the following question.
How can I use multiple threads to migrate a single large table in PostgreSQL?
You can leverage multiple threads to migrate a single large table by logically chunking/partitioning the Postgres table into multiple pieces and then using a pair of threads—one to read from source and one to write to the target per piece. You can chunk the table based on a watermark column. The watermark column can be a monotonically increasing column (e.g., id column) (OR) a timestamp column (e.g., created_at, updated_at, etc).
There are many commercial tools out there that implement the above logic. In the spirit of sharing, below is a Python script, called Parallel Loader, that is a sample implementation of the above logic. You can find the Parallel Loader script on GitHub if you want to use it yourself.
#suppose the filename is parallel_migrate.py

import os
import sys

#source info
source_url = sys.argv[1]
source_table = sys.argv[2]

#dest info
dest_url = sys.argv[3]
dest_table = sys.argv[4]

#others
total_threads=int(sys.argv[5]);
size=int(sys.argv[6]);

interval=size/total_threads;
start=0;
end=start+interval;

for i in range(0,total_threads):
        if(i!=total_threads-1):
                select_query = '"COPY (SELECT * from ' + source_table + ' WHERE id>='+str(start)+' AND id<'+str(end)+") TO STDOUT"";
                read_query = "psql "" + source_url + "" -c " + select_query
                write_query = "psql "" + dest_url + "" -c "COPY " + dest_table +" FROM STDIN""
                os.system(read_query+'|'+write_query + ' &')
        else:
                select_query = '"COPY (SELECT * from '+ source_table +' WHERE id>='+str(start)+") TO STDOUT"";
                read_query = "psql "" + source_url + "" -c " + select_query
                write_query = "psql "" + dest_url + "" -c "COPY " + dest_table +" FROM STDIN""
                os.system(read_query+'|'+write_query)
        start=end;
        end=start+interval;
How to invoke the Parallel Loader Script
python parallel_migrate.py "source_connection_string" source_table "destination_connection_string" destination_table number_of_threads count_of_table
With the Parallel Loader script, you can also control the number of threads used for migrating the large table. In the above invocation, the number_of_threads argument controls the parallelism factor.
Example invocation of the Parallel Loader Script
python parallel_migrate.py "host=test_src.postgres.database.azure.com port=5432 dbname=postgres user=test@test_src password=xxxx sslmode=require" test_table "host=test_dest.postgres.database.azure.com port=5432 dbname=postgres user=test@test_dest password=xxxx sslmode=require" test_table 8 411187501
The above implementation uses the monotonically increasing id column of a table to chunk it out and stream data from the source table to the target table using parallel threads. You can find some pre-requisites and recommendations for using Parallel Loader on this GitHub repo.
Comparing performance of Parallel Loader vs. pg_dump & pg_restore, for large Postgres tables
To compare the performance of pg_dump and pg_restore to the Parallel Loader script, I migrated a 1.4 TB Postgres table (with indexes) from one Postgres database to another in Azure in the same region, using both techniques.
You can see in the table below that the Parallel Loader script performed over 3X faster than pg_dump and pg_restore for this Postgres to Postgres data migration.
|
Parallel Loader
|
pg_dump & pg_restore
|
Time to migrate 1.4TB Postgres database (with indexes) in same Azure region
|
7 hours 45 minutes
|
> 1 day
|
 Figure 1: We observed a network throughput of ~9.5GB every 5 minutes for the migration, peaking at 27.9GB per 5 minutes.
Parallel Loader uses the COPY command for faster performance
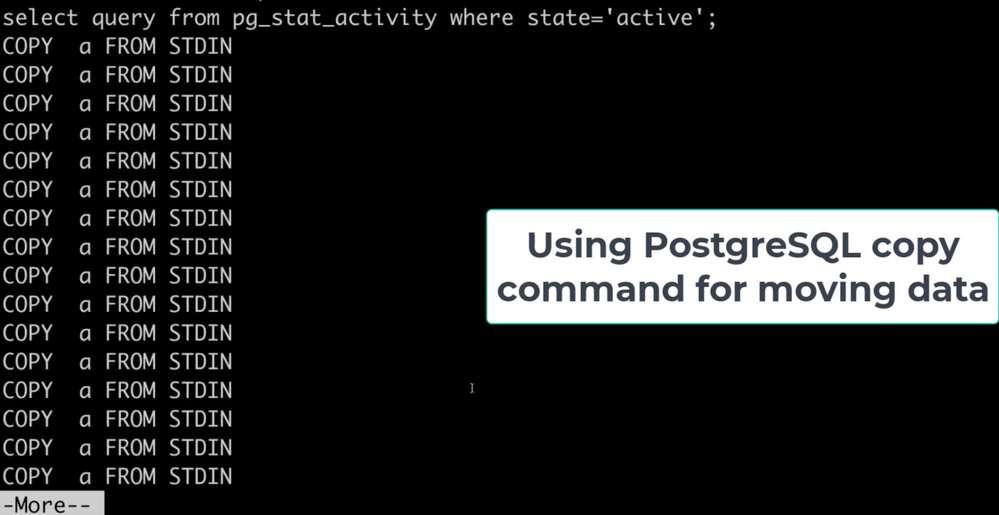
Note that Parallel Loader uses the COPY command across each thread for reading data from the source and writing data to the target database. The COPY command is the best way for bulk ingestion in Postgres. We have seen ingestion throughputs of over a million rows per second with the COPY command.
 Figure 2: Screenshot that shows the activity (pg_stat_activity) consisting of COPY commands on the target database. These COPY commands are generated by the Parallel Loader script while migrating a large table. Each COPY command translates to a single thread generated by the script.
Bottom line: you can use pg_dump/pg_restore in conjunction with Parallel Loader for faster Postgres data migrations
The pg_dump/pg_restore utilities are fantastic tools for migrating from a Postgres database to another Postgres database. However, they can drastically slow down when there are very large tables in the database. To solve that problem, you can use the approach explained in this post: to parallelize single large table migrations to Postgres by using the Parallel Loader script. We’ve seen customers use a combination of Parallel Loader and pg_dump/pg_restore to successfully migrate their Postgres databases. Parallel Loader can take care of the large tables while pg_dump/pg_restore can be used to migrate the rest of your Postgres tables.
More useful data migration resources:


Recent Comments