by Contributed | Mar 29, 2021 | Technology
This article is contributed. See the original author and article here.
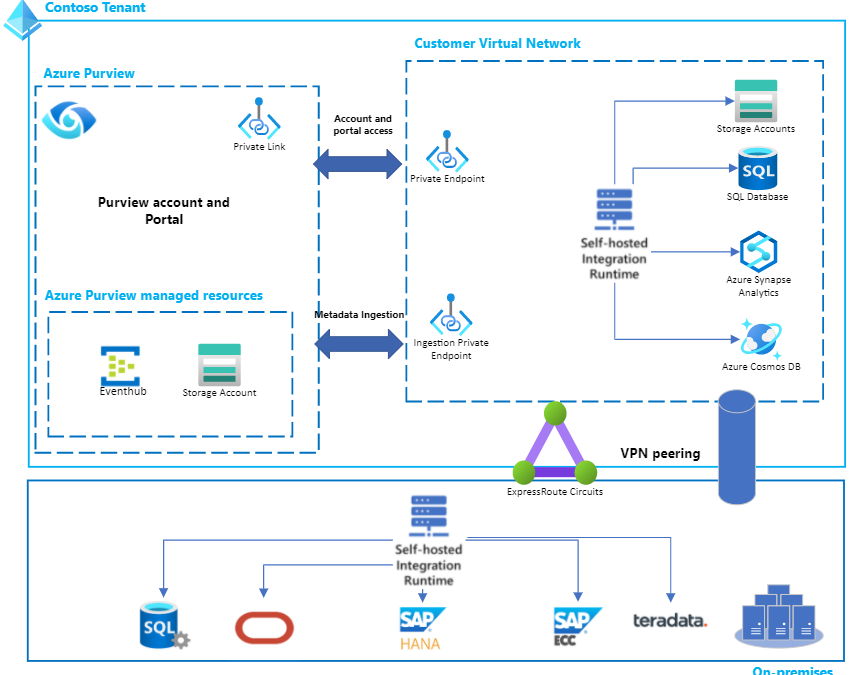
Earlier this week, we released a feature in Purview to use private endpoints for your accounts. Implementing this feature can unlock the following for you:
1. You can use private endpoints to allow clients and users on a virtual network (VNet) to securely access the Purview Data Catalog over a Private Link.
2. The private endpoint uses an IP address from the VNet address space for your Azure Purview account.
3. Network traffic between the clients on the VNet and the Purview account traverses over the VNet and a private link on the Microsoft backbone network, eliminating exposure from the public internet.
4. You can also ensure network isolation for your metadata flowing from the source which is being scanned to the Purview Data Map using ingestion Private endpoints.

Now let’s get started. Below is some helpful guidance to set this up within your own environment.
Creating a new Azure Purview account with Private Endpoints for the account & portal
Navigate to the Azure portal and then to your Purview account.
Fill basic information, and set connectivity method to Private endpoint in Networking tab. Set up your ingestion private endpoints by providing details of Subscription, Vnet and Subnet that you want to pair with your private endpoint.

Create an ingestion private endpoint only if you intend to enable network isolation for end-to-end scan scenarios, for both your Azure and on-premises sources. We currently do not support ingestion private endpoints working with your AWS sources.
You can also optionally choose to set up a Private DNS zone for each ingestion private endpoint.
Click Add to add a private endpoint for your Purview account.
In the Create private endpoint page, set Purview sub-resource to account, choose your virtual network and subnet, and select the Private DNS Zone where the DNS will be registered (you can also utilize your own DNS servers or create DNS records using host files on your virtual machines).
Create a private endpoint for the Azure Purview studio
Navigate to the Purview account you just created, select the Private endpoint connections under the Settings section.
Click +Private endpoint to create a new private endpoint.
Fill in basic information.
In Resource tab, select Resource type to be Microsoft.Purview/accounts.
Select the Resource to be the newly created Purview account and select target sub-resource to be portal.
Select the virtual network and Private DNS Zone in the Configuration tab. Navigate to the summary page, and click Create to create the portal private endpoint.
Ingestion private endpoints and scanning sources in private networks, virtual networks and behind private endpoints
If you want to ensure network isolation for your metadata flowing from the source which is being scanned to the Purview Data Map, then you must follow these steps:
Enable an ingestion private endpoint by following steps in this section of the documentation.
Scan the source using a self-hosted IR.
- All on-premises source types like SQL server, Oracle, SAP and others are currently supported only via self-hosted IR based scans. The self-hosted IR must run within your private network and then be peered with your Vnet in Azure. Your Azure vnet must then be enabled on your ingestion private endpoint by following steps here.
- For all Azure source types like Azure blob storage, Azure SQL Database and others, you must explicitly choose running the scan using self-hosted IR to ensure network isolation. Follow steps here to set up a self-hosted IR. Then set up your scan on the Azure source by choosing that self-hosted IR in the connect via integration runtime dropdown to ensure network isolation.
You can also set up private endpoints on your existing Purview accounts. To learn about this and more read our full documentation here today!

by Contributed | Mar 29, 2021 | Technology
This article is contributed. See the original author and article here.
We’re excited to share that our #BuildFor2030 campaign has returned with themes inspired by the United Nations Sustainable Development Goals, to continue our journey toward creating a more inclusive and sustainable future. As part of this campaign in 2020, we featured 80 partners, showing how our partners can leverage technology to make a difference.
In recognition of International Women’s Day 2021 this month, we are celebrating women in cloud, highlighting in our commercial marketplace partner solutions from women-led organizations driving digital transformation. In this blog post by Gavriella Schuster, read about how, together with the Microsoft partner community, we can uplift women in technology: Celebrating International Women’s Day with #BuildFor2030.
Discover and celebrate the partners being featured in #BuildFor2030 here.
Want to help amplify their impact? Use the frame above, comprised of the colors of the 17 UN SDGs, to help you spot featured partners of #BuildFor2030 on LinkedIn and Twitter.
Call for nominations:
If you have a solution that supports a more inclusive, sustainable, and equitable future, we’d love to celebrate your impact. Learn more and nominate your solution to be featured in #BuildFor2030.
by Contributed | Mar 29, 2021 | Technology
This article is contributed. See the original author and article here.
Do you wish you could take better notes during meetings or classes held on Microsoft Teams? Jeremy Chapman, from the Microsoft 365 team, demonstrates a new way to automate the process.
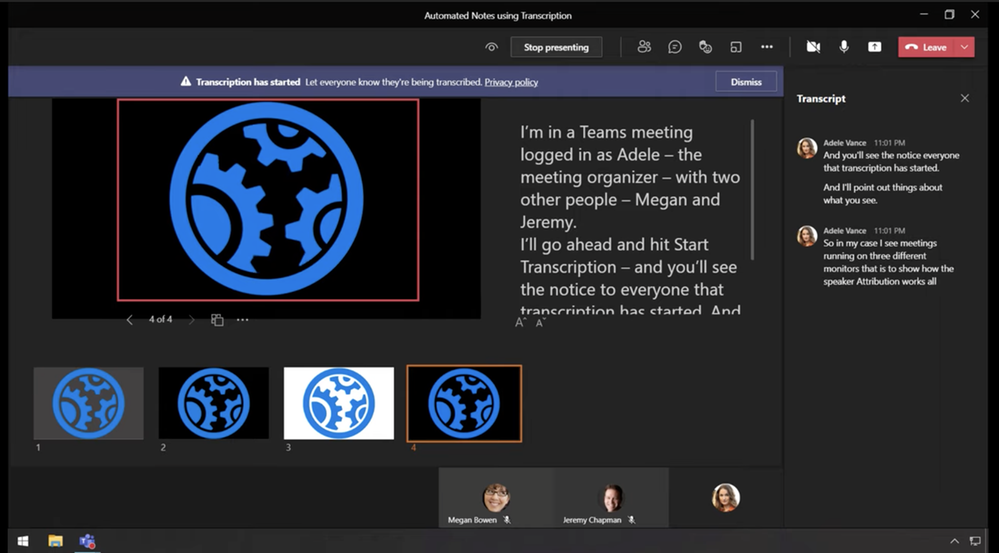
Now in Microsoft Teams, keeping detailed notes for your meetings just got easier, with in-context and automated meeting transcripts using the brand-new and AI-driven speech-to-text transcription capability built into Teams.
Once started, you can watch meeting transcription happen in real time. When the meeting is over, the transcript with speaker attribution is available to all meeting participants directly in the meeting’s chat. So everyone in the meeting can easily get to it and know what each person said.
QUICK LINKS:
00:23 — Meeting notes capability in Microsoft Teams
01:00 — Automated meeting transcription demo
02:13 — Finding the meeting transcript after the meeting
02:55 — Comparison with automatic captions in Microsoft Stream
03:21 — Enabling meeting transcription for Teams admins
03:37 — Closing remarks
Link References:
Find more shows in our work from home series at https://aka.ms/WFHmechanics
Unfamiliar with Microsoft Mechanics?
We are Microsoft’s official video series for IT. You can watch and share valuable content and demos of current and upcoming tech from the people who build it at Microsoft.
Video Transcript:
-Do you wish you could take better notes during meetings or classes held on Microsoft Teams? I’ll be the first to admit that I’m a terrible note taker and I’ve been in lots of meetings with people dedicated to taking meeting notes, but something like that isn’t practical for every meeting and it might just not be your favorite thing to do.
-So today I want to share another work-from-home tip that could make your note taking life a lot easier. So here I’m in a Teams meeting logged in as Adele, the meeting organizer, with two other people, Megan and Jeremy. Now, taking manual meeting notes in Teams has been around for a while. You just go into Settings, then click Take Notes. And this is a great capability to associate written notes with a meeting that everyone in the meeting can get to later. And, of course, you can type whatever you want to here. But that may have been hard to do if you were the one talking maybe or maybe you just wanted to focus on what was being said and not be distracted by typing, or maybe your keyboard was just kind of loud and you didn’t want to distract or disturb others.
-Well, now in Microsoft Teams keeping detailed notes for your meetings just got better, with in-context and automated meeting transcripts using the brand new and AI-driven speech-to-text transcription capability built into Teams. So I’ll go back into the meeting and onto the menu. Then I’ll go ahead and hit Start Transcription, and you’ll see the notice to everyone that transcription has started here.
-And I’ll go ahead and point out a few cool things about what you’re seeing. So in my case, I have three meetings running on three different monitors. Now just to show how the speaker attribution works, I’ll mute Adele’s microphone here and enable Megan’s. And now I’m talking in the context of Megan. But now I’m going to go head and mute her microphone and enable mine in the Jeremy instance of the meeting. So now you can see that as each person talks, their name and image is next to what they are saying. So this is pretty important for keeping track of who said what. Now I’ll mute my microphone again, and re-enable Adele’s.
-Now I’ll go back into the ellipses and stop the transcription. And you’ll see a notification that it’s stopped and you can restart this also if you want to. And this is great if you don’t want something transcribed, for example. And now I can go ahead and leave the meeting and you’ll see my Notes tab is still open, so I’ll go ahead and click into Chat, and there’s our meeting transcript, and it’s available to everyone who participated in this meeting.
-And here I’ll open the transcript, and you’ll see where things evolve even more. Here as I scroll down, you can see the speaker attribution, so you know who said what. And you can download the transcript as a Word document here with .docx or as a Video Text Track or .vtt file, and each of those has speaker attribution noted throughout.
-Now, just to be fair, the previous integration with Microsoft Stream and meeting recordings would automatically create a caption file that was searchable in Stream, but to find it, you had to go into your video, click on the ellipses, and then update video details, and then right here in captions, your could hit Download, and again that was something that only the person who hit the record button during the meeting could do by default. But now it’s just part of the Teams meeting chat and anyone who was on that meeting can get to it. So if you don’t quite see the Start Transcription option yet in your meetings, it could be that it hasn’t made it to your tenant, or your Teams admin may need to enable policy for you with Allow Transcription enabled as you can see here in the Admin Center. Now, once it’s enabled, if you’re the meeting organizer, you just need to start the transcription and let the speech-to-text AI do the rest.
-That was another work-from-home tip that for me has personally been a game changer as I juggle the huge range of topics that we present on Microsoft Mechanics. To find more tips like this on Microsoft Mechanics, check out https://aka.ms/WFHMechanics. Subscribe to our channel if you haven’t already, and thanks so much for watching.
by Contributed | Mar 29, 2021 | Technology
This article is contributed. See the original author and article here.
I am a Sustainability activist at work. And that’s OK.
Hello there, Jessica here, I am a marketing leader at Microsoft. This article is to share with you how I am working on making sustainability everybody’s job at Microsoft, as I reflect on my own journey working with a group of smart and agile leaders of the Worldwide Sustainability Community at Microsoft. I believe it is everyone’s responsibility to help their corporations become more responsible and sustainable. If you are interested in helping your organization step up its environmental game, this article will help you get started. As our Chief Environmental Officer at Microsoft, Lucas Joppa says: it is bigger than all of us. It will take all of us to partner and build a more just and sustainable future for all.
TL-DR version of this article: my “Make sustainability everybody’s job at Microsoft” checklist. |
1. Gather
– Find your allies
– Create a structure
– Speak up
– Measure impact early
|
2. Educate
– Create learning opportunities
– Make participation easy
– Promote curiosity
|
3. Activate
– Drive engagement
– Empower leaders
– Inspire people (or try to)
|
Step 0 – Dare to make a difference at work.
In the past eight years, my husband and I have been intentional at reducing our family’s carbon footprint and living a more sustainable lifestyle. But when I had my second baby in Jan 2019, I didn’t feel it was enough. While I was in complete awe of this new beautiful (of course) human being, I also felt this urgent need to better align my personal commitment with my professional life. It was as if bringing a new human being on earth, I had an additional responsibility towards the planet.
I was still on maternity leave when I connected to Microsoft’s internal network in the desperate seek of likeminded people who could become my sustainability allies. And that’s how I found the nascent WW sustainability community (WWSC) of Microsoft employees. Just a few months earlier, in their own efforts of finding people who care about sustainability, Drew and Holly had just founded the community. Before my maternity leave ended, I had decided to become an active member of this new community. I had decided I would drive sustainability forward at work.
Step 1 – Get (it) together.
If you are looking to drive change at your company and collaborate with your fellow employees, I’d encourage you to create a structure early, like Drew and Holly did with the Worldwide Sustainability Community at Microsoft. Once we had the right structure in place, a few things followed almost organically: we defined leadership roles to manage the community (I started as Comms Lead), we got ourselves an executive sponsor (our very own Lucas Joppa), and we defined a rhythm of business (monthly community calls, bi-weekly leads calls). As we got more structured and organized, grassroots word of mouth started, and more employees joined us.
While we didn’t have a roadmap, most WWSC leads shared my urgent need to get the sustainability conversations started. Finding sustainability allies had an energizing effect: I felt stronger, I wanted to speak up. Next thing I knew, I was at one of our Monthly Employee Q&A sessions asking a question to Satya Nadella himself about sustainability. After that, all Q&A sessions with our Senior Leadership Team had an employee ask a sustainability question. The community didn’t organize the sustainability line of questions, people just got naturally energized and it became okay to ask. Let’s not forget this was mid-2019, right in the middle of Fridays for Future, Greta Thunberg, etc. and it was about time we discuss it at work.
My tip here: Don’t wait to have everything figured out to get the discussions going. It’s okay to speak up and ask questions, even more when you are ready to roll up your sleeves and be part of the answer.
Speaking up also helped us articulate our mission and vision as a Worldwide Community. We define our mission as “identifying and acting on areas where grassroots, employee-driven engagement can be an effective mechanism for change in the sustainability space inside Microsoft and beyond.” We defined our objectives for the community, with simple metrics around growth, geographic footprint, and engagement to measure our impact. That led us to step 2.
.png") Microsoft Sustainability Mission Statement
Microsoft Sustainability Mission Statement
Step 2 – Initiate a learning journey for all.
We were a group of people with a mission and a goal: to grow a community of informed, inspired and engaged employees that collaboratively drive positive environmental change at every level of the company.
We quickly doubled down on creating learning opportunities and providing resources for everyone to skill up on sustainability. We made sure that participation was easy for each learning opportunity.
We encouraged more people to speak up and share their stories. Our global community provided sharing opportunities such as monthly community calls where local initiatives could get global visibility. Connections were built. People who never met each other would connect and start working on common projects. I led a virtual team that organized our first Earth Day campaign 2020, right at the start of the Covid pandemic, encouraging employees to share their actions for Earth, from home. The point was to learn from each other and promote curiosity. We ended up reaching 350,000 people, with many employees sharing their actions for Earth on LinkedIn.
 Celebrate Earth
Step 3: Activate
After a 2.5-year journey, the community is now 3,600 members, 26 local chapters strong, and growing every day. This is not just our grassroots work that made us grow so big and so fast. In 2020, Microsoft made bold sustainability commitments around carbon, water, waste and biodiversity. A sustainability journey that started more than 10 years ago (with our internal carbon tax, our 100% renewable energy datacenters, and more) finally got the main stage it deserved. Every public announcement Microsoft made, more employees would join us, looking for ways to make sustainability part of their work.
The WWSC is now a legitimate internal partner, and we actively work with several teams to make sure Sustainability is infused in every important Microsoft beats. A good example is our internal Hackathon, where tens of thousands of Microsoft employees come together to bring world-changing ideas to life. Employees have the opportunity to join a Hack for Sustainability challenge, tackling important challenges and helping us identify emerging sustainability leaders. We empower these leaders to hack throughout the year on our community Actionbox, where teams can continue to work on their employee-led sustainability projects across the company, in all stages of development.
As Brad Smith, President of Microsoft says: “We’ll continue to keep our house in order and improve it, while increasingly addressing sustainability challenges around the globe by engaging our strongest assets as a company – our employees and our technologies. Meeting this raised ambition will take the work of everyone across Microsoft, as well as partnerships with our customers, policymakers, and organizations around the world.”
My personal wish for 2021 is to encourage employee activism and to give employees ways to take action for Earth. Two years ago, I used to hide this part of me at work. But not anymore. I am a climate activist. I am a social justice activist. I am fighting – as much as I can – for a sustainable and equal world for all. It makes me feel hopeful that big companies like Microsoft take a strong stand on these important issues and I am hoping this article inspires you to do it too.
Become familiar with Microsoft’s Environmental Sustainability Report through Drew’s article summarizing the 96-page document.
See my originally published article on my LinkedIn profile.
by Contributed | Mar 29, 2021 | Technology
This article is contributed. See the original author and article here.
Running SQL Server on an Azure virtual machine is one of the quickest and easiest ways to lift-and-shift your SQL workloads into the cloud. The great thing about SQL Server on Azure Virtual Machines is that it’s the same SQL Server database engine you’re used to running on-premises. For the most part, configuration, settings, maintenance, and performance tuning techniques are all going to be the same, but infrastructure configuration such as choosing the right VM size and designing a storage layout are going to be quite different. The choices you make when creating and configuring a SQL Server VM in Azure can have a dramatic impact on performance and cost, potentially improving performance by 35% or more while decreasing the cost. No one knows SQL Server like Microsoft, so it should be no surprise that Azure offers the best overall value for running your SQL Server workloads in the cloud.
There are many benefits to running your SQL Server workloads on Azure VMs:
- SQL IaaS Agent Extension adds an array of manageability features for your SQL Server VMs at no additional cost.
- Azure Hybrid Benefit allows you leverage your existing on-premises Software Assurance investment in Azure including the value-add of free HA/DR instances for business continuity.
- Security Center helps keeps your secure with Azure Defender for SQL.
- Competitive price-performance for your modern SQL Server transactional workload, as demonstrated in our recent GigaOm performance benchmark.
So how do you get the best price-performance possible when configuring your SQL Server on Azure VM? In this blog, we’re going to cover three key aspects to right-sizing (and right-configuring) your Azure VM for SQL Server that are based on some common pitfalls customers face when migrating their on-premises workloads to Azure VM:
- Choosing the best VM series and size for your workload
- Configuring storage for maximum throughput and lower cost
- Leveraging unique to Azure features such as host caching to boost performance at no additional cost
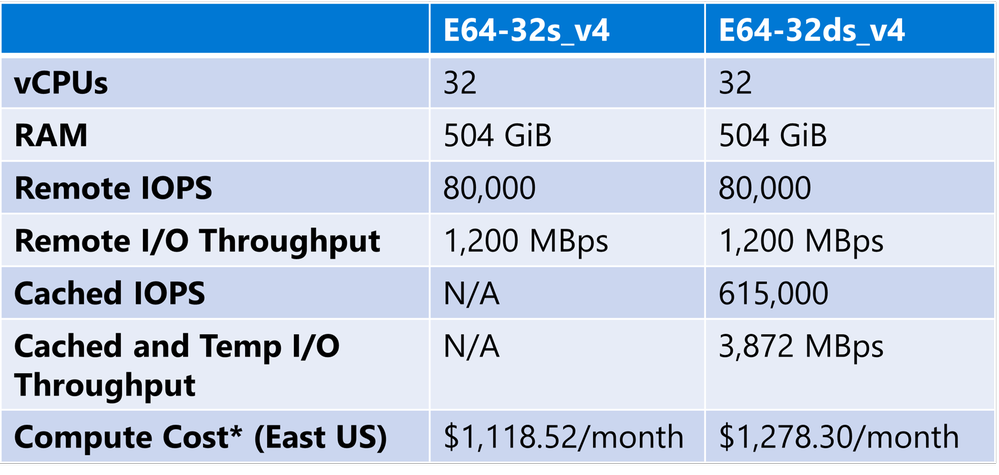
To help illustrate how small choices can have a big impact on price-performance, we conducted an internal experiment against two different VMs from our Memory Optimized series that are commonly used to host SQL Server workloads. Here are some specifications for the two VMs:
* This cost is for compute only with a 3-year reservation, assuming Azure Hybrid Benefit for both Windows OS and SQL Server licensing costs.
Note that these two VMs are very similar – they both have the same core count, RAM, and I/O throughput, but the E64-32ds_v4 VM has the addition of a fast local SSD that can be used for both temporary (ephemeral) storage within the VM and for host caching, also known as Azure BlobCache. Host caching is a great way to boost your performance with no additional cost, provided that you choose a VM size that supports it. This is particularly useful for SQL Server workloads which tend to be I/O intensive and read-heavy. In this case, the VM that supports caching is slightly more expensive, but as you’ll see in a moment, a little goes a LONG way when it comes to I/O throughput.
Speaking of I/O, how about storage configuration? You have a number of storage choices for Azure VM, but for SQL Server workloads we recommend managed disk, either Premium SSD or Azure ultra disk. Ultra disk provides high throughput at very low latency, but most SQL Server customers find Premium SSD meets their needs if it’s configured correctly. We generally recommend either P30 or P40 drives as these support host caching and provide reservations which can help with overall cost.
Coming back to our experiment, let’s assume that we have measured our on-prem workload and we estimate that we’ll need about 3 GBps of I/O throughput. You can’t get this from a single managed disk, so we’ll need to create a storage pool so that we can combine the throughput of multiple Premium SSDs. There are a few different ways we can do this, but generally a large number of small disks gives better price-performance than a small number of large disks. Here’s a comparison, both of these configurations assume 1-year reservation:


Note that the second configuration has a lot more drives, but the throughput is about the same. The capacity is lower, but we’re sizing for throughput here, not capacity. The price difference is pretty staggering. If you do need more capacity, you can go with larger drives – P40s would give you 32 TiB at $3,937.33/month and still support caching.
For our experiment, 16 TiB was more than enough storage, but we don’t want a single pool because we want to be able to configure the pools separately for data and log files. We created two pools as follows:


Note the cache settings. Writes in SQL Server are flagged as writethrough which means they always write directly to storage to guarantee durability. This means writes can’t take advantage of host caching. Since the transaction log is mostly writes, there’s no benefit to host caching there, and in fact enabling it for log drives can cause unnecessary overhead.
Data files on the other hand are read-heavy, even for most OLTP systems. Reads in SQL Server can take advantage of host caching, and we find that for many customers around 30% of data file reads will get satisfied from the cache, which frees up remote storage bandwidth for writes and other I/O. Remember that turning on host caching is free, so if you’re not configuring your storage and VM to take advantage of it, you’re leaving money (and I/O throughput) on the table!
OK, so let’s get to the fun part. We used HammerDB to execute a TPC-C1 style workload against both of our VM configurations. Normally for SQL Server benchmarks we use TPC-E because it’s a more realistic workload, but HammerDB is a common tool used by many database professionals to stress and benchmark systems, so we thought it would be a good choice for this informal experiment in case you want to run something like this yourself. Check out the results. The performance metric used for these tests is New Orders Per Minute (NOPM):

* This cost is for compute only with a 3-year reservation, assuming Azure Hybrid Benefit for both Windows OS and SQL Server licensing costs.
Just by following the best practices we outlined above, we were able to get 34% MORE performance at 50% of the cost!
These are pretty amazing results, but we’re doing a benchmark-style test here, can you really expect these results in your production system with your workload? The answer is yes, and maybe even better than what we see here. The TPC-C workload is designed to stress a system hard, particularly in I/O throughput. Because of this, it’s heavily weighted in favor of writes, about 2 to 1 reads/writes or 67% read / 33% write. Most SQL Server workloads, even busy OLTP workloads, are closer to 80%-90% read / 10%-20% write, so you may see an even bigger benefit from read caching, particularly if you can downsize to a lower-cost VM with a smaller memory footprint.
So whether you’re already running SQL Server workloads in Azure VMs, are in the process of migrating your on-prem workloads to Azure, or just considering your options, be sure to check out the following resources to help you get the best performance for your cloud dollar in Azure:
Checklist: Performance best practices & guidelines – SQL Server on Azure VM | Microsoft Docs
Deep Dive: Azure SQL Virtual Machine Sizing | Data Exposed Live – YouTube
Eight ways to optimize costs on Azure SQL | Azure Blog and Updates | Microsoft Azure
1The HammerDB TPC-C workload is derived from the TPC-C Benchmark and as such is not comparable to published TPC-C Benchmark results, as the HammerDB TPC-C workload results do not fully comply with the TPC-C Benchmark.

Recent Comments