by Contributed | Mar 29, 2021 | Technology
This article is contributed. See the original author and article here.
AzureRM PowerShell modules would be retired on 29 February 2024, Az PowerShell modules now have all the capabilities of AzureRM PowerShell modules.
This blog shows AZ module setup and common commands to manage your Azure Service Fabric.
Table of Contents
- Az module setup:
- Check if you have AzureRM module
- Install AZ module and remove AzureRM module
- Common commands
- Login to your Azure account
- Get service fabric cluster status
- Add nodes to a cluster
- Add nodeType to cluster
- Update cluster durability
- Update the cluster reliability
Notes:
- The following cmdlets of {Get-Az*} only support ARM deployed resources:
- Get-AzServiceFabricApplication
- Get-AzServiceFabricService
- Get-AzServiceFabricApplicationTypeVersion
- Get-AzServiceFabricApplicationType
- Add cluster certificate is not supported, suggest to use ARM instead.
Az module setup:
This section will cover how to setup the AZ module in your environment.
You can skip this part, If you have already setup a local environment for with the AZ module.
Step 1: check if you have AzureRM module.
If you do have the AzureRM installed, you will need to remove AzureRM module first.
Document Link
Run code:
if ($PSVersionTable.PSEdition -eq 'Desktop' -and (Get-Module -Name AzureRM -ListAvailable)) {

    Write-Warning -Message ('Az module not installed. Having both the AzureRM and ' +

      'Az modules installed at the same time is not supported.')

} else {

    Install-Module -Name Az -AllowClobber -Scope CurrentUser

}

Step2: install AZ module and remove AzureRM module
Uninstall AzureRM module: https://docs.microsoft.com/en-us/powershell/azure/uninstall-az-ps?view=azps-5.6.0#option-2-uninstall-the-azurerm-powershell-module-from-powershellget
First run code:
Install-Module -Name Az -AllowClobber -Scope CurrentUser

Then run code as an admin:
Uninstall-AzureRm

Common commands
- Login to your Azure account
To login, you will need to run the following command:
Connect-AzAccount

After sign in, you will be able to see the subscriptions you can work with:

(Optional) If you want to change a subscription to work with, run the following codes:
Run code:
$context = Get-AzSubscription -SubscriptionId ...
Set-AzContext $context
Use the Get-AzServiceFabricCluster command to get the information for a specific SF cluster.
Run code:
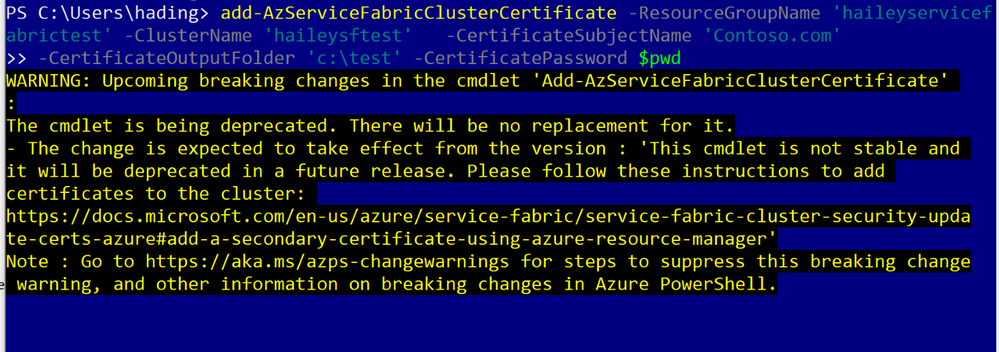
Get-AzServiceFabricCluster -ResourceGroupName 'haileyservicefabrictest' -ClusterName 'haileysftest'

You can run the following code to add nodes to your specific cluster.
Add-AzureRmServiceFabricNode -ResourceGroupName 'haileyservicefabrictest' -ClusterName 'haileysftest' -NodeType 'Type456' -Number 2
Run codes:
Add-AzServiceFabricNodeType -ResourceGroupName $resourceGroupName -ClusterName $clusterName -NodeType $nodeType -Capacity $capacity -VmUserName $vmUsername -VmPassword $pwd

Using the following command to update the durability tier or VmSku of a node type in the cluster.
Update-AzServiceFabricDurability -ResourceGroupName 'haileyservicefabrictest' -Name 'haileysftest' -DurabilityLevel Silver -NodeType 'mynodetype’

Use the following command to update the reliability tier of the primary node type in a cluster.
Update-AzServiceFabricReliability -ResourceGroupName 'haileyservicefabrictest' -Name 'haileysftest' -ReliabilityLevel Silver
by Contributed | Mar 29, 2021 | Technology
This article is contributed. See the original author and article here.
Microsoft 365 Business Voice makes it easy for small and medium organizations to turn Microsoft Teams into a powerful and flexible telephone system. If you already have phone numbers that you would like transfer to Business Voice, you can bring them with you by porting them from your previous service provider to Microsoft.
Porting your existing phone numbers to Microsoft 365 Business Voice can be a simple and straightforward process. To minimize potential issues, it is important to avoid common mistakes when submitting your porting requests.
This document provides a summary of how our porting process works and includes additional guidance and resources to assist you in completing your porting requests most efficiently.
Let’s quickly look at the porting process on a high level:
- In a nutshell, the gaining carrier (the phone service provider that you want to port your numbers to, i.e., Microsoft) raises a port request on your behalf (the end customer) and sends it to the losing carrier (the phone service provider that currently owns the phone numbers that you are trying to port).
- The losing carrier will process the port request and respond with either an approval or a rejection. Microsoft has no say in this decision and cannot influence the behavior of the losing carrier, as it is based on completion and accuracy of the port request data.
- When placing a port request, you will be asked to choose a target porting date and time. Choosing a target date does not mean that the port will happen on that date – the port will only occur on the target date IF the losing carrier provides approval to allow your numbers to be ported away from their system on the date that you have asked for.
- Microsoft takes your request and submits it to the losing carrier and then relays their response back to you.
Below are a few best practices that would make your number porting process as smooth as possible:
Creating a Number Porting Request
If you are in a supported region for the automated number porting process through Teams Admin Center, we strongly recommend you to use this method. You’ll benefit from an automated process and a structured wizard with additional guidance.
The following rules are important to be aware of when creating porting requests:
- Request to schedule the execution of your ports during business hours in your time zone.
- Avoid requesting to schedule the execution of number ports on Friday afternoon because it will limit our staff’s ability to connect with the losing carrier (if necessary). This may result in the numbers being out of service over the weekend.
- Submit one order per each account number from the losing carrier. Phone numbers from different account numbers in a single port order will fail.
- Careful planning is necessary to properly schedule the port order. Submitting multiple orders for the same carrier and account number may fail as the losing carrier may only accept one at a time.
- Toll-free phone numbers must be submitted on separate port orders.
- All phone numbers in a port order must be from the same carrier.
Validate Information you provide in a porting request.
The success of your port request depends on the accuracy of the information that you provide to Microsoft when you create it. Please validate the information accuracy with the existing provider before submitting the port request. You can do this by obtaining a Customer Service Record (U.S.), Equipment Record (Canada), or pre-order validation bill from the current carrier.
Do not cancel existing services until porting is complete.
Number porting occurs based on account information and if you cancel your subscription, it will not succeed.
Porting different number types
Phone numbers in Business Voice can have two types: user phone numbers that can be assigned to users and service numbers that can be assigned to services such as Call Queues.
In this model, the Service Desk can than schedule the inventory change right after the number port has been completed.
In addition to the above guidance, Microsoft is taking the following steps to improve the number porting experience:
- We’re investing in additional step-by-step guidance documentation to assist customers and partners in submitting port requests. This blog post is the first step in this direction and we will be providing more details as new resources become available.
- The porting process is being streamlined, with new automation being added this month to accelerate response times.
- We continue to add more staff to our number porting team to improve the experience with number porting management.
For more details and additional tips and tricks on number porting, please refer to the Number Porting – Best Practices Webinar and additional resources below:
- What is a port order. For an overview of what number porting is and answers frequently asked questions about number porting.
- Transferring phone numbers common questions. It includes regional support information, numbers that can and cannot be transferred, and the data required to complete the process.
- Use the Teams Admin Center to submit a port order:
- How to check the status of your port orders: In Teams Admin Center, use the left and go to > Voice > Port orders. Then click Order history. Each port order status is listed in the Status column.
- Manage phone numbers for your organization and obtain LOA templates: Manage phone numbers for your organization
by Contributed | Mar 29, 2021 | Technology
This article is contributed. See the original author and article here.
Scenario:
In the browser, if you send a request to your Azure API management service, sometimes you might get the CORS error, detailed error message like:
Access to XMLHttpRequest at ‘https://xxxxx.azure-api.net/123/test’ from origin ‘https:// xxxxx.developer.azure-api.net’ has been blocked by CORS policy: No ‘Access-Control-Allow-Origin’ header is present on the requested resource.

This blog is intended to wrap-up the background knowledge and provide a troubleshooting guide for the CORS error in Azure API Management service.
Background Information:
What is CORS?
https://developer.mozilla.org/en-US/docs/Web/HTTP/CORS
Cross-Origin Resource Sharing (CORS) is an HTTP-header based mechanism that allows a server to indicate any other origins (domain, scheme, or port) than its own from which a browser should permit loading of resources.
An example in my case, when I try to test one of my API in my APIM developer portal. My developer portal ‘https://coolhailey.azure-api.net’ uses XMLHttpRequest to make a request for my APIM service ‘https://coolhailey.developer.azure-api.net’, two different domains.
How does CORS work?
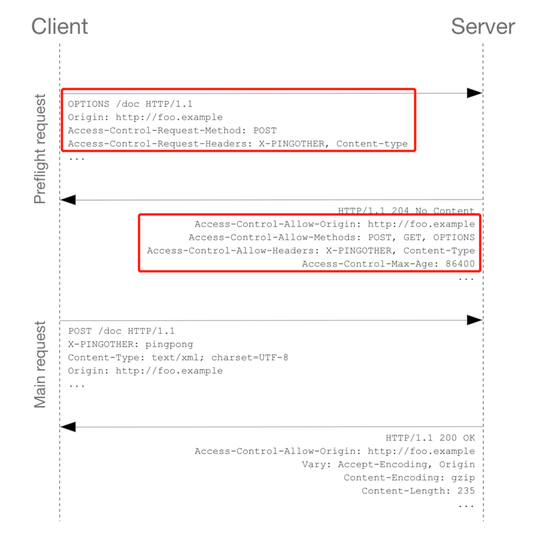
CORS relies on a mechanism by which browsers make a “preflight” request to the server hosting the cross-origin resource, in order to check that the server will permit the actual request. In that preflight, the browser sends headers that indicate the HTTP method and headers that will be used in the actual request. https://developer.mozilla.org/en-US/docs/Web/HTTP/CORS#preflighted_requests
Preflight: “preflighted” requests the browser first sends an HTTP request using the OPTIONS method to the resource on the other origin, in order to determine if the actual request is safe to send. Cross-site requests are preflighted like this since they may have implications to user data.
An example of valid CORS workflow:
Step 1: There will be an Options request first.
In the request header, the ‘Access-Control-Request-Headers’ and ‘Access-Control-Request-Method’ has been added.
Please pay attention to the response header: Access-Control-Allow-Origin. You might need to make sure the request origin URL has been added here. In my case, I am sending a request from my developer portal, so ‘https://coolhailey.developer.azure-api.net‘ needs to be added to the Access-Control-Allow-Origin field.
Then go to the real request, step 2.

Step 2: The real request starts.

Troubleshooting:
To troubleshoot the CORS issue with the APIM service, usually we need to prepare ourselves with the following aspects.
Checking if you have the CORS policy added to the inbound policy
You will need to navigate to the inbound policy and check if you have this <cors> element added.
Some example as the snapshot below:

here is a document for the CORS policy in APIM service
Understanding how CORS policy work in different scopes
If you have been using APIM policy before, you will notice that CORS policy can be added into the global level(All APIs) or the specific API level(An operation), which means that there are policies in APIs and there are also policies in specific operations. How does these policies work in different scopes?
The answer is that specific APIs and operations inherited the policies from their parent APIs, by using the <base/> element. By default, the <base/> element is added to all the sub APIs and operations. However by manually removing the <base/> from specific APIs and operations, the policies from the parent APIs won’t be inherited.
A default policy for an API and operation:

Calculating Effective Policies
We can use the tool ‘Calculate effective policy’, to get the current effective policies for a specific API/operation.
Navigate to the inbound policy for the specific API or operation, you will find the ‘Calculate effective policy’ button on the bottom right. Snapshot below:

Clicking on the botton, and choose the product you want to check, then you will find all the effective policies for the current API/Operation.

Common Scenarios:
Scenario 1: no <cors> policy enabled
If you want to apply the cors policy into the global level, you can add the <cors> policy at the ‘All APIs’ level.
In the allowed origins section, please make sure the origin URL which will call your APIM service, has been added.
<cors allow-credentials="true">
<allowed-origins>
<origin>the origin url</origin>
</allowed-origins>
<allowed-methods preflight-result-max-age="300">
<method>*</method>
</allowed-methods>
<allowed-headers>
<header>*</header>
</allowed-headers>
<expose-headers>
<header>*</header>
</expose-headers>
</cors>

In some cases, you may only want to apply <cors> policy to the API or Operation level. In this case, you will need to navigate to the API or Operation, add the <cors> policy into the inbound policy there.
Scenario 2: missing the <base> element into the inbound policyat different scopes
If you have enabled the <cors> policy at the global level, you would suppose all the child APIs or operations can work with cross region requests properly. However, things are not as expected if you’ve missed the <base> element for one of the child level policy.
For example, I have <cors> at the global level enabled, but for the ‘Get Test call’ Operation, the cors is not working.


In this case, your need to check the inbound policy for this specific Operation ‘Get Test call’ , and see if you have the <base> element here. If no, you will need to add it back into the inbound policy.

At the same time, you will need to check the inbound policy at the API level, which you can click the ‘All operations’, and make sure the <base> element is added at this different scope.

In my case, I find that I am missing the <base> element in the ‘Test API’ level, so my solution would be adding the <base> element here.
Scenario 3: <cors> policy after other policies
In the inbound policy, if you have other policies before the <cors> policy, you might also get the CORS error.
For example, in my scenario, navigate to the effective policy for the operation, there is a <rate-limit> policy right before the <cors> policy. The CORS setting won’t work as expected, since the rate-limit policy will be executed first. Even though I have <cors>, but it cannot work effectively.

In this case, I need to change the order of the inbound policy and make sure the <cors> is at the very beginning of my inbound policy, so that it will be executed first.
Scenario 4: product level CORS setting
Your product level policy setting can also affect your <cors> policy.
Please be noted that: when CORS policy applied at the product level, it only works when subscription keys are passed in query strings.
For one of my API, when I navigate to the calculate effective policies, and if I choose different Products, the inbound policies are completely different.
- When I choose Contoso product, I see <cors> setting working fine.

- However, when I choose a different product ‘Starter’, I have <rate-limit> and <quota> setting at the product level. These rate limit policies will be executed before the <cors> policy, which will result in the CORS error when I reach to the rate limit. This is actually a fake CORS error message, since the real problem comes with the rate limit.

- To avoid this kind of fake CORS error, you can navigate to the Starter product, and go to the Policies blade, then change the order of the inbound policies.
In my case, I just moved the <base/> element to the beganing of the inbound policy.


by Contributed | Mar 29, 2021 | Technology
This article is contributed. See the original author and article here.
Microsoft Teams is a rich collaboration platform used by millions of people every day. By building custom apps for Teams you can help them work more effectively and connect them with even more knowledge and insights. Here are some resources to help you get started.
What kind of apps can you build on Teams
The Microsoft Teams platform offers you several extensibility points for building apps. On Teams you can build:
- tabs that allow you to expose your whole web app inside Teams to let users conveniently access it without leaving Teams
- bots that help people complete tasks through conversations. Bots are a great way to expose relevant features of your app and guide users through the scenario like a personal assistant
- messaging extensions to help people complete tasks in a visually-compelling way. Messaging extensions are similar to bots but are more visually oriented and ideal for showing rich data
- webhooks to bring notifications from external systems into conversations
If you have an existing web or mobile app, you can also bring information from Teams into your app.
Resources for getting started with building apps for Teams
Sounds interesting? Here are some resources to help you get started building apps for Teams.
If you learn in a structured way and like to understand the concepts before getting to code, this is the best place to start. This learning path will teach you the most important pieces of building apps for Teams. You will learn what types of apps you can build for Teams and how to use the available tools. This learning path is a part of preparation for a Microsoft 365 developer certification.
View the learning path
Another great place to start is the developer documentation. It’s a complete reference of the different development capabilities on the Teams platform. You will find in there everything from a high-level overview of what you can build on Teams to the detailed specification of the different features. What’s cool about learning from the docs is that you can choose your own path and which topics you want to learn first.
View Microsoft Teams developer documentation
One way to learn is to see what’s possible and what others build. If you want to get inspired, see what’s possible or look at how you could implement a specific scenario, you should check out the Teams app templates. There are over 40 sample ready-to-use apps including their source code for you to explore!
A part of the docs are tutorials for the Teams developer platform. If you want to get hands-on, this is a great place to start. You can find tutorials showing apps built using different technologies like Node.js or C#. And don’t forget to check out code samples too!
View tutorials for the Teams developer platform
Microsoft 365 has a vibrant community that supports each other in building apps on Microsoft 365. We share our experiences through regular community calls, offer guidance, record videos, share sample apps, and build tools to speed up development. You can find everything we have to offer at aka.ms/m365pnp.
Start building apps for Teams today
Over 250 million users work with Microsoft 365 and Microsoft Teams plays a key role in people’s workdays. By integrating your app with Teams you bring it to where people already are and make it a part of their daily routine.
Give Teams a try and I’m curious to hear what you’ve built. And if you have any questions, don’t hesitate to ask them on our community forums at aka.ms/m365pnp-community.
by Contributed | Mar 28, 2021 | Technology
This article is contributed. See the original author and article here.
See how the latest updates to Azure Migrate provide one unified environment to discover and assess your servers, databases, and apps, and easily migrate them to Azure. Jeremy Chapman is joined by Abhishek Hemrajani, Group PM Manager for Azure Migration, to explore how we’ve merged three different tool sets for discovery and assessment into one unified, at scale, agentless discovery and assessment experience.
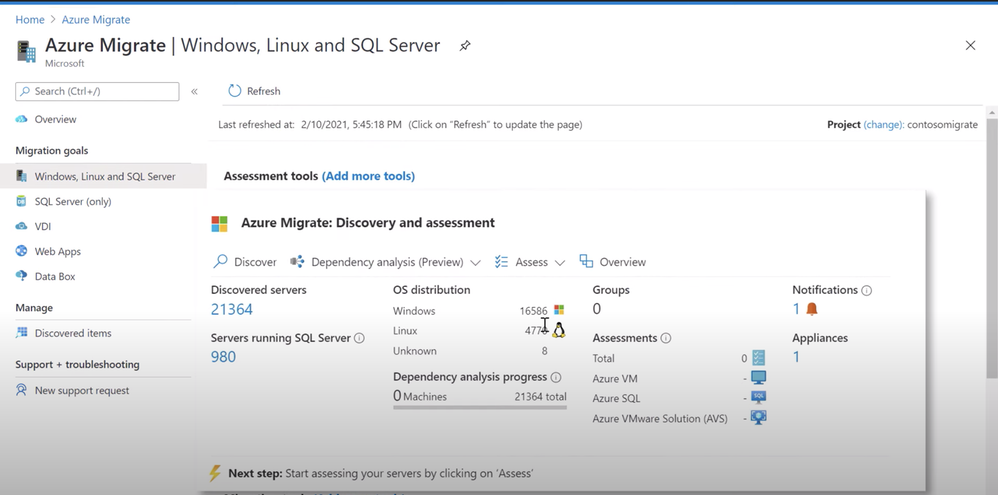
Discovery: Track multiple SQL server instances on the same server, and discover the different user databases within those instances.
Assessment: Understand the compatibility of various applications running on the server for successful migration. Assess for Azure SQL, Azure VMware Solution or AVS.
Issues & warnings: Understand the readiness and any potential migration concerns.
Cost details: Review compute and storage costs for every instance that has been assessed. Estimate monthly compute and storage costs when you run your SQL server databases on Azure SQL.
Experiment & modify assessments: Modify your assessment properties at any time, and recalculate the assessment. Compare assessments across different dimensions that were used to create them.
QUICK LINKS:
02:01 — Discovery
04:32 — Assessment
06:28 — Issues & warnings
09:27 — Cost details
09:59 — Experiment & modify
10:47 — How to start
11:54 — Wrap up
Link References:
For more on migration, go to https://aka.ms/LearnAzureMigration
Unfamiliar with Microsoft Mechanics?
We are Microsoft’s official video series for IT. You can watch and share valuable content and demos of current and upcoming tech from the people who build it at Microsoft.
Video Transcript:
– Up next on this special edition of Microsoft Mechanics we’re joined by Azure Migration and Business Continuity Engineering Lead, Abhishek Hemrajani to explore the latest updates to Azure Migrate to provide one unified environment to discover and assess your servers, databases, apps and migrate them to Azure. So Abhishek, welcome to Microsoft Mechanics.
– It’s great to be here, Jeremy, thank you for having me on your show.
– And thanks for joining us today. So about a year ago, you and the team actually set out to provide a centralized hub and unified tool set for migrating to Azure. And since then on Mechanics, we’ve actually shown how you can use Azure Migrate for everything from agentless discovery and assessment of your VMs and even bare metal physical servers, right through to right-sizing them and lifting and shifting them into Azure. We’ve also covered migration of VMware workloads, databases and apps, but what have you and the team been focused on lately with the latest round of updates?
– So we’ve been really focused on making it easy for you to migrate your VMs, your databases and your apps to Azure with Azure Migrate. Now with every release we set out to make these three primary migration scenarios as seamless as possible. Since discovery and assessment is the most important and critical phase of a migration project, we are now merging the three different tool sets for discovery and assessment into one unified, at-scale agentless discovery and assessment experience. First up in this experience is unified discovery and assessment for Windows server, Linux, and SQL Server. And soon we’ll expand capabilities to include .Net web apps that you could migrate over to Azure App Service.
– And that’s pretty significant because until recently you could do agentless discovery and assessment of your virtual machines and bare metal servers with Azure Migrate. But you would use integrations with things like Database Migration Assistant and App Service Migration Assistant to discover and assess your data in web apps. So, what have you done then to unify this experience? And can you walk us through an example of this?
– Absolutely Jeremy, let’s dive right into a demo and I’ll show you how things have gotten better. I’m going to start from the point at which you’ve set up the Azure Migrate appliance to discover your VMware VMs. These can be Windows or Linux VMs. Of course you can also discover bare metal servers with Azure Migrate. Now, if you provide us VM credentials we can inventory installed software and help you perform application dependency analysis without installing any agents. That allows you to discover network paths that originate and terminate on different VMs and the associated processes. Importantly, these credentials are never sent to Microsoft and remain on your Azure Migrate appliance running in your data center. With this release, we can now model servers running SQL Server and various instances and databases. Soon, we’ll do the same for IAS web servers. Azure Migrate supports both Windows and SQL authentication for discovering properties of SQL instances. Once the appliance is configured and discovery is initiated, Azure Migrate will be able to collect the required information to help you assess your SQL estate for migration to Azure SQL Managed Instance or Azure SQL Database. Here, you can see that we’ve discovered 21,364 servers. 980 are running SQL server. I can also see the OS distribution across my on-premise state. In the discovery view I can see servers which are running SQL server and how many instances are on each of the servers. So if you’re running multiple instances on the same server we’ll be able to capture that information.
– All right. So let me get this right. You can track multiple SQL server instances on the same server, but can you discover the different user databases within those instances?
– Yeah, absolutely. I can dive deeper into the instances to see the SQL version, the SQL edition, the count of the user databases and other SQL specific details. For example, here I can see that VM HRSQLVM04 is running five SQL server instances. I can see the various instances, SQL versions, count of user databases, SQL editions, and other details. We are adding support for SQL Server 2008 through SQL Server 2019. We will support the Enterprise, Standard, Developer, and Express editions. I can also go deeper into each instance and see the various user databases, their size, compatibility level, etc.
– Right. And previously, like you mentioned, you’d have to jump into quite a few different tools to achieve these types of results.
– That’s right. But to be clear, Data Migration Assistant as part of Azure Migrate is already a very powerful tool to assess your databases. What we are doing now is capturing the best of its capabilities to build a unified, at-scale discovery and assessment experience for SQL server. In addition to the discovery features there are also newer assessment types available for you. Now, we’ve always had Virtual Machine assessments, but you can now assess for Azure SQL, Azure VMware Solution or AVS, and very soon you’ll be able to perform application compatibility assessments for Windows Server. Now Jeremy, application compatibility is very important when you’re considering upgrading the operating system of your Windows Server, as part of the migration that helps you understand the compatibility of the various applications running on the server. Let’s create an assessment for Azure SQL. As I mentioned before, when you create an assessment for Azure SQL, we are assessing for both SQL Managed Instance and SQL Database. When you create an assessment most settings are applied automatically, but you can review and edit assessment properties. You can select the target location. In my case, I’ll stick with Southeast Asia. You can select the deployment type, which I’ll keep as the default recommended. I could choose Azure SQL Managed Instance or Azure SQL Database, if I want to go all in on one or the other. You can also select the options for reserved capacity, service tier and the performance history, which helps you better right-size your SQL workloads. I can then give this assessment a name and group the servers that need to be included. I’ll create a group and name it, ContosoVMSQL. Now I need to select my servers to assess. I will find all servers with SQLVM in their name and select all of those. Azure Migrate will ensure that servers running SQL instance are automatically included. Finally, I can review the details and create the assessment.
– Okay, so once you’ve run the assessment, what type of information do you get? And I remember with VM assessments you could get right-sizing, readiness, virtual machine sku and cost recommendations. Is that similar then for SQL servers?
– It absolutely is. For SQL, we’ll tell you the Azure SQL Managed Instance or Azure SQL Database Service tier that is the most optimal for your workloads. It takes only a few minutes for the assessment to get created. Once the assessment is created you can start understanding the Azure SQL readiness and Azure SQL cost details for your instances. You can see that in this case we assessed 57 servers running 207 SQL Server instances with 2,925 databases. You can see that the assessment gives you information about the readiness of your instances for SQL Managed Instance, SQL Database or where you may want to consider an Azure SQL VM. You’ll also get the aggregate compute and storage costs. So let’s go deeper into the Azure SQL readiness report. And you’ll see that for every instance you get readiness for SQL Managed Instance or SQL Database. We will also recommend which one might be a better target. And for that recommended target we’ll also tell you the optimal configuration.
– So how does Azure Migrate then determine these types of recommendations?
– That’s the magic Jeremy. Let’s look at the assessment for the instances for one of our Vms: HRSQLVM01. In this case, the VM is running three SQL instances. The first instance, MSSQLSERVER, is not ready for SQL Managed Instance. If you click on the recommendation detail we’ll tell you the rationale behind it. We classify migration information into issues and warnings. Issues are blocking conditions. For example, MSSQLSERVER has a database with multiple log files, which is not supported by Azure SQL Managed Instance. Warnings, on the other hand, are non-critical changes that may be needed to ensure that your applications run optimally post migration. In this case, you can see that there is a PowerShell job that you should review. Once I understand that Azure SQL DB is in fact the right deployment type for the instance, I can click on review Azure SQL DB configuration and get a consolidated view of all the databases along with the recommended SQL server tier for each of the user databases. Next, let’s look at the DMS2016SQL instance. This instance is ready for both SQL Managed Instance and SQL Database. I’m going to dive deeper into this instance to understand the reasoning behind the recommendation. The recommendation, in this case, is based on the configuration that will be the most cost effective. I can also see information related to total database size, CPU utilization, memory allocation and utilization, and IOPS. For this instance, there are no blocking issues but there are some warnings that I should be aware of.
– And that’s a lot of rich information and detail really to understand the readiness and any potential migration issues, but do you get similar details for cost?
– Absolutely Jeremy. Let’s look at the Azure SQL cost details. As you can see here, you can review compute and storage costs for every instance that has been assessed. This information allows you to estimate monthly compute and storage costs when you run your SQL server databases on Azure SQL. These cost components are calculated based on the assessment properties that you specify when creating the assessment, such as target Azure region, offers and important benefits such as the Hybrid Benefit.
– And it’s really great to see all the details and these assessments and the recommendations. But what if you want to maybe experiment and do different types of assessments, maybe you want to play around with what you might need in terms of compute or storage for specific workloads. Is there an easy way to kind of experiment and run different assessments against two groups?
– That’s a very important point Jeremy. You can modify your assessment properties at any time and recalculate the assessment. For example, here I’ll edit the properties and I can change the target deployment to Azure SQL MI and recalculate the assessment. Another useful feature is that once you’ve discovered your servers and have grouped them, there’s really no limit to the number of assessments that you can run on the same group. You can then compare the assessments across the different dimensions that were used to create them.
– Right. I can really see this information being super useful when you’re building out your business case. But what advice would you give people who are watching maybe starting out with their first discoveries and assessments?
– First start by prioritizing your discovery and assessment. Discovery and assessment is the most critical phase of a migration project, and will help you arrive at key decisions related to your migration. You also want to anticipate and start mitigating complexities. Think about architectural foundation and your management and governance approach in the cloud. And finally use an iterative approach to perform your migration. It’s all about creating the right size VMs that can help you execute more effectively.
– Cool stuff. Great progress since the last time we checked in on Azure Migrate but what are you and the team then working on next?
– So today we showed you unified discovery and assessment for SQL Server. Very soon, we’ll add capabilities for discovery, assessment and migration for .Net web apps over to Azure App Service with Azure Migrate. Also available in preview, is Azure Migrate App Containerization, which can help you containerize your .Net or Java web apps and deploy them over to Azure Kubernetes Service.
– Really looking forward to these capabilities. And thank you so much Abhishek for joining us today for the latest updates to Azure Migrate, but where could folks go who are watching learn more?
– So everything that they showed you today is available in preview. So you can try it out for yourself. You can also learn all things migration on aka.ms/LearnAzureMigration
– Thanks again Abhishek, and of course keep checking back to Microsoft Mechanics for the latest tech updates, subscribe if you haven’t yet and thanks for watching.

Recent Comments