UCL NHS IXN ImagineThis V2: Rapid no-code application builder on Azure

UCL NHS IXN ImagineThis V2: Rapid no-code application builder on Azure

This article is contributed. See the original author and article here.

IXNNHS.JPG


Authors: Lukas Cerny, Rui Zhou, Zhongyuan Li, Karish Singh, Denoy Hossain, Xin Deik Goh


Sponsor: Prof. Joseph Connor


Supervisors: Dr. Dean Mohamedally, Dr. Emmanuel Letier, UCL


ImagineThis is a multi-functional platform on Azure for building, testing and running early-stage designs of applications without the need to write any code. It converts a wireframe sketch design from Figma, into code and publishes it in a way that anyone can run the generated app on their iOS or Android devices merely by scanning a unique QR-code. Version 1 was developed by a group of UCL students as a part of summer 2020 UCL IXN project. We have substantially expanded the capabilities with Version 2 with our Azure implementation.


Demo


Introduction


Early-stage application prototype testing is one of the most important phases of software product development. It can reveal flawed assumptions or incorrect requirements and thus save lots of time and money. App designers working with clinical trusts in the NHS are currently facing a problem where it takes much longer to develop healthcare application than wanted. This is especially important in the healthcare sector where shorter product delivery times can lead to more lives being improved or potentially saved.


One of the causes for such delays is a general lack of developers and software engineers at the NHS. Another one is length of tender processes in which external companies demonstrate their proposals for apps and the NHS has to decide which one to go with. To reduce the overall development time, our partners within the NHS commissioned a tool to be enable rapid design prototypes to generate app templates on mobile devices.


Our solution


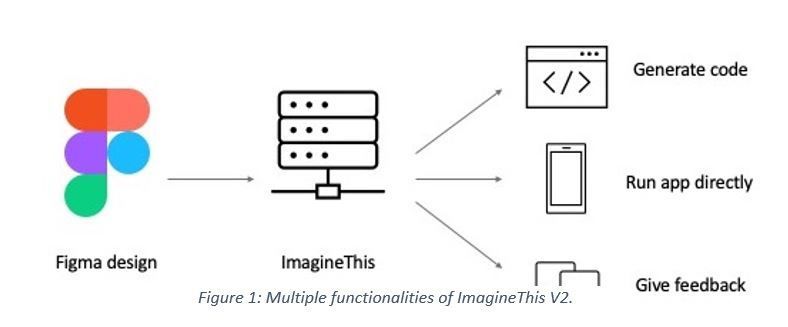
ImagineThis version 2 is a multi-functional platform for building and testing early-stage designs of applications. It works with a well-known commercial platform Figma through which users create designs of applications. Using Figma’s API, ImagineThis fetches a JSON file of a particular design the user wishes to build and converts it into React-Native source code. React-Native was chosen due to its cross-platform nature, meaning it can run on both iOS and Android devices. The auto-generated codebase contains all necessary files and components which developers can download as a ZIP file, so that they continue working on it.


Fig1MultipleFunctionalities.jpg


This code generation feature can save lots of time for developers as they no longer need to setup the whole codebase structure nor write code from scratch.


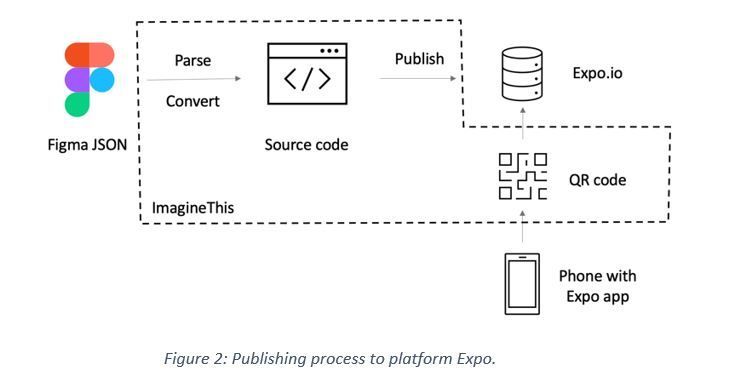
On top of that, after the code generation succeeds, ImagineThis publishes the app to a platform called Expo: an external commercial system that simplifies application development process. Expo has a mobile client Expo Go through which developers can easily test apps on their phones. We use Expo exactly for this purpose.


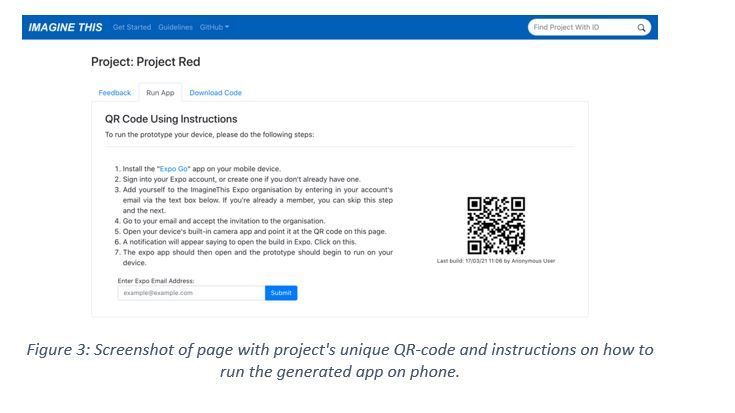
Furthermore, after ImagineThis publishes the generated source code to Expo, it displays a project unique QR-code that users can scan in order to open the Expo Go client where they run the published application directly on their phone, without any need for app stores or installations. This whole process works automatically and seamlessly, therefore building and running an app on user’s phone is just a matter of few clicks and no need for any coding at all! Figure 2 below graphically illustrates this process.


fig2publishingprocess.JPG


Fig3screenshot.JPG


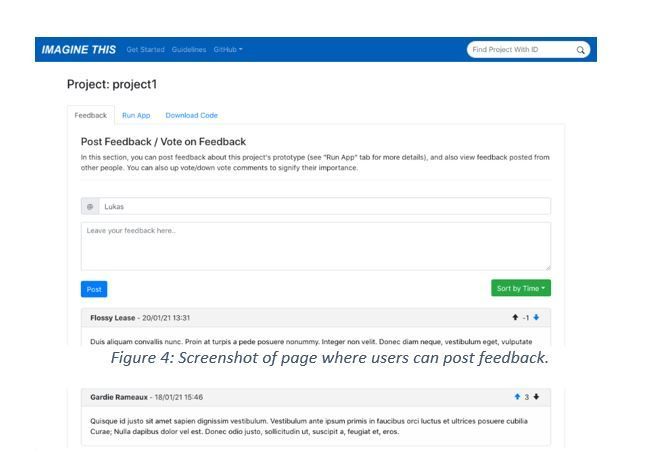
fig4screenshot.JPG


Finally, after users test the application, they can post feedback to ImagineThis and upvote or downvote feedback from other users. This information is incredibly useful for designers to make adjustments and for clinical study staff in the NHS to understand the opinion of end-users.


Architecture


We decided that a classic 3-tier layered architecture on Azure is the most suitable one that meets our requirements. Firstly, there is a web user interface, the front-end layer, implemented with ReactJS and using React-Hooks for global state management. Secondly, there is back-end, the busines logic layer, which performs the conversion of Figma design to React-Native source code and also communicates with the database.


The back-end is a RESTful API written in Java and using Spring Boot framework. Also, we use various state-of-the-art technologies like MyBatis for mapping database to Java objects, Swagger for testing and documenting the RESTful API or Jacoco for analysing the test suite code coverage that we aim to get above 50%. We even integrated Jacoco into our continuous integration (CI) pipeline, so that we can view the code coverage metric continuously and in real-time.


Lastly, there is PostgreSQL database in the persistence layer serving as the data storage for feedback and project data.


Code conversion


Although the code conversion functionality was already implemented by the previous group in ImagineThis V1, we’ll briefly describe how that works. ImagineThis’ back-end queries the Figma API for a large JSON file representing the whole design. This, of course, requires authentication, so users have to authenticate themselves either by entering their Figma account token into ImagineThis, or through Oauth 2.0 protocol.


The Figma design has to obey certain rules (e.g. naming conventions), so that ImagineThis can interpret what individual components are; for example, we want to differentiate a button from an input field. Using these rules, ImagineThis parses the JSON file with Java gson deserialization tool and produces a tree-like object with a list of FigmaComponents. This is our abstract representation of the Figma design. With 1-to-1 relationship we map each of these FigmaComponents into ReactComponents, which are responsible for producing the application code. We consciously made the distinction between these, in order to separate concerns and responsibilities, to improve code’s testability and also to make the system extensible to new languages (like Kotlin) or design platforms.


Docker containers


We decided to use Docker containers for running each of the layers mentioned previously. Docker gave us many valuable advantages. Firstly, it vastly simplified the deployment. Since we are using docker-compose functionality to orchestrate multiple containers, deployment is just a matter of running few shell commands.


Secondly, Docker increases flexibility as it works across different operating systems and environments. Deployment was practically the same whether we ran the whole system locally on our laptops, or on the Azure production server. It will be the same even on other cloud providers as well.


Thirdly, Docker is resource efficient, as we can run all layers on just one virtual machine (VM). This is how we cut down client’s costs by half, since instead of running 2 VMs separately, one for the front-end and the other for the back-end, we run all layers on just one VM. Consequently, the whole system can easily scale horizontally merely by adding extra containers and VMs.


Finally, we used Docker containers to facilitate the publishing process. The next section describes how this works.


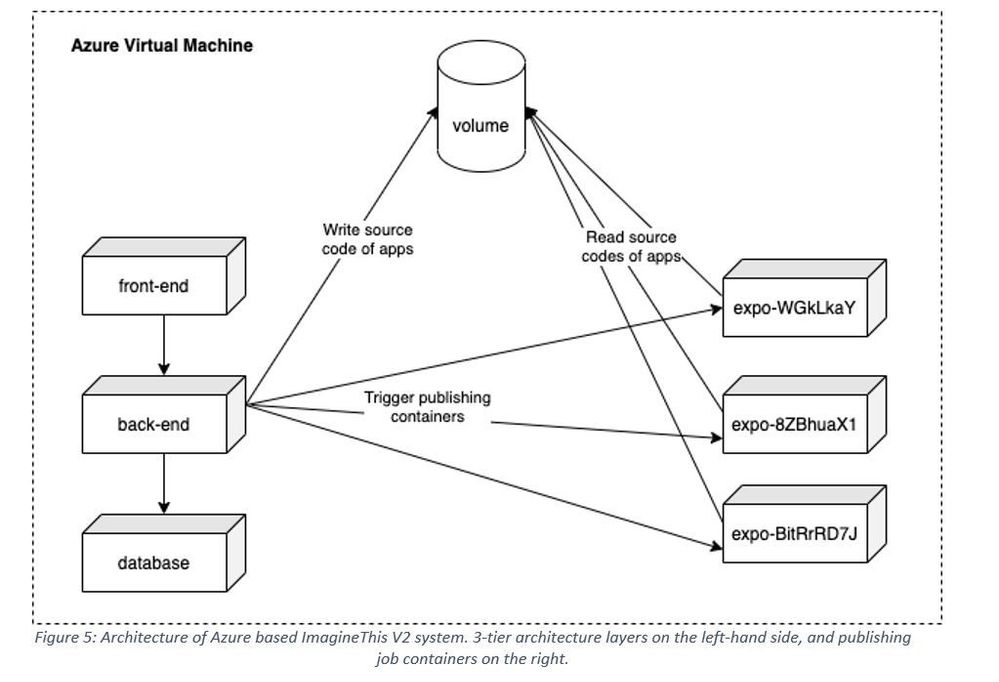
Figure 5: Architecture of Azure based ImagineThis V2 system. 3-tier architecture layers on the left-hand side, and publishing job containers on the right.


Fig5Architecture.JPG


Publishing process


As already described, after ImagineThis generates the source code, it builds and publishes the app to Expo. The publishing process takes quite a while. Also, the only available API Expo supports is the Expo CLI. Therefore, we needed a way how to run this asynchronously and in an environment that has access to shell.


Rather than using our back-end Java server for this, we decided that spinning up a new Docker container that performs the job will be a better solution. We setup an image with a Dockerfile, which runs a shell script that builds and publishes the generated app. The advantages of using Docker containers include the ability for jobs to run simultaneously and in isolation alongside the architecture being easily scalable. Moreover, the shell script that those containers run is actually trivial, we just copy generates files from a volume and run Expo command:


# Copy generated app source code to this directory
# Note: /usr/src/app is volume shared with backend container which generates code there
cp -r /usr/src/app/$PROJECT_ID/* .
expo publish


Having said that, we are using Docker volume for data communication across different containers. As Figure 5 shows, the back-end container writes generated React-Native source code files into the volume. On the other hand, Expo publishing containers mount that volume and copy files into its own directory (as showed in the code snippet). From there they run the Expo command to build and publish the app.


Furthermore, we are using Docker as a synchronization primitive. Since containers must have unique names, we are naming these job containers as imaginethis-expo-{project-id} (in Figure 5 just expo-{project-id} for brevity). Only one container with such name can run and thus Docker will prevent the back-end from triggering another job that publishes the same project.


Future work


There are several directions in which we see ImagineThis could continue to grow. One is to improve the code generation process by using multi-threading. Currently the conversion from a Figma design into React-Native code runs sequentially in a single thread. But wireframes (application pages) could be converted in parallel which would vastly improve the conversion time.


Implementing an authentication system will be an essential improvement. Users will have to sign up and log into ImagineThis, which will let them access only those projects they are authorised for (currently all users can access all projects). Finally, we want to use Azure Kubernetes as the orchestration engine for Docker containers.


GitHub Repo


For anyone interested, our code is available publicly on Github!


Business Email: Uncompromised – Part Three

Business Email: Uncompromised – Part Three

This article is contributed. See the original author and article here.

This blog is part three of a three-part series focused on business email compromise.


In the previous two blogs in this series, we detailed the evolution of business email compromise attacks and how Microsoft Defender for Office 365 employs multiple native capabilities to help customers prevent these attacks. In Part One, we covered some of the most common tactics used in business email compromise attacks, and in Part Two, we dove a little deeper into the more advanced attacks. The BEC protections offered by Microsoft Defender for Office 365, as referenced in the previous two blogs have been helping keep Defender for Office 365 customers secure across a number of different dimensions. However, to fully appreciate and understand the unique capabilities Microsoft offers, we need to take a step back.


Unparalleled scale


When we talk to customers about Microsoft Defender for Office 365, we always mention not only the size of our service, but the volume of data points we generate and collect throughout Microsoft. These things together help us responsibly build industry-leading AI and automation. Here are a few datapoints that can help put this into perspective:


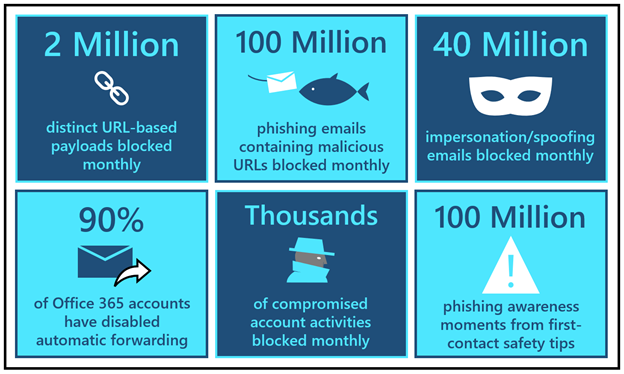
  • Every month, our detonation systems detect close to 2 million distinct URL-based payloads that attackers create to orchestrate credential phishing campaigns. Each month, our systems block over 100 million phishing emails that contain these malicious URLs.

  • Every month, we detect and block close to 40 million emails that attempt to leverage domain spoofing, user impersonation, or domain impersonation – techniques that are widely utilized in business email compromise attacks.

  • Clicking further into domain spoofing data, we observe that the majority of domains that send mail into Office 365 do not have a valid DMARC enforcement. That leaves them open to spoofing and that is why the Spoof Intelligence capability (as discussed in Part One) adds such a strong defense layer.

  • In the last quarter, we rolled out new options in the outbound spam policy that have helped customers disable automated forwarding rules across 90% of Office 365 email accounts to further disrupt BEC attack chains.

  • Additionally, our compromise detection systems are now flagging thousands of potentially compromised accounts and suspicious forwarding events. As we covered in our second blog, account compromise is a tactic used frequently in multi-stage BEC attacks. Learn more about how Defender for Office 365 automatically investigates compromised user accounts.

  • Just in the last quarter, we have seen many customers implement “first-contact safety tips”, which have generated over 100 million phishing awareness moments. Learn more about first-contact safety tips.


Figure 1: BEC by the numbersFigure 1: BEC by the numbers


Artificial intelligence meets human intelligence


At Microsoft, we’re deeply focused on simplifying security for our customers, and we heed our own advice. We build security automation solutions that eliminate the noise and allow security teams to focus on the more important things. Our detection systems are being constantly updated through automated intelligence harnessed through trillions of signals, and this helps us focus our human intelligence on diving deep into the things that help improve customer protection. Our Microsoft 365 Defender Threat Research team leverages these signals to track actors, infrastructure, and techniques used in phishing and BEC attacks to ensure Defender for Office 365 stays ahead of current and future threats.


Leading the fight against cybercrime


Outside of the product, we also partner closely with the Digital Crimes Unit at Microsoft to take the fight to criminal networks. Microsoft’s Digital Crimes Unit (DCU) is recognized for its global leadership in using legal and technical measures to disrupt cybercrime, including attacks like BEC. By targeting the malicious technical infrastructure used to launch cyberattacks, DCU diminishes the capability of cybercriminals to engage in nefarious activity. In 2020, DCU directed the removal of 744,980 phishing URLs and recovered 6,633 phish kits which resulted in the closure of 3,546 malicious email accounts used to collect stolen customer credentials obtained through successful phishing attacks.


Figure 2: DCU by the numbersFigure 2: DCU by the numbers


To disrupt cybercriminals taking advantage of the COVID-19 pandemic to deceive victims, in mid-2020, the Digital Crimes Unit took legal action in partnership with law enforcement to help stop phishing campaigns using COVID-19 lures. Additionally, with the help of our unique civil case against COVID-19-themed attacks, DCU obtained a court order that proactively disabled malicious domains owned by criminals. Read more about this here


The DCU continues to leverage its expertise and unique view into online criminal networks to uncover evidence that informs criminal referrals to appropriate law enforcement agencies around the world who are prioritizing BEC because it is one of the costliest cybercrime attacks in the world today. In fact, since launching this blog series, the FBI released their 2020 Internet Crimes Report, which contains updated statistics on BEC related losses.


To learn more about DCU, take a look at a collection of articles here. You can also check out a recent episode of our Security Unlocked podcast where Peter Anaman, a Director and Principal Investigator for DCU, discusses what it’s like to investigate these BEC attacks.


Reducing the threat of business email compromise


We’ve covered quite a bit of content in this series and it feels only appropriate that we summarize the most important things that you can do to prevent BEC attacks in your environment. We’ve compiled these recommendations from a variety of sources, including industry analysts. The good news is that with Microsoft Defender for Office 365, you can now have one integrated solution that helps you easily adopt these recommendations.


Upgrade to an email security solution that provides advanced phishing protection, business email compromise detection, internal email protection, and account compromise detection


In the second blog in this series we covered the new ways in which attackers are orchestrating these dangerous attacks that are becoming increasingly difficult to detect with legacy email gateways or point solutions. Defender for Office 365 provides a modern, end to end, compliant protection stack that protects against advanced credential phishing, business email compromise detection, internal email filtering, suspicious forwarding detection, and account compromise detection. With Microsoft Defender for Office 365, you can detect these threats in your Office 365 environment without sending data out of your tenant, making it one of the simplest and most compliant ways to protect Office 365.


Complement email security with user awareness & training


With attacks evolving every day, it’s critical that we not only build tools to prevent attacks, but also that we train users to spot suspicious messages or indicators of malicious intent. The most effective way to train your users is to emulate real threats with intelligent simulations and engage employees in defending the organization through targeted training. With Defender for Office 365 we now provide rich, native, user awareness and training tools for your entire organization. Learn more about Attack simulation training in Defender for Office 365.


Implement MFA to prevent account takeover and disable legacy authentication


Multi-factor authentication (MFA) is one of the most effective steps you can take towards preventing account compromise. As we discussed previously, new BEC attacks often rely on compromising email accounts to propagate the attack. By Setting up multi-factor authentication in Microsoft 365 and implementing security defaults you can eliminate 99.9% of account compromise attempts.


Review your protections against domain spoofing


As we shared earlier, the majority of domains that send email to Office 365 have not properly configured DMARC. Leverage Spoof Intelligence in Defender for Office 365 to protect your users from threats that spoof domains that haven’t configured DMARC. Additionally, take the necessary steps to make sure your own domains are properly configured so that they aren’t spoofed. You can implement DMARC gradually without impacting the rest of your mail flow. Configure DMARC in Microsoft 365.


Implement procedures to authenticate requests for financial or data transactions and move high-risk transactions to more authenticated systems


We use email and collaboration tools to perform a wide variety of tasks, and sharing financial data doesn’t need to be one of them. To minimize the risk of accidental sharing of sensitive information like routing numbers or credit card information, consider using Data Loss Prevention policies in Office 365. Additionally, consider, establishing a process that moves these transactions to a different system – one designed specifically for this purpose.


Closing thoughts


At Microsoft, we embrace our responsibility to create a safer world that enables organizations to digitally transform. We’ve put this blog series together with the goal of reminding customers not only of the significance of BEC, but the wide variety of prevention mechanisms available to them. If you’re looking for a comprehensive solution to protect your organization against costly BEC attacks, look no further than Microsoft Defender for Office 365.


Day in and day out, we relentlessly strive to enhance our security protections to stop evolving threats. We are committed to getting our customers secure – and helping them stay secure.


Do you have questions or feedback about Microsoft Defender for Office 365? Engage with the community and Microsoft experts in the Defender for Office 365 forum.


Azure Marketplace new offers – Volume 127

Azure Marketplace new offers – Volume 127

This article is contributed. See the original author and article here.


We continue to expand the Azure Marketplace ecosystem. For this volume, 117 new offers successfully met the onboarding criteria and went live. See details of the new offers below:


Applications


1QBit 1Qloud.png

1QBit 1Qloud Optimization for Azure Quantum: The 1Qloud platform from 1QB Information Technologies enables researchers, data scientists, and developers to harness the power of advanced computing resources and novel algorithms without needing to manage complex and expensive infrastructure.


8x8 Contact Center.png

8×8 Contact Center for Microsoft Teams: Fully integrated with Microsoft Teams, 8×8 Inc.’s Contact Center allows agents to connect and collaborate with experts to resolve customer issues faster. Features include performance metrics, activity history, speech analytics, and unlimited voice calling to 47 countries.


Admix.png

Admix: Admix is a monetization platform for game publishers. Advertisements are integrated into gameplay, making them non-intrusive. Publishers can drag and drop billboards and TVs within their virtual reality, augmented reality, or mixed reality environments.


AlmaLinux 8.3 RC.png

AlmaLinux 8.3 RC: ProComputers.com provides this minimal image of AlmaLinux 8.3 RC with an auto-extending root file system and a cloud-init utilities package. AlmaLinux is an open-source, community-driven project and a 1:1 binary-compatible fork of Red Hat Enterprise Linux 8.


Automate Repetitive Process.png

Automate Repetitive Process with Just One Click: Built with Microsoft Power Automate Desktop tools, CSI Interfusion’s medical claim extraction solution allows users to pull employee medical claim history details from a webpage and download them into Excel with just one click.


AUTOSCAN Mobile Warehouse.png

AUTOSCAN Mobile Warehouse Management: Enhance your enterprise resource planning system with this modern warehouse-scanning solution from CSS Computer-Systems-Support. Whether you’re scanning barcodes, QR codes, or RFID chips, AUTOSCAN automates numerous steps throughout your warehouse and shipping process chain.


Barracuda CloudGen Access.png

Barracuda CloudGen Access Proxy: Barracuda CloudGen Access establishes access control across users and devices without the performance pitfalls of a traditional VPN. It provides remote, conditional, and contextual access to resources, and it reduces over-privileged access and associated third-party risks.


Barracuda Forensics.png

Barracuda Forensics and Incident Response: Barracuda Forensics and Incident Response protects against advanced email-borne threats, with automated incident response, threat-hunting tools, anomaly identification, and more. Administrators can send alerts to impacted users and remove malicious emails from their inboxes with a couple of clicks.


BaseCap Data Quality.png

BaseCap Data Quality Manager: BaseCap’s Data Quality Manager features intuitive data quality scoring so you can know where your organization’s data quality stands in terms of completeness, uniqueness, timeliness, accuracy, and consistency. Ensure your data is fit for your use cases.


CAP Procurement.png

CAP2AM – Identity and Access Management: CAP2AM from Iteris Consultoria is an identity governance and administration solution that establishes an integrated task flow for corporate systems and resources. This enables organizations to synergize their governance, usability, integration, and auditing operations.


CAP2AM.png

CAP Procurement: CAP Procurement, an adaptable process management suite from Iteris Consultoria, is designed for procurement organizations. CAP Procurement’s no-code/low-code application platform fosters collaboration with business partners and suppliers through the streamlining of workflows.


CentOS 7.png

CentOS 7: This image from Atomized, formerly known as Frontline, provides CentOS 7 on a virtual machine with a minimal profile. CentOS is a Linux distribution compatible with its upstream source, Red Hat Enterprise Linux. 


CentOS 7 Latest (next 2).png

CentOS 7 Latest: This preconfigured image from Cognosys provides a version of CentOS 7 that is automatically updated at launch. CentOS is a Linux distribution compatible with its upstream source, Red Hat Enterprise Linux.


CentOS 7 Latest (next 2).png

CentOS 7 Minimal: This preconfigured image from Cognosys provides a version of CentOS 7 that has been built with a minimal profile. It contains the minimal set of packages needed to install a working system on Microsoft Azure.


CentOS 8.png

CentOS 8: This image from Atomized, formerly known as Frontline, provides CentOS 8. CentOS 8 offers a secure, stable, and high-performance execution environment for developing cloud and enterprise applications.


CentOS 8 Latest- Cognosys (next 2).png

CentOS 8 Latest: This preconfigured image from Cognosys provides a version of CentOS 8 that is automatically updated at launch. CentOS is a Linux distribution compatible with its upstream source, Red Hat Enterprise Linux.


CentOS 8 Latest- Cognosys (next 2).png

CentOS 8 Minimal: This preconfigured image from Cognosys provides a version of CentOS 8 that has been built with a minimal profile. It contains the minimal set of packages needed to install a working system on Microsoft Azure.


CHEQ Multi-channel.png

CHEQ Multi-channel Internal Communication Chatbot: CHEQ is an encrypted chat platform for internal communication with your employees. CHEQ works with Microsoft Teams and Viber and provides an easy way to send company announcements, documents, links, videos, and event invitations.


Colligo Briefcase.png

Colligo Briefcase: Easily access Microsoft SharePoint on Windows devices online or offline with Colligo Briefcase, an add-in for SharePoint. It combines easy-to-use apps with central configuration and auditable metrics on user adoption.


Customer Care Virtual Agent.png

Customer Care Virtual Agent: The EY Customer Care Virtual Agent uses a pretrained Microsoft Language Understanding (LUIS) intent classifier to indicate actions a user wants to perform. A predeveloped dialog flow can be customized to meet the client-specific needs of your industry.


Debian 9.png

Debian 9: This image from Atomized, formerly known as Frontline, provides Debian 9 on a virtual machine that’s built with a minimal profile. The image offers a stable, secure, and high-performance execution environment for all workloads.


Debian 10.png

Debian 10: This image from Atomized, formerly known as Frontline, provides Debian 10 on a virtual machine that’s built with a minimal profile. The image offers a stable, secure, and high-performance execution environment for all workloads.


Digital Finance.png

Digital Finance: EY Global’s Digital Finance solution utilizes the Microsoft Dynamics 365 Finance module to streamline strategic financial processes and address customer value, user experiences, processes, technology, and operational impacts.


Digital Fitness App.png

Digital Fitness App: Upskill your employees with PwC’s Digital Fitness app. Employees take a 15-minute assessment, which provides insights into their baseline proficiency and defines customized learning paths. The app then provides bite-sized content for them to consume to enhance their digital acumen.


DocMan.png

DocMan – Document organization made easy: BCN Group’s DocMan, an intuitive document management solution that works with Microsoft products, allows users to easily upload documents, images, and videos and to tag content, making it easier to search, filter, and retrieve.


Document Intelligence.png

Document Intelligence: The EY Document Intelligence platform uses machine learning, natural language processing, and computer vision to help companies review, process, and interpret documents more quickly and cost-effectively. Extract value and insights from your structured and unstructured business documents.


Energy and Commodity.png

Energy and Commodity Price Prediction System: CogniTensor’s Energy and Commodity Price Prediction is a combination of correlation analytics and prediction dashboards that recommend when to buy energy and other required commodities based on forecast market prices.


enVista.png

enVista Enspire Order Management System (OMS): enVista’s Order Management System (OMS) for retail delivers enterprise inventory visibility, optimizes omnichannel order fulfillment, and empowers associates to improve customer service and satisfaction through personalized experiences.


eSync.png

eSync Agent SDK: eSync from Excelfore is an embedded platform for providing over-the-air updates to multiple edge devices. Developed for automotive applications, eSync gives automakers a single server front end and allows data gathering from domain controllers, electronic control units, and smart sensors.


EY Digital Enablement.png

EY Digital Enablement Energy Platform: EY Digital Enablement Energy Platform (DEEP) supports the upstream oil and gas value chain with a common data model. DEEP breaks down silos to integrate reservoir engineering with production planning, well operations with supply chain management, and land management with decommissioning.


EY Nexus.png

EY Nexus for Insurance: Built on Microsoft Azure and Microsoft Dynamics 365, EY Nexus for Insurance is a platform that enables carriers to launch new products and services, develop digital ecosystems, and automate processes across the value chain.


Full stack camera.png

Full Stack Camera: Full Stack Camera from Broadband Tower Inc. features video storage and AI analysis (face identification, transcription, multilingual translation), along with video recording and operations management. This app is available only in Japanese.


Fuse Open Banking.png

Fuse Open Banking Solution: The EY Fuse Open Banking Solution from EY Global enables authorized deposit-taking institutions in Australia to comply with the Consumer Data Right legislation and manage data from consumers, regulators, and open-banking collaborators.


Gate Pass.png

Gate Pass Solution: CSI Interfusion’s Gate Pass, which uses the Microsoft Power Platform, digitizes pass access processes. Via mobile devices, logistics directors and supply chain managers can monitor access to facilities and analyze their delivery fleet’s efficiency.


Guidewire.png

Guidewire on Azure – CloudConnect: Built on the Guidewire platform for property and casualty insurance, PwC’s CloudConnect is designed to help insurers grow new products and brands. CloudConnect offers a quick-start approach for preconfigured lines of business and full core processing for policy administration, billing, claims, and more.


Hardened - Atomized (next 9).png

Hardened CentOS 7: This image from Atomized, formerly known as Frontline, provides CentOS 7 on a virtual machine that’s protected with more than 400 security controls and hardened according to configuration baselines prescribed by a CIS Benchmark.


Hardened - Atomized (next 9).png

Hardened CentOS 8: This image from Atomized, formerly known as Frontline, provides CentOS 8 on a virtual machine that’s protected with more than 400 security controls and hardened according to configuration baselines prescribed by a CIS Benchmark.


Hardened - Atomized (next 9).png

Hardened Debian 9: This image from Atomized, formerly known as Frontline, provides Debian 9 on a virtual machine that’s protected with more than 400 security controls and hardened according to configuration baselines prescribed by a CIS Benchmark.


Hardened - Atomized (next 9).png

Hardened Debian 10: This image from Atomized, formerly known as Frontline, provides Debian 10 on a virtual machine that’s protected with more than 400 security controls and hardened according to configuration baselines prescribed by a CIS Benchmark.


Hardened - Atomized (next 9).png

Hardened Red Hat 7: This image from Atomized, formerly known as Frontline, provides Red Hat 7 on a virtual machine that’s protected with more than 400 security controls and hardened according to configuration baselines prescribed by a CIS Benchmark.


Hardened - Atomized (next 9).png

Hardened Red Hat 8: This image from Atomized, formerly known as Frontline, provides Red Hat 8 on a virtual machine that’s protected with more than 400 security controls and hardened according to configuration baselines prescribed by a CIS Benchmark.


Hardened - Atomized (next 9).png

Hardened Ubuntu 16: This image from Atomized, formerly known as Frontline, provides Ubuntu 16 on a virtual machine that’s protected with more than 400 security controls and hardened according to configuration baselines prescribed by a CIS Benchmark.


Hardened - Atomized (next 9).png

Hardened Ubuntu 18: This image from Atomized, formerly known as Frontline, provides Ubuntu 18 on a virtual machine that’s protected with more than 400 security controls and hardened according to configuration baselines prescribed by a CIS Benchmark.


Hardened - Atomized (next 9).png

Hardened Ubuntu 20: This image from Atomized, formerly known as Frontline, provides Ubuntu 20 on a virtual machine that’s protected with more than 400 security controls and hardened according to configuration baselines prescribed by a CIS Benchmark.


Harmonic VOS360.png

Harmonic VOS360 Live Streaming: Harmonic’s VOS360 transforms traditional video preparation and delivery into a SaaS offering, helping you quickly launch revenue-generating streaming services. Deliver content from anywhere in the world, with total geographic redundancy and operational resiliency.


IPSUM Plan.png

IPSUM Plan: IPSUM-Plan from Grupo Asesor en Informática manages and supports strategic and operational planning along with budgeting and risk assessment. IPSUM-Plan can be adapted to all types of public institutions and private companies. This app is available only in Spanish.


IRM.png

IRM – Integrated Risk Management: KEISDATA’s Integrated Risk Management is a governance, risk, and compliance platform that offers real-time reporting and a performance-based enterprise risk management module. This app is available only in Italian.


Joomla.png

Joomla with Ubuntu 20.04 LTS: This preconfigured image from Cognosys provides Joomla with Ubuntu 20.04 LTS, MySQL Server 8.0.23, Apache 2.4.41, and PHP 7.4.3. Joomla is a content management system for building websites and powerful online applications.


Kafkawize.png

Kafkawize: Kafkawize, a self-service portal for Apache Kafka, simplifies Kafka management by assigning ownerships to topics, subscriptions, and schemas. Kafkawize requires both UI API and Cluster API applications to run.


Kx kdb.png

Kx kdb+ 4.0: kdb+ is a high-performance time-series columnar database designed for rapid analytics on large-scale datasets. kdb+ on Microsoft Azure allows you to efficiently run your time-series analytics workloads.


Lynx MOSA.png

Lynx MOSA.ic for Azure: Lynx MOSA.ic from Lynx Software Technologies acts as a bridge for wired and wireless networks used in industrial environments. With seamless connectivity, Lynx MOSA.ic enables analytics, AI, and update capabilities to be extended to manufacturing and logistics facilities.


ManageEngine PAM360.png

ManageEngine PAM360 20 admins, 50 keys: ManageEngine PAM360, a unified privileged access management solution, allows password administrators and privileged users to gain granular control over critical IT assets, such as passwords, SSH keys, and license keys.


Medxnote bot.png

Medxnote bot: Designed for Microsoft Teams, Medxnote gives frontline healthcare workers, such as doctors and nurses, their own personal robotic assistant that connects them to any clinical data at the point of care. It also includes a secure, HIPAA-compliant healthcare messaging and communications platform.


Migesa Cloud Voice.png

Migesa Cloud Voice: This solution allows your organization to connect and optimize its telecommunications infrastructure through the integration of leading information technology and communications platforms in the market. This app is available only in Spanish.


officeatwork.png

officeatwork | Slide Chooser User Subscription: Kickstart your presentation with Slide Chooser by putting together a presentation based on the most up-to-date slides served to you directly in Microsoft PowerPoint on any device or platform. Simply drag and drop your curated slides into your slide libraries stored in Microsoft Teams or Microsoft SharePoint.


Officevibe.png

Officevibe for Office 365: Officevibe gives employees a space to tell their managers anything, then empowers managers to respond and act. Weekly surveys, anonymous feedback, and smarter one-on-ones give team managers a full picture of their employees’ needs, strengths, and pains. Offer the support that will help your people thrive.


Prefect.png

Prefect: Prefect Cloud’s beautiful UI lets you keep an eye on the health of your infrastructure. Stream real-time state updates and logs, kick off new runs, and receive critical information exactly when you need it. Use Prefect Cloud’s GraphQL API to query your data any way you want. Join, filter, and sort to get the information you need.


PRIME365.png

PRIME365 Cocai Retail: This solution from Var Group is a modern and scalable Var Prime application that can cover all phases of the sales process. It’s adaptable to all chain stores and interfaces with standard connectors to Microsoft Dynamics 365. This app is available only in Italian.


PrivySign.png

PrivySign: One of Indonesia’s leading digital trusts, PrivySign provides you an easy and secure way to sign documents digitally. The digital signature is created by using asymmetric cryptography and public key infrastructure, ensuring each signature is linked to a unique and verified identity.


Procurement Planning.png

Procurement Planning System: CogniTensor’s Procurement Planning System is a combination of correlation analytics and prediction dashboards that are specially designed to help you make data-driven decisions for choosing the best supplier based on past performance and forecast analysis.


Azure Sentinel Proof of Value.png Proof of Value Automator for Microsoft Azure Sentinel: This platform from Satisnet configures Microsoft Azure Sentinel through a wizard so you can evaluate it in your business environment. Satisnet’s offer includes a cost modeler, support services, and a Microsoft 365-integrated email threat-hunting tool.
Pure Cloud Block.png

Pure Cloud Block Store (subscription): This is Pure’s state-of-the-art software-defined storage solution delivered natively in the cloud. It provides seamless data mobility across on-premises and cloud environments with a consistent experience, regardless of where your data lives – on-premises, cloud, hybrid cloud, or multiple clouds. 


Red Hat (next 2).png

Red Hat 7: This image from Atomized, formerly known as Frontline, provides Red Hat Enterprise Linux (RHEL) 7. RHEL is an open-source operating system that serves as a foundation for scaling applications and introducing new technologies.


Red Hat (next 2).png

Red Hat 8: This image from Atomized, formerly known as Frontline, provides Red Hat Enterprise Linux (RHEL) 8. RHEL is an open-source operating system that serves as a foundation for scaling applications and introducing new technologies.


Skribble.png

Skribble Electronic Signature: Use Skribble to electronically sign documents in accordance with Swiss and European Union law. Skribble integrates with Microsoft OneDrive for Business and enables companies, departments, and teams to sign documents directly from OneDrive and Microsoft SharePoint Online.


Smarsh.png

Smarsh Cloud Capture: This cloud-native solution captures electronic communications for regulatory compliance. With Smarsh, financial services organizations can utilize the entire suite of productivity and collaboration tools from Microsoft with a fully compliant, cloud-native capture solution.


Smart Green Drivers.png

Smart Green Drivers: Say hello to reliable transport emissions data and goodbye to manual quarterly and annual greenhouse gas data collection. Empower all your drivers to discover the impact of their behavior with Smart Green Drivers. Get the ability to be carbon-neutral as you work toward net zero.


Structured Data Manager.png

Structured Data Manager (SDM): This solution enables the discovery, analysis, and classification of data and scanning for personal and sensitive data in any database accessible through JDBC. SDM automates application lifecycle management and structured data optimization by relocating inactive data and preserving data integrity.


Tartabit.png

Tartabit IoT Bridge: The Tartabit IoT Bridge provides rapid integration between low-power wide area network devices and the Microsoft Azure ecosystem. The IoT Bridge supports connecting cellular devices via LightweightM2M and CoAP. Additionally, it supports numerous unlicensed wireless technology providers.


TekAxiom.png

TekAxiom Expense Management: Effectively manage technology expenses, accurately allocate costs, and automate payment management with TekAxiom. TekAxiom provides a cloud-based platform that delivers a customer-specific modular structure. It focuses on technology spend management, fixed and mobile telephony, and more.


Tetrate.png

Tetrate Service Bridge: Tetrate Service Bridge is a comprehensive service mesh management platform for enterprises that need a unified and consistent way to secure and manage services and traditional workloads across complex, heterogeneous deployment environments. Get a complete view of all your applications with Tetrate Service Bridge.


Timesheet.png

Timesheet System: This is a timesheet solution from CSI Interfusion for your Microsoft Office 365 environment. The solution aims to provide quick approvals, insightful reports, integration with upstream or downstream systems, and self-service that can maximize process efficiency.


Ubuntu - Atomized (next 2).png

Ubuntu 16: This image from Atomized, formerly known as Frontline, provides Ubuntu 16. Ubuntu 16 offers a secure, stable, and high-performance execution environment for developing cloud and enterprise applications.


Ubuntu - Atomized (next 2).png

Ubuntu 18: This image from Atomized, formerly known as Frontline, provides Ubuntu 18. Ubuntu 18 offers a secure, stable, and high-performance execution environment for developing cloud and enterprise applications.


Ubuntu 18.04 LTS Minimal.png

Ubuntu 18.04 LTS Minimal: This preconfigured image from Cognosys provides a Minimal version of Ubuntu 18.04 LTS. The unminimize command will install the standard Ubuntu Server packages if you want to convert a Minimal instance to a standard environment for interactive use.


Ubuntu - Atomized (next 2).png

Ubuntu 20: This image from Atomized, formerly known as Frontline, provides Ubuntu 20. Ubuntu 20 offers a secure, stable, and high-performance execution environment for developing cloud and enterprise applications.


Vigilo Onedhub.png

Vigilo Ondehub: Get a management information system with tools to efficiently manage daily life in education. Vigilo will deploy a highly scalable open platform for school data management. It ensures interoperability and security, introduces artificial intelligence, breaks vendor lock-in, and opens for services from suppliers.


Virsae.png

Virsae Service Management for UC & Contact Center: Virsae’s cloud-based analytics and diagnostics for unified communications (UC) and contact center platforms put you in the picture to keep UC running at peak performance. Go beyond simple monitoring with proactive fixes and system foresight to resolve up to 90 percent of issues.


Zammo.png

Zammo AI SaaS: This user-friendly platform gets your business on voice platforms and allows you to easily extend your content to interactive voice response and telephone-based voice bots, as well as chatbots across many popular channels: from web and mobile to Microsoft Teams.


Consulting services


Adatis AI Proof of Concept.png

Adatis AI Proof of Concept: 2-Week Proof of Concept: Get an insight into the potential of AI for your organization so you can begin your journey and realize benefits in the short term. This offer from Adatis will include a findings report with a summary of next steps, including estimates of time and cost.


AI system infrastructure.png AI System Infrastructure: Information Services International-Dentsu Co. Ltd. will customize its AI consulting service to your company’s purpose, data, and situation, then deliver a proof of concept of an AI system. This offer is available only in Japanese.
Azure Migration briefing.png

Azure Migration – Ignite and Engage: 1-Hour Briefing: Kickstart your migration journey to Microsoft Azure. In this session, Cybercom will run you through its proven migration practice that is designed to empower you with a smooth and efficient transition and transformation to the Azure cloud.


Azure Migration.png

Azure Migration: 10-Week Implementation: Computacenter will provide end-to-end support on your journey to Microsoft Azure. Fully aligned to the Microsoft Cloud Adoption Framework, Computacenter offers services that assist your organization in defining the strategy, creating the plan, ensuring readiness, and more.


Azure Sentinel Workshop.png

Azure Sentinel Workshop – 1 Day: Get an overview of Microsoft Azure Sentinel along with insights on active threats to your Microsoft 365 cloud and on-premises environments with this workshop from DynTek. Understand how to mitigate those threats using Microsoft 365 and Azure security products.


Azure Site Recovery.png Azure Site Recovery: 2-Week Assessment: Before you start protecting VMware virtual machines using Microsoft Azure Site Recovery, get a concrete and complete picture of the expected costs with this offering from IT1. Then employ a business continuity and disaster recovery strategy that ensures your data is secure. 
Azure Support - CSP.png

Azure Support – CSP: Tenertech offers a fully managed service for your mission-critical Microsoft Azure environment. Its service provides easy Azure access control via Azure Lighthouse for CSP customers. Get enterprise security via Azure Sentinel as well as management and incident response.


CAI Enterprise DevOps.png

CAI Enterprise DevOps: 6-Week Implementation: Conclusion will help you implement and realize DevOps as a Service. Switch to a sustainable way of working, based on a safe framework that uses an effective and efficient CI/CD approach. Create room for your business to innovate and respond better to the market and to customers.


Azure Cloud Migration.png

Cloud Migration: Implementation: Shaping Cloud’s cloud migration strategy, planning, and delivery services are designed to support customers and deliver improvement benefits. This can be in an advisory or technical assurance capacity, or up to Shaping Cloud’s complete service.


Cloud Readiness Assessment.png

Cloud Readiness Assessment: 2-Week Assessment: Logicalis will conduct a thorough analysis of your technology landscape and capabilities to determine what workloads should be running in the cloud. Logicalis will determine the right strategy for Microsoft Azure implementation and workload migration.


Customer Intelligence Retail.png

Customer Intelligence Retail: 10-Week Implementation: The Customer Intelligence Platform by ITC Infotech delivers contextual marketing and loyalty personalization with predictive modeling algorithms. Equip your marketers to perform the appropriate segmentation, persona creation, and product category analysis.


Data Estate Modernization.png

Data Estate Modernization: 10-Week Assessment: ITC Infotech will deliver real-time and predictive insights across your enterprise with platforms of intelligence for a scalable, flexible, secure data foundation that is future-ready. These services can help enterprises reduce costs by 30 percent to 50 percent.


Data Ingestion Service.png

Data Ingestion Service: 1-Hour Briefing: Adatis’ Microsoft Azure Data Ingestion framework as a service enables an easy and automated way to populate your Azure Data Lake from the myriad data sources in and around your business. This allows anyone you grant access the ability to connect and ingest data into your data lake.


Digital Diversity.png

Digital Diversity Intelligence: 7-Week Implementation: Globeteam uses insight from human behavior, different facility sensors, and data sources to create business value. Its solution combines these sources with classic data sources, such as customer loyalty applications, to create business value and knowledge.


Excel to Microsoft Access.png

Excel to Microsoft Access – Azure: 1-Hour Assessment: IT Impact’s team will evaluate your Microsoft Excel spreadsheets and recommend the best route to take based on your security and long-term goals. During this assessment, IT Impact will discuss how your data can be migrated to Microsoft Azure SQL.


Globeteam Azure Migration.png

Globeteam Azure Migration: 3-Week Assessment: Globeteam will analyze your on-premises infrastructure for Microsoft Azure migration and get a complete view of your business case and readiness for migration to Azure. The migration assessment will be presented in a report with all the findings, economic overview, and more.


Hybrid Integration Platform briefing.png

Hybrid Integration Platform: 1-Hour Briefing: Hybrid Integration Platform: 1-Hour Briefing: QUIBIQ will assist your company in building a modern hybrid integration platform as the basis of your digital transformation. This offer includes a one-hour briefing on Microsoft Azure Integration Services with a specialist from QUIBIQ.


Hybrid Integration Platform.png

Hybrid Integration Platform: 2-Hour Workshop: QUIBIQ will assist your company in building a modern hybrid integration platform as the basis of your digital transformation. This offer includes a two-hour workshop with a specialist from QUIBIQ to understand your specific integration challenges.


Iono Analytics.png

Iono Analytics on Azure: 2-Hour Assessment: IONO is a business intelligence service that frees users from relying on outdated data and provides them with easy-to-follow interactive reports without buying expensive software licenses. End users can create dashboards, share, and analyze, and more. 


IoT Accelerator.png

IoT Accelerator Proof of Concept: 2 Weeks: Proximus will act as your trusted advisor to help you implement an end-to-end proof of concept utilizing technologies such as Microsoft Azure IoT Hub, Azure IoT Edge, and Azure containers.


LogiGuard.png

LogiGuard: 3-Week Implementation: LogiGuard from Logicalis is a security solution and approach powered by Microsoft Azure, centrally managed by Azure Sentinel. Logicalis’ approach helps customers understand their security posture and adopt modern tools to help protect their environment.


Managed Services for Azure.png

Managed Services for Azure: DXC Technology’s Managed Services for Microsoft Azure provides design, delivery, and daily operational support of compute, storage, and virtual network infrastructure in Azure. DXC will monitor and manage system software, infrastructure configurations and service consumption, and more.


Manufacturing Intelligence.png

Manufacturing Intelligence:10-Week Implementation: ITC Infotech brings a bespoke AI/ML-powered intelligent platform to empower consumer packaged goods leaders to build stronger consumer connections, mutually rewarding retailer relationships, and streamlined supply chains. Define the roadmap of your platform.


MLOps Framework.png

MLOps Framework: 8-Week MVP Implementation: Slalom has developed a comprehensive MLOps-enabled advanced analytics framework, equipped to accelerate any machine learning initiative. Slalom’s 6 Pillar Framework is built using state-of-the-art Microsoft Azure services, catering to the full spectrum of end users.


NEC Professional Services.png

NEC Professional Services: NEC Australia provides professional consultants with expertise across various technology streams, business areas, and industries. Among its engagements are single or multiperson contract assignments, retained assignments, and executive search.


Pega Azure Cloud Service.png

Pega Azure Cloud Service Automation: 8-Week Implementation: Set up a Pega-based CRM platform on Microsoft Azure with a two-stage process. Achieve greater scalability and a high-availability solution on Azure while gaining control over cost, time, and implementation uncertainties.


Platform of Intelligence CPG.png Platform of Intelligence CPG: 10-Week Implementation: The Platform of Intelligence (PoI) offering from ITC Infotech will implement and deploy intelligence at scale to realize benefits in the consumer packaged goods industry.
Professional Services (next 4).png Professional Services – Cloud Application Services: NEC Australia can provide expertise in cloud application services, whether that be bespoke development, continuous improvement, or modernization. NEC Australia also possesses the analysis and development expertise to move your legacy applications to the cloud.
Professional Services (next 4).png Professional Services – Cloud Platform Services: NEC Australia’s Cloud Platform Services practice is a holistic offering that facilitates your cloud journey. The company’s certified consultants will start with an assessment of your infrastructure and guide you through architecture planning, service design, and more.
Professional Services (next 4).png Professional Services – Data & AI: NEC Australia’s Data and AI practice offers a rapid delivery of data analytics, IoT, and artificial intelligence. NEC Australia developers will help you adopt and integrate emerging technologies within your existing systems, realizing value in the short term with rapid development cycles.
Professional Services (next 4).png Professional Services – Modern Workplace: NEC Australia’s Modern Workplace practice focuses on user experience process automation and compliance by design. NEC Australia can implement intuitive, collaborative tools and supplement them with modern, cloud-first records and information management solutions.
PwC Data.png PwC Data & Analytics: 4-Week Implementation: PwC can support you in rapidly deploying Microsoft Azure and developing products to demonstrate the value of data and analytics in the cloud. PwC’s five-step approach to piloting cloud technologies and creating value includes problem framing, data ingestions, and more.
Rackspace.png Rackspace Government Cloud (Azure) 10-Week Assessment: This end-to-end service from Rackspace combines pretested UK OFFICIAL landing zone templates with a public services network-accredited operating environment and a U.K. sovereign operating model. Automation is used throughout to minimize the time and cost.
Rapid Azure Sentinel Deployment.png Rapid Azure Sentinel Deployment: 1-Hour Briefing: In this briefing, Adatis will work to understand your business cases, prove the value of Microsoft Azure Sentinel with a 31-day, no-cost trial, and deliver a roadmap on how to extend your Azure Sentinel implementation to reach your cybersecurity objectives.
SC Azure Cloud Adoption.png SC: Azure Cloud Adoption Assessment (4 Weeks): This cloud assessment from Shaping Cloud will provide your organization with a clear a plan of action on how you can use Microsoft Azure cloud technologies to modernize and optimize your business. Get a cloud view of your current applications estate.
Security Managed IT Solution.png

Security Managed IT Solution Managed Service: iV4’s service puts multiple defenses between corporate assets and hackers by establishing a modern perimeter of continuously managed security controls. The goal is to shorten the time it takes to detect and respond to malicious activity.


Smart Data Platform.png

Smart Data Platform Education: 5-Day Implementation: Make data work for your educational institution and its environment with the Smart Data Platform Education implementation, based on the Microsoft data platform. Macaw handles the availability, security, and further development of your data platform. This service is available only in Dutch.


SQL Server Cloud Readiness.png SQL Server Cloud Readiness Assessment: This cloud-readiness assessment from Seven Seas will help customers identify the on-premises SQL Server workloads that are compatible to be migrated to Microsoft Azure. Seven Seas will determine if PaaS, managed instance, or SQL Server virtual machines best suit your organization.

HOW-TO: Deploy AKS with POD Managed Identity and CSI using Terraform and Azure Pipeline

HOW-TO: Deploy AKS with POD Managed Identity and CSI using Terraform and Azure Pipeline

This article is contributed. See the original author and article here.

Today as we develop and run application in AKS, we do not want credentials like database connection strings, keys, or secrets and certificates exposed to the outside world where an attacker could take advantage of those secrets for malicious purposes. Our application should be designed to protect customer data. AKS documentation describes in detail security best practice


In this article we will show how to implement and deploy pod security by deploying Pod managed Identity and Secrets Store CSI driver resources on Kubernetes. There are many articles and blogs that discuss this topic in detail however we will discuss how to deploy it the resources using Terraform. The source code you will find here and Azure pipeline to deploy it is here


Prerequisite resources:


The following resources should exist before running azure pipeline.


  • Server Service Principal ID and Secret: Terraform will use it to access Azure and create resources. Also, will be used to integrate AKS with AAD.

  • Client Service Principal ID and Secret: It will be used to integrate AKS with AAD.

  • AAD Cluster Admin Group: AAD group for cluster admins

  • Azure Key Vault: A KV should exists where CSI will connect with it. You can also modify the code to create the KV during the TF execution


AKS Terraform Scripts Overview


Current repo has the following structure. Terraform scripts are located under “terraform_aks” folder.


magdysalem_0-1617211808512.png


Each file, under terraform_aks folder, is designed to define specific resource deployment. 


  • Variables.tf: terraform use this file to read custom settings variable to use during the run time.  If the variable is defined in the variable file then TF expect a default value or it will be passed as env variable during execution. For example, cluster network specification 

    variable "virtual_network_name" {
      description = "Virtual network name"
      default     = "aksVirtualNetwork"
    }
    
    variable "virtual_network_address_prefix" {
      description = "VNET address prefix"
      default     = "15.0.0.0/8"
    }
    
    variable "aks_subnet_name" {
      description = "Subnet Name."
      default     = "kubesubnet"
    }
    
    variable "aks_subnet_address_prefix" {
      description = "Subnet address prefix."
      default     = "15.0.0.0/16"
    }
    ​


  • main.tf:  defined different terraform providers will be use in the execution. 

    provider "azurerm" {
      version = "~> 2.53.0"
      features {}
    }
    
    
    terraform {
      required_version = ">= 0.14.9"
      # Backend variables are initialized by Azure DevOps
      backend "azurerm" {}
    }
    
    data "azurerm_subscription" "current" {}
    ​


  • vnet.tf: create the network resource to use with AKS based on variable.tf input

    resource "azurerm_virtual_network" "demo" {
      name                = var.virtual_network_name
      location            = azurerm_resource_group.rg.location
      resource_group_name = azurerm_resource_group.rg.name
      address_space       = [var.virtual_network_address_prefix]
    
      subnet {
        name           = var.aks_subnet_name
        address_prefix = var.aks_subnet_address_prefix
      }
    
      tags = var.tags
    }
    
    data "azurerm_subnet" "kubesubnet" {
      name                 = var.aks_subnet_name
      virtual_network_name = azurerm_virtual_network.demo.name
      resource_group_name  = var.resource_group_name
      depends_on           = [azurerm_virtual_network.demo]
    }
    ​


  • K8s.tf: The main script to create AKS.  The resource configuration as following 

    resource "azurerm_kubernetes_cluster" "k8s" {
      name       = var.aks_name
      location   = azurerm_resource_group.rg.location
      dns_prefix = var.aks_dns_prefix
    
      resource_group_name = azurerm_resource_group.rg.name
    
      linux_profile {
        admin_username = var.vm_user_name
    
        ssh_key {
          key_data = var.public_ssh_key_path
        }
      }
    
      addon_profile {
        http_application_routing {
          enabled = true
        }
    
      }
    
      default_node_pool {
        name            = "agentpool"
        node_count      = var.aks_agent_count
        vm_size         = var.aks_agent_vm_size
        os_disk_size_gb = var.aks_agent_os_disk_size
        vnet_subnet_id  = data.azurerm_subnet.kubesubnet.id
      }
    
      # block will be applied only if `enable` is true in var.azure_ad object
      role_based_access_control {
        azure_active_directory {
          managed = true
          admin_group_object_ids = var.azure_ad_admin_groups
        }
        enabled = true
      }
    
      identity {
        type = "SystemAssigned"
      }
    
      network_profile {
        network_plugin     = "azure"
        dns_service_ip     = var.aks_dns_service_ip
        docker_bridge_cidr = var.aks_docker_bridge_cidr
        service_cidr       = var.aks_service_cidr
      }
    
      depends_on = [
        azurerm_virtual_network.demo
      ]
      tags = var.tags
    }
    ​


  • To enable AAD integration we used the following configuration for the role_base_access_control section 

    # block will be applied only if `enable` is true in var.azure_ad object
      role_based_access_control {
        azure_active_directory {
          managed = true
          admin_group_object_ids = var.azure_ad_admin_groups
        }
        enabled = true
      }
    
      identity {
        type = "SystemAssigned"
      }


  • After creating the cluster we need to add cluster role binding where we assign AAD admin group as cluster admins 

    resource "kubernetes_cluster_role_binding" "aad_integration" {
      metadata {
        name = "${var.aks_name}admins"
      }
      role_ref {
        api_group = "rbac.authorization.k8s.io"
        kind      = "ClusterRole"
        name      = "cluster-admin"
      }
      subject {
        kind      = "Group"
        name      = var.aks-aad-clusteradmins
        api_group = "rbac.authorization.k8s.io"
      }
      depends_on = [
        azurerm_kubernetes_cluster.k8s
      ]
    }
    ​


  • roles.tf: this script will assign different roles to cluster and agentpool like acr image puller role

    resource "azurerm_role_assignment" "acr_image_puller" {
      scope                = azurerm_container_registry.acr.id
      role_definition_name = "AcrPull"
      principal_id         = azurerm_kubernetes_cluster.k8s.kubelet_identity.0.object_id
    }
    ​


  • To Enable POD Identity. Agent pool should have two specific roles as Managed Identity Operator over the node resource group scope 

    resource "azurerm_role_assignment" "agentpool_msi" {
      scope                            = data.azurerm_resource_group.node_rg.id
      role_definition_name             = "Managed Identity Operator"
      principal_id                     = data.azurerm_user_assigned_identity.agentpool.principal_id
      skip_service_principal_aad_check = true
    
    }

      Virtual Machine Contributor

    resource "azurerm_role_assignment" "agentpool_vm" {
      scope                            = data.azurerm_resource_group.node_rg.id
      role_definition_name             = "Virtual Machine Contributor"
      principal_id                     = data.azurerm_user_assigned_identity.agentpool.principal_id
      skip_service_principal_aad_check = true
    }


  • Addon-aad-pod-identity.tf: The script will deploy AAD Pod identity helm chart.


  • Addon-kv-csi-driver.tf: The script will deploy Azure CSI Secret store provider helm chart


  • Namespace-pod-identity.tf: It will deploy the managed Identity for specific namespace. Also, it will deploy CSI store provider for this namespace. 


Deploying AKS cluster using Azure DevOps pipeline


We can deploy the cluster using azure DevOps pipeline. In the repo there is file call “azure-pipelines-terraform.yml” 


The deployment use Stage and Jobs to deploy the cluster as following.


  • Task Set Terraform backed: will provision backend storage account and container to save terraform state

        - task: AzureCLI@1
          displayName: Set Terraform backend
          condition: and(succeeded(), ${{ parameters.provisionStorage }})
          inputs:
            azureSubscription: ${{ parameters.TerraformBackendServiceConnection }}
            scriptLocation: inlineScript
            inlineScript: |
              set -eu  # fail on error
              RG='${{ parameters.TerraformBackendResourceGroup }}'
              export AZURE_STORAGE_ACCOUNT='${{ parameters.TerraformBackendStorageAccount }}'
              export AZURE_STORAGE_KEY="$(az storage account keys list -g "$RG" -n "$AZURE_STORAGE_ACCOUNT" --query '[0].value' -o tsv)"
              if test -z "$AZURE_STORAGE_KEY"; then
                az configure --defaults group="$RG" location='${{ parameters.TerraformBackendLocation }}'
                az group create -n "$RG" -o none
                az storage account create -n "$AZURE_STORAGE_ACCOUNT" -o none
                export AZURE_STORAGE_KEY="$(az storage account keys list -g "$RG" -n "$AZURE_STORAGE_ACCOUNT" --query '[0].value' -o tsv)"
              fi
    
              container='${{ parameters.TerraformBackendStorageContainer }}'
              if ! az storage container show -n "$container" -o none 2>/dev/null; then
                az storage container create -n "$container" -o none
              fi
              blob='${{ parameters.environment }}.tfstate'
              if [[ $(az storage blob exists -c "$container" -n "$blob" --query exists) = "true" ]]; then
                if [[ $(az storage blob show -c "$container" -n "$blob" --query "properties.lease.status=='locked'") = "true" ]]; then
                  echo "State is leased"
                  lock_jwt=$(az storage blob show -c "$container" -n "$blob" --query metadata.terraformlockid -o tsv)
                  if [ "$lock_jwt" != "" ]; then
                    lock_json=$(base64 -d <<< "$lock_jwt")
                    echo "State is locked"
                    jq . <<< "$lock_json"
                  fi
                  if [ "${TERRAFORM_BREAK_LEASE:-}" != "" ]; then
                    az storage blob lease break -c "$container" -b "$blob"
                  else
                    echo "If you're really sure you want to break the lease, rerun the pipeline with variable TERRAFORM_BREAK_LEASE set to 1."
                    exit 1
                  fi
                fi
              fi
            addSpnToEnvironment: true​


  • Task Install Terraform CLI based on the parameter version.


  • Task Terraform Credentials: will read the SP account information that will be used to execute the pipeline

        - task: AzureCLI@1
          displayName: Terraform init
          inputs:
            azureSubscription: ${{ parameters.TerraformBackendServiceConnection }}
            scriptLocation: inlineScript
            inlineScript: |
              set -eux  # fail on error
              subscriptionId=$(az account show --query id -o tsv)
              terraform init 
                -backend-config=storage_account_name=${{ parameters.TerraformBackendStorageAccount }} 
                -backend-config=container_name=${{ parameters.TerraformBackendStorageContainer }} 
                -backend-config=key=${{ parameters.environment }}.tfstate 
                -backend-config=resource_group_name=${{ parameters.TerraformBackendResourceGroup }} 
                -backend-config=subscription_id=$subscriptionId 
                -backend-config=tenant_id=$tenantId 
                -backend-config=client_id=$servicePrincipalId 
                -backend-config=client_secret="$servicePrincipalKey"
            workingDirectory: ${{ parameters.TerraformDirectory }}
            addSpnToEnvironment: true


  • Task Terraform init to initiate terraform


  • Task Terraform apply will execute the terraform with auto-approve flag so terraform will run the apply.


P.S We could add task for terraform plan and the ask for approval.

Setting up pipeline in Azure DevOps


  • Under Pipeline Library Create new variable group call it terraform and create following variablesmagdysalem_3-1617213751404.png

  • Add new pipeline then select Github


          magdysalem_4-1617213793378.png


  • After login select the terraform repo 


          magdysalem_5-1617213859936.png


  • Select Existing Azure Pipeline YAML then select “azure-pipeline-terraform.yml”magdysalem_6-1617214056039.png


Once we save the pipeline and created the prerequisite resources and updated the variable.tf file then we are ready to run the pipeline and we should get something like thatmagdysalem_7-1617214230548.png


Check Our work


Cluster information


Under cluster configuration we should see AAD is enabled 


magdysalem_0-1617216276296.png


Azure POD Identity /  CSI Provider Pods
From command line we can check kube-system namespace for MIC and NMI pods


magdysalem_9-1617214291098.png


magdysalem_10-1617214299798.png


Namespace Azure Identity and Azure Identity Binding


magdysalem_11-1617214337124.png


Check for CSI secret store provider


magdysalem_12-1617214352096.png


The script was executed successfully, and all our resources and resources deployment are in place.


Summary


In this article we demonstrated how to deploy AKS integrated with AAD and deploy Pod Identity and CSI provider using terraform and helm chart. In the next article we will demo how to build application and use POD Identity to access azure resources.


HOW-TO: Deploy AKS with POD Managed Identity and CSI using Terraform and Azure Pipeline

HOW-TO: Deploy AKS with POD Managed Identity and CSI using Terraform and Azure Pipeline

This article is contributed. See the original author and article here.

Today as we develop and run application in AKS, we do not want credentials like database connection strings, keys, or secrets and certificates exposed to the outside world where an attacker could take advantage of those secrets for malicious purposes. Our application should be designed to protect customer data. AKS documentation describes in detail security best practice


In this article we will show how to implement and deploy pod security by deploying Pod managed Identity and Secrets Store CSI driver resources on Kubernetes. There are many articles and blogs that discuss this topic in detail however we will discuss how to deploy it the resources using Terraform. The source code you will find here and Azure pipeline to deploy it is here


Prerequisite resources:


The following resources should exist before running azure pipeline.


  • Server Service Principal ID and Secret: Terraform will use it to access Azure and create resources. Also, will be used to integrate AKS with AAD.

  • Client Service Principal ID and Secret: It will be used to integrate AKS with AAD.

  • AAD Cluster Admin Group: AAD group for cluster admins

  • Azure Key Vault: A KV should exists where CSI will connect with it. You can also modify the code to create the KV during the TF execution


AKS Terraform Scripts Overview


Current repo has the following structure. Terraform scripts are located under “terraform_aks” folder.


magdysalem_0-1617211808512.png


Each file, under terraform_aks folder, is designed to define specific resource deployment. 


  • Variables.tf: terraform use this file to read custom settings variable to use during the run time.  If the variable is defined in the variable file then TF expect a default value or it will be passed as env variable during execution. For example, cluster network specification 

    variable "virtual_network_name" {
      description = "Virtual network name"
      default     = "aksVirtualNetwork"
    }
    
    variable "virtual_network_address_prefix" {
      description = "VNET address prefix"
      default     = "15.0.0.0/8"
    }
    
    variable "aks_subnet_name" {
      description = "Subnet Name."
      default     = "kubesubnet"
    }
    
    variable "aks_subnet_address_prefix" {
      description = "Subnet address prefix."
      default     = "15.0.0.0/16"
    }
    ​


  • main.tf:  defined different terraform providers will be use in the execution. 

    provider "azurerm" {
      version = "~> 2.53.0"
      features {}
    }
    
    
    terraform {
      required_version = ">= 0.14.9"
      # Backend variables are initialized by Azure DevOps
      backend "azurerm" {}
    }
    
    data "azurerm_subscription" "current" {}
    ​


  • vnet.tf: create the network resource to use with AKS based on variable.tf input

    resource "azurerm_virtual_network" "demo" {
      name                = var.virtual_network_name
      location            = azurerm_resource_group.rg.location
      resource_group_name = azurerm_resource_group.rg.name
      address_space       = [var.virtual_network_address_prefix]
    
      subnet {
        name           = var.aks_subnet_name
        address_prefix = var.aks_subnet_address_prefix
      }
    
      tags = var.tags
    }
    
    data "azurerm_subnet" "kubesubnet" {
      name                 = var.aks_subnet_name
      virtual_network_name = azurerm_virtual_network.demo.name
      resource_group_name  = var.resource_group_name
      depends_on           = [azurerm_virtual_network.demo]
    }
    ​


  • K8s.tf: The main script to create AKS.  The resource configuration as following 

    resource "azurerm_kubernetes_cluster" "k8s" {
      name       = var.aks_name
      location   = azurerm_resource_group.rg.location
      dns_prefix = var.aks_dns_prefix
    
      resource_group_name = azurerm_resource_group.rg.name
    
      linux_profile {
        admin_username = var.vm_user_name
    
        ssh_key {
          key_data = var.public_ssh_key_path
        }
      }
    
      addon_profile {
        http_application_routing {
          enabled = true
        }
    
      }
    
      default_node_pool {
        name            = "agentpool"
        node_count      = var.aks_agent_count
        vm_size         = var.aks_agent_vm_size
        os_disk_size_gb = var.aks_agent_os_disk_size
        vnet_subnet_id  = data.azurerm_subnet.kubesubnet.id
      }
    
      # block will be applied only if `enable` is true in var.azure_ad object
      role_based_access_control {
        azure_active_directory {
          managed = true
          admin_group_object_ids = var.azure_ad_admin_groups
        }
        enabled = true
      }
    
      identity {
        type = "SystemAssigned"
      }
    
      network_profile {
        network_plugin     = "azure"
        dns_service_ip     = var.aks_dns_service_ip
        docker_bridge_cidr = var.aks_docker_bridge_cidr
        service_cidr       = var.aks_service_cidr
      }
    
      depends_on = [
        azurerm_virtual_network.demo
      ]
      tags = var.tags
    }
    ​


  • To enable AAD integration we used the following configuration for the role_base_access_control section 

    # block will be applied only if `enable` is true in var.azure_ad object
      role_based_access_control {
        azure_active_directory {
          managed = true
          admin_group_object_ids = var.azure_ad_admin_groups
        }
        enabled = true
      }
    
      identity {
        type = "SystemAssigned"
      }


  • After creating the cluster we need to add cluster role binding where we assign AAD admin group as cluster admins 

    resource "kubernetes_cluster_role_binding" "aad_integration" {
      metadata {
        name = "${var.aks_name}admins"
      }
      role_ref {
        api_group = "rbac.authorization.k8s.io"
        kind      = "ClusterRole"
        name      = "cluster-admin"
      }
      subject {
        kind      = "Group"
        name      = var.aks-aad-clusteradmins
        api_group = "rbac.authorization.k8s.io"
      }
      depends_on = [
        azurerm_kubernetes_cluster.k8s
      ]
    }
    ​


  • roles.tf: this script will assign different roles to cluster and agentpool like acr image puller role

    resource "azurerm_role_assignment" "acr_image_puller" {
      scope                = azurerm_container_registry.acr.id
      role_definition_name = "AcrPull"
      principal_id         = azurerm_kubernetes_cluster.k8s.kubelet_identity.0.object_id
    }
    ​


  • To Enable POD Identity. Agent pool should have two specific roles as Managed Identity Operator over the node resource group scope 

    resource "azurerm_role_assignment" "agentpool_msi" {
      scope                            = data.azurerm_resource_group.node_rg.id
      role_definition_name             = "Managed Identity Operator"
      principal_id                     = data.azurerm_user_assigned_identity.agentpool.principal_id
      skip_service_principal_aad_check = true
    
    }

      Virtual Machine Contributor

    resource "azurerm_role_assignment" "agentpool_vm" {
      scope                            = data.azurerm_resource_group.node_rg.id
      role_definition_name             = "Virtual Machine Contributor"
      principal_id                     = data.azurerm_user_assigned_identity.agentpool.principal_id
      skip_service_principal_aad_check = true
    }


  • Addon-aad-pod-identity.tf: The script will deploy AAD Pod identity helm chart.


  • Addon-kv-csi-driver.tf: The script will deploy Azure CSI Secret store provider helm chart


  • Namespace-pod-identity.tf: It will deploy the managed Identity for specific namespace. Also, it will deploy CSI store provider for this namespace. 


Deploying AKS cluster using Azure DevOps pipeline


We can deploy the cluster using azure DevOps pipeline. In the repo there is file call “azure-pipelines-terraform.yml” 


The deployment use Stage and Jobs to deploy the cluster as following.


  • Task Set Terraform backed: will provision backend storage account and container to save terraform state

        - task: AzureCLI@1
          displayName: Set Terraform backend
          condition: and(succeeded(), ${{ parameters.provisionStorage }})
          inputs:
            azureSubscription: ${{ parameters.TerraformBackendServiceConnection }}
            scriptLocation: inlineScript
            inlineScript: |
              set -eu  # fail on error
              RG='${{ parameters.TerraformBackendResourceGroup }}'
              export AZURE_STORAGE_ACCOUNT='${{ parameters.TerraformBackendStorageAccount }}'
              export AZURE_STORAGE_KEY="$(az storage account keys list -g "$RG" -n "$AZURE_STORAGE_ACCOUNT" --query '[0].value' -o tsv)"
              if test -z "$AZURE_STORAGE_KEY"; then
                az configure --defaults group="$RG" location='${{ parameters.TerraformBackendLocation }}'
                az group create -n "$RG" -o none
                az storage account create -n "$AZURE_STORAGE_ACCOUNT" -o none
                export AZURE_STORAGE_KEY="$(az storage account keys list -g "$RG" -n "$AZURE_STORAGE_ACCOUNT" --query '[0].value' -o tsv)"
              fi
    
              container='${{ parameters.TerraformBackendStorageContainer }}'
              if ! az storage container show -n "$container" -o none 2>/dev/null; then
                az storage container create -n "$container" -o none
              fi
              blob='${{ parameters.environment }}.tfstate'
              if [[ $(az storage blob exists -c "$container" -n "$blob" --query exists) = "true" ]]; then
                if [[ $(az storage blob show -c "$container" -n "$blob" --query "properties.lease.status=='locked'") = "true" ]]; then
                  echo "State is leased"
                  lock_jwt=$(az storage blob show -c "$container" -n "$blob" --query metadata.terraformlockid -o tsv)
                  if [ "$lock_jwt" != "" ]; then
                    lock_json=$(base64 -d <<< "$lock_jwt")
                    echo "State is locked"
                    jq . <<< "$lock_json"
                  fi
                  if [ "${TERRAFORM_BREAK_LEASE:-}" != "" ]; then
                    az storage blob lease break -c "$container" -b "$blob"
                  else
                    echo "If you're really sure you want to break the lease, rerun the pipeline with variable TERRAFORM_BREAK_LEASE set to 1."
                    exit 1
                  fi
                fi
              fi
            addSpnToEnvironment: true​


  • Task Install Terraform CLI based on the parameter version.


  • Task Terraform Credentials: will read the SP account information that will be used to execute the pipeline

        - task: AzureCLI@1
          displayName: Terraform init
          inputs:
            azureSubscription: ${{ parameters.TerraformBackendServiceConnection }}
            scriptLocation: inlineScript
            inlineScript: |
              set -eux  # fail on error
              subscriptionId=$(az account show --query id -o tsv)
              terraform init 
                -backend-config=storage_account_name=${{ parameters.TerraformBackendStorageAccount }} 
                -backend-config=container_name=${{ parameters.TerraformBackendStorageContainer }} 
                -backend-config=key=${{ parameters.environment }}.tfstate 
                -backend-config=resource_group_name=${{ parameters.TerraformBackendResourceGroup }} 
                -backend-config=subscription_id=$subscriptionId 
                -backend-config=tenant_id=$tenantId 
                -backend-config=client_id=$servicePrincipalId 
                -backend-config=client_secret="$servicePrincipalKey"
            workingDirectory: ${{ parameters.TerraformDirectory }}
            addSpnToEnvironment: true


  • Task Terraform init to initiate terraform


  • Task Terraform apply will execute the terraform with auto-approve flag so terraform will run the apply.


P.S We could add task for terraform plan and the ask for approval.

Setting up pipeline in Azure DevOps


  • Under Pipeline Library Create new variable group call it terraform and create following variablesmagdysalem_3-1617213751404.png

  • Add new pipeline then select Github


          magdysalem_4-1617213793378.png


  • After login select the terraform repo 


          magdysalem_5-1617213859936.png


  • Select Existing Azure Pipeline YAML then select “azure-pipeline-terraform.yml”magdysalem_6-1617214056039.png


Once we save the pipeline and created the prerequisite resources and updated the variable.tf file then we are ready to run the pipeline and we should get something like thatmagdysalem_7-1617214230548.png


Check Our work


Cluster information


Under cluster configuration we should see AAD is enabled 


magdysalem_0-1617216276296.png


Azure POD Identity /  CSI Provider Pods
From command line we can check kube-system namespace for MIC and NMI pods


magdysalem_9-1617214291098.png


magdysalem_10-1617214299798.png


Namespace Azure Identity and Azure Identity Binding


magdysalem_11-1617214337124.png


Check for CSI secret store provider


magdysalem_12-1617214352096.png


The script was executed successfully, and all our resources and resources deployment are in place.


Summary


In this article we demonstrated how to deploy AKS integrated with AAD and deploy Pod Identity and CSI provider using terraform and helm chart. In the next article we will demo how to build application and use POD Identity to access azure resources.