
by Contributed | Mar 31, 2021 | Technology
This article is contributed. See the original author and article here.
Build AI-powered apps with pre-trained models or create your own machine learning models
Azure AI puts artificial intelligence and machine learning at the fingertips of every developer. Looking to build ML models? Choose your preferred method to do so, whether you prefer a code-first experience, automated ML, or visual tools that simplify ML for any experience level. Looking to add pre-built models to your apps? Give your app the abilities of computer vision, natural language processing (NLP), speech, and decision-making with simple API calls.
What Solutions should you develop?
Put your skills to the test and apply Azure AI to a new or existing project! We welcome projects of all types, including AI-powered apps or devices, conversational bots, ML models, or something else entirely!
Check out the resources tab for tips on getting started or review and join our Slack office hours to get your questions answered.
Additionally, if you’re looking for more inspiration, you can view past submissions and winners here. We’re excited to see what you build!
New to AI/Machine Learning?
We’ve got your back. Our machine learning quickstarts and sample code will help you start building. Need datasets? Azure Open Datasets offers curated, ML-ready open data including featured datasets like weather, city safety, satellite imagery, socioeconomic data and more.
You can also visit this ML resources page for more guidance on getting started.
Additionally, you can visit our AI developer resource page for guidance on getting started with Cognitive Services- whether you’re looking to solve for optical character recognition (OCR), detect objects in images, transcribe audio, understand or process natural language, make personalized recommendations, or even add read-aloud text-to-speech capabilities to build inclusive applications.
What to Build:
Use one or more of the following Azure AI services to build a new project or update an existing project: Azure Machine Learning, Azure Cognitive Services, and Azure Search. Projects may integrate with other Azure services, open source technologies (including but not limited to frameworks, libraries, and APIs) and physical hardware of your choice.
Register Now
Resources
Microsoft Learn AI Fundamentals is a great place to onboard students/universities to Azure AI.
We have a dedicated page with resources like Essentials videos, and a curated self-paced learning journey published at:
- https://aka.ms/ai-dev – AI Fundamentals for developers
- https://aka.ms/data-scientists – Data Scientists
by Contributed | Mar 31, 2021 | Technology
This article is contributed. See the original author and article here.
As part of the Azure Sphere team, we have a small team known as Devices & Demos, which includes software, electronics, and design expertise I met Mike Hall and James Scott from the team whom are both based out of Microsoft, Cambridge, UK, to understand a bit more about what the team are working on.
Devices and Demos Team
This team maintains assets such as the design of the MT3620 Reference Development Board and other hardware reference designs. In addition, by designing, implementing, manufacturing, and deploying small runs of real devices, we enable the Azure Sphere team to experience and validate our OEM customers’ perspective. So one of the biggest challenges we have seen in education is how to keep student engaged and what can institutions and students develop to inspire school children at STEM out Reach events.
Welcome to the Azure Sphere Balance bot!
The Balance Bot is:
- Enclosed and self-contained
- Battery powered
- Connected to a cloud IoT dashboard – built with Azure IoT Central
- Using a small, custom PCB (printed circuit board)
- With real-time requirements
- Engaging and fun!
The Balance Bot is a balancing two-wheeled robot. Balancing robots (and inverted pendulums) are canonical examples of hard real-time control – if the control loop is stopped from executing, or misses timing constraints, they fall over – hard.
Of course, if we’re going to build a exciting showcase, it wouldn’t be complete without lasers. So we added some range-finding lasers that enable the robot to avoid obstacles.
Robot design and behavior
The device includes a small LCD screen to show the robot’s status. There are 4 icons, the top one being battery level, then WiFi connectivity status, then IoT Central connectivity status, and finally an indicator of the firmware version (version A or version B) that it is running that is used when demonstrating how the robot handles over-the-air software updates without falling over.
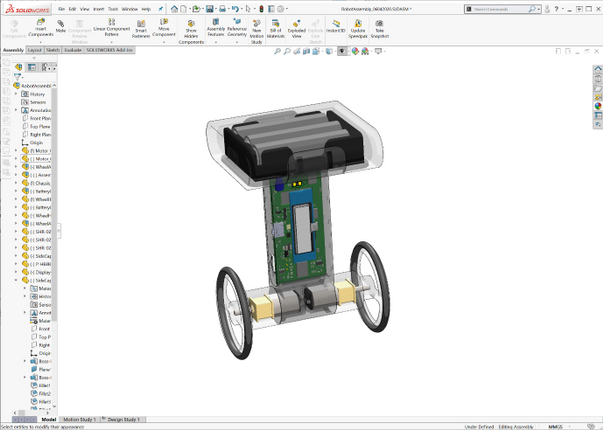
Inside, the robot looks like this:
As you can see, the 3 AA batteries are in the top compartment. The PCB forms the “spine” and includes an inertial measurement unit (IMU) for balancing, and the laser range-finders. The motors are housed at the bottom in line with the wheels. The whole thing is encased – we used 3D printing to quickly build some custom cases. To simplify the electronic design, we used the Avnet Azure Sphere MT3620 module.
The software architecture is illustrated in the diagram below. We made use of Azure RTOS on one of the MT3620’s M4F cores to perform the hard real-time loop of controlling the motors, using data from the IMU to stay upright, and data from the laser range-finders to detect and back away from obstacles. The “high level” A7 core app communicates with Azure IoT Central and with the real-time core to provide secured internet connectivity.

Connecting to the cloud
It wouldn’t be an IoT demo without showing how to view and control the data from the Internet. In Azure IoT Central, we implemented a dashboard showing the status of the robot:

This shows:
- The battery level of the robot over time
- The current heading of the robot in both degrees and as a compass direction
- The total number of obstacles that the robot has avoided using the laser rangefinder to detect and back away from an object
The team have also implemented a control feature in IoT Central:

This illustrates how IoT Central can set a “desired property” in the robot’s device twin, for the desired heading – the robot then turns on the spot to face in that direction.
Deferring updates while balancing
Being securely connected to the Internet requires a device to be regularly updated to stay on top of newly discovered security issues – this is one of the Seven Properties of Highly Secured Devices. However, to take a software update requires a device to be unresponsive while it installs – which is not a good idea if you’re balancing on two wheels. To address this, Azure Sphere supports deferral of device updates. For this robot, we use that feature and defer updates until the robot is safely lying down.
SourceCode
We have also made all the source files and docs for this robot available in the Azure Sphere Gallery github repository. This includes the software, electronics design, physical case design, plus assembly and end-user instructions. The Azure Sphere Gallery github repository includes unmaintained content that is not part of our official, maintained Azure Sphere platform. others might find useful as an example of a complete device implemented, manufactured and deployed on top of Azure Sphere.
Conclusion
If you haven’t already, why not grab an Azure Sphere dev board and see how quick it is to build a secured IoT device, or have a look at the github repository to see how we did it ourselves and we would love to hear what you build, This project welcomes contributions and suggestions. Most contributions require you to agree to a Contributor License Agreement (CLA) declaring that you have the right to, and actually do, grant us the rights to use your contribution. For details, visit https://cla.microsoft.com.
by Contributed | Mar 31, 2021 | Technology
This article is contributed. See the original author and article here.
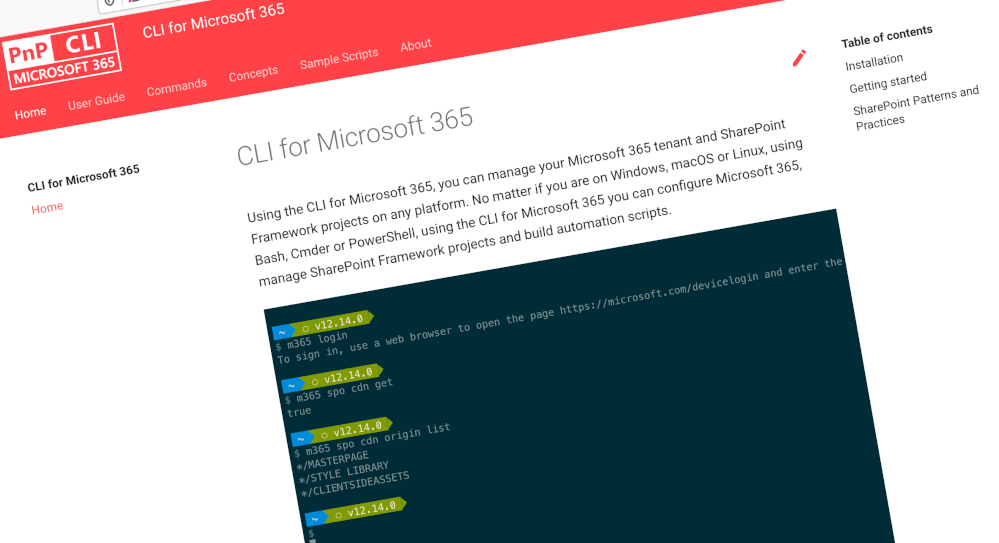
We’ve just published a new version of the CLI for Microsoft 365 with new commands for working with and managing Microsoft 365 tenants and SharePoint Framework projects on any platform.
Manage Microsoft 365 and SharePoint Framework projects on any platform
CLI for Microsoft 365 is a cross-platform CLI that allows you to manage various configuration settings of Microsoft 365 and SharePoint Framework projects no matter which operating system or shell you use.
While building solutions for Microsoft 365 expands beyond the Windows operating system, managing many of the platform settings is possible only through PowerShell on Windows. As more and more users work on non-Windows machines, it’s inconvenient for them to have to use a Windows virtual machine to configure their tenants. With the CLI for Microsoft 365, you can configure your tenant no matter which operating system you use. Additionally, using CLI for Microsoft 365, you can manage your SharePoint Framework projects.
New version of CLI for Microsoft 365 – v3.8
Following our monthly release cadence, we’ve released a new version of the CLI for Microsoft 365 with some new capabilities. Here are a few of the most noteworthy additions.
Changes
We’ve continued improving CLI building upon the changes we’ve introduced in the previous version.
Added support for configuring default command output
In the previous release, we added a new command `m365 cli config set` which gave you the ability to configure the CLI to your personal preferences, so with this release we have added the ability to configure the default output for all commands.
To set the default output for all commands to JSON, execute:
m365 cli config set --key output --value json
To set the default output for all commands to test, execute:
m365 cli config set --key output --value text
If there are other options that you would like to be able to configure, please let us know.
Improved error messages
In the 3.2.0 release of CLI for Microsoft 365, we replaced the request library with axios which we use to handle our requests to Microsoft 365 APIs.
Unfortunately, this change also changed the way that we handled error messages and instead of replying with the error message from the API we instead returned a generic error message which was meaningless.
So in this release, we have reverted back to our previous behaviour and so now error messages will be returned direct from the API call.
New Commands
Return Policies from Azure AD
Azure Active Directory (Azure AD) uses policies to control Azure AD feature behaviors in your organization. Policies are custom rules that you can enforce on applications, service principals, groups, or on the entire organization they are assigned to.
Administrators currently need to call multiple endpoints in the Microsoft Graph to return a list of policies based on policy type, as there are eight types of policies that can be listed this is not a trivial task, so we have We’ve introduced a single command that can return all policies created or policies of a specific type.
To return all policies from Azure AD, execute:
To return only Authorization policies, execute:
m365 aad policy list --policyType authorization
For information on the policy types that can be returned, checkout our documentation for this command.
New script samples
CLI for Microsoft 365 is a great tool both for quick adjustments to the configuration of your Microsoft 365 tenant as well as automating more complex tasks. Because CLI for Microsoft 365 is cross-platform you can use it on any OS and in any shell. To help you get started using the CLI for Microsoft 365 for automation scenarios, we started gathering some sample scripts.
If you have any scripts that you use frequently, please share them with us so that we can learn more about the common automation scenarios.
Monitor and notify Microsoft 365 health status
Grant API permissions to SharePoint Azure Active Directory (AAD) Application
List all Microsoft Teams team’s Owners and Members
Contributors
This release wouldn’t be possible without the help of (in alphabetical order)
Thank you all for the time you chose to spend on the CLI for Microsoft 365 and your help to advance it!
Work in progress
Here are some things that we’re currently working on.
More commands, what else
Microsoft 365 is evolving and new capabilities are being released every day. With CLI for Microsoft 365, we aim to help you manage your tenant on any platform in a consistent way, no matter which part of Microsoft 365 you interact with. While we keep adding new commands to CLI for Microsoft 365 each release, we still barely scratched the surface with what’s possible in Microsoft 365. In the upcoming versions of the CLI for Microsoft, you can expect us to add more commands across the different workloads in Microsoft 365.
Improved managing SharePoint pages
Microsoft keeps investing in modern SharePoint pages continuously introducing new capabilities to let us publish rich content. We’re looking into extending our support for managing modern SharePoint pages to let you use them to their full potential.
Improved creating Azure AD apps
Recently, we’ve introduced a command to easily create Azure AD app registrations. Because they’re backbone of every app you’d build on Microsoft 365, we think you should be able to create them as easily as possible. So with CLI for Microsoft 365, you can create a fully configured Azure AD app for the most common scenarios with just one line of code.
In the future versions of CLI for Microsoft 365 you can expect us extend the capabilities with additional scenarios and features supported by Azure AD.
Script examples
In every release of the CLI for Microsoft 365, we introduce new commands for managing Microsoft 365. With over 350 commands across the different Microsoft 365 services, the CLI for Microsoft 365 has become a powerful tool, not just for managing your tenant but also for automating your daily work.
We’d love to show you how you can use the CLI for Microsoft 365 to build automation scripts in PowerShell Core and Bash. If you have any scripts using SPO or PnP PowerShell that you use frequently, please share them with us so that we can learn more about the common automation scenarios.
‘ensure’ commands
We’ve just shipped our first ensure command – an easy way to help you that a site with specific settings exists. If it doesn’t, CLI creates it for you, if it does, CLI ensures it has the right properties. All in one line of code. We’d love to hear from you how you like it and if it’s something you’d like us to implement for other commands as well.
Try it today
Get the latest release of the CLI for Microsoft 365 from npm by executing:
npm i -g @pnp/cli-microsoft365
Alternatively, you can get the latest release from Docker by executing:
docker run --rm -it m365pnp/cli-microsoft365:latest
If you need more help getting started or want more details about the commands, the architecture or the project, go to aka.ms/cli-m365.
If you see any room for improvement, please, don’t hesitate to reach out to us either on GitHub or twitter.
by Contributed | Mar 31, 2021 | Technology
This article is contributed. See the original author and article here.
I’ve heard a bit of interest expressed recently in the ability to create a customizable Endpoint Configuration Manager (SCCM/ConfigMgr) console that could either be pruned down or featured up in a way to customize it to fit the specific needs of different departments and roles within the business. Help desk personnel may need to view installed apps on a device, while Software Update managers may need to view the status of software updates, while Application Deployment managers may only need to deploy apps. There’s a not-so-well known console customization tool that comes with every ConfigMgr admin console called Console Builder (see Matt Hinson’s blog post here for more on that.) However, what Console Builder cannot do, is it can’t make buttons hidden or visible based on the application user’s persona. It also doesn’t enable any external capabilities above and beyond what the out-of-the-box console offers, such as going out to Azure AD and grabbing a Bitlocker unlock key or displaying information about the endpoints in such a way that makes more sense to the needs of the business. This interest led me to an idea of creating a custom, Power Apps based Endpoint Manager / Intune administrative console and associated connectors to communicate with the Microsoft Endpoint Configuration Manager AdminService, Teams, and Intune.
Initially, I went down a path of creating individual Power Automate Flows for every AdminService request that I wanted to invoke. While this worked great, I soon realized how many different Power Automate Flows I’d eventually end up having when it was all said and done and decided instead to opt for creating a custom Power Apps connector. This would not only allow me to make the API calls within a single custom connector that could be wired in to any future Power App I create, but the same connector I create for my Power Apps could also be utilized for any Power Automate flows as well.
To facilitate the communications with ConfigMgr from the cloud, the ConfigMgr AdminService would need to handle the administrative action, by way of a Cloud Management Gateway (CMG) running within the site. The AdminService is a web service that provides connectivity to your on-premises SMS Provider role. It’s a Rest API service based on the OData v4 protocol that allows you to securely communicate with your on-premises SCCM/ConfigMgr/MECM hierarchy. While not 100% of the administrative actions are currently available via the AdminService just yet, you can accomplish a wide array of administrative actions against your hierarchy. For a very thorough blog posting along with some sample scripts that interact with the AdminService, do check out Adam Gross’ blog at https://www.asquaredozen.com and click on the ConfigMgr AdminService link at the very top. For the official documentation on setting up the AdminService, visit How to set up the admin service – Configuration Manager | Microsoft Docs.
First, you’ll need to enable access to the AdminService via CMG so that the Power App can access the AdminService. Then, you’ll need to create an Azure AD app registration in to allow communications with the AdminService via your CMG. This will allow you to launch your Power App from any web browser, or you can opt to create a mobile or responsive version of your Power App so it will automatically resize from a browser to an iPhone or Android as well.
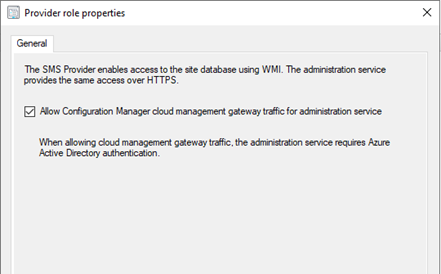
One of the pre-requisites to accessing the AdminService by way of the CMG, is to enable CMG traffic for the accessing the AdminService.
Configure the SMS Provider to allow access to the AdminService via CMG by going to Administration -> Servers and Site System Roles, selecting the server hosting the SMS Provider role, and clicking Properties.
Next, you’ll need to create an Azure AD app registration to facilitate the authentication and access to the AdminService API to external endpoints requesting it.
Creating the Azure AD Application Registration to allow access to the AdminService via CMG
An Azure AD app registration allows users to authenticate with their Azure AD credentials (or on-premises credentials of Azure AD Connect is syncing on-prem to Azure AD) to access the application. The Azure AD application will ultimately be used to provide a bearer token for authorization when connecting to the AdminService through CMG.
- 1. Log in to the Azure Portal -> Azure Active Directory -> App Registrations.
- 2. Click New registration.
- 3. Enter a name for the application and click Register
- Click API Permissions –> Add a permission.
- Click APIs my organization uses.
- Select your existing CMG server application.
- Check user_impersonation and click Add permissions.
- Click Grant admin consent for <orgname>

- Click Yes
- Click Overview
- Click Add a Redirect URI next to Redirect URIs
- Click Add a platform
- Click Mobile and Desktop applications
- Check the box to enable https://login.microsoftonline.com/common/oauth2/nativeclient
- Click Configure
- Click Expose an API
- Click Set next to Application ID URI and type in any FQDN that’s not already used in the tenant: ex: https://CMGAdminService and click Save.
- Click Certificates & secrets
- Under Client secrets, click New client secret.
- Enter a description, select an expiration date, and click Add

- Save the Client secret value to a safe place.
- Click Overview and save the Application (client) ID and Directory (tenant) ID to a safe place.
Creating the ConfigMgr AdminService Power Apps Custom Connector
After you create the app registration in Azure AD, you can begin to create the Custom Connector in Power Apps. To do so, you’ll need to define some basic settings such as the authentication type, as well as the Application URI. The Identity Provider should be Azure Active Directory, the Client id and Client secret should come from your Azure AD app you registered previously. Login URL, Tenant ID, and Scope can be left default. The resource URI should be something like <your CMG fqdn>/CCM_Proxy_ServerAuth/72057594037927941/AdminService/
Verify your external facing AdminService URL by running the following SQL query against your site database:
select ExternalEndpointName, ExternalUrl from vProxy_Routings where ExternalEndpointName = ‘AdminService’
The Identity Provider should be Azure Active Directory.
The Client id, and Client secret fields should come from your new Azure AD app registration properties. Tenant ID can be left as common or be populated with your Azure AD tenant ID.
Resource URL will come from the Expose an API screen on your new Azure AD app registration in the Application ID URI box. If it’s blank, you need to pick any URL to use. The only important requirement for this URL is it must be unique within your tenant. In my Azure AD application example, I used https://CMGAdminService so this is where I will enter this FQDN. This URL is not related in any way to the Homepage URL used when defining your CMG Web App.
The Redirect URL should be https://global.consent.azure-apim.net/redirect. The Redirect URL should also appear in your new Azure AD app registration in the Authentication section as either a Web, or Mobile and desktop application platform type.

After the security settings are defined, the next step is to define each action you want to perform. The actions make up the overall definition of the custom connector, and each action can be called directly from the Power App once the custom connector is wired to the Power App.

An example of a Definition within an Action is to get a list of devices. I named my first Action Get Devices and gave it an OperationID of GetDevices. When you call this action from the Power App, you will use the format CustomConnectorName.OperationID(<Parameters to pass>).
For example:
AdminService.GetDevices(({‘$filter’:”ClientType eq 1″,’$select’:”MachineId,Name,CNIsOnline,IsClient,SiteCode,ClientActiveStatus,LastDDR,LastHardwareScan,LastSoftwareScan,LastMPServerName,LastActiveTime,ADSiteName,LastClientCheckTime,Domain,ClientVersion,DeviceOS,DeviceOSBuild,PrimaryUser,CurrentLogonUser,ClientState,AADDeviceID,SMSID”}).value)
For the parameters, you can pass any of the same parameters that you would pass in the Rest API call including the parameter ‘$select’ to define which properties to select, filter to define any specific filters (ClientType eq 1 filters out things like unknown computers). It’s important to note that any time you change the parameters, the JSON schema that is in your response will likely also change. Therefore, you will probably have to make multiple updates to the action each time you change it in some way. This way, the action will be prepared for the overall structure of the request’s response that it should expect to receive from the request to the API.
The next step in creating an action, is to click Import from sample.

This will let you select a verb (ie. GET, PUT, POST), define the specific URL to call, any query parameters for the request ($filter, $select), any headers, and the body of the request.

From this sample URL, each of these will get automatically populated based on your sample. For example, let’s say you use a sample URL like: HTTPS://RIMCO.RUSSRIMMERMAN.COM/CCM_Proxy_ServerAuth/72057594037927941/AdminService/v1.0/Device?$filter=(startswith(Name,’DC1‘) eq true) and (ClientType eq 1)&$select=MachineId,Name,SMSID
The query will automatically populate with $filter and $select since they were used in the request URL. If you also entered any headers and a body, those would also automatically populate and when you call the action from within the Power App, you will be able to customize them each time you make the API call depending on what you want to take place.
A good way to test all your API calls before using them within your custom connector definition is to use an API testing tool like Postman. Not only can you test them here, but you can also export from Postman Collections into Power Apps to create the custom connector definitions that you’ve tested.
To make Rest API calls from Postman, the first step is to request a token from your Azure AD using the following information in the body of the POST. These body properties will come from the Azure AD app that was registered. When you make this POST request, you will receive back a Bearer token, which expires after 1 hour of inactivity and is used to make all subsequent API calls and a Refresh token to refresh the results and expires after 14 days of inactivity. The Bearer tokens are used in the Authorization tab of Postman and you can utilize Postman’s variables feature to automatically set the token upon its request to a variable so that you don’t have to copy/paste it each time into your subsequent requests.

Here’s an example of requesting the installed software for a specific Resource ID:

Once you get the request URL and results just the way you want to use it in the custom connector including any $filters, $selects, or other query parameters, copy the JSON formatted body of the results so you can paste it into the custom connector’s Response section for the action. Do this by clicking on the Add default response and pasting in the JSON results from Postman. You can also use the Test option within the connector to test the API call and get the JSON formatted results as well.

Utilizing the custom ConfigMgr connector in a Power App
Once you’ve created some or all the actions you want your connector to support, you are ready to connect it to a Power App and begin making your API calls with it.
Here is a list of devices along with their Client install status, Activity, and SiteCode, and the Azure AD Join Type (if applicable). Additionally, I added a Pending Restart icon if the endpoint has one pending.

Clicking the Installed Software button makes the following request to the AdminService:
https://RIMCO.RUSSRIMMERMAN.COM/CCM_Proxy_ServerAuth/72057594037927941/AdminService/wmi/SMS_G_System_INSTALLED_SOFTWARE
In the Power App, I have the OnSelect property of the Installed Software button call the custom connector with the following function:
ClearCollect(installedsoftware,AdminService.InstalledSoftware({‘$filter’:”ResourceID eq ” & selectedid,’$top’:25,’$skip’:0,’$select’:”ProductName,ProductVersion,Publisher,InstallDate”}).value)
This clears out anything that might already happen to be in the Power Apps collection I named installedsoftware from a previous request and populates it with the results of the request with the specified $filter parameters using the ResourceID of the selected machine, gets only the $top 25 results, and $select’s ProductName, ProductVersion, Publisher, and InstallDate and returns the array as “value” so I use .value to make sure this array is what is used to populate my installedsoftware collection. I also added sort options on the Product Name column and use the SortByColumns Power App function to sort by using either Ascending or Descending at the end of the SortByColumns function.

If I click the Device Collections button, my collections are listed along with their Collection ID and Limiting Collection. These are also sortable, and if I select any collection, it shows the last full evaluation run time and refresh times for the ConfigMgr collection (not to be confused with a Power Apps collection!)

Upon clicking App Deployments, it becomes obvious that I haven’t yet made a nice-looking display for the application deployment status info, but in the meantime have just dropped a basic gallery to show the results.

Clicking on any of the applications drills into the specifics of the app (another screen I haven’t put any beautification effort into yet.)

When clicking on the Client Actions button, it drills into the selected client. If you’re currently viewing a workstation OS, the Get Bitlocker Key button will also be visible. Clicking that button utilizes another Power Apps custom connector I created which makes a Graph API call to get the Bitlocker Key stored in Azure AD for the selected device. Just like the AdminService connector, using all the various documented Graph API calls for Intune can be useful for viewing and updating any Intune specific configurations.
If you’re using the Bitlocker Administration Service in ConfigMgr, you could also potentially have it go get and display your Bitlocker keys from there as well.

Clicking on the Current User brings up a dialog showing details of the currently logged on user including their current presence. This is all accomplished by leveraging Graph to query info using the user-id from both Azure AD as well as Teams. If you click the Chat button, it will bring up a chat window so you can communicate with the end-user via Teams without launching, using, or even having the Teams application installed on the device the Power App based console is running on. This is also done using Graph along with a Power Apps Gallery to display the chat messages between the user of the Power App and the end-user of the individual device. See Create chat – Microsoft Graph beta | Microsoft Docs for more information on this Graph request.
The chat session is first initiated using a POST to https://graph.microsoft.com/beta/chats. The body of the request must be the same structure as the following JSON, using the object ID GUIDs of each of the users in the chat session which is retrieved from their Azure AD user object.

The response will provide an id value which is the unique ID for the chat session.
Next, a chat message can be sent between the users in either direction using the Send chatMessage request. See Send chatMessage in a channel or a chat – Microsoft Graph beta | Microsoft Docs for more information on this Graph request.
The chat message is sent using the https://graph.microsoft.com/beta/chats/{id}/messages. The POST URL of the request must include the chat id provided in the Create chat request response.


Additionally, I’ve added some additional ideas I came up with to this custom console, like the ability to use the native ConfigMgr Run Script action on a given client or collection which lists all my available scripts in the Scripts node of the native console in a dropdown menu. You can use this to run any script like one to install all required updates immediately, collect all logs from the client (see https://github.com/russrimm/CollectAllLogs) and zip them up to a UNC share, etc. Leveraging the Run Scripts feature allows you to do things like gather all the updates currently pending installation in Software Center and display them prior to running the script to immediately initiate their installation on the selected client, and subsequently reboot the client.
Immediate software update insight + immediate software update action = immediate increased security!


The Install Application button allows selecting an available deployed application to be immediately installed on an endpoint. This is a feature introduced in ConfigMgr 1906 which installs applications in real time. See install applications for device for more details on this.
The Client Operation button allows you to run all the same client operations you can initiate from the native ConfigMgr console (restart, download policy, run hardware inventory, etc.)
The Device Category dropdown menu makes another call to Graph to enumerate and assign a Device Category to the device. You could also leverage Graph to allow creating/deleting categories as well.

Clicking Collection Memberships shows all the collections the device is currently a member of:

Since ConfigMgr now collects information related to boot performance as well as events including application crashes, driver installs, etc, all of this could be displayed to the administrator using the Power App.
Graph API calls can also be made from Power Apps in order to perform read and write operations in Intune. For example, I can enumerate all the applications in my tenant using a dropdown menu to pick iOS vs Android vs Built-In vs Win32.

As you can see, making your own Power App based console to accomplish the tasks you want to accomplish can be extremely powerful. I hope to continue improving my custom connector enough to eventually submit them as official Power Apps connectors so others can benefit from them. If you have any other ideas or suggestions, please do not hesitate to reach out to me. Also, if you’d like a demo of this or want to see any of it in more detail, feel free to hit up your Customer Success Account Manager (CSAM) and we can set up a time to discuss your specific needs and ideas further.
Thanks for reading!
by Contributed | Mar 30, 2021 | Technology
This article is contributed. See the original author and article here.
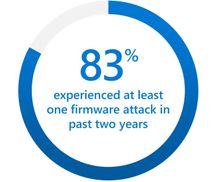
Today Microsoft announced the result of a leadership study on Security Signals in the IT industry. The study delves into the biggest challenges reported by security decision makers. Specifically, the report shows that as organizations are pivoting to hybrid work environments, attacks on endpoint devices have grown increasingly more frequent and sophisticated.
One area that is called out in the study is the recent surge (5x) of attacks against device firmware. The firmware, which lives below the operating system, is emerging as a primary target because it’s where devices store sensitive information, like credentials and encryption keys. The study points out that 83 percent of enterprises have experienced at least one firmware attack in the past two years. And during that time, less than a third of security decision makers allocated any budget resources on firmware protection. Respondents reported that little effort is made to invest in firmware protection until a breach occurs.
UEFI firmware protection
Microsoft introduced its own open-source UEFI to enable a secure and maintainable interface to manage firmware. On the Surface side, we have been enabling the automation of firmware protection since the 2015 release of Surface Pro 4. That’s when we made the decision to to build our own Microsoft UEFI 1 and move away from the third party UEFI that our OEM partners were using. The result is a fully transparent open-source project called Project Mu.
If you’re not already familiar with UEFI, it stands for Unified Extensible Firmware Interface. It’s essentially a modern version of a BIOS that initializes and validates system hardware components, boots Windows 10 from an SSD, and provides an interface for the OS to interact with the keyboard, display, and other input/output devices.
Centralized device management down to the firmware level
As Microsoft further developed the UEFI for Surface, we also built tools for managing and updating UEFI, beginning with SEMM (Surface Enterprise Management Mode). You can use it as a stand-alone tool or integrated with Microsoft Endpoint Configuration Manager to manage the UEFI settings on your Surface. SEMM lets you remotely enable and disable key components of Surface devices that would otherwise require you to physically go to every machine and boot straight into the UEFI (Power button + Volume Up). From a security perspective this is important as the more components you disable, that are not normally used, the smaller the attack vector.
Aligned to Microsoft’s broader commitments, we moved SEMM capabilities to the cloud with the launch of DFCI (Device Firmware Configuration Interface). DFCI enables cloud-based control over UEFI settings through the Intune component of Microsoft Endpoint Manager. The best part is that DFCI can be enabled via policy and deployed with Windows Autopilot before anyone even logs into the device. This advancement placed Surface into a distinct technical advantage over other devices on the market. With DFCI a Surface device can be fully managed from Windows 10 down to firmware all through the power of the cloud and Microsoft Endpoint Manager.
Surface drives innovation into firmware security
So, what makes our UEFI secure? To start, it can be updated via Windows Update. Our UEFI does not require an outside tool from a third party or download site. In fact, when the vulnerability of Spectre and Meltdown was announced, Surface already had a fix available that was automatically pushed to every Surface device accepting updates. Windows Update patched the microcode of our processors all through UEFI. Another security step we take is to lock down the UEFI, to protect against known exploits. Surface UEFI uses Boot Guard and Secure Boot, which translates to a measured and signed firmware check at each stage in the initial boot process.
To take it a step further, Boot Guard enables the SoC (System on a Chip) to use the Surface/OEM key to verify that the initial UEFI firmware stage was signed by the OEM. The OEM key is a Surface key that is fused into the SoC at the factory. In simpler terms Boot Guard ensures valid firmware is booted during the initial boot phase of the device.

All of this leads us back to the Security Signals study. Microsoft Surface has implemented safeguards to address firmware vulnerabilities. Surface devices are developed with our own UEFI that is open-source, and we’ve built tools – both on-prem and in the cloud — to centrally manage devices at the firmware level to help further reduce attack vectors. We also provide a means to ensure your UEFI stays up to date via Windows Update, and we’ve secured the UEFI via Boot Guard to ensure what you boot is authentic and what you expect. At Surface, we are fully committed to continuing our iteration on the Security front by designing and building innovative practices to protect your devices and data.
To learn more about Surface Security please visit the Surface for Business security website: Security & Endpoint Protection – Microsoft Surface for Business
1 Surface Go and Surface Go 2 use a third-party UEFI and do not support DFCI. DFCI is currently available for Surface Laptop Go, Surface Book 3, Surface Laptop 3, Surface Pro 7, Surface Pro 7+ and Surface Pro X. Find out more about managing Surface UEFI settings at https://docs.microsoft.com/en-us/surface/manage-surface-uefi-settings.

Recent Comments