by Contributed | Apr 28, 2021 | Technology
This article is contributed. See the original author and article here.
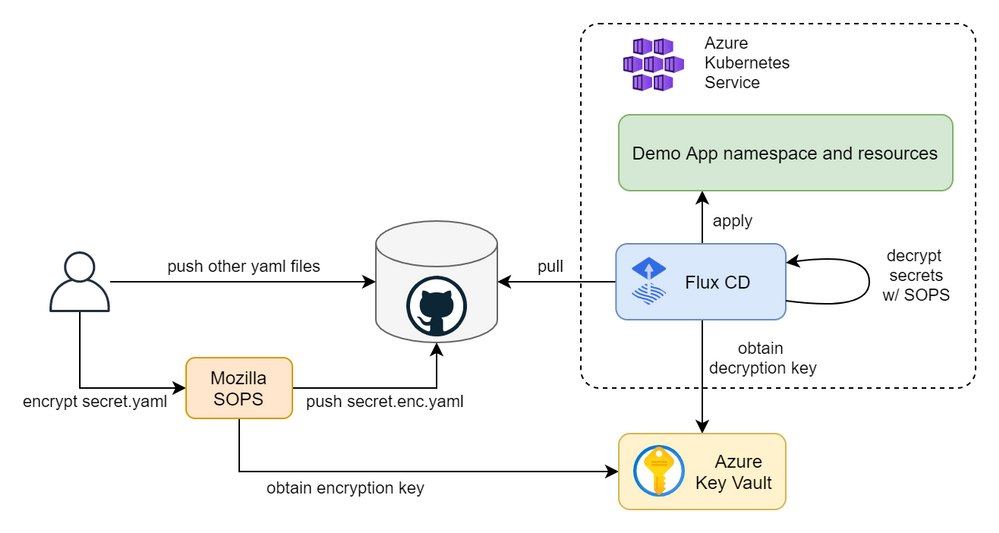
In this article you will learn how to create a fully automated GitOps workflow where your apps will be automatically deployed when you update their definitions in a Git repository. We will create a cluster in Azure Kubernetes Service (AKS) and configure Flux CD, including secret management with Mozilla SOPS and Azure Key Vault. We will push our app manifests and encrypted secrets to the repo and Flux will decrypt them using a cryptographic key in Key Vault and apply our changes. The figure below depicts the overall continuous deployment (CD) workflow.
Create a Kubernetes cluster
First, let’s export a few environment variables that will be used throughout the article to create and reference Azure resources. Replace the values with your own names and preferences.
export RESOURCE_GROUP_NAME=gitops-demo-rg
export LOCATION=westeurope
export CLUSTER_NAME=GitOpsDemoCluster
Create a resource group to contain all the resource that we will create as part of this guide.
az group create -n $RESOURCE_GROUP_NAME -l $LOCATION
Create an AKS cluster. The command below will create a cluster with the default configuration options, i.e., one node pool with three nodes, a system-assigned identity, kubenet network plugin, no network policy, etc. Feel free to customize the cluster to your needs.
az aks create -g $RESOURCE_GROUP_NAME -n $CLUSTER_NAME --enable-managed-identity
Once created, obtain the credentials to access the cluster.
az aks get-credentials -g $RESOURCE_GROUP_NAME -n $CLUSTER_NAME
And check that you are able to interact with it.
kubectl get nodes
The output should look something like this.
NAME                                STATUS   ROLES   AGE     VERSION
aks-nodepool1-30631669-vmss000000   Ready    agent   5m27s   v1.19.9
aks-nodepool1-30631669-vmss000001   Ready    agent   5m30s   v1.19.9
aks-nodepool1-30631669-vmss000002   Ready    agent   5m29s   v1.19.9
Set up Flux CD
Install Flux CD locally.
curl -s https://toolkit.fluxcd.io/install.sh | sudo bash
Validate Flux pre-requisites.
flux check --pre
The output should be something like this.
► checking prerequisites
✔ kubectl 1.19.7 >=1.18.0-0
✔ Kubernetes 1.19.9 >=1.16.0-0
✔ prerequisites checks passed
Create a GitHub repository and clone it locally.
git clone git@github.com:adrianmo/gitops-demo.git
cd gitops-demo
Export the token, your GitHub username, and the AKS cluster name.
export GITHUB_TOKEN=<your-token>
export GITHUB_USER=<your-username>
export GITHUB_REPO=<name-of-your-repo>
export CLUSTER_NAME=GitOpsDemoCluster
Bootstrap the Flux system components.
flux bootstrap github
--owner=$GITHUB_USER
--repository=$GITHUB_REPO
--branch=main
--path=./clusters/$CLUSTER_NAME
You should see how Flux starts to install and sync its components and eventually get a confirmation that all components are healthy.
► connecting to github.com
► cloning branch "main" from Git repository "https://github.com/adrianmo/gitops-demo.git"
✔ cloned repository
[...]
✔ kustomize-controller: deployment ready
✔ helm-controller: deployment ready
✔ all components are healthy
Additionally, you can run the following command to validate the Flux installation.
flux check
Output.
► checking prerequisites
[...]
► checking controllers
[...]
✔ all checks passed
Pull the latest updates published by Flux from the repository.
git pull origin main
Set up the application
Now that the Flux system is up and running, let’s configure the GitOps for our application called “demoapp”.
Since we are using the same repository for both the Flux system and our app, we will create a Kustomization referencing the same “flux-system” source, however, you could use different repositories for Flux and your app. Check the Flux CD getting started guide for more information about creating additional repository sources.
flux create kustomization demoapp
  --namespace=flux-system
  --source=flux-system
  --path="./manifests"
  --prune=true
  --validation=client
  --interval=5m
  --export > ./clusters/$CLUSTER_NAME/demoapp-kustomization.yaml
We are telling Flux that our app manifests are defined in `./manifests`, and Flux is going to keep that directory in sync with the cluster as soon as we make any changes to the app manifests.
Let’s create some manifests to give Flux something to apply.
Create the “manifests” directory.
mkdir manifests
Create the namespace definition.
cat > ./manifests/namespace.yaml <<EOF
---
apiVersion: v1
kind: Namespace
metadata:
  name: demoapp
EOF
The deployment.
cat > ./manifests/deployment.yaml <<EOF
---
apiVersion: apps/v1
kind: Deployment
metadata:
  name: demoapp
  namespace: demoapp
spec:
  replicas: 2
  selector:
    matchLabels:
      app: demoapp
  template:
    metadata:
      labels:
        app: demoapp
    spec:
      containers:
        - name: demoapp
          image: "mcr.microsoft.com/dotnet/core/samples:aspnetapp"
          ports:
            - containerPort: 80
              protocol: TCP
EOF
And the service.
cat > ./manifests/service.yaml <<EOF
---
apiVersion: v1
kind: Service
metadata:
  name: demoapp
  namespace: demoapp
spec:
  type: ClusterIP
  selector:
    app: demoapp
  ports:
    - protocol: TCP
      port: 80
      targetPort: 80
EOF
After a few moments you should see how your Kustomization has been applied the latest commit.
kubectl get kustomization -A
NAMESPACE     NAME          READY   STATUS                                                            AGE
flux-system   demoapp       True    Applied revision: main/a5f6b27feca2e1009afb474adc84c95c972018ad   10m
flux-system   flux-system   True    Applied revision: main/a5f6b27feca2e1009afb474adc84c95c972018ad   58m
And our app gets automatically deployed.
kubectl -n demoapp get pod,deploy,svc
NAME                           READY   STATUS    RESTARTS   AGE
pod/demoapp-6b757bbc47-bx7rx   1/1     Running   0          1m
pod/demoapp-6b757bbc47-rh4db   1/1     Running   0          1m

NAME                      READY   UP-TO-DATE   AVAILABLE   AGE
deployment.apps/demoapp   2/2     2            2           1m

NAME              TYPE           CLUSTER-IP    EXTERNAL-IP      PORT(S)        AGE
service/demoapp   LoadBalancer   10.0.252.90   51.144.185.175   80:31122/TCP   1m
Secret management
At this point Flux will apply any manifest we commit to the repo under the “manifests” folder. That will be fine for every Kubernetes resource except for Secrets, which we do not want to disclose and source control their plain values.
A solution for this would be using the Azure Key Vault Provider for Secrets Store CSI Driver, which allows us to define our secrets in Key Vault and automatically make them available as Kubernetes secrets. However, this approach breaks our the GitOps workflow where the Git repository is the single source of truth for our application desired state.
A popular GitOps approach for secret management is using Bitnami’s Sealed Secrets. Sealed Secrets require an additional controller and a new “SealedSecret” CRD that is safe to store in a Git repository. After Flux applies the “SealedSecret” object, their controller decrypts the sealed secret and applies the plain secrets.
Another popular approach for managing secrets in Flux is using Mozilla’s SOPS. Unlike Sealed Secrets, SOPS does not require us to deploy any additional controller because Flux’s kustomize-controller can perform the decryption of the secrets. Moreover, SOPS has integration with Azure Key Vault to store the cryptographic used to encrypt and decrypt secrets. Therefore, making it an ideal option for managing secrets in Azure.
To configure secret management with Mozilla SOPS and Azure Key Vault we have to create a few resources first.
Install AAD Pod Identity
AAD Pod Identity enables Kubernetes applications to access Azure resources securely with Azure Active Directory. It will allow us to bind a Managed Identity to Flux’s kustomize-controller.
Before installing AAD Pod Identity, we need to give the AKS Kubelet identity permissions to attach identities to the AKS nodes in the AKS-managed resource group. Let’s obtain the relevant IDs.
RESOURCE_GROUP_ID=$(az group show -n $RESOURCE_GROUP_NAME -o tsv --query id)
AKS_RESOURCE_GROUP_NAME=$(az aks show -g $RESOURCE_GROUP_NAME -n $CLUSTER_NAME -o tsv --query nodeResourceGroup)
AKS_RESOURCE_GROUP_ID=$(az group show -n $AKS_RESOURCE_GROUP_NAME -o tsv --query id)
KUBELET_CLIENT_ID=$(az aks show -g $RESOURCE_GROUP_NAME -n $CLUSTER_NAME -o tsv --query identityProfile.kubeletidentity.clientId)
And create the role assignment granting “Virtual Machine Contributor” permissions.
az role assignment create --role "Virtual Machine Contributor" --assignee $KUBELET_CLIENT_ID --scope $AKS_RESOURCE_GROUP_ID
az role assignment create --role "Managed Identity Operator" --assignee $KUBELET_CLIENT_ID --scope $RESOURCE_GROUP_ID
We are going to install AAD Pod Identity in a GitOps way, because Flux is also capable of managing Helm charts with the helm-controller, which is installed by default. Therefore, instead of installing the Helm chart directly from our computer as the AAD Pod Identity documentation indicates, we will create a “HelmRepository” and a “HelmRelease” resource that Flux will apply and keep in sync for us. This will allow us to manage and upgrade AAD Pod Identity from the Git repository.
cat > ./manifests/aad-pod-identity.yaml <<EOF
---
apiVersion: v1
kind: Namespace
metadata:
  name: aad-pod-identity
---
apiVersion: source.toolkit.fluxcd.io/v1beta1
kind: HelmRepository
metadata:
  name: aad-pod-identity
  namespace: aad-pod-identity
spec:
  url: https://raw.githubusercontent.com/Azure/aad-pod-identity/master/charts
  interval: 10m
---
apiVersion: helm.toolkit.fluxcd.io/v2beta1
kind: HelmRelease
metadata:
  name: aad-pod-identity
  namespace: aad-pod-identity
spec:
  interval: 5m
  chart:
    spec:
      chart: aad-pod-identity
      version: 4.0.0
      sourceRef:
        kind: HelmRepository
        name: aad-pod-identity
        namespace: aad-pod-identity
      interval: 1m
  values:
    nmi:
      allowNetworkPluginKubenet: true
EOF
Commit and push the changes to the repo and AAD Pod Identity will be deployed in a few seconds.
kubectl get helmrelease -A
Output.
NAMESPACE          NAME               READY   STATUS                             AGE
aad-pod-identity   aad-pod-identity   True    Release reconciliation succeeded   14m
And let’s check the pods.
kubectl -n aad-pod-identity get pods
Output
NAME                                   READY   STATUS    RESTARTS   AGE
aad-pod-identity-mic-5c9b5845c-4ktft   1/1     Running   0          14m
aad-pod-identity-mic-5c9b5845c-bskj8   1/1     Running   0          14m
aad-pod-identity-nmi-6h6rl             1/1     Running   0          14m
aad-pod-identity-nmi-76vk5             1/1     Running   0          14m
aad-pod-identity-nmi-tr9bk             1/1     Running   0          14m
If your Helm chart is not applied, check the status and logs of the kustomize-controller and helm-controller.
Create a Managed Identity
The Managed Identity will be used by the Flux kustomize-controller to obtain the cryptographic key from Key Vault and decrypt secrets.
az identity create -n SopsDecryptorIdentity -g $RESOURCE_GROUP_NAME -l $LOCATION
Obtain the client Id, object Id, and the resource Id of the identity.
CLIENT_ID=$(az identity show -n SopsDecryptorIdentity -g $RESOURCE_GROUP_NAME -o tsv --query "clientId")
OBJECT_ID=$(az identity show -n SopsDecryptorIdentity -g $RESOURCE_GROUP_NAME -o tsv --query "principalId")
RESOURCE_ID=$(az identity show -n SopsDecryptorIdentity -g $RESOURCE_GROUP_NAME -o tsv --query "id")
Create a Key Vault
Now it’s time to create a Key Vault instance, the cryptographic key and give permissions to our identity.
Create an environment variable with the desired name for your Key Vault resource.
export KEY_VAULT_NAME=GitOpsDemoKeyVault
Create a Key Vault instance.
az keyvault create --name $KEY_VAULT_NAME --resource-group $RESOURCE_GROUP_NAME --location $LOCATION
Create the cryptographic key.
az keyvault key create --name sops-key --vault-name $KEY_VAULT_NAME --protection software --ops encrypt decrypt
Add an access policy for the identity.
az keyvault set-policy --name $KEY_VAULT_NAME --resource-group $RESOURCE_GROUP_NAME --object-id $OBJECT_ID --key-permissions encrypt decrypt
Obtain the key ID and save it for later.
az keyvault key show --name sops-key --vault-name $KEY_VAULT_NAME --query key.kid
The key ID will have a the following form.
https://gitopsdemokeyvault.vault.azure.net/keys/sops-key/b7bc85c1a4ef4180be9d1de46725304c
Configure in-cluster secrets decryption
Now let’s create the Azure identity and binding to attach the Managed Identity we created previously to the kustomize-controller.
cat > ./clusters/$CLUSTER_NAME/sops-identity.yaml <<EOF
---
apiVersion: aadpodidentity.k8s.io/v1
kind: AzureIdentity
metadata:
name: sops-akv-decryptor
namespace: flux-system
spec:
clientID: $CLIENT_ID
resourceID: $RESOURCE_ID
type: 0 # user-managed identity
---
apiVersion: aadpodidentity.k8s.io/v1
kind: AzureIdentityBinding
metadata:
name: sops-akv-decryptor-binding
namespace: flux-system
spec:
azureIdentity: sops-akv-decryptor
selector: sops-akv-decryptor # kustomize-controller label will match this name
EOF
The identity will be bound to the pods that have the “sops-akv-decryptor” label, therefore, we need to patch the kustomize-controller to set such label and allow AAD Pod Identity to bind the identity.
Patch the kustomize-controller Pod template so that the label matches the `AzureIdentity` name. Additionally, the SOPS specific environment variable “AZURE_AUTH_METHOD=msi” to activate the proper auth method within kustomize-controller.
Create a kustomization.
cat > ./clusters/$CLUSTER_NAME/flux-system-kustomization.yaml <<EOF
---
apiVersion: kustomize.config.k8s.io/v1beta1
kind: Kustomization
resources:
  - flux-system
patchesStrategicMerge:
  - sops-kustomize-patch.yaml
EOF
And a file to patch the Flux system kustomize controller deployment.
cat > ./clusters/$CLUSTER_NAME/sops-kustomize-patch.yaml <<EOF
---
apiVersion: apps/v1
kind: Deployment
metadata:
  name: kustomize-controller
  namespace: flux-system
spec:
  template:
    metadata:
      labels:
        aadpodidbinding: sops-akv-decryptor  # match the AzureIdentityBinding selector
    spec:
      containers:
      - name: manager
        env:
        - name: AZURE_AUTH_METHOD
          value: msi
EOF
We also have to tell the kustomize-controller that our app Kustomization needs to use SOPS as the decryption provider and therefore be able to decrypt certain fields of our manifests.
Update the kustomization YAML file in “clusters/$CLUSTER_NAME/demoapp-kustomization.yaml” and add the `spec.decryption` block as shown below.
---
apiVersion: kustomize.toolkit.fluxcd.io/v1beta1
kind: Kustomization
metadata:
name: demoapp
namespace: flux-system
spec:
interval: 5m0s
path: ./manifests
prune: true
sourceRef:
kind: GitRepository
name: flux-system
validation: client
decryption:
provider: sops
Apply the changes and check that the identity binding and patching have been applied successfully.
At this point, the kustomize-controller should be able to decrypt files encrypted with SOPS via our Key Vault key.
Encrypt secrets
Install SOPS locally following the instructions from their repository. Then create a “.sops.yaml” file to contain the SOPS configuration. We will tell SOPS to encrypt only the “data” and “stringData” blocks of our YAML files. Therefore, only the values of our Kubernetes secrets will be encrypted. If that rule is omitted, SOPS will encrypt all keys in our YAML files, which is not necessary.
Also, we need to tell SOPS to use our Azure Key Vault key to encrypt the files. Before running SOPS make sure you are logged in with a user that has encrypt access to the Key Vault key being used, otherwise the encryption will fail.
cat > .sops.yaml <<EOF
creation_rules:
- path_regex: .*.yaml
encrypted_regex: ^(data|stringData)$
azure_keyvault: https://gitopsdemokeyvault.vault.azure.net/keys/sops-key/b7bc85c1a4ef4180be9d1de46725304c
EOF
Create a temporary secret file which we won’t commit to the repository.
cat > ./secret.yaml <<EOF
---
apiVersion: v1
kind: Secret
metadata:
  name: demoapp-credentials
  namespace: demoapp
type: Opaque
stringData:
  username: admin
  password: t0p-S3cr3t
EOF
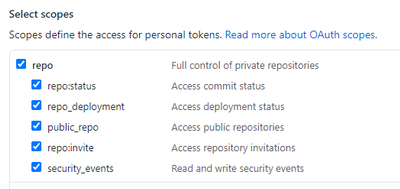
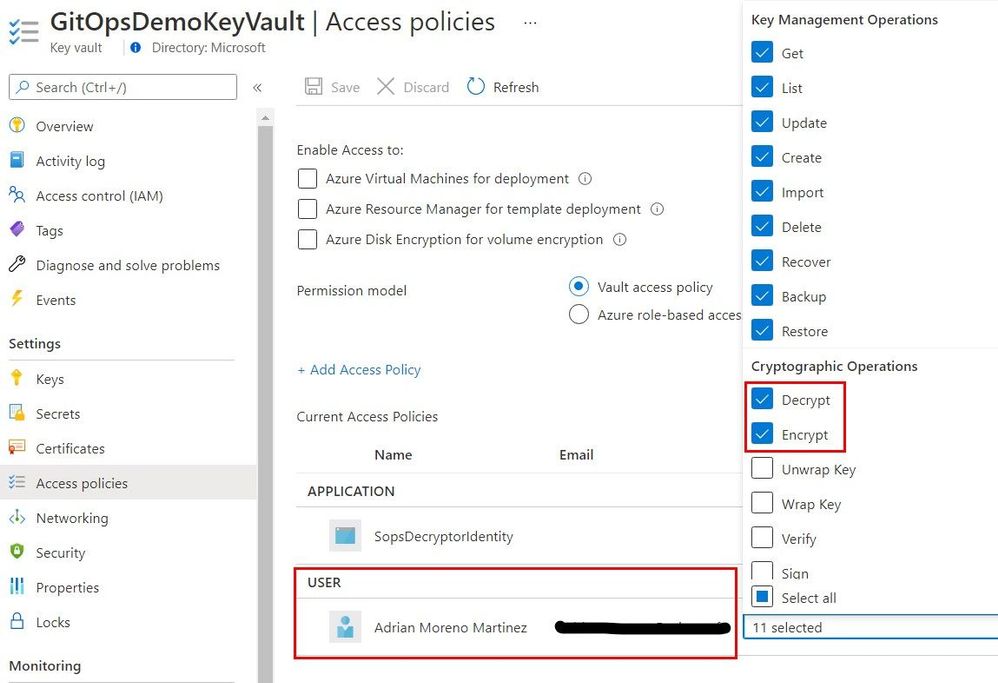
SOPS will use the logged in user in AZ CLI, therefore, make sure the logged in user has “encrypt” and “decrypt” Key Permissions as shown below.
You can also add those permissions with the following commands.
SIGNED_IN_USER_OBJECT_ID=$(az ad signed-in-user show -o tsv --query objectId)
az keyvault set-policy --name $KEY_VAULT_NAME --resource-group $RESOURCE_GROUP_NAME --object-id $SIGNED_IN_USER_OBJECT_ID --key-permissions encrypt decrypt
And encrypt the secret.
sops --encrypt secret.yaml > ./manifests/secret.enc.yaml
The encrypted secret at “./manifests/secret.enc.yaml” will look something like this.
apiVersion: v1
kind: Secret
metadata:
    name: demoapp-credentials
    namespace: demoapp
type: Opaque
stringData:
    username: ENC[AES256_GCM,data:21q4bo0=,iv:LOLxXQurjQR6cu9heQlZDdmhNgYO6VCBybbQHV6rO0w=,tag:58ep32CDrlCFuuDnD65VEQ==,type:str]
    password: ENC[AES256_GCM,data:oTZDkadQKL45dA==,iv:5VVbXC55xTVwH/n3t5gtKNtlkB3q7t8lW7Jw1czNSL0=,tag:WuqdubjTu6mQN5x1b3zDyw==,type:str]
sops:
    kms: []
    gcp_kms: []
    azure_kv:
        - vault_url: https://gitopsdemokeyvault.vault.azure.net
          name: sops-key
          version: b7bc85c1a4ef4180be9d1de46725304c
          created_at: "2021-04-23T14:22:15Z"
          enc: KuFxRbcge198GU7hwHs078JNd_1EFtvcFqQ6bOLJDYMnWaW0kSbeD4DCxY0jX9MA17Rv3UMKHGfImgEbNfXGGIh7UucLPygpiuUyn9I73ClSQQ4trc4bD2yVkonCMwz5-0MiPVC3muhQpn3KjhThSucOgjhBnqQy_ymwTeUP9PWi1pSp1jc3S2BxQIuKy09-oEakQogU4BRy55219befizYN7EFe8mstSIkvpksqGxKccH6dQum2k-OqsBUH2jkxiVgi5CEU35COy0pNWVJpZGuOaDMkGGqo7lrT4XKEGxtFKvEDxr6bTfjjQafuuxW9-4a9ZtaBkHCKopk55R9dcQ
    hc_vault: []
    age: []
    lastmodified: "2021-04-23T14:22:18Z"
    mac: ENC[AES256_GCM,data:aw5mfREh5xdeiwbchkiiBS96tGuLJnEqme6VdDrPWKV9R0A4ATIM/1+HcbdAzGBXb9TmhO71hZMl3IvmX9DrNA/tvpPwFvLCkDfNhoWXJoXRRv6aRR7AJPlfcXkVMxxYaRDqz+ugAJkZG+5dhYeh1QAmiswjZOXaINEOw3Jf5dI=,iv:p/M2OhPdh2Naxu37Jt7EwiLf9Eb9OgExsmXX3hSUOJQ=,tag:fVqJ2jy++6GxHBPGXZHmHw==,type:str]
    pgp: []
    encrypted_regex: ^(data|stringData)$
    version: 3.7.1
We can now delete the plain secret and push the encrypted secret to the repo.
rm secret.yaml
git add manifests/secret.enc.yaml
git commit -m "Add encrypted secret"
git push
Flux will read the encrypted secret, decrypt it using the identity and the key, and apply it.
kubectl describe secret -n demoapp demoapp-credentials
Output.
Name:         demoapp-credentials
Namespace:    demoapp
Labels:       kustomize.toolkit.fluxcd.io/checksum=c7c24c5836c9f935d9ab866ab9e31192bd98268e
              kustomize.toolkit.fluxcd.io/name=demoapp
              kustomize.toolkit.fluxcd.io/namespace=flux-system
Annotations:  <none>

Type:  Opaque

Data
====
password:  10 bytes
username:  5 bytes
From this point on, Flux will keep our app up to date with the latest Kubernetes definitions in your repository, including secrets. You can find the code generated by this guide in the github.com/adrianmo/aks-flux GitHub repository.
Next steps
Automatic image updates
Flux has a couple of optional components called Image Automation Controllers, which can monitor a container registry and detect when new image tags are uploaded. Then, they can automatically update your deployments to roll out an update to the new container image. Check the official documentation to know more.
Keep Flux up to date
There are multiples ways to keep the Flux components up to date when new versions are released.
Flux’s system components are defined in the “./clusters/${CLUSTER_NAME}/flux-system/gotk-components.yaml” manifest file, therefore, if we regenerate that file with a newer version of Flux (i.e. running “flux install –export ./clusters/${CLUSTER_NAME}/flux-system/gotk-components.yaml”), the manifests will be updated with the new container images and configurations and the Flux system running in the cluster will apply those changes and update itself.
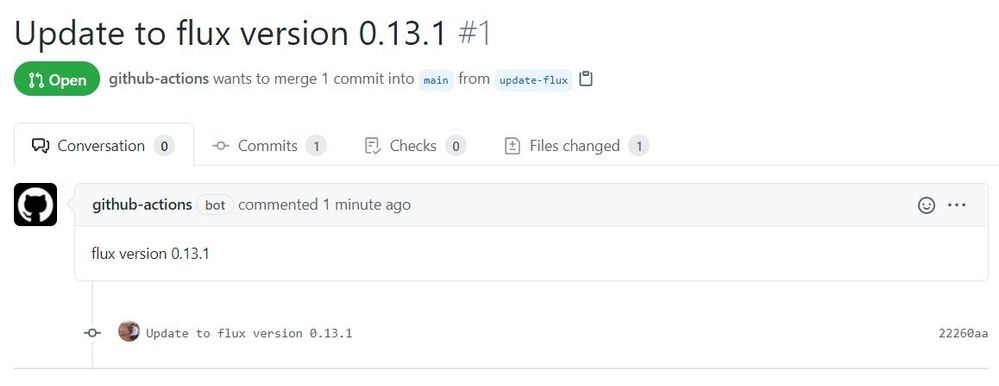
The above procedure can be turned into a scheduled CI workflow and create a Pull Request when changes are made to the manifests, giving us the possibility to review and approve the changes before they are applied. An example implementation of this workflow can be found here.
Notifications and monitoring
Since there are many operations that happen automatically, it can be become quite challenging to understand what is going on in our cluster. Therefore, it is crucial to know the state of our system at any time, but especially when things go south.
With Flux we can configure Notifications to forward events to collaboration and messaging apps like Microsoft Teams or Slack, and also to Git repositories in the form of commit statuses.
Flux also comes with a Monitoring stack composed of Prometheus, for metric collection, and Grafana dashboards, for displaying the control plane resource usage and reconciliation stats.
by Contributed | Apr 28, 2021 | Technology
This article is contributed. See the original author and article here.
Final Update: Wednesday, 28 April 2021 14:52 UTC
We’ve confirmed that all systems are back to normal with no customer impact as of 04/28, 14:30 UTC. Our logs show the incident started on 04/28, 13:40 UTC and that during the 50 minutes that it took to resolve the issue some customers may have received failure notifications when performing service management operations – such as create, update, delete – for workspaces hosted in all Australia regions. Customers may have also experienced that deletion of automation accounts and linking automation account with workspace may have failed. Performing queries against the workspaces may also have failed.
- Root Cause: We determined that a recent deployment task failed to complete causing impact to service management operations for the service.
- Incident Timeline: 50 minutes – 04/28, 13:40 UTC through 04/28, 14:30 UTC
We understand that customers rely on Azure Log Analytics as a critical service and apologize for any impact this incident caused.
-Anmol
by Contributed | Apr 28, 2021 | Technology
This article is contributed. See the original author and article here.
This blog is part one of a three-part series detailing the journey we’re on to simplify configuration of threat protection capabilities in Office 365 to enable best-in class protection for our customers.
Effective security is a never-ending battle to achieve balance between security and productivity. If we apply too many security controls to an environment, we limit the ability of its users to function efficiently. And if we err on the side of restraint, we do not hinder users in any way, but we leave the door open to threats. Email security is complex and ever-changing. With over 90 percent of threats surfacing through email, it’s critical that organizations are empowered to configure security tools in a way that works for their environment.
Configuration is key
We’re committed to offering Office 365 customers the best email protection by continually focusing on improving the effectiveness of our solutions both within Exchange Online Protection (EOP) as well as Defender for Office 365. EOP has a rich legacy of policy granularity and customizations that help customers meet their unique needs. As we’ve built and innovated on Microsoft Defender for Office 365, we have applied those same principles to the new advanced protection capabilities we offered as part of Defender for Office 365, while still respecting many of the EOP settings.
This deeply customizable protection stack within Office 365 has allowed customers over the years to implement policies and rules that fulfill an endless list of requirements. The drawback here, however, is that as customizations are added, they require regular review, upkeep, modifications, and even removal over time. In the absence of that continued focus, there is a high risk of creating an overall reduced state of protection. And while that might sound counter-intuitive, we see this very often. Here are some examples of how these configurations can inadvertently get out of hand:
- An organization in Europe had configured 198 domains to be allowed to bypass our filters
- A firm in India had over 900 URLs stipulated to bypass by our detonation service per week
- An enterprise in Asia had over 50,000 known phishing URLs configured to bypass our filters
In each of these cases, the result was an increase in phishing campaigns making their way to end users. And these are just a few examples of what we see as a widespread problem – custom policies and configurations put in place with perhaps the best of intentions but without considering the immediate or long-term security impact of creating them or keeping them in place permanently.
Across Office 365, we estimate that 20% of phishing mails are delivered to user mailboxes as a result of poorly configured (often legacy) policies that haven’t been revisited for a long time. It was clear that we needed to help customers through this. It wasn’t sufficient that we educate customers of the problem, we had to actively help with getting customers to a more secure state. That started a series of efforts for the past many months that have resulted in capabilities, tools and changes in the product that we’ll walk you through in this blog series. But before we get into it, it might help to get a better appreciation for how the problem arises in the first place.
How did we get here?
The natural question to ask is, how did we arrive at a place where customer configuration could be a problem?
Historical settings can age
In some ways, Exchange Online represents the final frontier. The promise of the cloud is a world where upgrades to Exchange no longer occur every few years. Over the lifespan of Exchange, many customers have migrated with existing mail flow configurations and transport rules from Exchange 2010, to Exchange 2013, and ultimately ending up with Exchange Online in Office 365. Many of our customers reading this may have relied on Exchange versions long before Exchange 2010!
And these configurations and rules may have been implemented at a time where the worst thing that could happen as a result of an overly permissive policy was a spam email getting through. All of that has changed over the past few years.
New attack scenarios
Just as technology has evolved, so have attackers. A lot has changed since we first launched our advanced email security solution in 2015. Since then, email borne attacks have been increasing exponentially both in volumes and complexity. We’ve seen phishing evolve to become only the entry point for much more sophisticated attacks, like business email compromise. We’ve seen attackers pivot away from malware in favor of attacks that help them establish persistence through account compromise and external forwarding. We know that attackers are savvy cybercriminals that will continue to evolve their techniques to take advantage of email users. And one common path they look to exploit are these aging and overly permissive controls or poorly protected pockets within the organization.
New security controls
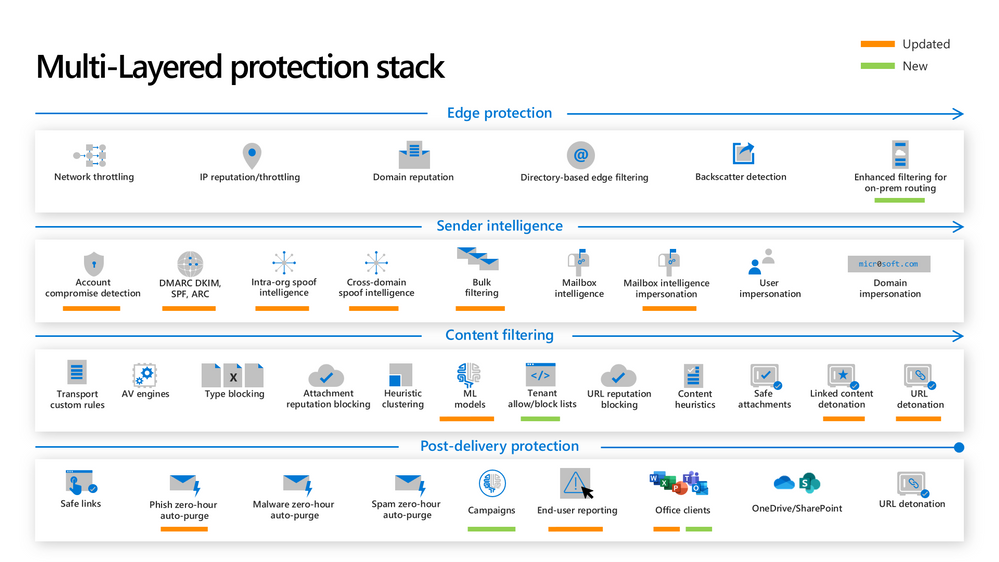
As the threat landscape evolves, so do our protections. Microsoft Defender for Office 365 employs a multi-layered protection stack that is always being updated to meet the needs of our customers. As we introduce new capabilities and make improvements to existing ones, it’s important that our customers are able to take advantage of these capabilities. That sometimes requires frequent evaluation of settings to ensure the latest protections are turned on. Failing that discipline, it’s possible that the latest protections are not being applied to all users in the organization.
Naturally, these three challenges signify the importance of secure posture. It’s more important than ever that configuring protection against threats is easy to achieve and maintain.
 Figure 1: The new and updated layers of the Defender for Office 365 protection stack
So how can we solve this problem?
Over the past many months, we’ve been on an aggressive journey to eliminate misconfigurations across Office 365 – to give customers the right tools to achieve secure posture simply and maintain these configurations over time. There are two broad categories of focus:
Eliminating overly permissive configurations
First, it’s critical that these (often) legacy settings or other inadvertent rules and policies don’t come in the way of us being able to keep users protected.
Preventing inadvertent gaps in protection coverage
Second, we want to make sure that organizations can easily protect all their users with the very best of protections that we offer as and when we make them available. This is critical in a fast-changing threat landscape where we’re constantly innovating to ensure users are protected.
As we’ve approached tackling both classes of problems, we’ve applied the following principles:
- Give customers the awareness and tools to get secure
- Actively help customers ‘get to secure’ through changes in the product
- Help customers with the right tools/guardrails to stay secure.
Through this blog series we’ll show how we’re applying all three principles to help customers.
What we have accomplished so far
We’ve been hard at work over the last year to achieve these goals of raising awareness on configuration gaps and preventing these gaps from inhibiting effective threat protection. I want to share with you some of the enhancements we’ve released.
Preset Security Policies
In order to help customers understand the impact of misconfigurations, we needed to do something fundamental – we had to establish what the ideal configuration looked like. Last year we released preset security policies for Exchange Online Protection and Defender for Office 365. These policies provide a simplified method to apply all of the recommended spam, malware, and phishing policies to users across your organization. Since different organizations have different security needs, we released these presets in multiple variations, and allow customers to apply our standard or our strict presets to their users as they see fit.
We’ve seen tremendous adoption of preset security policies since they launched in 2020, with over 18,000 tenants enabling a preset policy in their environment. Preset security policies not only give customers a choice, but they also help them stay up to speed with changing recommendations as the threat landscape evolves. To learn more about preset security policies, check out our documentation.
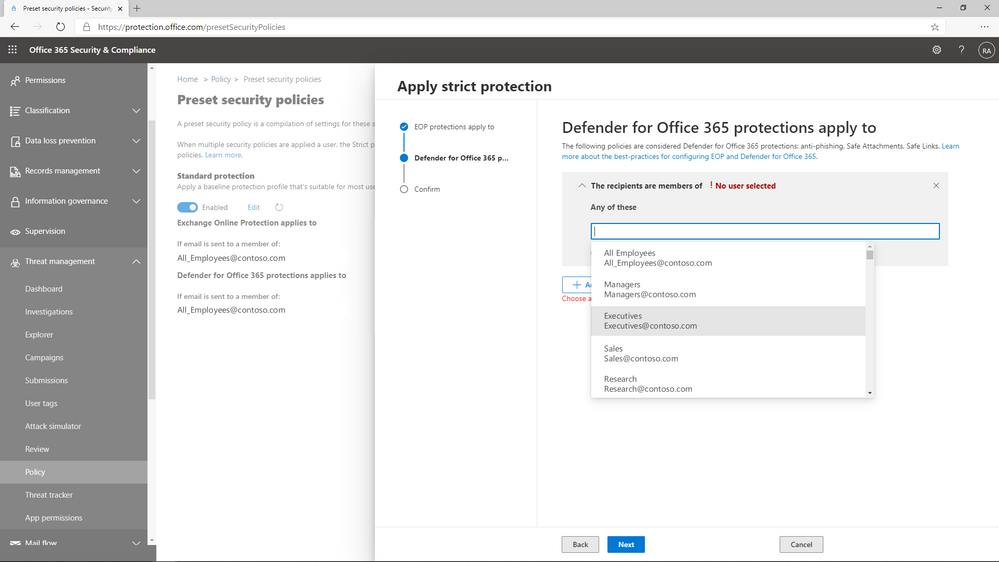 Figure 2: Preset policies can be applied to users, groups, or domains.
Configuration Analyzer
Once we’d established the ideal configuration based on our own recommendations, we needed to give customers the ability to identify the instances where their configurations deviate from our recommended settings, and a way to adopt these recommendations easily.
In 2019, we launched ORCA, the Office 365 Recommended Configuration Analyzer. ORCA gives customers a programmatic way to compare their current configuration settings against recommendations via PowerShell. As a result of the overwhelming success of ORCA, last year we built Configuration Analyzer right into the product. Customers can now view policy discrepancies right from within the admin portal, and can even choose to view recommended adjustments to reach our standard or our strict recommendations.
We’ve seen incredible adoption of the configuration analyzer as well, with 290,000 policy changes made across more than 26,000 tenants since we launched the capability last year! With a few clicks, policies can be updated to meet the recommended settings, and as a result, it’s never been easier to keep email security configurations up to date. Learn more about configuration analyzer here.
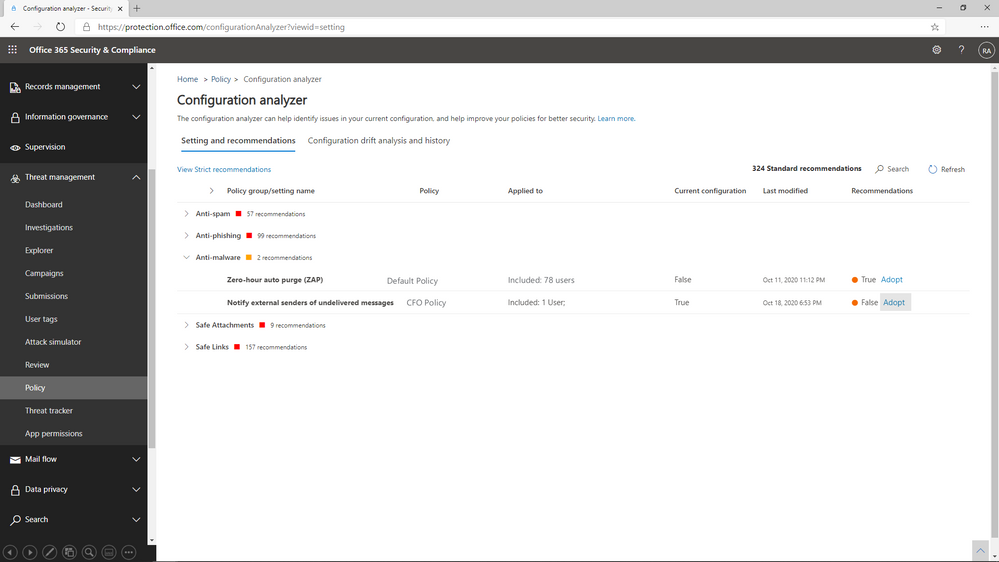 Figure 3: Configuration Analyzer shows policies that do not meet our recommended settings.
Overrides Reports and Alerts
You’ll hear us refer to overrides frequently throughout this series. We define overrides as tenant level or user level configurations that instruct Office 365 to deliver mail even when the system has determined that the message is suspicious or contains malicious content. Examples of overrides could be an Exchange transport rule that bypasses filtering for a specific range of IP addresses, or a user level policy like an allowed sender or domain at the mailbox level.
The thing to understand about overrides is that they represent scenarios where policies are properly configured, but other settings have neutralized their effect. It’s important that we allow organizations to customize their Office 365 environment to meet their needs, but that doesn’t mean we feel comfortable allowing malicious content like malware or phish to land in the inbox of users.
We’ve added a view to the Threat protection status report that allows you to view overrides across your environment. By filtering the report to view data by Message Override, you can view overrides over time by type of override, like Exchange transport rule or user safe sender, and you can dig deeper in the details table to identify the causes of these overrides.
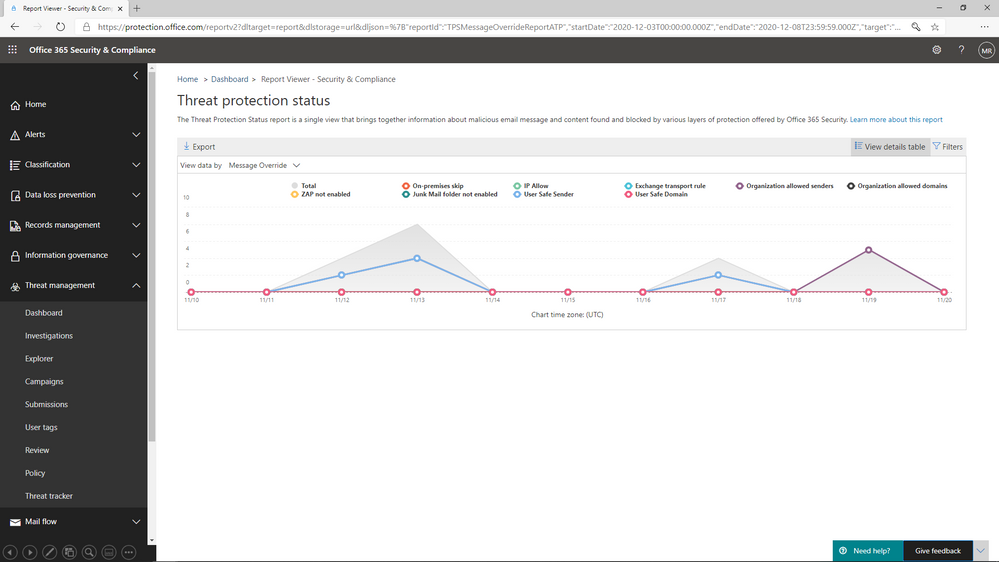 Figure 4: The Threat protection status report shows overrides by type and date
What comes next?
We’ve shared in this blog the steps we’ve taken to shed light on configuration gaps, and to help customers understand the impact configurations have on their environment. In the next blog, we will share details about the capabilities we are building to eliminate the legacy override problem, and what you can do to minimize the impact these overrides have on security posture.
Do you have questions or feedback about Microsoft Defender for Office 365? Engage with the community and Microsoft experts in the Defender for Office 365 forum.
by Contributed | Apr 28, 2021 | Technology
This article is contributed. See the original author and article here.
Using a hierarchy of IoT Edge devices in manufacturing scenarios lets customers keep their existing infrastructure but at the same time customers can benefit from being able to fully address, manage and control the IoT edge devices on the factory floor, even if they are completely disconnected from the Internet.
This helps to address critical challenges in the implementation of Industrial IoT such as the balance between security and business value, as well as how to effectively implement new technology within the context of a legacy infrastructure.
One of the established concepts in operational technology is the ISA-95 standard and the Purdue model of control. These define the models, interactions and relationships between systems in well understood layers. These layers are in turn used to define the network infrastructure, with strict interfaces between layers controlled by firewalls.
Azure IoT Edge in a nested hierarchy is ideally placed to address many of these requirements and help you to build secure and manageable edge solutions within established structures.
Let us move beyond the Tutorials to create a hierarchy of IoT Edge devices and answer the following questions:
- Which steps and configurations should you carry out to make your IIoT edge solution production ready?
- How to secure communications between edge devices and the IoT Hub
- What are best practices to scale your deployments across a fleet of devices and keep your configurations clear and manageable.
- What are the extra steps needed to deploy a hierarchy of IoT Edge devices with 3 or more layers?
- How would you manage and control lower-level disconnected devices?
- How can I control what happens when connectivity between layers or the cloud is lost?
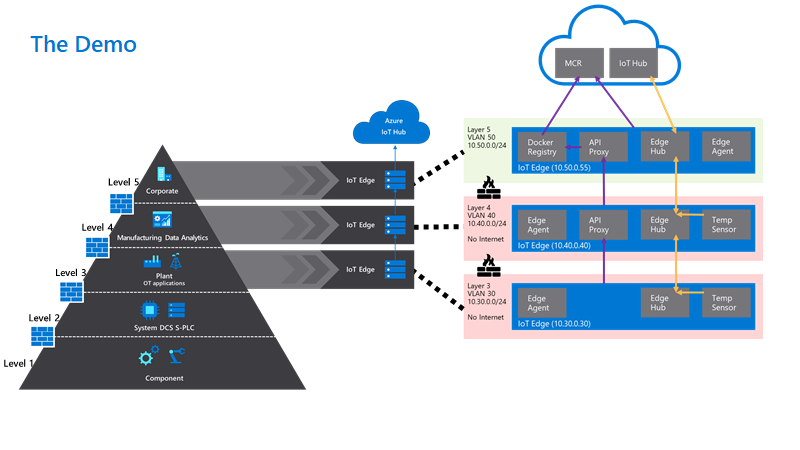
To make this real we have set up a sample configuration of 3 physical IoT Edge devices in a nested configuration defined as:
“Level 3 – Lower Layer Device”, “Level 4 – Lower Layer Gateway” and “Level 5 – Top Layer Gateway”.
To give you a glimpse of the configuration we have built and how it maps to the ISA-95 levels, check out this diagram:

You can find a step-by-step tutorial how to enable and use all of these best practices on this GitHub. Make sure to check it out.
Getting your IIoT edge solution production ready
Most of the best practice for implementing edge solutions for industrial IoT applies, whether you are using a nested configuration or not. Introductory reading here is the excellent checklist for getting your IoT edge instance ready for production.
On top of that, we would advise you to use a set of best practices that the Azure IoT Services have to offer, namely:
- Securing communications
- Use Root CA X.509 certificates to authenticate and secure communications between parent and child devices, as well as to the IoT Hub.
- Use existing company public key infrastructure if possible, for managing your certificates with dedicated intermediate certificates for signing the edge certificates.
- Consider a separate intermediate certificate outside the enterprise chain of trust to sign the edge CA certificates.
- Deployment management
- Tag your devices in the Device Twins to identify a target group of devices via queries
- Use automatic deployments and jobs to apply the same configuration to a set of devices
- Use layered deployments to extend the capabilities of some devices without having to change configurations for all devices in the fleet
- Connectivity resilience
- Store and forward messages if the devices are separated from the network on the device using the Time To Live Setting in Device Twin
Certificates for a hierarchy of edge devices
To establish communication and authentication between the devices and the cloud, Industrial IoT companies often prefer using certificate-based authentication instead of using symmetric keys. We also recommend using X.509 based authentication with a chain extending to a trusted root CA for added security in productive environments.
On top of using a certificate for the authentication to the cloud, you would be required to use certificates to establish trust between the parent and child devices for transparent gateway operations.
Even in a nested scenario, every IoT Edge device needs to have its own unique device identity in the IoT Hub. Crucially, this means that you would usually generate two sets of certificates for each device:
- An optional device client certificate and key for each device to identify and authenticate the device to the IoT Hub. Alternatively, this could be a symmetric key and the user is free to mix authentication modes within the nested hierarchy.
- A required signing CA certificate, so that the edge can sign its own workload client certificates. These are used to secure connections between the different components on an IoT Edge device or between an IoT Edge device and any leaf devices in a nested hierarchy. This concept is further explained in our documentation.
If you are unsure about the terminology, check out this blogpost: The layman’s guide to X.509 certificate jargon
On the layer 4 device, the respective part of the files would look like the following. Look closely at the naming differences to understand the different certificate sets:
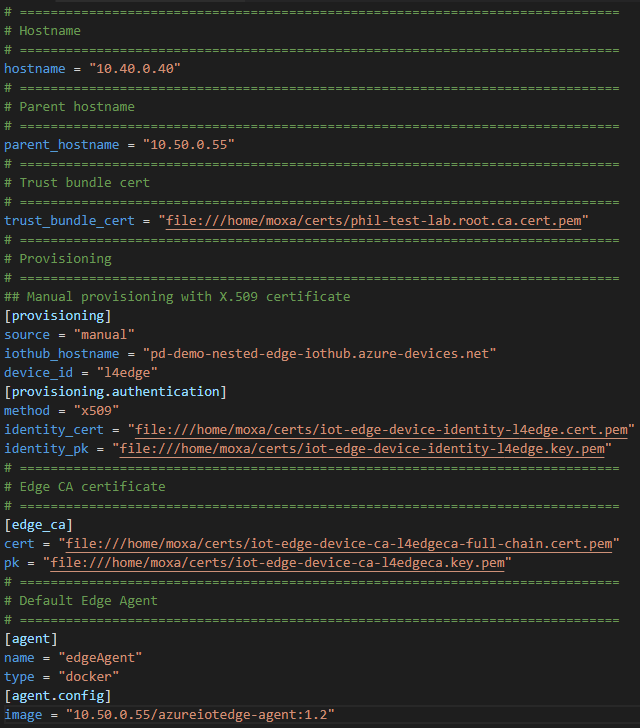
If you need more details how to apply the certificates to the devices and to IoT Hub, check out the GitHub.
Using layered deployments to roll out configurations at scale
Instead of setting the modules and deployment manifests manually for each IoT Edge device, it is recommended to use automatic deployments for a fleet of devices and especially in production scenarios. In a nested edge scenario, we have seen particular value in the use of layered deployments to fine tune workloads.
Deployments are rolled out to device populations by matching user defined target conditions, for example device twin properties or tags, in a strict priority order.
Layered Deployments can be used to expand the deployment to include additional modules or override configurations on top of a base deployment manifest.
Tags are very useful to group a set of devices by using the Device Twin or Module Twin of IoT Edge Devices.
Our devices have the following tags set to true in their device twins.
|
Level 5 – Top Layer Gateway
|
Level 4 – Lower Layer Gateway
|
Level 3 – Lower Layer Device
|
Tag Names
|
topnestededge
tempsensor
|
nestededge
nestedgateway
tempsensor
|
nestededge
tempsensor
|
In detail we have the following configuration:
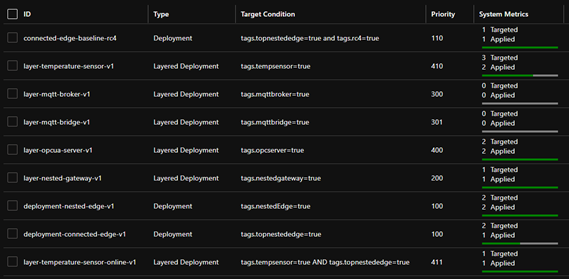
- One base deployment manifest for the top layer Gateway (layer 5) for devices where topnestededge=true. This is a basic deployment manifest with the system modules and the API proxy module needed for nested operations. Since this has an internet connection we get obtain images directly from the Microsoft Container Registry (MCR).
- One layered deployment manifest for the layer 5 edge devices to deploy the Simulated Temperature also from the MCR. This targets device with both tags.tempsensor=true AND tags.topnestededge=true
- One base deployment manifest for the lower layer devices (layer 3 + 4) with tag nestededge. This only contains the system modules with an image that points to $upstream. This tells the edge runtime to pull images from the parent edge device.
- One layered deployment manifest for the lower layer 4 Edge Device to deploy the IoTEdgeAPIProxy from $upstream. This applies to all devices with tag nestedgateway.
- One layered deployment manifest for the lower layer 3 + 4 Edge Devices to deploy the Simulated Temperature Sensor from $upstream.
In IoT Hub, all deployments together look like the following:
Some other examples of layered deployments are also available in the GitHub.
Use the Module Twin or Direct Methods to send commands and desired configurations to lower-layer devices
As we have created IoT Hub Device Identities for all devices, we are able to control these devices from the cloud directly.
If we would like to update the Module Twin of our Level 3 device, for example, we would change the desired property for the respective module to enable it.
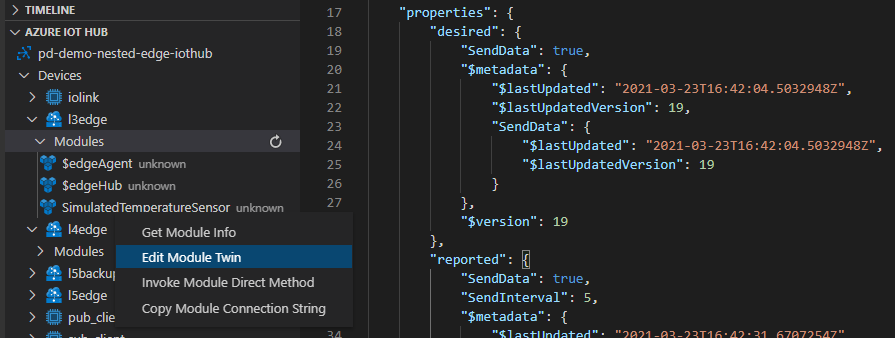
On top of that, we can also send direct methods directly from the cloud to a lower layer device. The message will be received by the top layer device and be routed through the edgeHubs of each device in the hierarchy until it reaches its designated device.
While sending direct methods to a lower layer device is a good way to directly control even disconnected devices, it requires the lower layer device to be connected to and discoverable by a parent device.
But what happens if a lower-layer device would go offline due to a networking failure of its parent?
What happens to the up – and downstream data flow on the lower levels?
How do the devices recover if the connection between the layers is separated?
In a nested hierarchy, each device has a dependency on its parent devices for connectivity. If the network connection is severed on a device in a given layer, then all devices that are residing in lower layers will also be unable to continue sending messages.
In our example, if the network connection of the layer 4 device is disconnected, both the layer 4 device and layer 3 device recognize this, and the normal store and forward functionality of the Edge Hub starts buffering. Layer 5 remains unaware and continues sending its messages to the IoT Hub. Once the network connections are re-established, each device automatically sends their queued messages in the original order. The time of how long a message should be stored is defined as the TTL (“Time To Live”) in the Module Identity twin for edgeHub of each device. The standard TTL setting is 7200 seconds or two hours.
"$edgeHub":{
	"properties.desired": {
		"schemaVersion": "1.0",
		"routes": {},
		"storeAndForwardConfiguration": {
			"timeToLiveSecs": 7200
		}
	}
}
If fine tuning is required the both the TTL and the priority of messages can also be defined in the routing rules for the edgeHub. The actual number of messages able to be stored on the device of course depends on the disk size of the device.
Device twin updates, cloud-to-device messages and direct method calls that are targeting a device that is temporarily offline, will also be queued in the IoT Hub whilst the edge is offline. They will be sent on, as long as the device reappears within the defined TTL period for C2D or the timeout for a direct method. This needs to considered in the solution design to avoid potential message loss or undesired operations occurring after they are still needed. The most robust way of communicating configuration, operational parameters and status remains the device or module twins.
See Operate devices offline – Azure IoT Edge | Microsoft Docs if you would like to learn more about offline behavior of IoT Edge devices.
Conclusion
We have walked through the practical application of nesting IoT Edge devices in industrial IoT and shown some best practice in managing the complexity in managing many heterogenous workloads on the edge. For more technical detail please visit the linked GitHub repository.
Want to try out and deploy a simulated purdue network model using IoT Edge? Look at this Github!
Stay informed. For the latest updates on new releases, tools, and resources, stay tuned to this blog and follow us @MSIoTDevs on Twitter.
by Contributed | Apr 28, 2021 | Technology
This article is contributed. See the original author and article here.
Claire Bonaci
You’re watching the Microsoft us health and life sciences, confessions of health geeks podcast, a show the offers Industry Insight from the health geeks and data freaks of the US health and life sciences industry team. I’m your host, Claire Bonaci. On episode two of the three part patient experience series guest host, Antoinette Thomas discusses health plan member experience with our Director of population health, Amy Burke.
Toni Thomas
Amy, thank you for joining. As we get started, it would be great to share a little bit about yourself with our guests.
Amy Berk
Wonderful, thank you so much for having me, Toni. So I am the new director of Population Health at Microsoft, I bring forth clinical and operational experience in the population health realm or ecosystem, I started my career as a nurse. So I am a clinican by background. And after graduate school, I embarked on a career in consulting, I’d been a healthcare consultant for 15 years. And the span of my work is cross payers and providers, looking at innovation of care delivery models, working domestically and internationally, working in the public and private sectors. So I feel that my experience is broad, but also very focused on population health.
Toni Thomas
So I’m really glad to be working with you. And as the person that’s really responsible for developing the point of view on experience for health and life sciences, I think it’s really important to, you know, work with all my colleagues on the industry, industry team across their subject matter to make sure we’re developing a holistic view of experience. And so if you would, um, can you share a little bit about traditional member experience? And what drives improvement of that experience inside health plan or per the purview of health plan? And the second part of that question is, does consumerism play a role?
Amy Berk
So thank you so much for that question. Toni, I’ve had some time to think about that question. And, in my mind, the traditional role of the member in a health plan is one that was very reactive versus proactive. We have care managers that are reaching out to engage our members in these programs. Oftentimes, members aren’t even aware of these programs. So how can the health plan really be more keen on outreach and targeting members for these type of programs, health care management, behavioral health programs, pharmacy programs, etc. You know, and even in the role, or probably even in the traditional realm of care management, it has been very much a telephonic model, and how much how much impact we have over the telephone versus how can we engage our members through digital mechanisms, digital modalities, pardon me, like virtual, like digital, etc. So really, you know, harnessing in on engaging that member more through more creative technologies, and I would say also, that it empowers the member, then to really have a responsibility to, you know, take care of themselves, right We are, we are putting the member in, in a place of power to really be able to, you know, engage to be proactive with their own healthcare. And I forgot to mention, but this is an important part as well, in terms of, you know, what’s out there in terms of remote patient monitoring. So, you know, really putting the onus on them to take care of their health in a way that they haven’t done before, and that, that spans across the entire continuum of health. And I would say even the, the entire continuum of demographics, through age and culture and gender, etc. So I think it’s really a good place for any consumer to be right now. Because consumers today have choices like they hadn’t had before. You can go on the internet and consumers can look up and, and really have a clear picture and understanding and knowledge of their disease course of their condition. They have, you know, knowledge of who their providers are against other providers, they can now look up price transparency, is becoming very prominent in terms of being able to look up costs. So that’s very important to consumers today. And I think that, you know, putting our consumers at the heart of what we do, both from a chronic care management perspective, as well as a member satisfaction perspective becomes quite important.
Toni Thomas
So in the hospital world, and the clinic world, we have, you know, the H caps measurements that measure how satisfied a patient might be with within certain realms of that experience. How, how do health plans, how do health plans solicit feedback from their members to understand how satisfied they are with the experience that they’re having within their care management program are within the health plan itself.
Amy Berk
So there are a couple of ways in which that happens. So there are h caps that applied to the member experience and a health plan also stars. So that’s a CMS quality measure for Medicare programs, member satisfaction is actually now weighted most heavily in those star measures. And thirdly, then, you know, through surveys that are solicited to members, through their net promoter scores, etc, that become quite relevant in terms of measuring member satisfaction.
Toni Thomas
That’s great, because I know some of the the listening audience might be Microsoft health and life science field sales teams who are really trying to understand a little bit more about how satisfaction is rated. So that’s helpful to them in their daily jobs, like certainly to understand specifically the star ratings that you referenced. Something that I’m personally interested in, and I think our audience would be interested in is the comparison or contrast between what healthcare system patient experiences and I think most people understand that, and health plan member experience, so if you could, you know, give a little bit of that picture of what that looks like, that’d be helpful.
Amy Berk
so I would say that, you know, a patient versus a member, if we want to put it in that perspective, a patient is often going to the hospital, for reasons in which they need to be taken care of. And they become a guest at that hospital in that, you know, they’re, they’re being taken care of by nurses, and there are physicians there that are treating them with protocols, etc. You know, and often this is in a place of sickness versus in health, right, so a patient is sick. And, you know, that in itself brings in a cadre of, of emotions and experiences of that patient in the hospital, right, where once that patient goes out of the hospital is discharged from the hospital, rather, their disposition to a post acute facility or to home. And they’re within an environment that, you know, they’re now on the road to recovery, and they’re well, and, you know, they’re getting healthy or healthier, shall I say. And it goes back to that first comment, which I said, where the member has more, I would say, power, more, you know, ability to manage their condition, right. And this of work becomes so important for our care managers that are out there to take a proactive approach with our members to engage them better in their care. So they can have that opportunity to self manage their care for better outcomes. So you know, now it’s more proactive, and I would say where I said, The patient is a guest of the hospital and that everything is directed by this interdisciplinary care team in, you know, how they deliver care. Now, it becomes a little bit different of a shift to now the care management team, the interdisciplinary team is a is a guest to that member’s home, even when the person or the member goes to see the provider. There’s it’s still a different dynamic, right? Because I think that that member is at the heart in the center of making key decisions and shared decision making. And that applies to to the provider side, right, there should be shared decision making in the hospital setting as well. But I think it’s even more elevated in the post acute setting in that members are on their way to becoming healthy. And a member has control over that pathway, more so than a patient, if that makes sense.
Toni Thomas
I think that’s really profound. And it’s it’s also very interesting, Amy because some of the things I’ve been doing a lot of reading and research on agency and like a personal agency. And I think what we’re seeing right now with patients, consumers, customers members is that They’re exhibiting more personal agency than they ever have before. People who study this aren’t really certain as to why that might be. I don’t think there’s one reason for it, I think there’s a multitude of reasons I’m having access to information technology. And also the fact that we have been living 12 months inside of a pandemic, where they really feel that they have to take control over their own health, their own wellness, their own decision making. And so what I’m starting to see in the provider or the healthcare systems, space is really kind of this movement that you were referencing about. Being a collaborator with someone in their health, health, knowing that person personally, to offer the guidance that they need to make the decisions about their health. So I’m really starting to see healthcare systems want to move in that direction, especially on how they’re communicating with patients, either who are trying to make appointments, or soliciting some advice on hospitals. And it’s just really interesting paradigm shift. So I’m excited to see what happens there. I think it’s important. And then lastly, what important lessons can the healthcare system world and the plan world learn from one another to improve this experience?
Amy Berk
Yeah, so thank you for that question. And this, again, centers around, we have to focus in on patient member centric care, and what that means and including the member in terms of or the patient, what matters most to them. In terms of their care journey, I would also say that, you know, we have to think about our patients slash members holistically. So we shouldn’t be focusing in on one disease we should be focusing in on if that person has co morbidities if that person has gaps in terms of social determinants of health, behavioral health, post pandemic, I mean, the, the crisis of mental health, as it has never been before is is a pandemic in itself, right. So, you know, really honing in on not just one disease or one condition or even that person’s clinical picture, but we have to think more broadly, in terms of that person holistically, right, and bring through those social determinants that have impact on their health outcomes, behavioral health, emotions, and, you know, and needs. So I would, I would say, that’s very important, and that spans across both provider and member and, you know, holistically, culturally, clinically, etc.
Toni Thomas
So that brings us to the end of our time together. But I do want to say I always enjoy speaking with you and asking you questions because I, I learn so much from you, Amy and I, I’ve learned things that will help me make me better in my job and also allow me to help the customers that I’m out there serving. So I really, really thank you for joining us for this session and contributing to patient experience. We thank you so much.
Claire Bonaci
Thank you all for watching. Please feel free to leave us questions or comments below and check back soon for more content from the HLS industry team.




Recent Comments