by Contributed | Jun 29, 2021 | Technology
This article is contributed. See the original author and article here.
Credit and thanks to Alexandru Jercaianu and Vladimir Cernov for implementation work
Over the last year, we have been improving the DNS over HTTPS (DoH) functionality in the Windows DNS client. Now we are pleased to introduce you to the different features now available through the Windows Insider program.
To start with, we want to note that the registry key controls documented in our original DoH testing blog post are no longer applicable. As stated there, those instructions were time limited to the initial DoH test rollout. If you did ever set that key, please delete it then reboot your machine before proceeding with the rest of this blog post.
Next, we will be reviewing the new configuration behavior, how Windows will know if a DNS server supports DoH, and what our next steps are in advancing encrypted DNS discovery.
UI
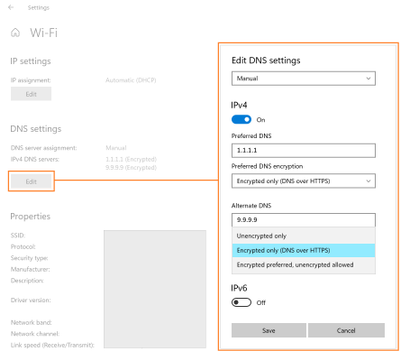
The first control you should try out is the new UI fields in the Settings app, originally announced on the Insider blog. When Windows knows a given DNS server’s IP address has a corresponding DoH server, it will unlock a dropdown that lets you decide whether to require encryption always be used, use encryption but fall back to plain-text DNS when encryption fails, or not to use encryption (the default value).
GPO
For enterprise administrators, we have provided a new GPO for controlling DoH behavior. This will allow the use of DoH to be allowed, required, or prohibited system-wide.
- Allowed will defer the use of DoH to local settings available in the UI per network adapter.
- Required will prevent the use of configured DNS servers if they do not support DoH and will disable fallback to plain-text DNS.
- Prohibited will prevent any local DoH settings from taking effect, ensuring Windows functions as it did before the DoH client using plain-text DNS only.

NRPT
The Name Resolution Policy Table (NRPT) allows administrators to specify rules for name resolution by namespace. For example, you can create an NRPT rule that specifies all queries for “*.microsoft.com” must be sent to a specific DNS server.
If Windows knows that a DNS server provided in an NRPT rule supports DoH (see the next section for how this works), then the traffic affected by the NRPT rule will inherit the benefits of using DoH. This allows admins who want to use DoH for some namespaces and not others to configure that behavior.
Knowing a server supports DoH
All these mechanisms rely on Windows already knowing a given DNS server IP address supports DoH. We ship a few definitions of known DoH servers in Windows:
Server Owner
|
Server IP addresses
|
Cloudflare
|
1.1.1.1
1.0.0.1
2606:4700:4700::1111
2606:4700:4700::1001
|
Google
|
8.8.8.8
8.8.4.4
2001:4860:4860::8888
2001:4860:4860::8844
|
Quad9
|
9.9.9.9
149.112.112.112
2620:fe::fe
2620:fe::fe:9
|
Other definitions need to be added using the netsh command. To start with, you can check to see what DoH server definitions we already know by retrieving them:
Using netsh
netsh dns show encryption
Using PowerShell
Get-DnsClientDohServerAddress
Then you can add another server definition to the list and ensure it never falls back to plain-text DNS:
Using netsh
netsh dns add encryption server=<resolver-IP-address> dohtemplate=<resolver-DoH-template> autoupgrade=yes udpfallback=no
Using PowerShell
Add-DnsClientDohServerAddress -ServerAddress ‘<resolver-IP-address>’ -DohTemplate ‘<resolver-DoH-template>’ -AllowFallbackToUdp $False -AutoUpgrade $True
If you prefer to allow fallback so that when encryption fails you can still make DNS queries, you can run the same commands with the fallback flag toggled to add a new server:
Using netsh
netsh dns add encryption server=<resolver-IP-address> dohtemplate=<resolver-DoH-template> autoupgrade=yes udpfallback=yes
Using PowerShell
Add-DnsClientDohServerAddress -ServerAddress ‘<resolver-IP-address>’ -DohTemplate ‘<resolver-DoH-template>’ -AllowFallbackToUdp $True -AutoUpgrade $True
The `-AutoUpgrade` and `-AllowFallbackToUdp` flags together represent the values present in the Setting app per-server dropdown. If for some reason you want to add these DoH server definitions but leave them to use unencrypted DNS for now, you can set the `-AutoUpgrade` flag to false instead of true as in the examples above.
If you want to edit an existing list entry rather than adding a new one, you can use the `Set-DnsClientDohServerAddress` cmdlet in place of the `Add-DnsClientDohServerAddress` cmdlet.
It would be easier for users and administrators if we allowed a DoH server to have its IP address determined by resolving its domain name. However, we have chosen not to allow that. Supporting this would mean that before a DoH connection could we established, we would have to first send a plain-text DNS query to bootstrap it. This means a node on the network path could maliciously modify or block the DoH server name query. Right now, the only way we can avoid this is to have Windows know in advance the mapping between IP addresses and DoH templates.
Coming up next
Going forward, we want to be able to directly discover DoH server configuration from the DNS server. This would mean DoH servers could be used without having to include it in Windows or manually configure the IP address to DoH template mapping. We are currently contributing to two proposals in the IETF ADD WG to enable this: Discovery of Designated Resolvers (DDR) and Discovery of Network-designated Resolvers (DNR). We look forward to updating you with our first tests in supporting DoH discovery!
by Contributed | Jun 29, 2021 | Technology
This article is contributed. See the original author and article here.
Introduction
In this article, we will see a step-by-step implementation of how to break and change list item permission using Power Automate. and for this, we will use REST API.
Implementation
Create a SharePoint List
Create a Power Automate – We will create an Automated Cloud Flow
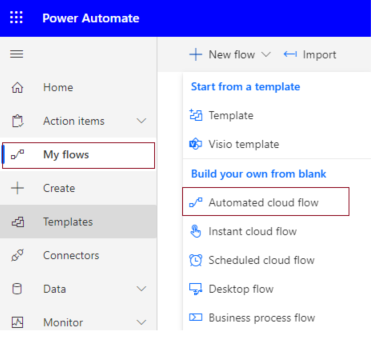
1. Go to Power Automate > My flows > Click on New flow > Select Automated Cloud Flow
2. It will ask for the flow name and trigger.
Add flow name and choose a trigger when an item is created.

3. Click on Cerate.
4. Now set Site name and list name in when an item is created in list action.

For all API Calling, we will use Send an HTTP request to SharePoint action.
5. Now we will call REST API to break role inheritance.
Set all properties as below.
Site Address |
Select Site Name from Dropdown |
Method |
POST |
Uri |
_api/lists/getByTitle(‘ListTitle’)/items(ID)/breakroleinheritance(copyRoleAssignments=false,clearSubscopes=true) |
Headers |
{
“Accept”: “application/json”,
“Content-type”: “application/json”
} |

6. Now we will set new permission so for that we need a user id to whom we have to give permission and need a role definition ID.
User ID: You can directly use User ID if you have or if you have a user name or login name then we have to find user id from the particular user so for that we will call REST API.
Role definition ID: You can use id based on permission.
Role Definition Name |
Role Definition Id |
Limited Access |
1073741825 |
View Only |
1073741924 |
Design |
1073741828 |
Edit |
1073741830 |
Contribute |
1073741827 |
Read |
1073741826 |
Full Control |
1073741829 |
1. Create a variable and set User Title or if you have any list column then you can use it.

2. Call API to get a user ID and filter it by the above-declared user name.

It will return an object as below,
{
  "d": {
    "results": [
      {
        "__metadata": {
          "id": "https://sitename.sharepoint.com/_api/Web/GetUserById(2)",
          "uri": "https://sitename.sharepoint.com/_api/Web/GetUserById(2)",
          "type": "SP.User"
        },
        "Id": 2,
        "Title": "Chandani Prajapati"
      }
    ]
  }
}
Now we want to use the only id from this so we will use an expression as below,
outputs(‘Send_an_HTTP_request_to_SharePoint_-_Get_user_id’)?[‘body’][‘d’][‘results’]?[0][‘Id’]
And we will set it in a variable called UserId.

3. Now we will set contribute permission for the above UserId.

Now we can test the flow.
Output
We can see contribute permission for an item as below,

Summary
In this article, we have seen how to break and change list item permission using power automate.
Hope this helps!
Sharing is caring!
by Contributed | Jun 29, 2021 | Technology
This article is contributed. See the original author and article here.
Windows Package Manager was announced at Build 2020 and has been in preview since. At Build 2021 the team announced version 1.0, you can see the Roadmap journey the team have been on over the past year and where they are heading here.
Now if you’ve never heard of Windows Package Manager before then in simplistic form it’s a tool that will help you manage the software/package/applications on your machine. It can help you install them, update them, and uninstall them. And a whole lot more. It’s an open-source project that the Microsoft team are excited to work on with the community.
What I want to do today is talk to you about how YOU can help the project.
The Windows Package Manager can help you install over 1,400+ packages or pieces of software onto your machine. If you install the Windows Package Manager and issue the command winget search <SomePackage> you will see what packages are available to install. This is where you can help. By growing that list. And today I want to talk to you about the best practices you should follow when submitting a new package into the Windows Package Manager repository.
Windows Package Manager Manifest Creator Preview
At Build 2021 the team launched another open-source tool, the Windows Package Manager Manifest Creator. This new tool will help you build out the manifest file that is needed to be able to install package or application via Windows Package Manager.
The Windows Package Manager Manifest Creator can be installed on your machine via the Windows Package Manager using the command winget install wingetcreate
Getting Involved
If you’ve ran the winget search <somepackage> command and not found the package or piece of software that you want to install, then you can help to add it to the repository to help you and others in the future.
First, you need to check the following things:
– GitHub account
– Windows Package Manager currently supports installers in the following formats: MSIX, MSI, and EXE, if the piece of software you want to install doesn’t have one of those kinds of installers it can’t be added to the repository.
– If the software comes in MSIX, MSI or EXE format it’s worth checking to see if someone else has already submitted it for consideration, you can do that by checking the current Pull Requests being worked on within the Community Repository
– If the software comes in MSIX, MSI or EXE format and someone else hasn’t already submitted it you need to make sure you have both the Windows Package Manager and Windows Package Manager Manifest Creator installed on your machine.
Now that checklist has been completed, it’s time to start to build the manifest needed.
You can start from scratch at creating your own manifest files, however there is a tool that can help you with the process that can make the whole process a lot easier.
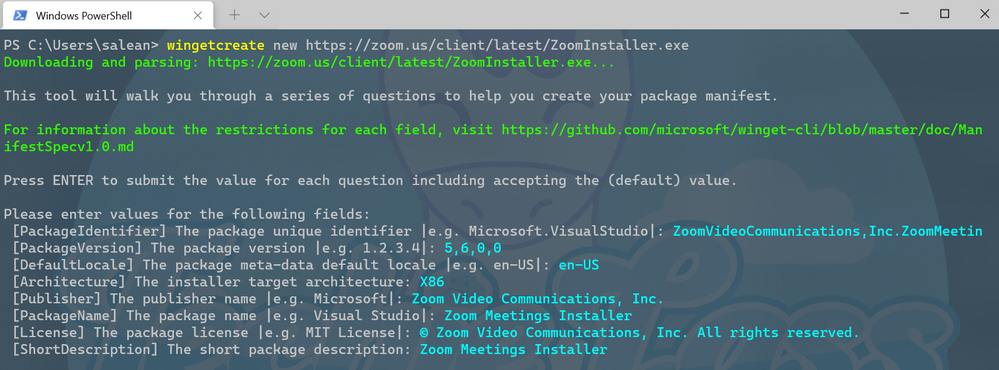
To kick start you should enter the command wingetcreate new
The tool will prompt you for the URL of the software package, this should be a publicly accessible URL and not something that is stored on your OneDrive or the like. The tool will start to query the file and pull some information out. It will start by suggesting a package identifier, package version, default language, the architecture the package will install on (think x86, x64, etc), publisher name, package name, package license and a description for the package. All this information helps people find and install the software.
WingetCreate example wizard
Custom Silent Switches
If the piece of software, you are trying to package up requires a bespoke install switch to make it install silently without any user input you can configure that within the installer.yaml file.
If we take the VMware Workstation Player as an example, we can see within its installer.yaml file it has a couple of configuration lines:
**Screenshot https://github.com/microsoft/winget-pkgs/blob/master/manifests/v/VMware/WorkstationPlayer/16.1.2/VMware.WorkstationPlayer.installer.yaml**
Tags
Another thing that can be done when submitting is adding in tags in your manifest files. Tags will help packages/software be found when folks are searching through the winget search command.
 Searching for anything that relates to audio
 Tags inside the VLC manifest file
These tags help expand the search results beyond the software maker or name of the software.
Validating and Testing
Now that you’ve setup the manifest files it’s time to validate them and test they work as they should before you are ready to submit to the repository.
The first thing to do is validate the manifest files, it will check the syntax and configures it confirms to the standards that it should. If you’ve went through the wingetcreate new process and made no manual changes to the files, then it should pass validation. However, if you have made some manual changes then there might be changes you need to make to pass the validation test.
The command to use to validate your manifest is winget validate –manifest <manifest path>
The path to your manifest file will vary depending on your setup, however it should have been displayed to you at the end of the wingetcreate process.
Once you’ve had the output from the validate command and everything is okay, you can now move on to testing the manifest installs the package/piece of software that you’ve set it up to do. You might have to test this on a separate machine or uninstall the software if you already have it installed to test this properly.
The command you need to use is winget install –manifest <manifest path>
Hopefully, this will go through without any issue and install the software as it should. If there are any issues, then you will need to look at resolving them and going through the process again until it works as expected.
Submitting the manifest
Now the manifest is validated and tested it’s time to submit your contribution to the Microsoft team to check and merge into the repository for the rest of the community to take advantage of.
The first thing to do is set up a Token, that is a GitHub personal access token that can help avoid you having to put your password into the command line for authentication to GitHub. If you haven’t set up a token before you can use this great guide from the GitHub team – Creating a personal access token.
Once you have the token you need to store it into your command line tool for winget to use, you do this by issue wingetcreate –store <token>
You are now ready to submit your creation to the Microsoft team for review. To do this you should issue the command wingetcreate submit <path to manifest>
This will create a repository store within you GitHub profile and then create a pull request on the Windows Package Manager repository.
When that command is complete, it will open a browser session to the pull request (PR). Here you will be asked to complete a checklist.

It will also start to kick off some automated tests, validating the manifest and testing it does what it should do. You can close your browser and check on this later, or you can watch it update its progress.
If any issues are detected you will have to address them, otherwise someone from the Windows Package Manager will check over the submission and either approve or give feedback on improvements.
The team do have some SLA’s that they are working on to ensure that your submissions are reviewed within a timely manner.
Call to Action
So, your call to action is look at Windows Package Manager, see if any of your favourite pieces of software aren’t there and get packaging!

Recent Comments