by Contributed | Jun 27, 2021 | Technology
This article is contributed. See the original author and article here.
Configure release pipeline
Earlier we prepared the package for deployment with CI pipeline. Now finally let’s deploy it to the Azure App Service.
Create a Release pipeline
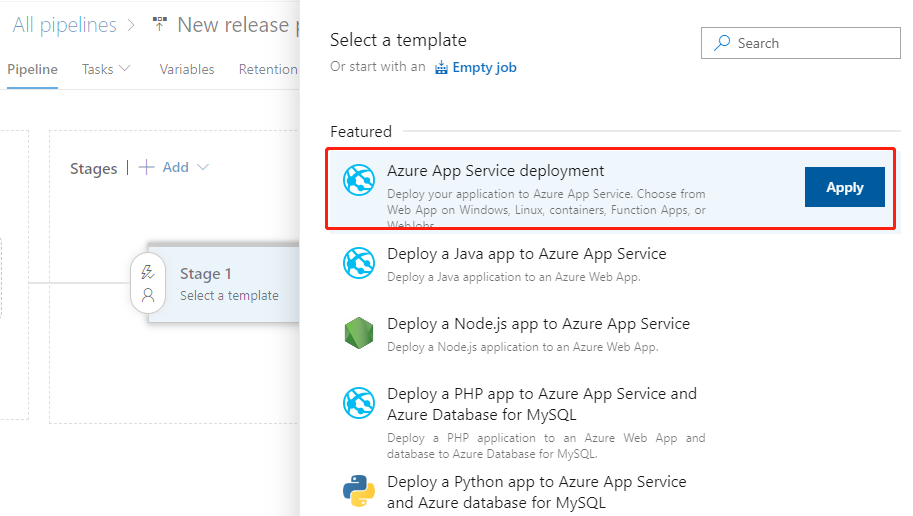
Click Releases in the left navigation menu under Pipelines. In the middle find the New button and click New release pipeline to create a new release pipeline. Open directly to the selection template page.
Let’s select the first Azure App Service deployment and click the Apply button.
Then pop up the Stage float layer.

Click on the upper right corner fork to close it the float layer. Click on the name line and enter a meaningful name.

Then click on the add an artifact button at the bottom left. Add a product.

First select the ASP_Backend that line we had prepared before for Source. Then the program automatically refreshes the lower half of the float layer. We use default values for all items, and click the bottom Add button to complete the addition.
Click the “1 job, 1 task” link to the right to open the configuration float layer for the deployment target. Start by filling out the configuration for the entire phase of Stage 1.

We mainly elect the Azure subscription and the type of App as prompted, and then select the instance we created earlier.
We then find that the Deploy Azure App Service task is ready to use with the default values.

If we click the 3-point button in the lower right corner of the Package or folder, a floating layer pops up to select a specific package file. However, it is recommended to use the default wildcard instead of not a specific file name, which is the most flexible.
Click the Save button in the upper right corner to save it, and then click the Create release button next to it to pop up the floating layer

As you can see, the latest version of the CI pipeline is shown here, and it is recommended that you write some descriptions related to this deployment in Release description for later traceability. Click the Create button at the bottom to create it.

Once the release is created and it is run immediately. And here we can see an animation showing the progress.

Click on Stage 1 and click on the View logs on the right to see the detailed logs in real time for the deployment process below.

When the deployment task is complete, we go back to the console of App Service and find the URL in Overview.
Open this URL with a browser and you’ll see that we’ve deployed a successful website.
by Contributed | Jun 27, 2021 | Technology
This article is contributed. See the original author and article here.
Protecting IoT devices using a Zero Trust approach is a security imperative
Even in the face of significant security challenges organizations continue to rapidly adopt Internet of Things (IoT). They understand IoT adoption is critical to their digital transformation journey and to advancing their business’s interests. This trend is not limited so a single industry and is in fact It’s happening across all industries including automotive, financial, healthcare, retail, energy, agriculture just to name a few.
The scenarios for IoT devices are incredibly diverse ranging from highly sophisticated autonomous vehicles and medical devices that capturing real time data to the most simple sensors such as those that monitor the occupancy of a parking space at a local shopping center. Theis diversity in these scenarios leads to diversity in the devices themselves at the hardware, operating system and application level and also in terms of form factor. Many devices are quite small,and consume littlesmall amounts of power and must be low costs and because of this don’t have the computing power to integrate sophisticated firewalls, antivirus and other security capabilities to protect them. The security challenges are further complicated by the diverse environments these devices are deployed within – ranging from inside factories with physical security measures in place to help protect them to remote locations and public spaces where physical access to device is literally there for anyone which malicious intent to tamper with. IoT devices are exposed in unique ways and offer high-value targets to attackers. Sometimes the IoT devices themselves are of interest to attackers but often times these devices are used as means to gain access to the network they are connected to which may have more interesting targets to attack. All of these factors make securing IoT devices an absolute imperative.
A large majority of our of our customers are familiar with some of these challenges. In fact a recent study conducted by Microsoft found that 97% of security decision makers believe IoT related security is a key concern and they are actively looking for better solutions and approaches securing them. Many of these same organizations are turning to a Zero Trust security approach to address these concerns.
How to implement zero trust in my IoT organization?
Today, there few if any security professionals that are unaware of Zero Trust, nearly every CIO, CTO, or CISO understands the benefits and is now on the journey to learn more about implementation best practices and that solution that can help. Microsoft recently published a Zero Trust for IoT best practice and maturity model that organizations can use to design their own Zero trust roll-out strategy based on their unique business needs. The model principal assumes you must verify any connection in your network before you trust it and then explicitly verify the security status of each identity, endpoint, network, and other resources based on all available signals and data.
How can Azure Defender for IoT help you achieve Zero Trust?
The Azure Defender for IoT provides both agentless and agent based options to help achieve Zero Trust and today we’re are going to focus on the agent based option. With it a Zero Trust model and security controls can be implemented across each of the Zero Trust pillars which identities, network, data and .
Defender for IoT offers a lightweight security “micro” agent that can be embedded into IoT device, supporting any major IoT Operating system . This agent gives Defender for IoT a much richer set of signals to monitor than can be achieved by using network signals alone. For instance, because agents can monitor the identities, processes, data being used on the device itself our ability to detect malicious and anomalous behaviors is significantly enhanced. With it we have a much better understanding of what is happening, and we can rely a lot less on inference which can lead to false alerts. The agent performs little processing and forwards event data from the device to the Azure Defender for IoT cloud services, for ongoing monitoring of your network, assisting to enforce device compliance to a secure access which helps to prevent attackers from moving laterally across the network
With the ability to perform and compliance assessments on agent based IoT devices Defender for IoT provides you with strong Zero Trust controls. It monitors for invalid configurations and operating system updates on your devices and assesses them against vulnerability assessment standards like those from the Center for Internet Security (CIS). Additionally, Defender for IoT applies behavioral analytics to both device and network telemetry to monitor and quickly detect anomalies and unauthorized activities. For instance, scenarios like:
- Is the device communicating outside of the normal hours?
- Is the device performing unauthorized outbound connections?
and many more can be achieved enabling you to indicate about a potential attack threats running on the device and ultimately take protective actions to improve your IoT security posture.
Azure Defender for IoT can also integrate with Azure Sentinel and even 3rd party SIEM systems giving security operations more comprehensive forensic capabilities and anomaly remediation for a better Zero Trust maturity and control.
We hope you find this information helpful, and we would love to hear from you. join us out community :
Azure Defender for IoT – Microsoft Tech Community
For more information about Azure Defender for IoT check out the following resources:
Azure Defender for IoT | Microsoft Azure Defender for IoT
What is agent-based solution architecture
If you have any suggestions, questions, or comments, please visit us on our discussion form on Microsoft Tech Community
by Contributed | Jun 27, 2021 | Technology
This article is contributed. See the original author and article here.
Build the front-end project
Go back to the YAML file editing interface and find this step.
steps:
- checkout: Angular
  displayName: 'checkout Angular'
Add the following 2 tasks below the step.
- task: Npm@1
  displayName: 'npm install'
  inputs:
    command: install
    workingDir: '$(Agent.BuildDirectory)/s/ASP_Angular/'

- task: Npm@1
  displayName: 'Build Angular'
  inputs:
    command: custom
    customCommand: run build
    workingDir: '$(Agent.BuildDirectory)/s/ASP_Angular/'
The first 1 new task is to install the dependency library by the dependency of the front-end project. The last 1 task is to build files that can be published by the front end.
Note that both tasks have workDir: ‘Agent.BuildDirectory’/s/ASP_Angular/’ statement. $(Agent.BuildDirectory) is an environment variable that refers to /home/vsts in the context of the current task /work/1, so the code check-out path /home/vsts/work/1/s/ASP_Angular shown in the previous log can be represented by an environment variable that is $(Agent.BuildDirectory)/s/ASP_Angular/.
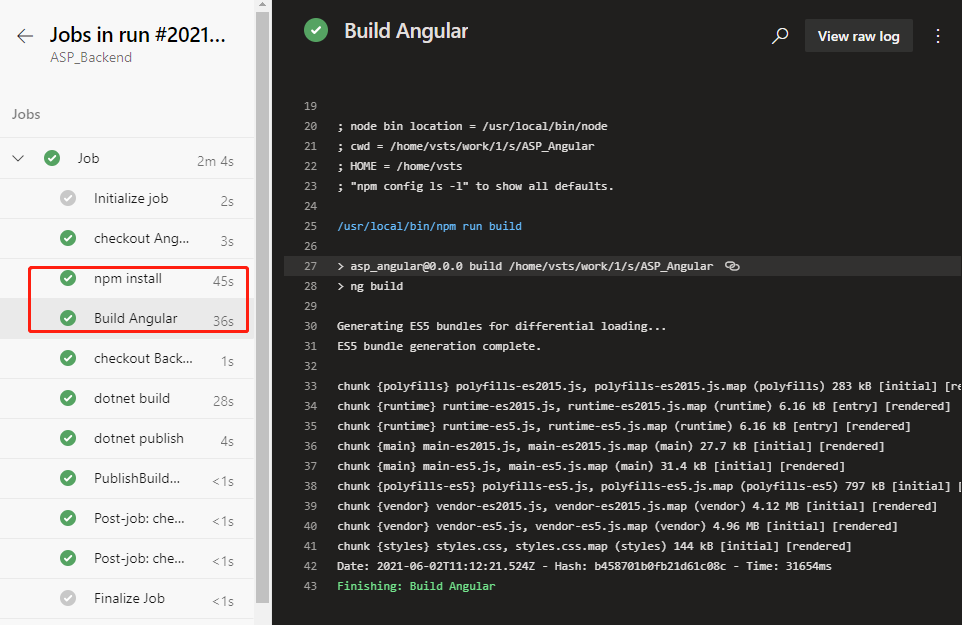
Save and run. Wait patiently for a while, when the task runs, we click into the task log and see the following log.
This Indicate that the build of the front end has been successfully completed.
Combine the front-end and back-end artifacts
Finally, we copy the front-end built files to the back-end built directory to prepare the total package for the release.
Go back to the YAML file editing interface and find the task.
- task: DotNetCoreCLI@2
  displayName: 'dotnet publish'
  inputs:
    command: publish
    publishWebProjects: false
    projects: '**/*.csproj'
    arguments: '--configuration $(BuildConfiguration) --output $(build.artifactstagingdirectory)'
    zipAfterPublish: true
Change the last zipAfterPublish: true to zipAfterPublish: false, which means that we don’t compress at this step, keep the original directory and files. Then add a task after this task.
- task: CopyFiles@2
  displayName: 'copy frontend files'
  inputs:
    SourceFolder: '$(Agent.BuildDirectory)/s/ASP_Angular/dist'
    Contents: '**'
    TargetFolder: '$(Build.ArtifactStagingDirectory)/ASP_Backend/wwwroot'
This is to copy the files built from the front end into the specified directory that the back end is built in.
SourceFolder: ‘Agent.BuildDirectory)/s/ASP_Angular/dist’ means that the source path is set to $(Agent.BuildDirectory)/s/ASP_Angular/distbecause by default the files generated by the Angular build are placed in the project’s /dist directory.
TargetFolder: ‘Build.Artifact Staging Directory’/ASP_Backend/wwwroot’ means that the target path is the back-end built directory in wwwroot, which is a path ASP.Net projects use usually for static files. Static files in wwwroot are output directly.
Then add a task.
- task: ArchiveFiles@2
  inputs:
    rootFolderOrFile: '$(Build.ArtifactStagingDirectory)/ASP_Backend/'
    includeRootFolder: false
archiveType:  'zip'
    archiveFile: '$(Build.ArtifactStagingDirectory)/$(Build.BuildId).zip'
    replaceExistingArchive: true
    verbose: true
Archive the previously organized directories and files in one package.
archiveFile: ‘$(Build.ArtifactStagingDirectory)/$(Build.BuildId).zip’ this line declares the path to which the packaged file is stored. $(Build.BuildId) is an environment variable that stands for a built serial number that is typically used to generate a different name for each packaged file built.
Finally, the task of publishing the product is changed from the original
PathtoPublish: '$(Build.ArtifactStagingDirectory)/'
to
PathtoPublish: '$(Build.ArtifactStagingDirectory)/$(Build.BuildId).zip'
Let’s just save this final package, and ignore the rest files in the process.
Run after saving. After a successful run, this time we can see that the resulting product file name becomes like this.

Because it contains all the built files from the front and back ends, the volume also increases to 4MB.
We download this file and can look at it on our computer.
unzip -l 235.zip
Archive:  235.zip
  Length     Date   Time    Name
 --------    ----   ----    ----
   138528  06-03-21 08:12   ASP_Backend
    10240  06-03-21 08:12   ASP_Backend.Views.dll
    19216  06-03-21 08:12   ASP_Backend.Views.pdb
   106734  06-03-21 08:12   ASP_Backend.deps.json
    11264  06-03-21 08:12   ASP_Backend.dll
    20472  06-03-21 08:12   ASP_Backend.pdb
      292  06-03-21 08:12   ASP_Backend.runtimeconfig.json
    62328  04-23-21 18:32   Microsoft.AspNetCore.SpaServices.Extensions.dll
      162  06-03-21 08:11   appsettings. Development.json
      196  06-03-21 08:11   appsettings.json
      487  06-03-21 08:12   web.config
        0  06-03-21 08:12   wwwroot/
  2530889  06-03-21 08:12   wwwroot/vendor-es5.js.map
     6303  06-03-21 08:12   wwwroot/runtime-es5.js
     6289  06-03-21 08:12   wwwroot/runtime-es2015.js.map
    14659  06-03-21 08:12   wwwroot/main-es2015.js.map
     5430  06-03-21 08:11   wwwroot/favicon.ico
   387821  06-03-21 08:12   wwwroot/polyfills-es5.js.map
     6286  06-03-21 08:12   wwwroot/runtime-es5.js.map
   816259  06-03-21 08:12   wwwroot/polyfills-es5.js
   289746  06-03-21 08:12   wwwroot/polyfills-es2015.js
     6306  06-03-21 08:12   wwwroot/runtime-es2015.js
    16417  06-03-21 08:12   wwwroot/main-es5.js.map
   147637  06-03-21 08:12   wwwroot/styles.css
      819  06-03-21 08:12   wwwroot/index.html
  5198180  06-03-21 08:12   wwwroot/vendor-es5.js
    28439  06-03-21 08:12   wwwroot/main-es2015.js
  4315318  06-03-21 08:12   wwwroot/vendor-es2015.js
   776588  06-03-21 08:12   wwwroot/styles.css.map
   256877  06-03-21 08:12   wwwroot/polyfills-es2015.js.map
  5079925  06-03-21 08:12   wwwroot/vendor-es2015.js.map
    32199  06-03-21 08:12   wwwroot/main-es5.js
 --------                   -------
 20292306                   32 files
It does contain all the files on the front and back ends and is organized in the directory format that are ready to deploy.
If you still have problems editing YAML files for CI pipelines, you can refer to the ASP_Combine.yml file in the back-end source package ASP_Backend.zip.
by Contributed | Jun 26, 2021 | Technology
This article is contributed. See the original author and article here.
Introduce the second source repository
Let’s go back to the YAML file editing interface and add the following paragraph after the trigger:- master segment at the beginning of the file:
resources:
  repositories:
    - repository: Angular
      name: <YourProjectName>/ASP_Angular
      type: git
      ref: main
Here repository: Angular is a code name for the referenced source repository, which can be simply called later.
name: <OurProjectName>/ASP_Angular is the “project name / repository name” format.
ref: Main claims to use the main branch.
Then add after steps:
- checkout: Angular
  displayName: 'checkout Angular'

- checkout: self
  displayName: 'check Backend'
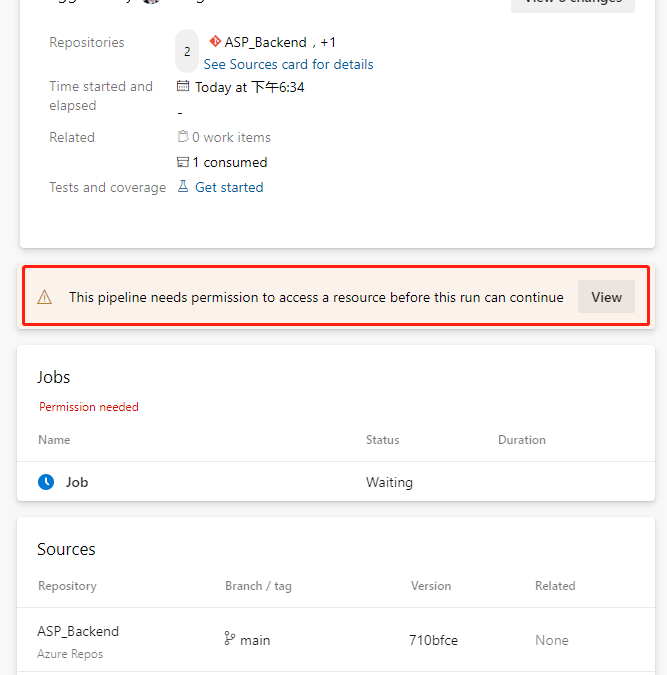
The task means checking out the front-end repository. Because a second source repository is introduced, the current repository itself also has a task – checkout:self to check out. Now save and run. Because a second source repository is included in the current pipeline, we will see a prompt to grant permission when we run this pipeline for the first time.

Click the View button.

Just click the “Permit” button on the float layer. This permission only needs to be done the first time we add a task, and it won’t pop up again.
This execution probability will fail.

We click on this error message and jump directly to the specific error log.

ASP build tasks that used to work properly did no work this time. Let’s locate the task that were previously built by the wizard.
- script: dotnet build --configuration $(buildConfiguration)
  displayName: 'dotnet build $(buildConfiguration)'
Replace with this below.
- task: DotNetCoreCLI@2
  displayName: 'dotnet build'
  inputs:
    command: 'build'
    projects: '**/*.csproj'
    arguments: '--configuration $(BuildConfiguration)'
Save and run again and it works fine. We click on the Job link on the green check-in on the job run details page to see that the task of checking out the back-end repository of the front-end repository in the log is complete, and we can click on each task name to view the detailed log.

Note that there is a line in the log checked out by the front-end project here
git init “/home/vsts/work/1/s/ASP_Angular”
This means the path where the front-end code was saved in the container that our job was executed by the pipeline. We note this path down and we will need it to add build tasks later.
![[Guest Blog] At the Intersection of Mixed Reality and Business Applications: My Career Journey](https://www.drware.com/wp-content/uploads/2021/06/fb_image-1184.png)
by Contributed | Jun 25, 2021 | Technology
This article is contributed. See the original author and article here.
This article is written by Martin Heward, a Microsoft employee and long time professional in Business Applications, who shares his biz apps to mixed reality journey as a part of our Humans of Mixed Reality series. This blog is formatted in a Q&A style – please read Martin’s answers to questions around his career story.
Q: How did you get started in the MR space?
A: As a long time professional in Business Applications (as a customer, partner, now Global Black Belt aka GBB specialist), I am no stranger to emerging technology since during much of my career, I’ve seen many Dynamics 365 products start off as an incubation product just like our Mixed Reality business applications today. Not long after I joined Microsoft 3.5 years ago, I came across the concept of Mixed Reality and immediately was intrigued by its possibility to add unmatched business value for my customers and prospects. As a new employee with time to learn (remember those days?) in the summer of 2018, I jumped on the opportunity to be one of the early adopters and became Master-Certified in both Mixed Reality and the HoloLens.
As part of that process, I received an HoloLens (1st gen) for learning and pre-sales. However, I am glad that I was disciplined enough to not play with it, or even turn it on until I had completed the learning courses. I will NEVER forget that magical moment when I put it on for the first time after having some idea (albeit only 2-dimensional) about what to expect. Even though the HoloLens (1st gen) had some limitations with field of view and gesturing that was not exactly intuitive at the time, I was completely blown away with Mixed Reality in general. I know many people have already said this before, but it truly is one of those rare concepts that you can describe with words and human emotions all day long, but not understand until you experience it on your own.
Here’s a handy diagram to illustrate where mixed reality business applications like Remote Assist and Guides come in the broader Dynamics 365 infrastructure:

Q: What excites you most about mixed reality?
A: Personally, mixed reality is exciting to me because of how relevant and complementary it is to core challenges that our Business Applications customers are tackling each day. Mixed Reality and the value it brings spans every industry we operate in. It is certainly extremely relevant in my focus industries of Process Manufacturing, Energy, and Utilities. From Health and Safety, to Production Optimization, to an aging workforce of frontline workers; these are fundamental issues discussed in board rooms at every single one of the customer organizations I interact with. My job is to create a vision of transformation of business processes with Dynamics 365 – adding in Mixed Reality to my messaging is a way of super-charging this message and making the previously perceived sci-fi-like future seem very possible and current.
Q: Why do you think mixed reality business applications are truly transformative for organizations?
A: We all know transformation may be one of the most overused terms in our industry, and perhaps the most vague. Business Applications is unique in the sense that it is not a commodity that we are delivering, instead it is more like a box of LEGO, if you will, that requires transformation of business processes that the configured Business App is meant to complement. This process of envisioning typically takes lots of time. What is so refreshing about Dynamics 365 mixed reality business applications such as Remote Assist and Guides is that they are much closer to a commodity than those of us in Business Applications are used to. Mixed Reality applications can transform business processes and be adopted quickly, sometimes even right out of the box.
This quick time to value is related to the fundamental nature of mixed reality apps. I’ve spoken with many individuals who experience mixed reality for the first time (be it at marketing shows and conferences) and they often have sentiment much like mine around “the experience” of learning in a completely different manner than we are used to. Everyone’s learning styles are quite different – I see this first hand with my own two kids. Some are traditional, others are kinesthetic and require movement to retain information. There is something profound and different about performing tasks on a HoloLens. Many, including myself seem to retain information in much greater quantity and specificity than traditional methods.
Here’s a nostalgic photo of me with my very first HoloLens (1st gen) device:

Q: What advice would you give to others considering careers in mixed reality, or exploring the use of mixed reality in their organizations?
A: As stated earlier, my advice about mixed reality is to first perform research and due diligence before jumping in and worrying about devices and your organizations specific use cases. The applications of mixed reality are vast, and just like any emerging technology, many decision makers within business see this as a future-state investment. For many, most unfortunately, this could mean months and years of pilots and proof of concepts. This is a medium that is proven to be transformational even in the most hard industrial environments within our customers operations. To avoid this perception of emerging versus ready, I would think outside the box and be very selective about the business problems you are aligning with. First impressions are quite powerful and can be a challenge to overcome if outcomes are not aligned with expectations. A good way of avoiding this is to weave it into messaging as matter of fact versus something profound and singled out.
Q: Do you have any useful resources you can share that have inspired you (links, e-books, podcasts etc)?
I hope you will be bold and experience mixed reality for yourself, and witness firsthand what it can do for industries worldwide!
#MixedReality #CareerJourney

Recent Comments