by Contributed | Jun 24, 2021 | Technology
This article is contributed. See the original author and article here.
You want to build an app using SharePoint Framework and wonder which framework you should use? Here’s my personal advice.
Extend conversations and portals on Microsoft 365
Using SharePoint Framework you can extend conversations and portals on Microsoft 365. With SharePoint Framework, you can build widgets, called web parts, which users can put on pages or open as tabs in Teams. You can also use SharePoint Framework to add code to existing pages or change how data in lists is displayed.
If you have experience building web apps using JavaScript, you can build apps using SharePoint Framework. SharePoint Framework is based on open source tools that you already know, like npm, TypeScript, Yeoman, webpack, and gulp, and there is very little that you have to learn to build your first app.
Can I use [your-framework-here] with SharePoint Framework?
There are many JavaScript frameworks that you can use to build web apps. But can you use any one of them when building apps with SharePoint Framework?
Use any JavaScript framework
When building apps using SharePoint Framework, you can use any JavaScript framework. If you’re comfortable working with Vue or Handlebars, or any other framework, you don’t need to learn any other framework. You can be productive from the start and focus on building your app. That said, there is a caveat…
While you can use any JavaScript framework when building apps with SharePoint Framework, you will have the best development experience when using React. Here is why.
Integrated dev experience
From the development experience point of view, React is integrated with SharePoint Framework. Using the SharePoint Framework Yeoman generator you can create a project that uses React. The necessary configuration, and build and packaging tasks are already configured and ready for you to use. In comparison, if you choose to use another framework, you will need to find a way to integrate its tooling, like the ng CLI, into SharePoint Framework so that you can work efficiently.
Seamless UX integration
Next to the SharePoint Framework, Microsoft offers Fluent UI React: a set of ready-to-use components that help you make your app look like Microsoft 365. Rather than spending time on building CSS and ensuring that your app looks as intended in the different browsers, you can save a ton of time and use Fluent UI components instead. But only if you use React. If you use a different framework, you will need to take care of presenting the data yourself.
First-load performance
Finally, from the performance point of view, React is already loaded on SharePoint pages. If you build your app on React, your app will load faster. That said, the difference of using React instead of any other framework will be visible only on the initial load. Because once users download your app, it will load from their cache the next time they use it, making the difference imperceptible.
The verdict
You can use any JavaScript framework to build apps using SharePoint Framework. SharePoint Framework allows you to benefit from your existing knowledge and use the tools that you already know to build apps for the 250 million people using Microsoft 365.
If you’re just starting with web development, I’d recommend you to learn React. It will give you the smoothest experience when building apps for Microsoft 365. There are many tools and samples built for React both by Microsoft and the community which you can use to learn and speed up building your apps.
by Contributed | Jun 23, 2021 | Technology
This article is contributed. See the original author and article here.
Azure DevOps, as an end-to-end tool chain for DevOps on the Microsoft Cloud, provides commonly used modules for developing the main features commonly used today, especially the CI and CD that are automated by the Repos source repository combined with the Pipelines pipeline. As current Web applications evolve, separated front and back architectures have become mainstream. Front-end and back-end source code are typically developed by two teams and stored in two source repositories, while automated integration and deployment often require unified deployment to a single resource environment. To implement this common scenario, today we’ll take you through the pipelines of Azure Pipelines, familiarize yourself with the basic usage of YAML files, and integrate the docking of pipelines and release lines.
The fundamental deployment
The overall steps for our presentation are:
- Build ASP.Net back-end projects into publishable release packages
- Build the code on the front end into a publishable Angular project
- Package the front and back releases and deploy them to Azure App Service.
First, let’s get the source repository and the final deployment target App Service ready.
Prepare the source repository
Demo with app source code can be downloaded here:
https://github.com/xfsnow/azure-multi-region-example/blob/master/ReposCombine/ASP_Angular.zip
https://github.com/xfsnow/azure-multi-region-example/blob/master/ReposCombine/ASP_Backend.zip
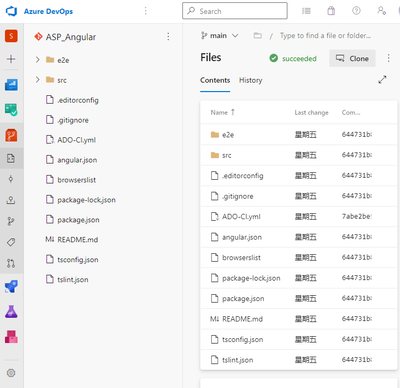
Download the two compression packages, unzip them, and create 2 Azure DevOps Repos with each of these 2 directories and push the source code to the appropriate Repos. For more information, please refer to the document Creating a new Git repository in your project. The two source repositories that are completed are shown in the figure below.
This is the source repository for the front end, which, as the name suggests, is a pure front-end project that uses Angular.js.

This is the source repository for the back end, which is a back-end project that uses ASP.Net.
Provision an App Service instance
We use the console to quickly create a web app instance.

The main configuration items are:
Publish: choose Code;
Runtime stack: choose .Net Core 3.1;
Operation System: choose Windows.
Please click Change size to choose Sku and size.

Click on the far-left Dev/Test in the pop-up float and click on 1GB memory type, which is a free model for easy experimentation without charge. You can do this by clicking on the Review-create button at the bottom and clicking on the Create button. The creation process takes a few minutes, and we’ll continue with the following tasks while waiting.
by Contributed | Jun 23, 2021 | Technology
This article is contributed. See the original author and article here.
The latest Maven plugin for Azure Web Apps provides a brand new experience that enables you to deploy not only application artifacts such as JAR, WAR, and EAR files but also application dependencies like libraries, module definitions, and startup scripts — using one single Maven Goal.
mvn azure-webapp:deploy
Why use it?
Starting from version 1.16.1, the Maven plugin for Azure Web Apps now supports deploying extra file types like JAR, WAR, EAR, libraries, app server module definitions, startup scripts, and more. This new experience gives you:
- Simplicity: Infrastructure as Code (IaC) by defining everything in your pom.xml and applying changes to Azure with a single Maven deploy Goal. You can easily embed the process in your CI/CD and avoid context switching between multiple tools.
- One single app restart: Many file changes require Web App restart in order to take effect. The Maven plugin will manage restart policy during the deployment for you so that, no matter how many files are deployed, the Maven plugin will trigger only one restart.
- Fewer errors: The Maven plugin ensures files are deployed in the right location for Azure App Service. (For example, startup scripts can only take effect if they are deployed under “/home/site/scripts/”.) Using this plugin can help you avoid many errors.
How to get started
The Maven plugin for Azure Web Apps greatly simplifies the development experience for Tomcat, Spring Boot, and JBoss EAP apps on Azure App Service. Starting from a Maven project, run the following config goal, follow the wizard to authenticate with Azure, and generate configurations in your pom.xml that are ready to deploy.
mvn com.microsoft.azure:azure-webapp-maven-plugin:1.16.1:config
      <plugin>
        <groupId>com.microsoft.azure</groupId>
        <artifactId>azure-webapp-maven-plugin</artifactId>
        <version>1.16.1</version>
        <configuration>
          <schemaVersion>v2</schemaVersion>
          <subscriptionId>xxxxxx</subscriptionId>
          <resourceGroup>xxx-rg</resourceGroup>
          <appName>xxx</appName>
          <pricingTier>P1v3</pricingTier>
          <region>westeurope</region>
          <appServicePlanName>asp-xxx</appServicePlanName>
          <appServicePlanResourceGroup>xxx-rg</appServicePlanResourceGroup>
          <runtime>
            <os>Linux</os>
            <javaVersion>Java 8</javaVersion>
            <webContainer>Jbosseap 7.2</webContainer>
          </runtime>
          <deployment>
            <resources>
              <resource>
                <directory>${project.basedir}/target</directory>
                <includes>
                  <include>*.war</include>
                </includes>
              </resource>
            </resources>
          </deployment>
        </configuration>
      </plugin>
The above configuration includes only your build artifact. As demonstrated in the PetStore JBoss EAP sample app, you might need to upload a script containing extra steps to prepare the environment before running the artifact. Now, instead of uploading files to the Web App with FTP, deploying the WAR package, and triggering an app restart, you can simply add the configurations below in your pom.xml.
<deployment>
  <resources>
    <resource>
      <type>war</type>
      <directory>${project.basedir}/target</directory>
      <includes>
        <include>*.war</include>
      </includes>
    </resource>
    <resource>
      <type>lib</type>
      <directory>${project.basedir}/.scripts/3B-mysql</directory>
      <includes>
        <include>*.jar</include>
      </includes>
    </resource>
    <resource>
      <type>startup</type>
      <directory>${project.basedir}/.scripts/3B-mysql</directory>
      <includes>
        <include>*.sh</include>
      </includes>
    </resource>
    <resource>
      <type>script</type>
      <directory>${project.basedir}/.scripts/3B-mysql</directory>
      <includes>
        <include>*.cli</include>
        <include>*.xml</include>
      </includes>
    </resource>
  </resources>
</deployment>
You can then deploy the app with one single command and everything is up and ready!
mvn package azure-webapp:deploy
Try our tools
Please do not hesitate to try it! Your feedback and suggestions are especially important to us and will help shape our product in future.
by Contributed | Jun 23, 2021 | Technology
This article is contributed. See the original author and article here.
When your team members are working on multiple projects using Project for the Web, it can be difficult for them to know what tasks they are assigned, and when they should be completed across all their projects. This blog shows you how to create a My Tasks experience using Power Apps to help your team stay on track.
Step 1: Create a new View for Project in Power Apps
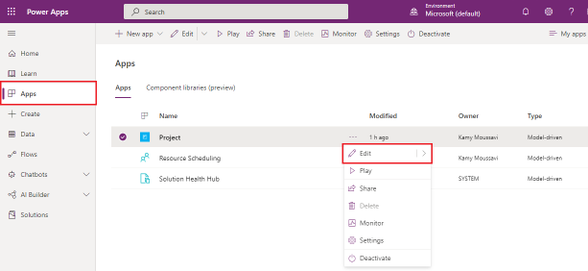
- Go to Powerapps.com and sign in.
- Click on Apps on the left navigation menu.
- Locate the Project App in the Apps list and click the More Commands ellipses menu and click Edit.
4. Click the + Add button on the top left, and then select Views.
5. On the right options pane, use the drop-down menu to select Project Task.
6. Press the Create New button above the drop-down menu.

Step 2: Create a filter for Tasks Assigned to You
- Create a new filter by opening the Filter Pane and pressing Add Filter.
- Select Resource Assignment (Task) in the drop-down menu.
- In the Resource Assignment (Task) box, Press Add Filter.
- Select Bookable Resource (Bookable Resource) in the drop-down menu.
- In the Bookable Resource (Bookable Resource) box, Press Add Filter.
- Select User in the drop-down menu.
- In the drop-down menu that says Equals, select Equals Current User.

Step 3: Add Columns Attributes for more details on your View
- In the right pane, select the Components tab and press Column Attributes: Primary Entity.
- Drag and drop any new column attribute necessary for you in the Columns section in the bottom left.
- We recommend adding Project, Start Date, Due Date, % Complete.
- Once satisfied with this view, press Save on top right, the name your view My Tasks.

Step 4: Add the Project Task view to your Project Site Map
- On the App Designer landing page, press the edit icon on the Site Map (the first tile in the canvas)

2. Select the blue Projects text under the Projects Tab press + Add to add a Subarea.
3. Use the Type drop-down menu to select Entity.
4. Use the Entity drop-down menu to select Project Task.
5. In the Title text field, name this Entity Project Tasks.
6. Press Save, then Publish, then Save and Close.

Step 5: Try out your new My Tasks view in Project Power Apps
- In the App Designer landing page, press Play in top right to launch Project.
- Select the new Project Tasks subarea under Projects in the left menu.
- In the view selector at the top left defaulted to My Open Project Tasks, select your My Tasks view.
- Voila! You can now see all tasks assigned to you across all projects, and click either the task name or the project name to go the respective project.

FAQ
What license do users need to view this My Tasks view once it is created?
All users with Office, P1, P3 and P5 will be able to view this My Task View.
What license do I need to be able to create this My Tasks view?
Project P1, P3 and P5 all have access to Power Apps and can design this custom My Tasks view.
How can I add more details to the My Tasks view?
You can customize the view by going through Step 3 and adding any column attribute to this view.

Recent Comments