by Contributed | Jun 22, 2021 | Technology
This article is contributed. See the original author and article here.
The June 2021 Windows 10 Security update (KB5003637) includes a pre-requisite for the Servicing Stack Update which is included in the May 2021 Windows 10 Security Update (KB5003173). If you use Microsoft Endpoint Configuration Manager with Windows Server Update Services (WSUS) to manage and deploy your monthly cumulative updates, you must install the May 11, 2021 update (KB5003173) before you can install the latest cumulative update.
Because the June 2021 security update supersedes the May 2021 security update, it is possible that the May 2021 security update is no longer deployable in your Configuration Manager environment if you have changed the supersedence rule from the default. This could impact your ability to meet the pre-requisites for the June 2021 security update.
Workarounds
The May 2021 Windows 10 Security Update is not yet expired: To prevent the May 2021 security update from being marked as expired before all your devices are updated, ensure that the supersedence rule’s “Months to wait before a superseded software update is expired” setting is set to the default of 3 months, or to an interval long enough to get the update installed on all required devices.
The May 2021 Windows 10 Security Update has already been expired: If you still need to deploy the May 2021 security update and it has been marked as expired, follow the directions in Supersedence and Expired Software Updates to recover an expired update.
TIP: Use the Software updates deployment re-evaluation behavior upon restart user experience setting. Select this setting to configure software updates deployments to have clients run a software updates compliance scan immediately after a client installs software updates and restarts. This enables the client to check for additional updates that become applicable after the client restarts, then installs them during the same maintenance window. This setting could reduce potential delays between the May 2021 security update install and the June 2021 security update being returned as applicable and installed. By default, software update deployments are reevaluated every 7 days. |
by Contributed | Jun 22, 2021 | Technology
This article is contributed. See the original author and article here.
Typically, a software update that supersedes another software update does one or more of the following actions:
- Enhances, improves, or updates the fix that was provided by one or more previously released updates.
- Improves the efficiency of the superseded update file package, which is installed on clients if the update is approved for installation. For example, the superseded update might contain files that are no longer relevant to the fix or to the operating systems that are supported by the new update. Those files aren’t included in the superseding file package of the update.
- Updates newer versions of a product. In other words, it updates versions that are no longer applicable to older versions or configurations of a product. Updates can also supersede other updates if modifications were made to expand language support. For example, a later revision of a product update for Microsoft 365 Apps might remove the support for an older OS, but it might add additional support for new languages in the initial update release.
Consider the following scenarios in which you might need to deploy a superseded software update:
- A superseding software update supports only newer versions of an OS. Some of your client computers run earlier versions of the OS.
- A superseding software update has more restricted applicability than the software update it supersedes. This behavior would make it inappropriate for some clients.
- If a superseding software update wasn’t approved for deployment in your production environment.
Microsoft Endpoint Configuration Manager current branch provides control for how superseded software updates are handled. Supersedence rules allow you to decide if superseded software updates are immediately expired or expired after a defined period. “Expired” software updates in the context of Configuration Manager are no longer deployable. They can’t be added to new deployments and will also be removed from any existing deployments.
Supersedence rules default to waiting 3 months before superseded updates are expired. It is recommended that you do not assume that superseded updates should be immediately expired in favor of the new, superseding updates. As noted above, there is no guarantee that supersedence is absolute. You should allow enough time to make sure superseded updates are no longer needed by any of your client computers.
Recovering an Expired Update
If you need to deploy a superseded update that has been marked as expired in Configuration Manager, follow the steps below.
- Change the Months to wait before a superseded software update is expired value on the Supersedence Rules tab of the Software Update Point Component properties page, to an interval that is greater than the supersedence age for the update. For example, if the update marked as expired was superseded six months ago, the months to wait interval would need to be greater than six months.
NOTE: If the “Decline expired updates in WSUS according to supersedence rules” option is enabled, the software update(s) may need to be reinstated prior to synchronizing software updates. Also, the interval change is global, meaning any expired update meeting the changed criteria could result in a state change, not just the desired software update(s). |
- Synchronize software updates (scheduled or manual). See Synchronize software updates for more information.
References
Supersedence Rules
Expired Icon
Superseded Icon
by Contributed | Jun 22, 2021 | Technology
This article is contributed. See the original author and article here.
We are currently performing updates to the Hardware Dev Center (HDC). As part of this effort, it is vital that you update/complete your HDC Profile to keep your account active. To keep your HDC account active, you must update/complete your HDC profile by July 2, 2021. Please ensure that the following information is up to date:
- Business name
- Address
- Contact phone
- Email
Even if there are no changes to this information, you must validate the profile settings in HDC to maintain your program access. Remember that HDC access is needed to submit drivers, devices and systems for signing or certification.
To update your HDC Partner Profile:
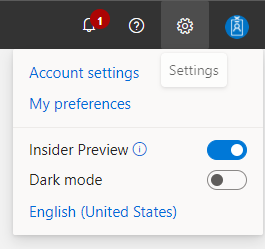
- Log in to the Microsoft Partner Center Dashboard using the AAD Global Admin account (or account with Global Admin AAD Role assigned).
- Click on the “Gear” Icon in the upper right-hand corner of the screen.
- Then click on “Account Settings”.
- Click “Organization Profile”, and then click on “Legal”.

- On the “Legal info” page you will see two tabs, Partner and Developer.

- Click the “Partner” tab and ensure that the information under “Legal business profile” is complete, and correct. If any fields are blank, or any information needs to be updated.

- Under “Contact info”, ensure that all fields are completed with accurate contact information for the person in your organization that is responsible for your Partner Center registration.
- If you are unable to update your profile information, please open a ticket with Partner Center support.
- Click on the “Support” button. Under “Problem summary” enter “Can’t update partner profile”. Under “Problem type” select “General > Accounts, Onboarding, Access > Company details (legal business profile)”

Thank you for your help in maintaining the Hardware Dev Center! We appreciate your prompt attention to this matter.

by Jenna Restuccia | Jun 22, 2021 | ADA Compliance, American Sign Language
The Americans with Disabilities Act (ADA) is a federal law that U.S. Congress enacted and signed into law in July of 1990 and has since expanded. The Act protects individuals with disabilities who work and seek employment within the United States.
The Act’s purpose is to ensure that ALL employees companies are provided with reasonable accommodation to perform their jobs. For instance, companies may require at least one translator (or interpreter) to translate English into Sing Language and vice versa. An interpreter is especially critical in specific fields such as engineering or medicine because of the specialized nature of the information needed. If an employee or client cannot comprehend communications, they will have a hard time understanding crucial information involved in the workplace. These misunderstandings can mean someone’s life in medical settings and someone’s future on legal grounds.
The ADA ensures that individuals with disabilities are given the same opportunity for employment as other individuals. Any individual with a disability who experiences discrimination can use the ADA law for protection in court.
What are some of the steps that a business owner can take to ensure that they comply with the ADA? Business organizations must register with the Department of Labor. Once they become registered, they are required to undergo many tests and monitoring procedures to ensure compliance. Managers and employees should also begin by undergoing cultural competency training and awareness presentations.
by Contributed | Jun 22, 2021 | Technology
This article is contributed. See the original author and article here.
The growing number of devices connecting to the cloud is producing treasure troves of information. This information can be used to not only understand the state of a device, but the state of an entire environment such as a building, energy grid, or factory. However, this vast amount of data can produce its own challenges. As each device generates a time series stream that is often labeled with an encoded tag, it can be hard to understand how different streams are related, or how an overall environment is behaving.
This is where Azure Digital Twins comes in. Azure Digital Twins enables you to create digital models of assets, places, people, and processes, and then relate these items based on their real-world relationships. Now, you can use the Azure Digital Twins plugin for Azure Data Explorer to combine the digital models of your environment with time series data from your devices. More specifically, you can use the plugin to contextualize disparate time series data in ADX by reasoning across digital twins and their relationships to gain insights into the behavior of your modeled environments over time.
For example, with the new Azure Digital Twins plugin for ADX, you can write a query that…
- selects digital twins of interest via the Azure Digital Twins query plugin, then
- joins those twins against the respective times series data in ADX, and then
- performs advanced time series analytics on those twins.
To get you up and running with the new plugin, we’ve created an example scenario where you will combine data in a sample twin graph in Azure Digital Twins with sample time series data in ADX. More specifically, you’ll use joint Azure Digital Twins/ADX queries to understand the operational behavior of various portions of a power distribution grid.
Create a twin graph of an energy grid using Azure Digital Twins Explorer
- To get started, create an Azure Digital Twins instance using the CLI commands below or via the Azure portal. Copy the instance’s URL once it is online.
az account set --subscription <your-subscription-ID> az dt create -n <instance-name> -g <resource-group>
Note: Ensure the resource group exists.
- Grant yourself the Azure Digital Twins Data Owner role on the instance. It may take up to five minutes for this RBAC change to apply.
az dt role-assignment create -n <instance-name> --assignee "<owneruser@microsoft.com>" --role "Azure Digital Twins Data Owner"
- Download the sample models and graph from the energy-grid-example folder to your local computer. You can do this by cloning this repository or downloading it as a ZIP, and then navigating to the energy-grid-example folder on your machine.
- Open Azure Digital Twins Explorer. It should prompt you to enter your Azure Digital Twins instance URL. If not, click on the globe icon in the top right corner.
- Enter your Azure Digital Twins instance URL (endpoint must start with ‘https://’).
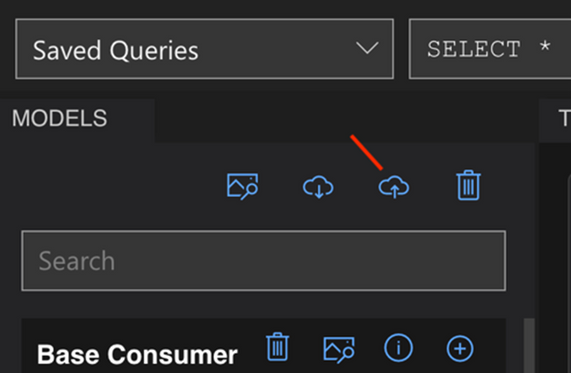
- On the left pane, click on the Upload a Model button (cloud icon with upward arrow).
i. Go to the folder where you downloaded the repository. Navigate into /model/energy-grid-example.
ii. Select all the JSON files (models) and upload them.
- In the middle pane, click the Import Graph button (also a cloud icon with upward arrow).

i. Within /model/energy-grid-example, select distributionGrid.xlsx to import it.
- You should see a graph preview. Click on the floppy disk icon to finish importing the graph (this creates twins and relationships).
- Navigate back to the Twin Graph tab. In the query section, type in “SELECT * FROM DIGITALTWINS” and select Run Query. You should see the graph displayed in the Twin Graph window.
- Click on one of the leaf nodes that has this model: dtmi:example:grid:plants:domesticConsumer;1.
- Update the PowerRequirement value to 500 and save it (using the disc button circled in red below) to patch the twin.

Run joint Azure Digital Twins/ADX queries to understand the behavior of the energy grid
- Connect to the Samples database on the public ADX help cluster. The database features the table SamplePowerRequirementHistorizedData that contains historized property values over a one month period for selected digital twins in the energy grid.
- Get the list of example queries in the sample-queries. Kusto file. Copy and paste each query into ADX. To run a query, click on the query to highlight it and press the Run button. In each query, replace <your_ADT_endpoint> with your instance’s endpoint. Your endpoint should be in quotes, start with https://, and be followed by a semicolon. For example:
let ADTendpoint = "https://MyExampleADTinstance.api.wcus.digitaltwins.azure.net";
- Run the below query, which will invoke the plugin and return all twins in the energy grid.
//Get all twins in your Azure Digital Twins instance
let ADTendpoint = <your_ADT_endpoint>;
let ADTquery = "SELECT T FROM DIGITALTWINS T";
evaluate azure_digital_twins_query_request(ADTendpoint, ADTquery)

- Now that you’ve use the plugin to run an Azure Digital Twins query from ADX, run the next query to retrieve the IDs of the digital twins that are fed power by the Fall Street Substation. The Azure Digital Twins plugin query selects these twins based on those that have a ‘feeds’ relationship with that substation.
// Get the twin ID of all consumers fed by the Fall Street substation
let ADTendpoint = <your_ADT_endpoint>;
let ADTquery = "SELECT CSMR.$dtId as tid FROM DIGITALTWINS SUB JOIN CSMR RELATED SUB.feeds WHERE SUB.$dtId = 'sub_fall_street' AND IS_PRIMITIVE(CSMR.$dtId)";
evaluate azure_digital_twins_query_request(ADTendpoint, ADTquery)

- Now that you have selected the twins of interest from your twin-graph, you can join the twin IDs against the respective time series in ADX and perform time-series analytics. For example, the below query calculates the average power usage on an hourly basis for all customers fed by the Fall Street substation during week 10.
// Chart the average hourly power usage of consumers fed by the Fall Street substation ('sub_fall_street') during week 10
let ADTendpoint = <your_ADT_endpoint>;
let ADTquery = "SELECT CSMR.$dtId as tid FROM DIGITALTWINS SUB JOIN CSMR RELATED SUB.feeds WHERE SUB.$dtId = 'sub_fall_street' AND IS_PRIMITIVE(CSMR.$dtId)";
let weekNumber = 10;
let startDate = datetime_add('week',weekNumber - 1, make_datetime(2021,1,1));
let endDate = datetime_add('week',1, startDate);
evaluate azure_digital_twins_query_request(ADTendpoint, ADTquery)
| extend twinId = tostring(tid)
| join kind=inner (SamplePowerRequirementHistorizedData) on twinId
| project timestamp, twinId, value
| where timestamp between (startDate .. endDate)
| summarize avg(value) by bin(timestamp,1h),twinId
| render timechart

- This last example selects the twins that feed power into the solar grid, identifies missing time series samples, fills in the missing samples with interpolated data points, and then identifies anomalies in the time series for each twin.
// Identify any anomalies in the data
let ADTendpoint = <your_ADT_endpoint>;
let ADTquery = "SELECT PLANT.$dtId as tid FROM DIGITALTWINS PLANT JOIN GRID RELATED PLANT.feeds WHERE GRID.$dtId = 'pl_solar_gen' AND IS_PRIMITIVE(PLANT.$dtId)";
let weekNumber = 10;
let startDate = datetime_add('week',weekNumber - 1, make_datetime(2021,1,1));
let endDate = datetime_add('week',1, startDate);
evaluate azure_digital_twins_query_request(ADTendpoint, ADTquery)
| extend twinId = tostring(tid)
| join kind=inner (SamplePowerRequirementHistorizedData) on twinId
| project timestamp, twinId, value
| where timestamp between (startDate .. endDate)
| make-series AvgPower=avg(value) on timestamp step 10m by twinId
| extend NoGapsTemp=series_fill_linear(AvgPower)
| project timestamp, NoGapsTemp, twinId
| extend anomalies = series_decompose_anomalies(NoGapsTemp,4)
| render anomalychart with(anomalycolumns=anomalies)

- Want even more fun? Build an ADX dashboard with charts from your new Azure Digital Twins/ADX queries! ADX also offers integrations with third party visualization packages such as Power BI, Grafana, Tableau and others.

Step 3: Delete all resources
When you’re finished, follow these steps to delete the resources used in this walkthrough.
- Delete your Azure Digital Twins instance using the following CLI command. This will also delete the twins and models associated with the instance.
az dt delete -n <instance-name>
- Remove the cloned or downloaded repository from your machine.
For more information
- Read more about the plugin in
- Check out the above example and others on GitHub

Recent Comments