Create Private AKS Cluster using Bicep

Create Private AKS Cluster using Bicep

This article is contributed. See the original author and article here.

Overview


This is a blog on how to use a modular approach for Infrastructure as Code (IaC) in provisioning a private AKS cluster and other related resources. The Bicep modules in the repository are designed keeping the AKS baseline architecture in mind. You can start using these modules as is or modify to suit your own needs.


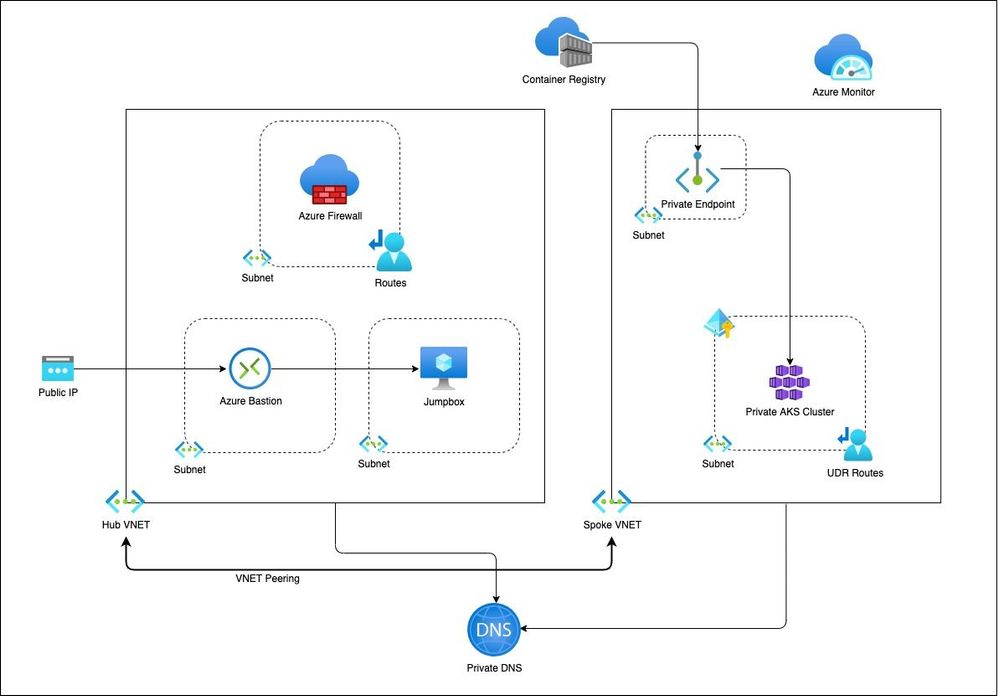
Architecture


PrivateCluster.jpg


Setup


The Bicep modules will provision the following Azure Resources under subscription scope:


  1. A Resource Group with Baseline variables

  2. Hub VNet with required subnets

  3. Azure Firewall Subnet

  4. Azure Bastion Subnet

  5. A jumpbox subnet

  6. Spoke VNET with AKS cluster subnet and additional subnet for other services like Azure Container Registry etc.

  7. Azure Firewall and required routes

  8. Azure Bastion resource and a jumpbox VM without public IP for securing traffic

  9. Azure Container Registry for storing images.

  10. A Private Endpoint for ACR

  11. Private DNS Zone

  12. AAD Enabled, Managed Private AKS Cluster with monitoring Addon and Azure Policy enabled

  13. Private AK Cluster need the UDR routes enabled via Firewall.


Resource Provisioning


Clone the repo


git clone https://github.com/ssarwa/bicep
cd bicep
# You could use deploy.azcli as your working file. Don’t run the script as is!

Login to Azure


az login

az account set -s <Subscription ID>


Initialize variables


# Change the variables as required (baseline and location) on deploy.azcli
# Deploy the bicep script
az deployment sub create -n $baseline‘Dep’ -l $location -f main.bicep

The deployment could take somewhere around 20 to 30 mins. Once provisioning is completed you can use the cluster for your needs.


Next Steps


  1. Enable GitOps using Flux operator for Application deployment

  2. Enable IaC using CI/CD pipelines on Github Actions

VMware Releases Security Update

This article is contributed. See the original author and article here.

VMware has released a security update to address a vulnerability in VMware ESXi and VMware Cloud Foundation. An attacker could exploit this vulnerability to take control of an affected system.

CISA encourages users and administrators to review VMware Security Advisory VMSA-2021-0014 and apply the necessary update.

Use guided integration to set up Fraud Protection for your business

Use guided integration to set up Fraud Protection for your business

This article is contributed. See the original author and article here.

Adopting new systems can be a complex process that can lead to spending time and resources learning and setting up instead of focusing on your core business. When setting up a fraud protection system, you need to focus your resources on measuring the business impact and optimization rather than spending time doing setup tasks.

To simplify the Dynamics 365 Fraud Protection integration process, we have added a guided process experience.

The integration experience functionality, available as preview, provides a guided integration process for each product capability, with well-defined start and end points. We have included out-of-the-box snippets and step-by-step instructions that can be started from within the product. The guided processes are interactive and provide step-by-step integration instructions, including information about why something is required.

The integration processes have been grouped by the stages that you need to follow to set up a comprehensive fraud protection workflow.

Enable core integration

To integrate with Fraud Protection APIs, you must have an Azure Active Directory (Azure AD) application and set up device fingerprinting. Your Azure AD application is used to acquire access tokens, and device fingerprinting is used to get input for fraud assessments. These are the first steps needed to set up Fraud Protection. The integration wizard will walk you through this setup.

Integrate APIs

To benefit from the full suite of Fraud Protection functionality, next you will need to integrate your system with real-time APIs. Depending on your business scenarios, you may need to integrate with specific sets of APIs.

The real-time API integration experience has been split into two categories Purchase Protection and Account Protection based on the assessment types that are most pertinent to your business needs.

Each integration experience provides a milestone-based approach. When you successfully complete an API integration, you will be guided to the next integration phase so you will be able to track your progress.

Integration experiences can be launched more than once and can be personalized based on user input. For example, you may want to run the steps for integrating the Purchase API twice if you have two different online store fronts and want to integrate both.

Next steps

To learn more about integration experience capabilities, visit the Dynamics 365 Fraud Protection Portal or take a guided tour.

Join the Dynamics 365 Fraud Protection Insider Program to get an early view of upcoming features, to discuss integration best practices, and to learn how to combat fraud.

If you’re not currently using Dynamics 365 Fraud Protection, check out the free trial.

The post Use guided integration to set up Fraud Protection for your business appeared first on Microsoft Dynamics 365 Blog.

Brought to you by Dr. Ware, Microsoft Office 365 Silver Partner, Charleston SC.