by Contributed | Jul 9, 2021 | Technology
This article is contributed. See the original author and article here.
This blog is part of the Change Data Capture in Azure SQL Databases Blog Series, which started with the announcement on releasing CDC in Azure SQL Databases in early June 2021. You can view the release announcement here: https://aka.ms/CDCAzureSQLDB
In this tutorial, you will create an Azure Data Factory pipeline that copies change data from Change Data Capture tables in an Azure SQL database to Azure Blob Storage.
Change Data Capture
Change Data Capture (CDC) is currently available in SQL Server (all supported versions), Azure SQL Managed Instance, and Azure SQL Database (Preview). CDC records insert, update, and delete activity that applies to a table. This makes the details of the changes available in an easily consumed relational format. Column information and the metadata that is required to apply the changes to a target environment is captured for the modified rows and stored in change tables that mirror the column structure of the tracked source tables. Table-valued functions are provided to allow systematic access to the change data. Learn more about CDC here.
Azure Data Factory
Azure Data Factory is a cloud-based data integration service that orchestrates and automates the movement and transformation of data. You can create data integration solutions using the Data Factory service that can ingest data from various data stores, transform/process the data, and publish the result data to the data stores. Learn more about Azure Data Factory here.
Azure Blob Storage
Azure Blob storage is Microsoft’s object storage solution for the cloud. Blob storage is optimized for storing massive amounts of unstructured data. Unstructured data is data that doesn’t adhere to a particular data model or definition, such as text or binary data. Learn more about Azure Blob Storage here.
Using Azure Data Factory to send Change Data Capture data from an Azure SQL Database to Azure Blob Storage
Prerequisites:
Steps:
- Create a data source table in Azure SQL:
- Launch SQL Server Management Studio and connect to your Azure SQL database.
- In Server Explorer, right-click your database and choose the New Query.
- Run the following SQL command against your Azure SQL database to create a table named “customers” as data source store.
create table customers
(
customer_id int,
first_name varchar(50),
last_name varchar(50),
email varchar(100),
city varchar(50), CONSTRAINT “PK_Customers” PRIMARY KEY CLUSTERED (“customer_id”)
);
- Enable Change Data Capture on your database and source table.
EXEC sys.sp_cdc_enable_db
EXEC sys.sp_cdc_enable_table
@source_schema = ‘dbo’,
@source_name = ‘customers’,
@role_name = ‘null’,
@supports_net_changes = 1
- Insert some data into the customers table.
INSERT INTO customers (customer_id, first_name, last_name, email, city)
VALUES
(1, ‘Chevy’, ‘Leward’, ‘cleward0@mapy.cz’, ‘Reading’),
(2, ‘Sayre’, ‘Ateggart’, ‘sateggart1@nih.gov’, ‘Portsmouth’),
(3, ‘Nathalia’, ‘Seckom’, ‘nseckom2@blogger.com’, ‘Portsmouth’);
- Create an Azure Data Factory pipeline
- Launch the Azure Portal. In the left menu, go to Create a resource -> Data + Analytics -> Data Factory.
- Select your Azure subscription in which you want to create the data factory.
- For the Resource Group, do one of the following steps:
- Select Use existing and select an existing resource group from the drop-down list.
- Select Create new and enter the name of a resource group.
- Select the region for the data factory. Only locations that are supported are displayed in the drop-down list. The data stores (Azure Storage, Azure SQL Database, etc.) and computes (HDInsight, etc.) used by data factory can be in other regions.
- Enter ADFCDCTutorial in name. Note that this name must be globally unique.
- Select V2 for version.
- Click Review + Create.
- Once the deployment is complete, click on Go to resource.
- Click Author and monitor tile to launch the Azure Data Factory user interface (UI) in a separate tab.
- In the get started page, switch to the Author tab in the left panel.
- Create an Azure Storage linked service
- In Manage, click Linked services and click + New.
- In the New Linked Service window, select Azure Blob Storage, and click Continue.
- In the New Linked Service window, do the following steps:
- Enter AzureStorageLinkedService for Name.
- Select your Azure Storage account for Storage account name.
- Click Create.
- Create an Azure SQL Database linked service
- Click Linked services and click + New.
- In the New Linked Service window, select Azure SQL Database, and click Continue.
- In the New Linked Service window, do the following steps:
- Enter AzureSqlDB for the Name field.
- Select your SQL server for the Server name field.
- Select your SQL database for the Database name field.
- Enter name of the user for the User name field.
- Enter password for the user for the Password field.
- Click Test connection to test the connection.
- Click Create to save the linked service.
- Create a dataset to represent source data
- In Author, click + (plus) and Dataset
- Select Azure SQL Database and continue.
- In the Set properties tab, set the dataset name and connection information:
- Insert AzureSQLCDCCustomers for Name.
- Select AzureSqlDB for Linked service.
- Select [dbo].[dbo_customers_CT] for Table name. Note: this table was automatically created when CDC was enabled on the customers table. Changed data is never queried from this table directly but is instead extracted through the CDC functions.
- Click OK.
- Create a dataset to represent data copied to sink data store
- In the treeview, click + (plus), and click Dataset.
- Select Azure Blob Storage, and click Continue.
- Select DelimitedText, and click Continue.
- In the Set Properties tab, set the dataset name and connection information:
- Select AzureStorageLinkedService for Linked service.
- Enter raw for container part of the filePath.
- Enable First row as header
- Click Ok
- Create a pipeline to copy the change data
- In the treeview, click + (plus), and click Pipeline.
- Change the pipeline name to IncrementalCopyPipeline
- Expand General in the Activities toolbox, and drag-drop the Lookup activity to the pipeline designer surface. Set the name of the activity to GetChangeCount. This activity gets the number of records in the change table for a given time window.
- Switch to the Settings in the Properties window:
- Specify the SQL DB dataset name for the Source Dataset field.
- Select the Query option and enter the following into the query box:
DECLARE @from_lsn binary(10), @to_lsn binary(10);
SET @from_lsn =sys.fn_cdc_get_min_lsn(‘dbo_customers’);
SET @to_lsn = sys.fn_cdc_map_time_to_lsn(‘largest less than or equal’, GETDATE());
SELECT count(1) changecount FROM cdc.fn_cdc_get_all_changes_dbo_customers(@from_lsn, @sto_lsn, ‘all’)
3. Enable First row only
- Click the Preview data button to ensure a valid output is obtained by the lookup activity.
- Expand Iteration & conditionals in the Activities toolbox, and drag-drop the If Condition activity to the pipeline designer surface. Set the name of the activity to HasChangedRows.
- Switch to the Activities in the Properties window:
- Enter the following Expression: @greater(int(activity(‘GetChangeCount’).output.firstRow.changecount),0)
- Click on the pencil icon to edit the True condition.
- Expand General in the Activities toolbox and drag-drop a Wait activity to the pipeline designer surface. This is a temporary activity in order to debug the If condition and will be changed later in the tutorial.
- Click on the IncrementalCopyPipeline breadcrumb to return to the main pipeline.
- Run the pipeline in Debug mode to verify the pipeline executes successfully.
- Next, return to the True condition step and delete the Wait activity. In the Activities toolbox, expand Move & transform, and drag-drop a Copy activity to the pipeline designer surface. Set the name of the activity to IncrementalCopyActivity.
- Switch to the Source tab in the Properties window, and do the following steps:
- Specify the SQL dataset name for the Source Dataset field.
- Select Query for Use Query.
- Enter the following for Query.
DECLARE @from_lsn binary(10), @to_lsn binary(10);
SET @from_lsn =sys.fn_cdc_get_min_lsn(‘dbo_customers’);
SET @to_lsn = sys.fn_cdc_map_time_to_lsn(‘largest less than or equal’, GETDATE());
SELECT * FROM cdc.fn_cdc_get_all_changes_dbo_customers(@from_lsn, @to_lsn, ‘all’)
4. Click preview to verify that the query returns the changed rows correctly.
5. Switch to the Sink tab, and specify the Azure Storage dataset for the Sink Dataset field.
6. Click back to the main pipeline canvas and connect the Lookup activity to the If Condition activity one by one. Drag the green button attached to the Lookup activity to the If Condition activity.
7. Click Validate on the toolbar. Confirm that there are no validation errors. Close the Pipeline Validation Report window by clicking >>.
8. Click Debug to test the pipeline and verify that a file is generated in the storage location.
9. Publish entities (linked services, datasets, and pipelines) to the Data Factory service by clicking the Publish all button. Wait until you see the Publishing succeeded message.
This process is very similar to moving change data from Azure SQL MI to Blob Storage, which is documented here: Incrementally copy data using Change Data Capture – Azure Data Factory | Microsoft Docs
Blog Series for Change Data Capture in Azure SQL Databases
We are happy to continue the bi-weekly blog series for customers who’d like to learn more about enabling CDC in their Azure SQL Databases! This series explores different features/services that can be integrated with CDC to enhance change data functionality.

by Contributed | Jul 8, 2021 | Technology
This article is contributed. See the original author and article here.
Tracking your project’s software dependencies is an integral part of the machine learning lifecycle. But managing these entities and ensuring reproducibility can be a challenging process leading to delays in the training and deployment of models. Azure Machine Learning Environments capture the Python packages and Docker settings for that are used in machine learning experiments, including in data preparation, training, and deployment to a web service. And we are excited to announce the following feature releases:
Environments UI in Azure Machine Learning studio
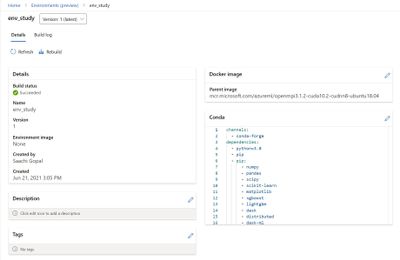
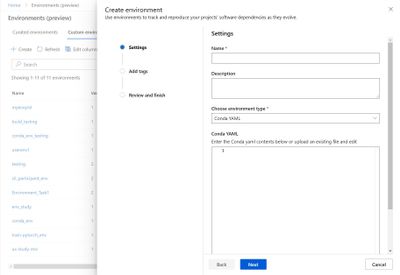
The new Environments UI in Azure Machine Learning studio is now in public preview.
- Create and edit environments through the Azure Machine Learning studio.
- Browse custom and curated environments in your workspace.
- View details around properties, dependencies (Docker and Conda layers), and image build logs.
- Edit tag and description along with the ability to rebuild existing environments.


Curated Environments
Curated environments are provided by Azure Machine Learning and are available in your workspace by default. They are backed by cached Docker images that use the latest version of the Azure Machine Learning SDK and support popular machine learning frameworks and packages, reducing the run preparation cost and allowing for faster deployment time. Environment details as well as their Dockerfiles can be viewed through the Environments UI in the studio. Use these environments to quickly get started with PyTorch, Tensorflow, Sci-kit learn, and more.
Inference Prebuilt Docker Images
At Microsoft Build 2021 we announced Public Preview of Prebuilt docker images and curated environments for Inferencing workloads. These docker images come with popular machine learning frameworks and Python packages. These are optimized for inferencing only and provided for CPU and GPU based scenarios. They are published to Microsoft Container Registry (MCR). Customers can pull our images directly from MCR or use Azure Machine Learning curated environments. The complete list of inference images is documented here: List of Prebuilt images and curated environments.
The difference between current base images and inference prebuilt docker images:
- The prebuilt docker images run as non-root.
- The inference images are smaller in size than compared to current base images. Hence, improving the model deployment latency.
- If users want to add extra Python dependencies on top of our prebuilt images, they can do so without triggering an image build during model deployment. Our Python package extensibility solution provides two ways for customers to install these packages:
- Dynamic Installation: This method is recommended for rapid prototyping. In this solution, we dynamically install extra python packages during container boot time.
- Create a requirements.txt file alongside your score.py script.
- Add all your required packages to the requirements.txt file.
- Set the AZUREML_EXTRA_REQUIREMENTS_TXT environment variable in your Azure Machine Learning environment to the location of requirements.txt file.
- Pre-installed Python packages: This method is recommended for production deployments. In this solution, we mount the directory containing the packages.
- Set AZUREML_EXTRA_PYTHON_LIB_PATH environment variable, and point it to the correct site packages directory.
https://channel9.msdn.com/Shows/Docs-AI/Prebuilt-Docker-Images-for-Inference/player
Dynamic installation:
https://docs.microsoft.com/en-us/azure/machine-learning/how-to-prebuilt-docker-images-inference-python-extensibility#dynamic-installation
Summary
Use the environments to track and reproduce your projects’ software dependencies as they evolve.

by Grace Finlay | Jul 8, 2021 | Business, Marketing
Content marketing offers a long-term value that can’t be easily found with paid advertising, but paid advertising will help get the right traffic to increase your content marketing efforts. They go hand-in-hand. So, what are these types of Digital Advertising for small businesses? This article will give you an idea.
Social Media Platforms: There are many social media platforms which include Facebook, LinkedIn, Twitter, and YouTube. If you have a blog or a website, consider adding a Facebook account to increase the reach of your digital advertising. You can set up a fan page on Facebook to share your posts and get your friends to share your posts as well. Similarly, there are plenty of other social media platforms which will allow you to place Google ads and vice versa. The great thing about these media platforms is that you can track the ROI of your ads by adding an app on your Facebook page or a tracking code in your Google AdWords account.
Facebook Ads: With Facebook, you can run two types of digital advertising campaigns. A single-page campaign and a group campaign. In a single-page campaign, you’ll place a single ad on your Facebook page. In a group campaign, you’d have a list of users to whom you’d wish to advertise. Running this type of campaign is easy since you can run different ads for different groups.
Email Marketing: Email marketing has become quite popular these days, especially for businesses with a solid client base. To make the most out of your email advertising campaign, you can use email marketing or SMS marketing. Email marketing is an effective way of reaching out to your target audience. Unlike Facebook and Google, you can also track your email advertising campaigns through web analytics.
Pay Per Click Marketing: This kind of Digital Advertising for small businesses is usually done through Google AdWords. Basically, you place the ads of your chosen vendors on Google search results and wait for the clicks to flow in. What you pay here is not a one-time cost; you’ll be charged every time the ad is clicked on. The good thing about it is that the cost per click may vary depending on the quality of the advertisers. So, if you’re running a low-budget advertising campaign, you may want to consider using the pay-per-click program.
These are just some of the many ways by which you can use the platforms provided by the internet. You can find an advertising platform suitable for your business based on the type of products or services you provide. The key is to create awareness of your brand and ensure that your target audience will become familiar with your ads.
by Scott Muniz | Jul 8, 2021 | Security, Technology
This article is contributed. See the original author and article here.
CISA has released an analysis and infographic detailing the findings from the Risk and Vulnerability Assessments (RVAs) conducted in Fiscal Year (FY) 2020 across multiple sectors.
The analysis details a sample attack path a cyber threat actor could take to compromise an organization with weaknesses that are representative of those CISA observed in FY20 RVAs. The infographic provides a high-level snapshot of five potential attack paths and breaks out the most successful techniques for each tactic that the RVAs documented. Both the analysis and the infographic map threat actor behavior to the MITRE ATT&CK® framework.
CISA encourages network defenders to review the analysis and infographic and apply the recommended mitigations to protect against the observed tactics and techniques. For information on CISA RVAs and additional services, visit the CISA Cyber Resource Hub.

by Contributed | Jul 8, 2021 | Technology
This article is contributed. See the original author and article here.
Mithun Prasad, PhD, Senior Data Scientist at Microsoft
“I don’t have enough relevant data for my project”! Nearly every data scientist has uttered this sentence at least once. When developing robust machine learning models, we typically require a large amount of high-quality data. Obtaining such data and more so, labelled or annotated data can be time-consuming, tedious and expensive if we have to rely on experts. Hence, there is a compelling need to generate data for modelling using an automated or a semi-automated way. Specifically, in this work, we explore how we can utilize Open AI’s Generative Pre-trained Transformer 3 (GPT-3) for generating data to build models for identifying how credible news articles are.
GPT-3
GPT-3 is a language model that leverages deep learning to generate human-like text. GPT-3 was introduced by Open AI in May 2020 as a successor to their previous language model (LM) GPT-2. It is considered to be better than GPT-2. In fact, with around 175 billion trainable parameters, OpenAI GPT-3’s full version is one of the largest models trained so far.
Fake News Generation
In this blog post, we discuss the collaborative work between Microsoft’s ACE team and the Dataclair AI lab of O2 Czech Republic, where the goal is to identify fake news. Fake news is defined as a made-up story with an intention to deceive or to mislead. The general motive to spread such news is to mislead the readers, damage the reputation of any entity, or gain from sensationalism. The creation of a dataset for identifying credible news requires skilled annotators and moreover, the task of comparing proposed news articles with the original news articles itself is a daunting task as it’s highly subjective and opinionated. This is where the recent advances in natural language modelling and those in text generation capabilities can come to the rescue. We explore how new language models such as GPT-3 can help by generating new data.
We generate fake news data using GPT-3 by providing prompts that contain a few sample fake news articles in the Czech language. Doing something like this would have been unthinkable a few years ago, but the massive advancement of text generation through language models opened doors to such experiments. As the research paper describing GPT-3 shows, GPT-3 is very good at generating news articles of high quality that even humans are not capable of detecting as computer-generated:

Source: https://arxiv.org/pdf/2005.14165.pdf
The plot also shows how text generating models improved via having access to more parameters. GPT-3 is the furthest to the right and the plot conveys how accurately people were able to recognize generated articles from those written by humans.
Prompt Engineering
“Prompts” are a way to get the model to produce text by specifying an instruction in natural language and showing some demonstrations of how to follow the instructions well. GPT-3 has an incredible capacity to mimic writing styles. When the prompt is set up correctly, GPT-3 adheres to the example just enough to copy those underlying elements (for example: includes or excludes citations, etc.) and introduce a new twist to the generated text. It is even capable of creating its own complex arguments. Thus, it is not just a replication of pre-existing data, but a creation of new and original articles from which the model can learn.
An example of a prompt and parameters used to generate fake news are as follows in bold. The generated text is in italics.
Generate a news article based on the headline and with the same style of writing as given in the example.
Headline: Where do leftist extremists get the audacity to speak for the nation?
Text:
My fellow Czechs, we must shake off the shame that the USA, Brussels and other countries have been forced on us with the help of our own “experts” and “journalists”. The same people who are now digging into our nation with the help of a genuine community of the USA and Brussels – the Pekarová and other forces…
Parameters:
Temperature: 0.7, Max tokens: 1000, Top p: 1, Frequency penalty: 0, Presence penalty 0
From these parameters, the most important ones are temperature and max tokens. Temperature controls randomness in the text. Therefore, a temperature of 0.7 was chosen to produce less deterministic results that still follow the structure and writing style of the example. Max token value was set to 1000 tokens (~4000 characters) because this is the average length of a news article. It should be noted that when working with GPT-3, the process of finding the right parameters is about experimentation.
Admittedly, there are still challenges to deal with. One of them is the need to manually inspect if GPT-3 returns articles that are relevant and in the right credibility category. Due to the sensitivity of the topic of article credibility, data quality checks will need to be implemented. Another minor limitation is that while GPT-3 understands many articles that it has been trained on, it has problems when analysing newer topics. For example, it is unable to fully grasp the significance of COVID-19 and it usually avoids writing about it due to not having enough knowledge about the global pandemic. Thus, it generates less realistic articles when faced with such a topic.
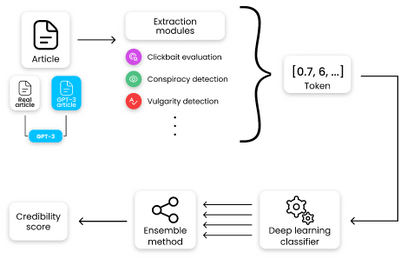
Nevertheless, if those obstacles are kept in mind, GPT-3 can help make dataset creation faster and more reliable. This is something that the O2 CZ team plans to utilize for their disinformation recognition AI model. “Our model extracts different features (aggressivity, clickbait etc.) from the article via smaller extraction modules. Those features are then evaluated by the deep learning classification module and subsequently transformed into one number by the ensemble method. For the system to work, we need as many articles as possible for training the classification module, which we hope to obtain with the help of GPT-3,” described by Filip Trhlik, a Data Scientist at the Dataclair AI lab.

Disinformation recognition AI model diagram
In conclusion, artificially generating new data is a very exciting use case of language models and even though the data generated requires a small amount of manual inspection, it is very beneficial for downstream modelling tasks. The ability to generate a large amount of synthetic data in a short time is very promising.


Recent Comments