by Contributed | Jul 8, 2021 | Technology
This article is contributed. See the original author and article here.
Azure Kubernetes Services (AKS) is a managed Kubernetes service on Microsoft Cloud Azure that can be used to rapidly deploy Kubernetes clusters, integrate with other Azure services and features to achieve simple operations and elastic business applications. The Kubernetes community is booming, and version upgrades are frequent. AKS manages version upgrade so that AKS clusters can be upgraded at the click of a button, rolling through the working nodes within a cluster. This makes it easy to upgrade AKS for small or non-mission-critical clusters. However, the in-place upgrade method is not very suitable for large-scale clusters or mission-critical applications, because it has a long overall upgrade time and the possibility of upgrade failure. And the failure cannot be rolled back. The safest approach is to create a new AKS cluster, switch upgrades using blue-green deployments. This approach can switch in seconds, and roll back the backup cluster at any time, which is faster and safer. Correspondingly, the architecture and operation of this approach is more complex. This article leads you to gradually build such an architecture scheme. This time we’re using a scenario for a classic Web application, which can be expanded into other scenarios.
Architecture overview
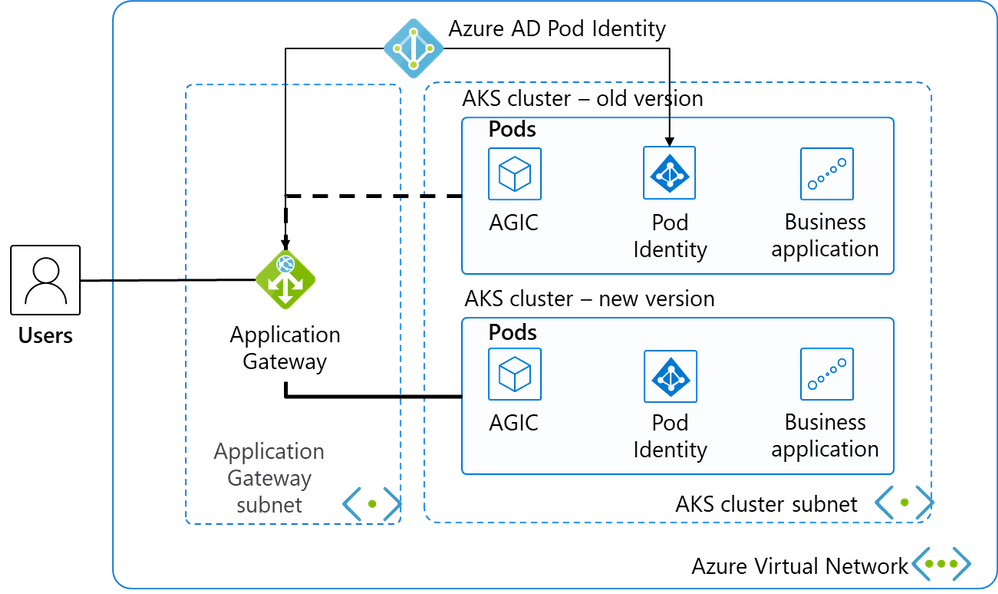
This is a classic Web application architecture diagram, and we’ve selected the most streamlined resources to keep the demonstration and instructions as concise as possible.
Place 2 subnets in a virtual network, and place the application gateway in the first subnet as a load balancer for external services.
The second subnet has only 1 AKS cluster daily and deploys the business system. The AKS cluster uses advanced network CNI to simplify network patterns and facilitate application gateway communication with them.
Deploy Pod Identity is deployed in the AKS cluster to authorize pods in AKS to manage the application gateway through Azure AD’s Pod Identity.
AGIC, known as Application Gateway Ingress Controller, not only distributes network traffic from the app gateway to the appropriate Pod, but also monitors changes in some Kubernetes resources, automatically updates the back-end pool of the app gateway as AKS scales, and updates the back-end pool of the app gateway synchronously as the AKS cluster switches. The core idea for our blue-green deployment is dynamically updating the back end of the app gateway with AGIC.
Resources Deployment
Basic resources such as the network
We quickly create the underlying resources of the current environment with CLI. Resource group:
AZ_REGION=ChinaNorth2
RESOURCE_GROUP=AKS_Upgrade
az group create -n $RESOURCE_GROUP -l $AZ_REGION
Create VNET and subnets.
VNET_NAME=AksVnet
APPGW_SUBNET=AppGwSubnet
AKS_SUBNET=AksSubnet

network  vnet  create on $VNET_NAME
-g $RESOURCE_GROUP
-l $AZ_REGION
--address-prefix 10.0.0.0/8
--subnet-name $APPGW_SUBNET --subnet-prefix 10.1.0.0/16

az network vnet subnet create
-g $RESOURCE_GROUP
-n $AKS_SUBNET
--address-prefixes 10.240.0.0/16
--vnet-name $VNET_NAME
The current AKS cluster
Create a public IP.
APPGW_IP=AppGatewayIp
az network public-ip create -n $APPGW_IP
-g $RESOURCE_GROUP
--allocation-method Static
--sku Standard
Create an app gateway.
APP_GATEWAY=AppGateway
az network application-gateway create -n $APP_GATEWAY
 -g $RESOURCE_GROUP
 -l $AZ_REGION
 --vnet-name $VNET_NAME
 --subnet $APPGW_SUBNET
 --sku Standard_v2
 --public-ip-address $APPGW_IP
Create an old AKS cluster with the current default mainstream AKS version. Get the subnet ID of the AKS cluster we created earlier.
AKS_SUBNET_ID=$(az network vnet subnet show -g $RESOURCE_GROUP --vnet-name $VNET_NAME --name $AKS_SUBNET --query id -o tsv)
Create the old AKS cluster.
AKS_OLD=old
az aks create -n $AKS_OLD
-g $RESOURCE_GROUP
-l $AZ_REGION
--generate-ssh-keys
--network-plugin azure
--enable-managed-identity
--vnet-subnet-id $AKS_SUBNET_ID
At the time of writing, the mainstream AKS version is 1.19.11.
The app gateway integrates with the current version of AKS
We use the Azure service principal to authorize the AKS cluster to manage the configuration of the application gateway.
Connect to the AKS cluster
az aks get-credentials --resource-group $RESOURCE_GROUP --name $AKS_OLD
We can then manage the AKS cluster with the familiar kubectl.
Install Helm and run the following command to add the application-gateway-kubernetes-ingress Helms package. Our AKS cluster has enabled Kubernetes RBAC, so use the following command.
kubectl create serviceaccount --namespace kube-system tiller-sa
kubectl create clusterrolebinding tiller-cluster-rule --clusterrole=cluster-admin --serviceaccount=kube-system:tiller-sa
helm repo add aad-pod-identity https://raw.githubusercontent.com/Azure/aad-pod-identity/master/charts
helm install aad-pod-identity aad-pod-identity/aad-pod-identity
The command will return:
NAME: aad-pod-identity
LAST DEPLOYED: Tue Jun 29 08:14:30 2021
NAMESPACE: default
STATUS: deployed
REVISION: 1
TEST SUITE: None
NOTES:
You have successfully installed AAD Pod Identity in your Kubernetes cluster!
…
Wait a minute or two and use
kubectl get po -o wide
NAME                                    READY   STATUS    RESTARTS   AGE   IP            NODE                                NOMINATED NODE   READINESS GATES
aad-pod-identity-mic-787c5958fd-kmx9b   1/1     Running   0          71s   10.240.0.33   aks-nodepool1-94448771-vmss000000   <none>           <none>
aad-pod-identity-mic-787c5958fd-nkpv4   1/1     Running   0          72s   10.240.0.63   aks-nodepool1-94448771-vmss000001   <none>           <none>
aad-pod-identity-nmi-mhp86              1/1     Running   0          72s   10.240.0.4    aks-nodepool1-94448771-vmss000000   <none>           <none>
aad-pod-identity-nmi-sjpvw              1/1     Running   0          72s   10.240.0.35   aks-nodepool1-94448771-vmss000001   <none>           <none>
aad-pod-identity-nmi-xnfxh              1/1     Running   0          72s   10.240.0.66   aks-nodepool1-94448771-vmss000002   <none>           <none>
See that several of the related pods are already running.
Install Application Gateway Ingress Controller with helm.
helm repo add application-gateway-kubernetes-ingress https://appgwingress.blob.core.windows.net/ingress-azure-helm-package/
helm repo update
Copy the following YAML file and save it as helm_agic.yaml to configure AGIC.
# This file contains the essential configs for the ingress controller helm chart
# Verbosity level of the App Gateway Ingress Controller
verbosityLevel: 3


# Specify which application gateway the ingress controller will manage
#
appgw:
    subscriptionId: <subscriptionId>
    resourceGroup: <resourceGroupName>
    name: <applicationGatewayName>
    environment: AzureChinaCloud

    # Setting appgw.shared to "true" will create an AzureIngressProhibitedTarget CRD.
    # This prohibits AGIC from applying config for any host/path.
    # Use "kubectl get AzureIngressProhibitedTargets" to view and change this.
    shared: false


# Specify which kubernetes namespace the ingress controller will watch
# Default value is "default"
# Leaving this variable out or setting it to blank or empty string would
# result in Ingress Controller observing all acessible namespaces.
#
# kubernetes:
#   watchNamespace: <namespace>


# Specify the authentication with Azure Resource Manager
#
# Two authentication methods are available:
# - Option 1: AAD-Pod-Identity (https://github.com/Azure/aad-pod-identity)
# armAuth:
#    type: aadPodIdentity
#    identityResourceID: <identityResourceId>
#    identityClientID:  <identityClientId>

## Alternatively you can use Service Principal credentials
armAuth:
    type: servicePrincipal
    secretJSON: <<Generate value with: "az ad sp create-for-rbac --sdk-auth | base64 -w0">>


# Specify if the cluster is RBAC enabled or not
rbac:
    enabled: true # true/false
Let’s fill in the parameter values in the above profiles one by one.
<subscriptionId>
Use command az account show –query id -o tsv to get.
<resourceGroupName>
Use the value of $RESOURCE_GROUP environment variable.
<applicationGatewayName>
Use the value of $APP_GATEWAY environment variable.
The value of secretJSON is obtained using the az ad sp create-for-rbac–sdk-auth | base64 -w0 command, which is a long string of more than 800 bytes encoded by base64.
Because our AKS cluster has RBAC enabled, the last configuration rbac is set to true.
Finally, run the following command.
helm install agic application-gateway-kubernetes-ingress/ingress-azure -f helm_agic.yaml
returns
W0629 08:16:47.733467   16087 warnings.go:70] apiextensions.k8s.io/v1beta1 CustomResourceDefinition is deprecated in v1.16+, unavailable in v1.22+; use apiextensions.k8s.io/v1 CustomResourceDefinition
NAME: agic
LAST DEPLOYED: Tue Jun 29 08:16:48 2021
NAMESPACE: default
STATUS: deployed
REVISION: 1
TEST SUITE: None
NOTES:
Thank you for installing ingress-azure:1.4.0.

Your release is named agic.
The controller is deployed in deployment agic-ingress-azure.

Configuration Details:
----------------------
 * AzureRM Authentication Method:
    - Use AAD-Pod-Identity
 * Application Gateway:
    - Subscription ID : 3d07553f-f6a8-455f-9de6-876fbcc00bb4
    - Resource Group  : AKS_Upgrade
    - Application Gateway Name : AppGateway
 * Kubernetes Ingress Controller:
    - Watching All Namespaces
    - Verbosity level: 3
And then
kubectl get po -o wide
NAME                                    READY   STATUS    RESTARTS   AGE     IP            NODE                                NOMINATED NODE   READINESS GATES
aad-pod-identity-mic-787c5958fd-kmx9b   1/1     Running   0          4m54s   10.240.0.33   aks-nodepool1-94448771-vmss000000   <none>           <none>
aad-pod-identity-mic-787c5958fd-nkpv4   1/1     Running   0          4m55s   10.240.0.63   aks-nodepool1-94448771-vmss000001   <none>           <none>
aad-pod-identity-nmi-mhp86              1/1     Running   0          4m55s   10.240.0.4    aks-nodepool1-94448771-vmss000000   <none>           <none>
aad-pod-identity-nmi-sjpvw              1/1     Running   0          4m55s   10.240.0.35   aks-nodepool1-94448771-vmss000001   <none>           <none>
aad-pod-identity-nmi-xnfxh              1/1     Running   0          4m55s   10.240.0.66   aks-nodepool1-94448771-vmss000002   <none>           <none>
agic-ingress-azure-8d9d85dd9-z8dwh      1/1     Running   0          2m37s   10.240.0.70   aks-nodepool1-94448771-vmss000002   <none>           <none>
We can see that the new agic-ingress-azure pod is also working.
by Contributed | Jul 8, 2021 | Technology
This article is contributed. See the original author and article here.
Final Update: Thursday, 08 July 2021 08:03 UTC
We’ve confirmed that all systems are back to normal with no customer impact as of 07/08, 06:30 UTC. Our logs show the incident started on 07/07, 22:45 UTC and that during the 07 hours and 45 minutes that it took to resolve the issue some of customers with workspace-enabled Application Insights resources in Central US may have experienced intermittent log data gaps and incorrect alert activation.
- Root Cause: The failure was due to an issue with our dependent service
- Incident Timeline: 07 Hours & 45 minutes – 07/07, 22:45 UTC through 07/08, 06:30 UTC
We understand that customers rely on Application Insights as a critical service and apologize for any impact this incident caused.
-Soumyajeet
by Contributed | Jul 8, 2021 | Technology
This article is contributed. See the original author and article here.
Have you ever got your PC to the state where it has all the settings and software installed and configured that you need to use and it’s just in the right state for your daily tasks and then bam something happens, and you need to rebuild or start from scratch with a new PC?
Yip, I’ve been there and it’s always super annoying trying to get your PC back to the state you had it in before. Thankfully, a lot of things are getting better, and you have technology that can sync your settings that can then be pulled down again easily speeding up the rebuild of your PC to the way you like it. But what about the software you like to have installed with that specific version installed that does just what you want?
Well, this is where Windows Package Manager can come into play!
What is it?
Windows Package Manager is an open-source project that Microsoft announced at Build 2020 and version 1.0 was released at Build 2021. It can help you manage and install software onto your machines in an easy and consistent way.
It’s straightforward to get it installed on your machine and start installing software.
Exporting your software list
So how can it help with the initial problem, well the Windows Package Manager has an import and export features that allows you to export a list of software installed on your PC and then use that file to install the same software on another machine. And I might be a bit biased, but I really like this feature, so let me show you how it works.
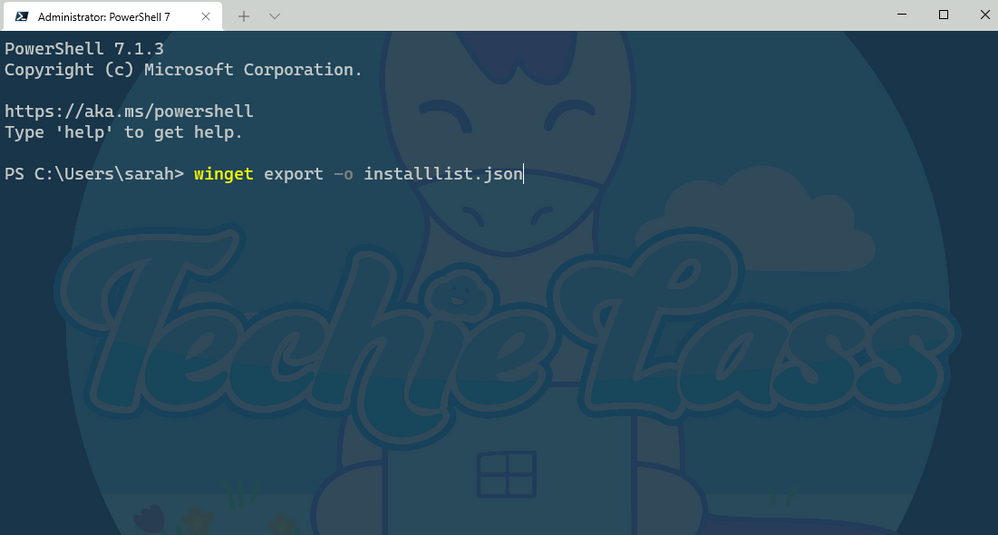
Within Windows Package Manager installed on your machine open your favourite command shell, I like Windows Terminal.
Enter the command:
winget export -o nameoflist.json
This will export a list of software that is installed on your machine to a file location of your choosing. The file will be a JSON file.
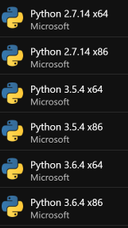
Windows Package Manager export command
 Windows Package Manager export list
As you can see from the output file picture above Windows Package Manager lists out each of the software that’s installed.
You do have another option when exporting the list. You can use this command:
winget export -o nameoffile.json –include-versions
 Windows Package Manager export with versions
 Windows Package Manager export list with versions
Now you can see from the output file the file contains the version of software you have as well, so if you have a need for a specific version to be installed and want to take a note of that you can.
Editing the output file
Now what happens if you want a specific version of a specific piece of software, but you don’t care about the versions of the other?
Well, you can edit the output file to suit your needs. As I said earlier it’s a JSON file so can be easily edited within something like Visual Studio Code.
 Windows Package Manager modify export list
Hopefully, you can see from that short clip, that Intellisense within Visual Studio Code is helping to identify where my syntax is wrong, in this case by leaving trailing commas and accidentally deleting quotation marks I need.
Import onto another machine
Now that we have a list of software that we like to have installed, we can start to use this on other machines.
So transfer the JSON file you’ve created to another machine and make sure that you have Windows Package Manager installed.
Now you have the JSON file and Windows Package Manager setup it’s time to use that file to install the software you want, with the versions you prefer.
With the winget import command there are some switches that you can use when importing. You have –ignore-unavailable and –ignore-versions.
The –ignore-unavailable command will continue if any packages are unavailable and the –ignore-versions will ignore any specified versions in the import file and install the latest version instead.
Your needs and wants will depend on how you use those switches. For me I’m going to take my JSON file with listed software and versions and install as per that file with this command:
winget import –import-file installlistversion.json –ignore-unavailable
 Windows Package Manager import command
After a few minutes, the software I want is now installed on that second machine!
Give it a try!
I’d love to hear how you are using this feature in your environment or if you have any feedback after using it!
by Contributed | Jul 7, 2021 | Technology
This article is contributed. See the original author and article here.
The article is written to share how to deploy and configure your custom version of Python in Windows App Service.
Before you continue reading the detailed steps of how to use custom version of Python, please notice:
- Microsoft has deprecated the Python extensions for App Service on Windows as described in this article in favor of a direct deployment to App Service on Linux.
- If your application can run on the following version of Python, you can use platform provided Python extensions, rather than deploy your own version of Python.
Step 1: Install preferred version of Python on your local machine
Step 2: Upload your Python to Windows App Service
Step 3: Add the custom Python binary into the PATH environment variable
- Create an applicationhost.xdt file in D:homesite folder.

Sample applicationhost.xdt file contents:
<?xml version="1.0"?>
<configuration xmlns:xdt= http://schemas.microsoft.com/XML-Document-Transform>
<system.webServer>
<runtime xdt:Transform="InsertIfMissing">
<environmentVariables xdt:Transform="InsertIfMissing">
<add name="PATH" value="%HOME%Python388;%PATH%" xdt:Locator="Match(name)" xdt:Transform="InsertIfMissing" />
</environmentVariables>
</runtime>
</system.webServer>
</configuration>
Then Restart the Web App.Every time you Restart the web app, the platform will check your D:homesitesapplicationhost.xdt file, use it to transfer the D:localConfigapplicationhost.config.
The transform logs are all recorded in D:homeLogFilesTransform, you can check the timestamp and file name to get the latest log.

Check your D:localConfigapplicationhost.config file, should see Python path being added as the “PATH” environment variables.

In the Kudu Powershell console, use “python -V” to check Python version. You should be able to see the customer Python version.

by Contributed | Jul 7, 2021 | Technology
This article is contributed. See the original author and article here.
Idea
When not coding and building IoT project I spend time working on a personal project or building an aircraft, and to be more specific a
South African designed Sling TSi.
The design of the aircraft is widely regarded in Light Aircraft circles as being one of the best 4-seat aircraft out there for the home builder and one of the main reasons I picked the design, now I know what you’re thinking have I opened the wrong blog post here what’s all this Airplane speak…
Well, there is an issue with the Factory shipping the kits around the world and that is that they struggle to get the trained staff due to Covid issues and thus kits are being shipped with incorrect parts or 2 left parts when there should be a left and a right for example. My idea is that I have this awesome Percept device I have been loaned from Microsoft to write some blog posts and have a play with and I got to thinking could I train it to recognize the parts and show the tagged name of the part so that an untrained shipping agent in the factory could us it to make sure the kits has all the correct parts?
Let have a play and see shall we…
Where do we start?
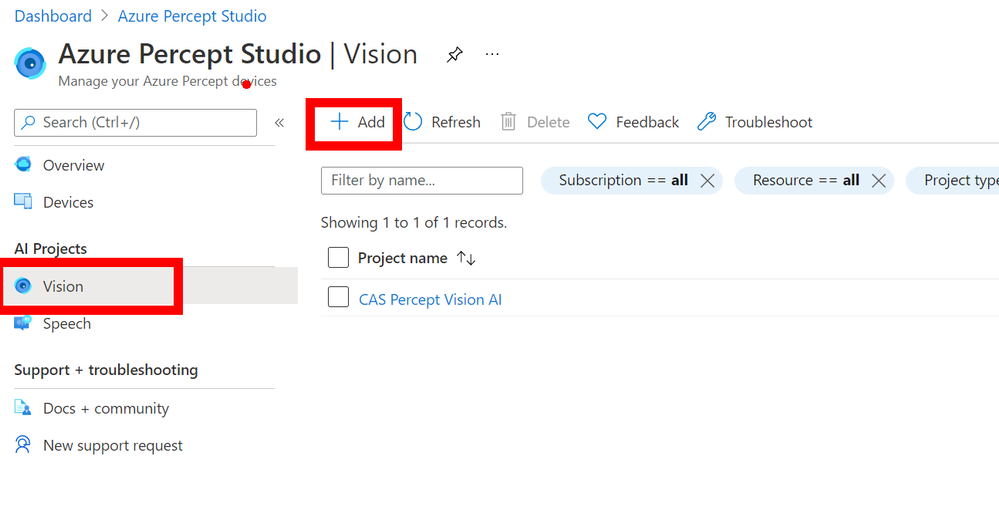
We start in the
Azure Portal and more specifically the
Azure Percept Studio where we can access the Vision Blade of the Percept Device. In here click the `ADD` button at the top to add a new Vision Project.
In the new blade you can fill in the boxes by giving the new Vision Model a name and a nice description (For when you or a college comes back in a few months and wonder what this is!), then you can make sure you have `Object Detection` selected and `Accurancy` and you can then click `Create` at the bottom of the page.

Image Capture
Next we move onto the Image capture that is then used to train the model with our first parts, so make sure you have the correct device selected and tick the `Automatic image capture` checkbox and the drop-down lists will appear where you can select the setting needed. As this is just the first images of the first component I want to capture to test everything is working I have set mine to be `1 Frame every 5 seconds` and `Target` to 25 this means that the Percept will take a photo every 5 seconds until it has taken 25 photo’s. These images will then all be loaded into the AI model ready to be tagged and trained.

Small issue is that you don’t really know when the images are being taken and when it has started… So if you click the `View Device Stream` just above the Automatic Image Capture you will see what the Percept-EYE can see and watch as the images are taken.
The alternative if you have enough hands is to NOT tick the `Automatic Image Capture` in which case the button bottom left will say `Take Photo` and this will take a single photo. However I find I need more hands than I have, but this would be good if the Percept is right next to you on your desk but not so good it’s on the factory floor.
Custom Vision
Now we have the images and yes I know there is not really any feedback with this method of training it would be nice if the Stream Video in the browser had a border that flashed up with a colour or something when an Image was captured so you knew what was happening but hey ho with work with what we have.
Now if you click the next button you can go to what looks like a pointless page but stick with us there is a reason for this, but click the `Open project in custom vision` link in the centre of the page, this will open the customer vision project and there will be a few agree boxes to check on the way but then you should have your project open.

As you can see there are 2 projects in my Custom Vision and the left one is the new one we just created with me holding one of the Aircraft Horizontal Stabilizer Ribs which goes on the front of the Horizontal Stabilizer. Click the project to open it and lets look at the images we managed to grab.

Tagging the Images
You will look and at first (Like me!) wonder where all those images went but don’t panic they are just `Untagged` so on the left menu click the Untagged button to view them all.

Clean up the images
First I like to go through the images and remove all the either poor quality or clearly nothing to see here images, you can do this by hovering over the bottom right of the image, you will see a white tick appear for you to click. Once clicked it turns blue to show it’s selected repeat for all the images you want to remove. Once complete at the top of the page is a `Delete` button that will delete them all for you.

The next part is sadly rather laborious and boring so I hope you have a fresh cup of
IoTLive as this can take a while.
So select the image and then using you mouse hover over the part you are interested in within the image and you hopefully should see a bounding box around it to select. Once selected you will see a Text Entry appear so that you can give it a Tag name, this name will be what is shown when the Percept views this part and decides to show the tag name on the screen as part of look what I found bounding box, so pick a good name. As I am tagging aircraft parts I am giving them the Aircraft Component reference from the drawings.
If you don’t get a bounding box on the part you want to select just Left mouse click and draw your own box.

As you move to the next image using the Arrow to the right of the modal box on the screen the next image will appear and it’s just a repeat of the process, however when you select the next area to tag the previous Tag names will appear so it’s quicker to just click along through the images.
When you have tagged all the images click the close `X` top right, you will see that you now don’t have any untagged images so select the `Tagged` button so that you can see them all again.

Now this is Important
You need a minimum of 15 images for each tag, in my case I only managed to capture 12 so I was a few short, so remember when I said before that the Azure Portal seemed to leave you hanging with that pointless page to select `Custom Vision` well this is where you need that.
Go back to that browser tab (You didn’t close it did you!) and then you can click the `Previous` button bottom left and again select another `Automatic Image Capture`. This seems tedious but it’s the quickest and easiest way I have found to grab all the images in the correct format and sizes etc and upload them into the Custom Vision Project.
So take another batch of images of that component and repeat the tagging process, 15 is the minimum number need for the training to take place ideally you want 30-40+ of each part/object from many directions in many lighting levels etc…
Training
Now you have more than 15 images hopefully closer to if not more than 40 images you can train your model, so there is a nice compelling big green `Train` button at the top of the screen. Give it a click and you will be asked what type of training I normally always select `Quick` and then go refresh that Cup<T> as this part takes a few minutes.

Once it’s trained you should see a nice page with lots of high percentages like below, but don’t be fooled it’s not really 100% accurate but we can test it and see how good it really is.

Testing
Like all good developers we like to test and this is no different, so at the top of the page click the `Quick Test` button.

Sadly you do need to grab an image that is not already used so in this case I just use my Mobile phone to take an image and then copy to my PC using the awesome `Your Phone` feature in Windows or if you still have the browser tab open with the `Webstream` from the Percept you can do a screen clip from that browser. Only downside is that the bounding boxes from you as a Person may be over the image hence me preferring to using my mobile phone.
As you can see when you give it an image it will show bounding boxes and the prediction rates for those boxes, you can use the slide to change the `Threshold` value so that you can hide the noise if there is any.

For a 2nd attempt with some noise in the background you can see that I had to move the slider all the way down and it was only 9.5% probability that it could identify the Rib, so this means the test has proven that more images are required and more training.

Iterate and Improve
The process is very simple to set-up and train a customer vision model with the Azure Percept, and as you can see with a component from the aircraft on the very first training run it was fairly good with the white background but poor with all the noise.
So I went on and spent some time training with even more photos and even added in the next RIB along in the build so there were 2 parts similar.
However now that you have a trained model that is improving when you take the images and your tagging them you will see at the top of the Tagging Dialog a slider for `Suggested Objects On` if you turn this on and give it a second or two it should find your object and bounding box it with a big blue `Confirm Suggested Objects` button to click. If this doesn’t work repeat the old way of selecting or drawing the bounding box until it has learned enough.
The advantage of using the suggested was is that you can creep the slider up and it’s a form of testing for the images and the Model as well, so you can see it improving over time.

When you have tags a lot more images and you are confident you have a good selection you can improve the trained model by giving it more resources and more time to learn. You do this by selecting `Advance Training` after clicking the Green train button, this will open the dialog some more and show you a slider where you can allocate the time you wish to train the model for and even have it send you an email when it’s done.

Final step
Now that we have a model that we have Trained, Tested and Iterated with to a point that we feel comfortable sending down to the Edge and using in Production we can go back to the Azure Portal and Percept Studio Page to finish things off.
The last Tab is for `Evaluate and Deploy` and it’s here that we send the model to the device so that it can be used without the connection to Azure, yes that’s right it can work away at the Edge even with a slow or non-existent connection.
Just select the Device and the Iteration of the Trained model you wish to use and then tap `Deploy` once that is done you can open the Web stream to the device and you will notice that there will be a message for a minute or two on the first load where it shows `Loading Model` after this it will show live tagged images when you hold the parts in front of the camera.

Results
You will see that when I am holding a Part in front of the Percept camera it is correctly identifying the part and the last 3 digits are it’s confidence that it’s found the correct part and as you can see with just 35 and 58 images of the two parts I trained it’s already very impressive, but for production you would want more images in different lighting levels etc.

Conclusion
Building this blog and training the models took a few hours but most of that was off doing something else while the training system worked away, if I’m honest I probably only spent maybe an hour actually working on it and have some very impressive results.
Also now you have a trained model it’s not restricted to the Percept devices, you can download the model and use it elsewhere like maybe a Xamarin/MAUI app on a mobile device so that engineers out in the field can have the Parts Checker with them the uses become endless. If you want to read more about this there is a fantastic guest
Blog Post by Daniel Hindrikes and Jayme Singleton that’s well worth a look.
I do hope you enjoyed this long walk through all the set-ups to using the Percept Vision system and enjoy playing with you Vision Models, if you have any questions just reach out on Twitter or LinkedIn.
Happy Coding, I’m off back to building the Sling.
Cliff.


Recent Comments