by Contributed | Jul 6, 2021 | Technology
This article is contributed. See the original author and article here.
With the switch to remote working, we also switched to remote meetings. The differences between the two are quite big – and since for a lot of my customers that move was made in haste – they often lack knowledge and/or ability to take the most out of virtual meetings.
So, with this blog, I wanted to share with you some quick tips and hints as to how you can improve those calls! How to make them more effective, more fun, and finally – less tiresome! We will discuss this in three stages, starting with…
Before the meeting
1. Prepare an agenda
Sounds obvious, but the number of meetings without any agenda or an almost non-existent description is staggering. It is great that you, as an organizer, know what this meeting is about, but oftentimes to a lot of attendees this will be one of many, many meetings – especially when we switched to remote working.
Add at least a short description that will include what the meeting is about, possibly some key points of discussion and at best – what you would like to get out of it.
It may seem pointless (everyone knows what this meeting should be about), but since the increase in online meetings a lot of them start with five-minute talks as to why we meet or what should we start with.
2. Choose date and time wisely
You might have heard the “location, location, location” saying, but with online meetings (since we know the location ;)) it is all about time, time, time!
Don’t schedule your meetings too early (everyone has different sleeping habits) nor too late (meeting at 4:30 pm? BAD idea!). I would personally avoid beginning and end of the week for bigger meetings/workshops as well, since people might think of the weekend still!
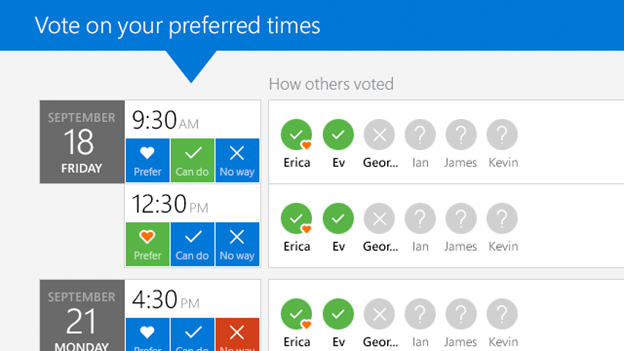
Finding a time that all attendees are available at is also a challenge – if the meeting is in your organization – remember to use scheduling assistant in Outlook! However, if you need to have a talk with your clients or business partners OUTSIDE – it might be a great idea, to utilize the FindTime add-on (produced by Microsoft, available for free), so that everyone can vote for the best time :smiling_face_with_smiling_eyes:!
3. Setup your meeting options
Now THAT is something that (unfortunately) not many use but SHOULD.
Meeting options (available either when editing a meeting from Outlook or Microsoft Teams calendar) will allow you to decide who is the presenter and who is the attendee – and believe me, that is crucial for bigger meetings! With this you can keep control of your meeting – you decide who (and when) can use their microphones, whether chat is available (or maybe only there for the duration of the meeting?) or if the lobby should be enabled and for whom.
Also – if you plan larger meetings with the option to join via phone – please consider turning off the “Announce when callers join or leave.” I have participated in meetings that were a disaster at the beginning due to this option being marked and the automated voice constantly interrupting presenters!

4. Extend your meeting with forms and quizzes from Microsoft Forms!
Since this is a fairly new option, I have not seen this used much – but boy, is it fun. Since November last year, you can include Forms questions and/or quizzes in your meetings!
Whenever you need to vote for something during a meeting or just to check if your participants are paying attention ;) use the Microsoft Forms tab in a meeting. With this, you can prepare interactive polls beforehand (or if needed add those ad-hoc during a meeting) and when the time comes – launch them from the meeting window, so that others can share their thoughts.
Since I am conducting quite a lot of training sessions with Teams – this is one of my favorite things and my trainees love it too.

So the meeting begins – what then?
5. BE ON TIME! I cannot stress this enough – do not make others wait for you
I would even extend this point to “do not wait for others.” unless it is the presenter who is late :smiling_face_with_smiling_eyes: Why? If we have 10 people at a meeting and 9 are on time, but we wait 5 minutes for the last person – overall you lose 45 minutes of company time (5 minutes times 9 people who are waiting). Imagine what happens during bigger meetings with hundreds of participants!
6. Show yourself
The biggest difference between on-site and online meetings is the lack of… how should we call it, physical presence? During remote calls we often cannot see the reactions of others, their body language etc.
So, what you should do is for sure to enable your cameras. This will at least give you a tiny little bit of feeling like you are in the same place.
Extend this with Together mode – that should help you with the video fatigue as mentioned in the linked article.
And as a presenter – you will not lose touch with your audience. With together mode I can see the reactions of the participants and adjust my content or breaks accordingly.

7. Record the meetings and, if possible, delegate someone to take notes
Always remember that by recording the meeting, those who are out of office or cannot join due to other responsibilities can catch-up at convenient time. If the conference is a channel meeting – the recording will be saved in the files in that channel. If it is a regular Teams meeting – it will end up in the OneDrive folder of the person who initiated the recording.
Keep in mind, that you might need to share that video externally as well.
Additionally, I would very much recommend adding a OneNote notebook to your team and using it as an universal place for all the meeting minutes. With meeting recap all the important details of a meeting will be listed in that meetings chat on Microsoft Teams!
8. Mix it up!
Remember when I mentioned the Microsoft Forms add-on in point 4? Launch those forms for a change of pace.
Also – have you tried the Microsoft Whiteboard? With this app, you can create your virtual flip-chart and have a free-form canvas, to use as you want! It is even better when you have access to touchscreens (like Microsoft Surface devices).
Suggestion from my side – the Whiteboard available from Teams in the “web” version of the app does NOT yet support many of its features. I highly recommend opening whiteboard in a meeting but continuing the editing of the canvas in the app you can download from Microsoft Store. There, you get the option to use templates, import images and many, many more, while still being able to communicate and collaborate with others.

As a side note: if you are presenting slides made in PowerPoint, do NOT share your app window or whole screen, but utilize PowerPoint Live. With that, you will not lose contact with the audience – you can still see them, still monitor the chat and you will also get the presenter view, with options to skip slides or use ink! Be aware of the raised hands as well.
9. And if you want to work in groups – make use of breakout rooms feature!
This is especially useful in all the bigger meetings when you want to work in subgroups or during brainstorming – with the Breakout rooms feature, you can divide your meeting into few smaller ones, so that your participants can work in groups!
There are however slight limitations to this right now – the biggest one (from my experience) is that only the meeting organizer can manage the rooms (so launch them, move people around and freely move across the rooms). Keep that in mind and DRY RUN before you use this feature.

And with the meeting finished…
10. Share the notes/recording/used resources and forms results
All of those things should be in the meeting chat (available in the Microsoft Teams), however with our email-oriented culture, many users still prefer a short summary via email. Copy the links and share the summary, and over the time – switch completely to Microsoft Teams held resources :smiling_face_with_smiling_eyes:!
Keep in mind that attendees outside your organization will NOT have access to the recording by default (and often to the shared materials as well) – so it is crucial to share those with them via email.
To sum things up
Microsoft Teams is a powerful tool, that can be further extended with that use of third-party add-ons/apps, so you could try those out as well. Try not to use it as a straight replacement to legacy Skype for business meetings.
Play with available options, plan a meeting thoroughly, mix things up, so that no one is bored and finally… have fun! Virtual meetings, when used properly, should be even more effective than those held in person ;)
Kuba Borkowski is a Microsoft Cloud solutions specialist at Integrity Partners. With years of experience in anything Modern workplace related, he helps customers with all topics around security, compliance and productivity. As a change practitioner he has worked with various big and small customers supporting them in their adoption journey and much, much more. LinkedIn: https://www.linkedin.com/in/kubaborkowski
To write your own blog on a topic of interest as a guest blogger in the Microsoft Teams Community, please submit your idea here: https://aka.ms/TeamsCommunityBlogger
by Contributed | Jul 6, 2021 | Technology
This article is contributed. See the original author and article here.
The intelligent intranet is ever changing. To facilitate evolving management requirements, the SharePoint admin center in Microsoft 365 offers new insights for admins, aligning with admin center designs across the suite. These updates highlight activities and connections for your sites and content, with actionable controls for managing your intelligent intranet. Everything we build is inspired from community feedback and is designed to make day-to-day administration easier.
The following new features are now available in the SharePoint admin center:
- Enhanced insights dashboard on SharePoint admin center
- Improved site information – ‘Created from’ and ‘Teams’-connected status
- SharePoint root site replacement
- OneDrive settings now accessible in the SharePoint admin center
Lets dig into the details of each new feature, and we encourage you to scroll the whole post to see a long-form video that showcases all, plus two relevant podcast episodes – toward the end of this blog.
Enhanced insights dashboard on SharePoint admin center
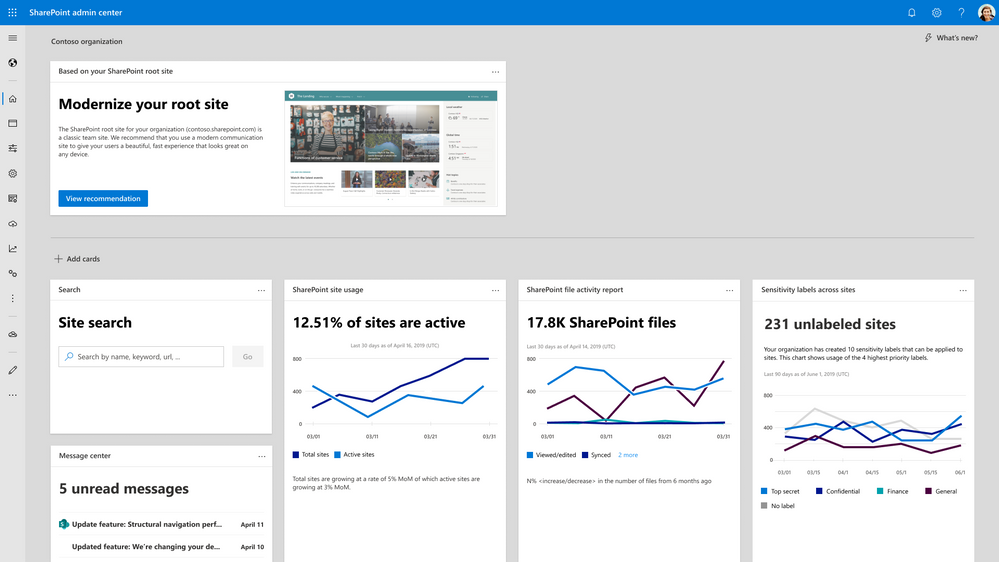
One of the most common themes of feedback is around insights and reporting. Thus, we designed a new dashboard to get ahead of this problem. It provides a set of insights and reporting tools that make admins more productive, especially as the number of SharePoint-backed collaboration spaces grows.
This new card-based dashboard is command central. SharePoint admins gain visibility of important updates and alerts, saving time and effort. There are several dashboard cards available today, ranging from trends on storage usage, to adoption of sensitivity labels – alongside smart recommendations to improve your Microsoft 365 tenant. Most of the cards provide a one-click experience to act. In addition, most of these same cards will be available to admins in both the SharePoint admin center and the Microsoft 365 admin center.
New homepage with actionable insights
Learn more about the updated dashboard in SharePoint admin center.
Improved site information – ‘Created from’ and ‘Teams’-connected status
Across many collaborative scenarios, SharePoint is the connected content service. Self-service site creation enables end users and other admins to create sites directly or indirectly – created from Teams, Outlook, the admin center, via API, during migration, etc.. Thus, it’s important for admins to know where sites were created from. This new column, ‘Created from’, shows exactly which workload created the site.
The ‘Create from’ column is filterable, allowing admins to view sites based on where they were created from. This information can become a proxy to understand why a site was created. For instance, if a site was created from Teams, it’s clear that the site was created to power file sharing and collaboration for a certain project or team. In addition, the new column, ‘Teams’, shows which sites are connected to Microsoft Teams.
The site creation source and Teams connected status provide key information for admins without having to dig into hidden settings. For instance, admins can see all team sites in the organization that aren’t connected to Teams and boost productivity by recommending team sites to be connected to Microsoft Teams.
 New columns available in the list of active sites – Teams & Created from
Learn more how SharePoint can be integrated with Microsoft Teams.
SharePoint root site replacement
The root site of any organization is a vital part of a SharePoint-powered, intelligent tenant. It’s what your users see when they navigate to the root URL: https://Contoso.SharePoint.com. In the past, PowerShell was the only way to set a new site as the root site. Admins can now replace the root site from the admin center directly, by selecting the current root site and selecting ‘Replace site’ on the command bar.

Learn more about your SharePoint root site and how to modernize it.
Suggestion: It is possible to assign your root site to be your SharePoint home site. With this, you can design your company’s primary portal with an easy to remember URL and get one step closer to bringing your company intranet into Microsoft Teams by taking advantage of Microsoft Viva Connections; combine the power of your intelligent SharePoint intranet with the chat and collaboration tools in Teams.
OneDrive settings now accessible within the SharePoint admin center
With the new integrated admin center, you can manage everything at an organizational level all in one place: control internal and external sharing, set user access controls, manage default storage limits, enable user device notifications, specify retention policies, and manage sync controls for OneDrive. We’ve also improved the user interface to provide a more consistent experience and support Web Content Accessibility Guidelines (WCAG) 2.1 compliance, enhanced reporting, and added the Global Reader admin role, which provides a read-only view of SharePoint admin center. When you assign the Global Reader role to an admin, they can view—but not edit—all administrative features and settings in all Microsoft 365 admin centers, which helps you delegate admin responsibilities more efficiently.
 Modernized OneDrive settings in the SharePoint admin center
And per the insights dashboard update, there are actionable OneDrive cards such as OneDrive usage and OneDrive file activity. This enables you to quickly see OneDrive activity for files that have been viewed/edited, synced, and shared internally or externally.
Learn more about finding and using OneDrive admin settings from within the SharePoint admin center.
Additional resources
SharePoint admin center (primary Help content)
VIDEO | “Monitor and manage SharePoint investments in Microsoft 365” presented by Dave Minasyan, Trent Green and Rk Menon – team members on the SharePoint admin center team at Microsoft:
TWO PODCASTS
“SharePoint roadmap pitstop – June 2021” episode on The Intrazone podcast, featuring a conversation with Rk Menon – lead program manager designing and developing admin experiences and capabilities for the SharePoint admin center in Microsoft 365:
“Consolidating OneDrive and SharePoint admin centers” – a previous episode of the OneDrive Sync Up podcast interview with Rk’s colleague, Dave Minasyan, Principal program manager:
Closing
Managing SharePoint and OneDrive in Microsoft 365 continues to improve. With these new features, we hope that your job as a SharePoint administrator becomes easier.
Our goal is to empower you and every person on your team to achieve more. Let us know what you need next. We are always open to feedback via in product feedback – please let us know within the SharePoint forum within the Microsoft Tech Community —and we always have an eye on tweets and @mentions to @SharePoint.
Thanks, Rk Menon (Program manager) and Mark Kashman (Senior product manager) — OneDrive and SharePoint

by Jenna Restuccia | Jul 6, 2021 | ADA Compliance, American Sign Language
Deaf Culture is the collection of cultural beliefs, practices, language, history, literature, and shared institutions of deaf communities that use sign language as a primary means of communication. These complex factors greatly impact how people experience the world. In the United States, more than 19 million deaf individuals use American Sign Language (ASL) to communicate. Many experts argue that the lack of awareness of deafness in American society contributes largely to the misunderstanding of the deaf and their experiences.
By the early twentieth century, American Sign Language became a popular language. ASL appears in all walks of life including teachers, doctors, lawyers, and government workers. Though efforts are made in incorporating individuals of varying capabilities into all areas of American society, it is crucial for hearing individuals to familiarize themselves with Deaf Culture to better understand their community.
Gallaudet, founded over 100 years ago, was the first institution to offer special courses for deaf students. The Gallaudet curriculum is steeped in the history and culture of Deaf and Hard-of-Hearing individuals. Many deaf students attend Gallaudet to get a fulfilling and extensive education. Gallaudet also teaches hearing individuals in courses for learning, translating, and interpreting ASL.
For students who learn ASL from a young age, their experiences in American Sign Language extend beyond the classroom. Beginners start to understand the significance of facial expressions, hand movements, and body movements that signify different spoken and written words. ASL literature and signed dialogues expand the life experiences of deaf people, teaching them how to communicate with others.
In recent years, many developments in science and technology have helped to further develop the understanding deafness. Neurological and neurobiological research suggests that there are differences between the brains of deaf people and those of hearing people. This has led to the development of new methods of diagnosing neurological conditions in the deaf. The advent of the Americans with Disabilities Act in 1990 has added another layer of legal protection for the deaf. Work in education and advocacy resulted in programs and policies that promote equal treatment of the deaf in employment settings. However, there are still many gaps in the field of medical services and compensation for the deaf. The lack of accessible health care and services for the deaf remains a pressing issue.
The use of sign language as a secondary language to communicate with the deaf is not widespread in the United States. The few universities that offer courses on this subject do not require students to learn or use sign language. Efforts are underway to provide access to the Internet and make sign language available in schools. The challenge will persist as hearing individuals continue to educate themselves on the lives, culture, and hardships of the Deaf community.
by Contributed | Jul 6, 2021 | Technology
This article is contributed. See the original author and article here.
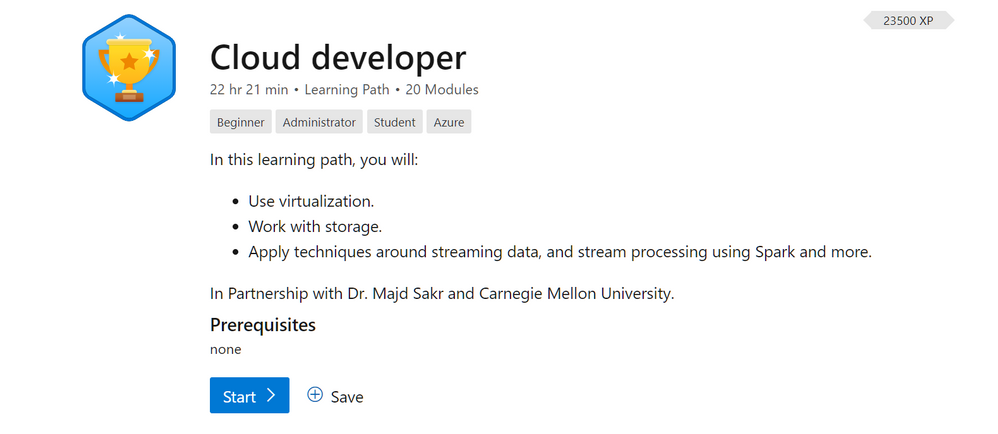
There are 16 million developers in the world today. So an understanding of cloud development is therefore a good skill to have as you are looking to land that first job and build a career in Cloud Computing.
But where do you begin to learn all that? With this path
Cloud developer
Cloud Developers design and develop cloud applications, services, and products. With the support of these Microsoft Learn Modules students will gain knowledge and develop hands-on experience solving real-world problems in the field of cloud development. This learning path will introduce this domain and cover the topics of cloud infrastructures, virtualization, software-defined networks and storage, cloud storage, and programming models (analytics frameworks). Modern data centers enable many of the economic and technological benefits of the cloud paradigm; hence, we will describe several concepts behind data center design and management and software deployment. Subsequently, students will learn about different cloud storage concepts including data distribution, durability, consistency and redundancy. Student will gain experience of how to use MapReduce, clean, prepare and analyze a large data set as well as serverless computing through Functions as a Service. It is our goal that students will develop the required skills needed to become a cloud developer.
This learn path covers everything from using virtualization, work with Cloud storage. Apply techniques around streaming data, and stream processing using Spark and more. These modules were developed in Partnership with Prof. Majd Sakr and Carnegie Mellon University.
Students who complete the Cloud Developer Learning Path should be able to:
- Explain the core concepts of the cloud computing paradigm: how and why this paradigm shift came about, the characteristics, advantages and challenges brought about by the various models and services in cloud computing.
- Apply fundamental concepts in cloud infrastructures to understand the tradeoffs in power, efficiency and cost, and then study how to leverage and manage single and multiple datacenters to build and deploy cloud applications that are resilient, elastic and cost-efficient.
- Discuss system, network and storage virtualization and outline their role in enabling the cloud computing system model.
- Describe the overall organization of data and the fundamental concepts of cloud storage. Compare and contrast different types of distributed file systems and discuss their design considerations. Compare and contrast different types of databases and discuss their design tradeoffs. Discuss the concepts of cloud object storage.
- Explain the main execution flow, scheduling and fault tolerance concepts in various cloud programming models. Recall and contrast different cloud programming models (MapReduce, Spark, GraphLab, Spark Streaming and Samza).
- Design, architect, implement, test, deploy, monitor and maintain cloud-based applications.
- Identify the appropriate tools and architectures to implement a cloud-based design.
- Analyze the tradeoffs between different tools and cloud offerings to meet real-world constraints.
- Evaluate performance characteristics of cloud-based services to implement optimizations.
The Cloud Developer Learning path contains the following modules.
Get an introduction to virtualization, one of the many technologies that power the cloud. Learn what virtualization is, its benefits, and how cloud resources are shared.
Take a deep dive into virtualization by understanding its formal definition as well as the different types of virtual machines.
Learn about how computing power is virtualized to create cloud resources. Covers different types of CPU virtualization.
Learn how memory is virtualized to support cloud resources. Covers different types of memory mapping and related issues.
Learn about how computer input/output is virtualized. Covers I/O basics and a case study of virtualizing I/O.
Learn about how storage and network resources can be virtualized to support software defined datacenters.
- 1 hr 20 min
- Module
- 9 Units
Discover what the cloud is, the history of cloud computing, what types of clouds are available, and how you might use the cloud.
Learn how developers pay to use the cloud and how cloud providers are able to charge for their services. Get an overview of how the cloud is kept secure.
Datacenters power the cloud. Learn what they are, how they work, and challenges in managing them.
- 1 hr 58 min
- Module
- 9 Units
Take a deep dive into datacenters to discover how they are laid out and how computing resources are provisioned and metered.
Get into the nitty-gritty of cloud computing to understand how resources are provisioned, billed, and monitored. Learn about how to orchestrate cloud infrastructure with examples.
- 1 hr 21 min
- Module
- 9 Units
Learn how developers write programs that run on the cloud, including how to deploy, be fault-tolerant, load balance, scale, and deal with latency.
- 2 hr 43 min
- Module
- 15 Unit
Learn all about data and get an overview of how it’s stored, including local and distributed file systems, databases, and object storage.
- 1 hr 7 min
- Module
- 6 Units
Discover how distributed file systems work, then learn about Hadoop and Ceph.
- 1 hr 22 min
- Module
- 6 Units
Learn about two more types of storage – NoSQL databases and object storage – with case studies from industry.
- 1 hr 57 min
- Module
- 15 Units
Learn about distributed programming and why it’s useful for the cloud, including programming models, types of parallelism, and symmetrical vs. asymmetrical architecture.
- 1 hr 47 min
- Module
- 9 Units
MapReduce was a breakthrough in big data processing that has become mainstream and been improved upon significantly. Learn about how MapReduce works.
- 1 hr 3 min
- Module
- 9 Units
GraphLab is a big data tool developed by Carnegie Mellon University to help with data mining. Learn about how GraphLab works and why it’s useful.
- 1 hr 5 min
- Module
- 7 Units
Spark is an open-source cluster-computing framework with different strengths than MapReduce has. Learn about how Spark works.
- 1 hr 2 min
- Module
- 8 Units
The increase of available data has led to the rise of continuous streams of real-time data to process. Learn about different systems and techniques for consuming and processing real-time data streams.
by Contributed | Jul 6, 2021 | Technology
This article is contributed. See the original author and article here.
Previously, when you migrated content from Google Workspace (formerly G Suite) to Microsoft 365, a user could bring over their Mail, Calendar, and Contact information. While this did help reduce friction for users getting used to the new platform, it did not avoid the burden of re-creating all their email organization rules in Outlook. To address this, we have now added the capability to migrate Gmail filters to Outlook rules as a part of the standard migration offering!
With this feature you can now migrate Mail, Rules, Calendar and Contact data for all users and everyone is opted in by default.
Here are some of the conversions we support:
Gmail filter criteria
Gmail filter Criteria
|
Criteria Syntax
|
Outlook Rule Condition
|
From:
|
user@domain.com
|
From people or public group
|
|
!user@domian.com
|
Except it from people or public group
|
|
-user@domain.com
|
Except it from people or public group
|
To:
|
me
|
Where my name is in the To box
|
|
user@domain.com
|
Send to people or public group
|
|
!user@domain.com
|
Except it send to people or public group
|
|
-user@domain.com
|
Except it from people or public group
|
Has the words:
|
cc:me
|
Where my name is in the CC box
|
|
word1 or word2
|
With word1 or word2 in the subject or body
|
Doesn’t have:
|
Word1 or word2
|
Except if the subject or body contains word1 or word2
|
|
cc:me
|
Except where my email address is in the cc box
|
Subject:
|
Word1 or word2
|
With word1 or word2 in the subject
|
|
!word1 AND !word2
|
Except if the subject contains word1 or word2
|
|
word1 AND !word2
|
(With word1 in the subject) AND (Except if the word2 contains B)
|
|
!word2 AND word1
|
(Except if the subject contains word2) AND (With word1 in the subject)
|
Size:
|
Greater than number unit
|
With a size in a specific range
|
Has attachment:
|
|
Which has an attachment
|
Gmail filter action
Gmail filter Action
|
Outlook Rule Action
|
Skip Inbox (Archive it)
|
Move it to the Archive folder
|
Mark as read
|
Mark it as read
|
Apply the label
|
Move a copy to the specific folder
|
Forward it
|
Forward it to people or public group
|
Delete it
|
Delete it (Move to Deleted Items folder)
|
Always mark it as important
|
Mark it as important
Importance: High
|
Never mark it as important
|
Mark it as important
Importance: Medium
|
Conversions that are not supported
We do not currently support migrations of Categories from Google Workspace to Microsoft 365.
Additionally, if there are certain filters we are unable to process and convert, we mark these as bad items. And bad items from filters to rules migration do not negatively impact the DCS score of a job since that mechanism is more relevant for identifying data loss for the underlying data set (like Mail, Calendar and Contacts).
How to configure the feature
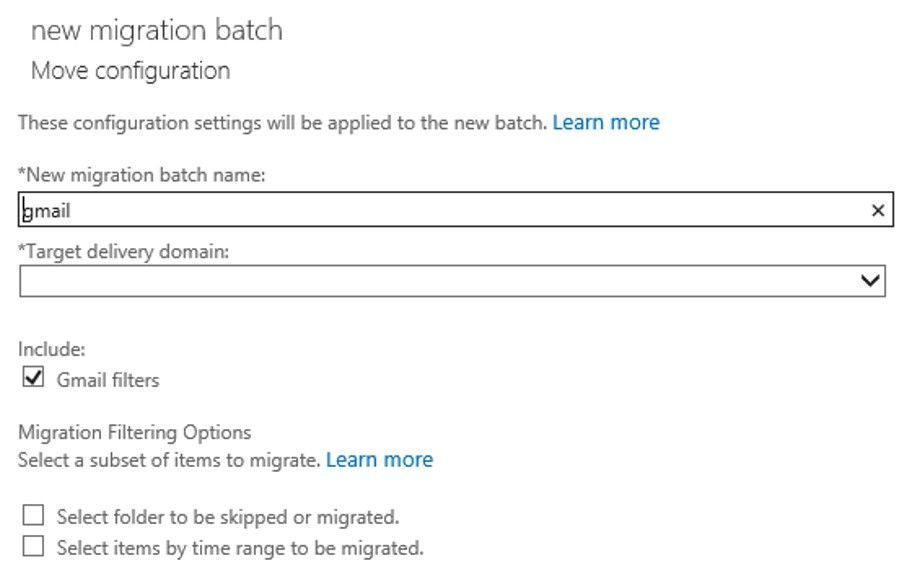
By default, the feature is enabled when you use New-MigrationBatch for Google Workspace migrations. If, however, you wish to disable the rule migration capability, you can do so by specifying the –SkipRules parameter via PowerShell.
In the screenshot below, you can see that there are now checkboxes for migrating Gmail Filters (to Outlook Rules) – which is checked by default. Simply un-checking the checkbox for Rules will skip migrating those items. Currently you need to do this via the Classic Exchange Admin Center; this change will be incorporated into the Modern Exchange Admin Center in the future.
Note: We do not have a way to reset rules once migrated, as is the case for any other data like Mail, Calendar or Contacts.
Try the feature out and give us feedback in the comments if the conversion was to your liking and what improvements we can make in the future!
The Exchange Migration team

Recent Comments