Azure Monitor – Alert notification via Teams

Azure Monitor – Alert notification via Teams

This article is contributed. See the original author and article here.

Hi there, Bruno Gabrielli here again to talk about how to get alert notification using a Teams channel.


I apologize because this s is going to be a long post with all the steps to achieve the notification goals, so please bear with me if you’re interested in getting the configuration done.


Lots of customers are using Teams channel as notification mechanism in their alert management process. They find it very helpful because Teams can be used over mobile devices and browsers without relying on your company laptop. Apparently, there’s no built-in activity in Azure Monitor out of the box to notify an alert via Teams, but we DO have all the pieces that we need.


In this post I will drive you through the Azure Monitor configuration which is behind the Teams channel alert notification mechanism.


First and foremost, a Teams and a Teams channel need to exist. We will not cover this part since it is out of scope, however, should you need information on how to accomplish the pre-requisites you can rely on the following articles:


With that said, here we are with some steps that will be completed in the Azure portal. Let’s see them in detail.


Step 1: Create a blank Logic App


For this step, you need to login to the Azure portal and create a new Logic App. For the purpose of this article, I decided to name it SendAlertNotificationToTeamsChannel, but you can choose the name you prefer the most and according to the company standard you have in place.


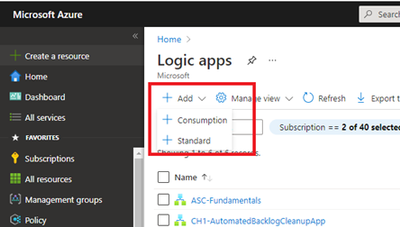
  1. Once you’re in the right place, click on the Add menu and select the Logic App type you want to create. The available types are: Standard and Consumption. You can find all the necessary info in the page Pricing and billing models for Azure Logic Apps at https://docs.microsoft.com/en-us/azure/logic-apps/logic-apps-pricing


BrunoGabrielli_4-1625142619856.png


  1. Once you have selected the billing model that best suite your needs, you will be presented with a page in which you will select/enter basic initial information, such as:


  • Subscription

  • Resource Group

  • Logic App name

  • Region


BrunoGabrielli_5-1625142619864.png


  1. As you can see from the above screenshot, you can also choose to associate the Logic App with an ISE and or to enable Log Analytics for observability purpose (which is always recommended). Specify the Tags if used and then click on the Review + create button. Once the validation process has finished click on the Create button.


BrunoGabrielli_6-1625142619869.png


  1. The deployment of a new Logic App will start. Once completed click on the Go to resource button to get redirected on the newly created Logic App designer page for editing.


BrunoGabrielli_7-1625142619878.png


Step 2: Configure the Logic App


  1. In the Logic App designer page, click on When a HTTP request is received. This will be our trigger.


BrunoGabrielli_8-1625146576181.png


  1. After the selection, you will be presented with the Logic App designer canvas. This is where we will do all our remaining configurations starting with the trigger activity we just added.


BrunoGabrielli_9-1625146576205.png


  1. Configure the activity with the JSON schema that the trigger will use. Since the request will contain the alert’s JSON payload, you can refer (and use) the sample schema you can find in the article Common alert schema definitions at https://docs.microsoft.com/en-us/azure/azure-monitor/alerts/alerts-common-schema-definitions .Copy the sample alert payload from the page, click on Use sample playload to generate schema, paste the content and click Done


BrunoGabrielli_10-1625146576225.png


  1. Now let’s have some fun with the notification formatting. Since I preferred to create different activities to notify specific information according to the type of alert (i.e., Metrics, Log Analytics or Application Insight alerts), I created 3 separate but similar activities which differ only in some parts that are related in the information to be sent. If you prefer having just one notification activity for all alert type, jump to step 7

  2. To create a condition used to decide which notification activity to use, click on the New Step, in the search box type Control


BrunoGabrielli_19-1625147748170.png


  1. Select the Control group and then select the Switch activity to add it to the canvas. For groups with lots of activities, you can enter the activity name or part of it in the search box.


BrunoGabrielli_20-1625147765940.png


  1. To configure this activity:

    1. Click on the On field and select monitoringService from the Dynamic content list


      BrunoGabrielli_22-1625148131758.png


    2. Click on the Equals and enter the string corresponding to the alert type you’re going to create the notification for. For the possible values to be used you can refer at the samples in the Common alert schema definitions at https://docs.microsoft.com/en-us/azure/azure-monitor/alerts/alerts-common-schema-definitions located under the Alert context paragraph. In this example we will use the Metric alerts (excluding availability tests) section, hence as value we will enter Platform.


      BrunoGabrielli_23-1625148277434.png


    3. If you like to configure specific notification activities, click on the +sign between the 2 blocks and add a new case and configure it accordingly (for configuration step, refer to step b above) or add the notification activity as a new action inside the specific case (see next steps)


  1. Now we can move on with the notification activity. As we did for the Switch action, click on New step (or click on Add an action if you’re adding it as a child action as result of choice made during step 4)

  2. Follow what has been described in steps 5 and 6 using Microsoft Teams as group and Post a message (V3) (Preview) as action

  3. Once added, this activity needs some configuration:

    • Team ID

    • Channel

    •  Message

      1. As far as the Team ID and the Channel go, you can select them from a drop-down list


        BrunoGabrielli_15-1625146576272.png


      2. With regards to the Message body part, this is representing the information sent through the notification. Here you can enter static text formatted as you like, dynamic content as well as formulas. In my example I started with a kind of title and followed with sections under which there are the info I wanted to send. For the static text, you just need to write it. For the dynamic content and/or formulas, once you decided the line where to put it, click on Add dynamic content and select it from the side panel click in the Message canvas and either select it from the Dynamic content list or assemble it using the Expression builder


        BrunoGabrielli_16-1625146576280.png


        In this post, since I got everything correctly parsed from the trigger activity (the When a HTTP request is received), I will go use the dynamic content only. For instance, after heving put some text like – Alert Id: I will select alertId content from the list


        BrunoGabrielli_17-1625146576299.png


      3. Repeat the above step for all the field you want to make part of the message such as Alert Rule Name, Severity, Description, etc.


  1. Once the activity configuration is complete, repeat the steps 8, 9 and 10 if you want to add more specific notification activity or click on Save when done.


BrunoGabrielli_18-1625146576317.png


Step 3: Configure the Action Group


Now that the Logic App has been created, we need to configure an Action Group to use it in order receive our alerts as expected.


From the Azure Monitor blade, follow the steps below:


  1. From the Alerts page, click on Manage actions


BrunoGabrielli_24-1625148379872.png


  1. Click on New action group


BrunoGabrielli_25-1625148379875.png


  1. Enter the necessary basic information and click on Next: Notifications >

    1. Subscription

    2. Resource group

    3. Action group name

    4. Display name


BrunoGabrielli_26-1625148379881.png


  1. Leave everything unchanged click on Next: Actions >

  2. Configure the following according to what has been created before:

    1. Action type

    2. Name

    3. Selected


, making sure to enable the common alert schema and select


BrunoGabrielli_27-1625148379887.png


  1. Click on Next: Tags >and configure the Tags if necessary. Then click on Next: Review + create >and the on Create


Step 4: Add the new action group to your alerts


Now that we have the Action group created and configured, we need to add it to all the alerts we want to notify:


  1. From the Alerts page, click on Manage alert rules


BrunoGabrielli_28-1625148464834.png


  1. Identify the alert you want to notify (i.e., the Low CPU usage on Virtual Machines) and click on it to edit


BrunoGabrielli_29-1625148464844.png


  1. In the Actions section, add the new action group to the existing one (or remove them if not necessary anymore) by clicking on the Manage action groups


BrunoGabrielli_30-1625148464846.png


  1. Select the newly created (and de-select the selected ones if necessary) and click Select


BrunoGabrielli_31-1625148464853.png


  1. Click Save to save and apply the changes


BrunoGabrielli_32-1625148464858.png


Step 5: Test, test, test


As always when re-using something from others, we gotta make sure it works in our environment. What’s better than a deep test session? Play with the alert rules you configured to generate some alert and see if it gets notified. If everything went smoothly, we should get notifications similar to the one below in our Teams:


BrunoGabrielli_33-1625148528212.png


Hope that will make the Alert Management process as well as the Notification process easier and usable enough. If you want to test the version I created, you can download the sample code attached to this post changing the necessary configuration to reflect your environment.


Thanks for reading through the entire loooooong post :xd:


Disclaimer


The sample scripts are not supported under any Microsoft standard support program or service. The sample scripts are provided AS IS without warranty of any kind. Microsoft further disclaims all implied warranties including, without limitation, any implied warranties of merchantability or of fitness for a particular purpose. The entire risk arising out of the use or performance of the sample scripts and documentation remains with you. In no event shall Microsoft, its authors, or anyone else involved in the creation, production, or delivery of the scripts be liable for any damages whatsoever (including, without limitation, damages for loss of business profits, business interruption, loss of business information, or other pecuniary loss) arising out of the use of or inability to use the sample scripts or documentation, even if Microsoft has been advised of the possibility of such damages.

The new and refreshing data factory home page

The new and refreshing data factory home page

This article is contributed. See the original author and article here.

We have redesigned the Data Factory home page for a modern and more accessible (WCAG 2.1) experience. The new design is more fluid with better contrast and reflow capabilities. 


Additionally, we have introduced a few sections on the homepage to help you improve productivity in your data integration journey. Below is the breakdown of the new design elements.


AbhishekNarain_0-1625463538599.png


AbhishekNarain_1-1625464580910.png


  1. The “New” menu provides a shortcut to the various design surfaces for a quick start from the homepage.  

  2. Shortcut tiles are focused on use-cases and let you directly dive into the scenarios. 

  3. The “Discover more” section is coming soon! These are important resources intended to help you during your data integration journey.

  4. “Recent resource” helps you find out the recently created/ modified pipelines and artefacts to identify and open those quickly. 

  5. “Feature showcase” places a few of the latest announcements and integrations. 

  6. Resources” point to essential training videos, tutorials and community blogs.  

  7. Useful links” point to vital product links. You can submit feature requests using the ‘Give feedback’ page. ‘Questions and answers’ hyperlink gets you access to the community-run Q&A. 

  8. The “Set up code repository” banner reminds you to set up git if you have not already set it up. 


We have also updated the Data Factory blade in the Azure Portal, and the UI looks as below – 


AbhishekNarain_3-1625464935957.png


WAS service unable to start with the error 'the data is invalid'

WAS service unable to start with the error 'the data is invalid'

This article is contributed. See the original author and article here.

We had an issue where WAS service was unable to start with  error data is invalid


ashfana_4-1625459443840.png


We checked the procmon and we could see that Service is trying to read the apphost.config file and nothing happens after that


4:45:05.6132558 PM  svchost.exe      31736  41848  QueryAttributeInformationVolume            C:WindowsSystem32inetsrvconfigapplicationHost.config          SUCCESS            FileSystemAttributes: Case Preserved, Case Sensitive, Unicode, ACLs, Compression, Named Streams, EFS, Object IDs, Reparse Points, Sparse Files, Quotas, Transactions, 0x3c00600, MaximumComponentNameLength: 255, FileSystemName: NTFS     NT AUTHORITYSYSTEM         0


4:45:05.6133179 PM  svchost.exe      31736  41848  QueryRemoteProtocolInformation            C:WindowsSystem32inetsrvconfigapplicationHost.config          INVALID PARAMETER             NT AUTHORITYSYSTEM  0


4:45:05.6133488 PM  svchost.exe      31736  41848  QuerySecurityFile            C:WindowsSystem32inetsrvconfigapplicationHost.config          SUCCESS          Information: Attribute          NT AUTHORITYSYSTEM         0


4:45:05.6135904 PM  svchost.exe      31736  41848  ReadFile            C:WindowsSystem32inetsrvconfigapplicationHost.config          SUCCESS          Offset: 0, Length: 131,072, Priority: Normal       NT AUTHORITYSYSTEM         0


4:45:05.6137492 PM  svchost.exe      31736  41848  ReadFile            C:WindowsSystem32inetsrvconfigapplicationHost.config          SUCCESS          Offset: 131,072, Length: 95,532            NT AUTHORITYSYSTEM         0


4:45:05.6140994 PM  svchost.exe      31736  41848  CloseFile            C:WindowsSystem32inetsrvconfigapplicationHost.config          SUCCESS                      NT AUTHORITYSYSTEM  0


We checked the apphost.config file and understood that we had a null parameter getting added which corrupts the apphost.config file… removing that lines resolved the issue .


ashfana_5-1625459477954.png


C:WINDOWSsystem32>net start WAS


The Windows Process Activation Service service is starting.


The Windows Process Activation Service service could not be started.


 A system error has occurred.


 System error 13 has occurred.


 The data is invalid.


Removing the last line “null” from the same apphost.config I was able to start the WAS service


C:WINDOWSsystem32>net start WAS


The Windows Process Activation Service service is starting.


The Windows Process Activation Service service was started successfully.


so someone/some process is corrupting the apphost by passing null parameter


 possible causes which I can think of:


  • if apphost is on shared config or network share there can be disk corruption leading to this kind of issue

  • i have also seen some scenarios like this when the disk gets corrupted, memory level corruptions etc can lead to config file corruption

  • some scanning software /AV scanning the config folder corrupts it


in order to find the actual case ,


  • we need procmon with filter set to apphost.config path to see who is touching those files

  • and file level auditing for config folder

  • ensure AV is not scanning IIS files/config files

CISA-FBI Guidance for MSPs and their Customers Affected by the Kaseya VSA Supply-Chain Ransomware Attack

This article is contributed. See the original author and article here.

CISA and the Federal Bureau of Investigation (FBI) continue to respond to the recent supply-chain ransomware attack leveraging a vulnerability in Kaseya VSA software against multiple managed service providers (MSPs) and their customers. CISA and FBI strongly urge affected MSPs and their customers to follow the guidance below.

CISA and FBI recommend affected MSPs:

  • Contact Kaseya at support@kaseya.com with the subject “Compromise Detection Tool Request” to obtain and run Kaseya’s Compromise Detection Tool available to Kaseya VSA customers. The tool is designed to help MSPs assess the status of their systems and their customers’ systems.
  • Enable and enforce multi-factor authentication (MFA) on every single account that is under the control of the organization, and—to the maximum extent possible—enable and enforce MFA for customer-facing services.
  • Implement allowlisting to limit communication with remote monitoring and management (RMM) capabilities to known IP address pairs, and/or
  • Place administrative interfaces of RMM behind a virtual private network (VPN) or a firewall on a dedicated administrative network.

CISA and FBI recommend MSP customers affected by this attack take immediate action to implement the following cybersecurity best practices. Note: these actions are especially important for MSP customer who do not currently have their RMM service running due to the Kaseya attack.

CISA and FBI recommend affected MSP customers:

  • Ensure backups are up to date and stored in an easily retrievable location that is air-gapped from the organizational network;
  • Revert to a manual patch management process that follows vendor remediation guidance, including the installation of new patches as soon as they become available;
  • Implement:
    • Multi-factor authentication; and
    • Principle of least privilege on key network resources admin accounts.

Resources:

CISA and FBI provide these resources for the reader’s awareness.  CISA and FBI do not endorse any non-governmental entities nor guarantee the accuracy of the linked resources.

IIS Admin Service failed to start with 'Class not  registered' error

IIS Admin Service failed to start with 'Class not registered' error

This article is contributed. See the original author and article here.


I came across a scenario where IIS admin was failing to start with error


ashfana_0-1625290153686.png


0x80040154


-2147221164


REGDB_E_CLASSNOTREG


Class not registered


winerror.h


ashfana_1-1625290153692.png


–Checked procmon which is a must go tool for  such issues


–tracing it , I could see below


1:46:11.7430366 PM      inetinfo.exe       9184       7516       RegOpenKey      HKCRCLSID{BA4E57F0-FAB6-11CF-9D1A-00AA00A70D51}                NAME NOT FOUND         Desired Access: Read      NT AUTHORITYSYSTEM 0


1:46:11.7431643 PM      inetinfo.exe       9184       7516       RegOpenKey      HKCRWOW6432NodeCLSID{BA4E57F0-FAB6-11CF-9D1A-00AA00A70D51}            NAME NOT FOUND         Desired Access: Read      NT AUTHORITYSYSTEM 0


1:46:11.7437105 PM      inetinfo.exe       9184       7516       RegOpenKey      HKCRCLSID{BA4E57F0-FAB6-11CF-9D1A-00AA00A70D51}                NAME NOT FOUND         Desired Access: Read      NT AUTHORITYSYSTEM 0


1:46:11.7438050 PM      inetinfo.exe       9184       7516       RegOpenKey      HKCRWOW6432NodeCLSID{BA4E57F0-FAB6-11CF-9D1A-00AA00A70D51}            NAME NOT FOUND         Desired Access: Read      NT AUTHORITYSYSTEM 0


1:53:01.7480590 PM      inetinfo.exe       9440       9812       RegOpenKey      HKCRCLSID{BA4E57F0-FAB6-11CF-9D1A-00AA00A70D51}                NAME NOT FOUND         Desired Access: Read      NT AUTHORITYSYSTEM 0


1:53:01.7481572 PM      inetinfo.exe       9440       9812       RegOpenKey      HKCRWOW6432NodeCLSID{BA4E57F0-FAB6-11CF-9D1A-00AA00A70D51}            NAME NOT FOUND         Desired Access: Read      NT AUTHORITYSYSTEM 0


1:53:01.7485668 PM      inetinfo.exe       9440       9812       RegOpenKey      HKCRCLSID{BA4E57F0-FAB6-11CF-9D1A-00AA00A70D51}                NAME NOT FOUND         Desired Access: Read      NT AUTHORITYSYSTEM 0


1:53:01.7486327 PM      inetinfo.exe       9440       9812       RegOpenKey      HKCRWOW6432NodeCLSID{BA4E57F0-FAB6-11CF-9D1A-00AA00A70D51}            NAME NOT FOUND         Desired Access: Read      NT AUTHORITYSYSTEM 0


this key HKEY_CLASSES_ROOTCLSID{BA4E57F0-FAB6-11cf-9D1A-00AA00A70D51}InprocServer32 has the value %windir%system32inetsrvmetadata.dll  which was missing


–I did  a test on my machine by deleting BA4E57F0-FAB6-11CF-9D1A-00AA00A70D51}      from HKCR node


–got the exact error


ashfana_3-1625290332392.png


Such issues can come up after OS upgrade, while doing a registry restore/backup