by Contributed | Jul 3, 2021 | Technology
This article is contributed. See the original author and article here.
We often come across issue where IIS admin service fails to start with multiple error codes and often error codes points to machine key corruption..
sharing one scenario below:
The IIS Admin Service terminated with “Key not valid for use in specified state “ which clearly means NTE_BAD_KEY_STATE. The machine key starting with c2319 for IIS admin service is corrupted
How it works?
–The IIS Admin Service attempts to load the IIS metabase, metabase.xml into memory upon startup.
–To do this, it has to be able to decrypt certain parts of the metabase, using a specific RSA machine key. if for some reason its unable to decrypt service cannot start
–The root cause is that the IISAdmin service cannot read the encrypted sections of the IIS Configuration file.
Corruption can happen due to multiple reasons
- By default IIS Machine Key is In C:documents and settingsall usersapplication datamicrosoftcryptoRSAMachineKeys folder. If there is any change like compression/permission change for this path we can see issue
- AV /encryption software scanning file
- application like doubletake.exe touching machine key files on reboot
- abrupt restart/shutdown when the MachineKeys files were accessed
- Metabase.xml is corrupt (due to reasons listed above)
- permission alternation of the machine key folder
We have seen usually patch /windows update has always been the victim of such issues.. We always suggest below practice so that “patch does not become victim of any issue”
- Before patching , reboot the server
- Once the server is up, check if all required application is working as expected
- Install patches
- Reboot the server
- check applications again
It is difficult for us to tell why the Machine Key file gets corrupted without any data. Audtiing can help us to provide more clues in case similar problem occurred again in future.
1 Enable auditing policy on the problematic IIS server:
- Click Start, click Run, type Gpedit.msc, and then click OK.
- Under Local Computer Policy, expand Computer Configuration, and then expand Windows Settings.
- Expand Security Settings, expand Local Policies, and then click Audit Policy.
- In the details pane, double-click Audit object access
- Click to select the Success check box, and then click to select the Failure check box.
- Click OK.
2 Enable auditing on the C:Documents and SettingsAll UsersApplication DataMicrosoftCryptoRSAMachineKeys folder.
- Right click the folder C:Documents and SettingsAll UsersApplication DataMicrosoftCryptoRSAMachineKeys and choose “Properties”.
- Switch to “Security” tab, and click “Advanced” button.
- Switch to “Auditing” tab, and click “Add”.
- Enter “Everyone” and then choose “OK”.
- Check following operations, then choose “OK”.
- Traverse Folder/Execute File
- Create Files/Write Data
- Create Folders/Append Data
- Write Attributes
- Write Extended Attributes
- Delete Subfolders or files
- Delete
- Change Permissions
- Take Ownership
- Choose “OK” to confirm the change.
by Contributed | Jul 2, 2021 | Technology
This article is contributed. See the original author and article here.
SharePoint has a lot of great out-of-the-box capabilities, but sometimes you need to take it a step further. For example, you need a custom user interface to improve productivity.
The SharePoint Framework (aka SPFx) is a great way to customize SharePoint and Teams. There have been various ways to customize SharePoint in the past, but SPFx is the recommended option. This is especially true for SharePoint Online, but also for more recent versions of SharePoint on-prem. What I like about SPFx – beyond the fact that it lets you customize SharePoint – is that there are several web controls that are ready to use and require very little effort to incorporate into your customizations. Not only do these components function well, they also fit the look and feel of SharePoint today.
SPFx is supported with SharePoint 2019 and SharePoint 2016 (with feature pack 2), but there are limitations to both. This post focuses on the limitations with SharePoint 2016 which are more restrictive than SharePoint 2019. In addition, some of the details I provide will be specific to my development environment which runs on Windows 10.
Confused Yet?
I think part of the confusion on developing with SPFx on SP2016 is because SP2016 hasn’t changed in years, but SPFx is constantly changing. The documentation on what to use with SP2016 is pretty old and hasn’t kept up. For example, to get started with SPFx on SharePoint 2016, this seems like the logical place: SharePoint Framework development with SharePoint Server 2016 Feature Pack 2. The web page was updated within the last month of when I wrote this post. However, the video shown is from 2017. In the video, Vesa recommends version 1.0.2 as the SPFx version and the post mentions version 1.1.0. What worked for me (more details below) was version 1.9.1.
What made this more confusing to me is that there were other blog posts indicating you can use any version of key dependencies:
That last post mentions version 1.9.1 of @microsoft/generator-sharepoint, which is what I used. But it was the latest at the time of that post. I had trouble with later versions, which it recommended (but did caveat that they may not work). Your mileage may vary.
Multiple Paths Forward and Limitations
I definitely recommend checking out the links above to see if they work for you. If they don’t, then hopefully the steps I outline below will work. It’s hard to sound too confident because others sounded confident in the posts above. They clearly worked for them, but didn’t work for me. Maybe it was user error, but who knows what else will change going forward that may somehow cause issues.
Whenever deciding on what versions to use, a good resource to use is: SPFx Compatibility Matrix.
Depending on the path you take may change your limitations, but here are some I know of:
- You can only create web parts, not extensions.
- You cannot bundle your assets with the package (sppkg) file. You must host your assets (manifest JSON and JavaScript files) in a SharePoint document library, Azure, or somewhere else. I discuss how to do this further below.
- Some Fluent UI Controls won’t work. Based on the path I took (described below), There was no ComboBox, no PeoplePicker, and the Dropdown did not allow multi-select. There are probably several other controls that aren’t available, but I didn’t need them, so I didn’t check. Of those that are available, the documentation has properties/capabilities that are newer than what I was able to use. Sometimes I went to the old Office UI Fabric React documentation, but even then that was sometimes too new for what I was using.
- I was unable to use React Hooks and had to use the React component class. React hooks were introduced in React 16.8. I’m using React 15.4.2. This may be why some newer Fluent UI controls cannot be used.
Prerequisites
Regardless of the approach you take, everyone appears to agree on the prerequisites:
- SharePoint Server 2016
- Feature Pack 2 Installed
To check to see if Feature Pack 2 is installed, I went to Feature Pack 2 Required to Install ShortPoint SPFx on SharePoint 2016 On-premise. There may be better articles out there. Two key parts of this that helped me were:
- If you don’t see “Manage Patch Status”, look for “Check Production and Patch Installation Status”.
- For “Microsoft SharePoint Foundation 2016 Core”, you are looking to see if there is an item with a version number >= 16.0.4744.1000 with a status of Installed. If not, you’ll need to install Feature Pack 2 as the link above describes.
Node v8.17.0 (Recommended: Install NVM for Windows)
If you’re developing SPFx for SharePoint Online or SharePoint 2019 in the same development environment, you’ll need to maintain multiple versions of node. A great way to do that is with nvm-windows.
After installing nvm-windows, you need to install and use node version 8.17.0:
nvm install 8.17.0
nvm use 8.17.0
Then you can check the active version of node with:
nvm list
Note: if you don’t want to install nvm and just want to install node, you can get version 8.17.0 from here: Index of /dist/latest-v8.x/ (nodejs.org). If you have installed node directly, you can check the version using:
node -v
Install NPM Packages
Before installing other packages, I wanted to check on the version of npm. I did this with:
npm -v
npm list g --depth 0
Both v3.10.10 and v6.13.4 of npm worked for me.
Then I installed a specific version of gulp, yeoman generator, and generator-sharepoint:
npm install -g gulp@3.9.1
npm install -g yo@1.8.5
npm install -g @microsoft/generator-sharepoint@1.9.1
Installing gulp may not be required, but it helps to have gulp at the ready from the command line. Otherwise you may need to play with the path or add scripts to package.json to call gulp for you while you do something like: npm run <my-script>
Regarding v1.9.1 of generator-sharepoint, it could be that a later version works for you. This worked for me and v1.12.0 did not work for me. Maybe something in between is a better choice.
Generate Your Project
This is old hat for many, but for those not used to it, I’ll spell out some details…
Create a directory for your web part project and cd into that directory. This could be the name of your solution or even just “WebParts”. Think about how you want to organize your code. Do you want a separate solution per web part or do you want to be able to have several web parts within one project in the future. The former makes it so a change to one web part does not require all to be re-deployed. The latter allows the web parts to have shared components. You generate the project with:
yo @microsoft/sharepoint
Then you answer several questions. Here are some example answers:
What is your solution name?
|
Hello World SPFx 2016
|
Which baseline packages do you want to target for your component(s)?
|
SharePoint 2016 onwards, including 2019 and SharePoint Online
|
Where do you want to place the files?
|
Use current folder
|
Which type of client-side component to create?
|
WebPart
|
What is your Web part (on-prem) name?
|
HelloWorld
|
What is your Web part (on-prem) description?
|
A sample web part
|
Which framework would you like to use?
|
React
|
Test Your Project in the SharePoint Workbench
Even though you haven’t done much yet, your project should run. To run the workbench you would normally do a “gulp serve”, but since we’re stuck in version 8 of node, we need to Run gulp serve with ‘NODE_NO_HTTP2=1’ when using SPFx on node v8:
set NODE_NO_HTTP2=1 && gulp serve
Note that the command above looks a little different when run on a Mac.
From the resulting web page that pops up, you should be able to see your web part and edit the web part property.
Minor Cleanup
The yeoman generator does a great job, but it does make some assumptions that aren’t ideal. One is the solution name could be friendlier. This shows when you are adding the solution to App Catalog (discussed below). To fix this, go into configpackage-solution.json and change the solution name to be a friendlier name. You can use spaces instead of dashes and feel free to capitalize the first letter of each word. You can’t use a period in the solution name, however.
{
    "$schema": "https://developer.microsoft.com/json-schemas/spfx-build/package-solution.schema.json",
    "solution": {
        "name": "Hello World SPFx 2016",
        "id": "5d88310e-6651-4dc3-a80a-be165e851e9b",
        "version": "1.0.0.0"
    },
    "paths": {
        "zippedPackage": "solution/hello-world-spfx-2016.sppkg"
    }
}
Consider updating the group that is shown when adding a web part to a page. By default this is “Other”. The group name is defined in the web part json file found at srcwebparts<web-part-name><web-part-name>WebPart.manifest.json. Change “Other” to any name you like. You don’t need to change the groupId.
"preconfiguredEntries": [
    {
        "groupId": "5c03119e-3074-46fd-976b-c60198311f70", // Other
        "group": { "default": "Other" },
Dev Test / Deploy
If your dev environment has access to the SharePoint 2016 server, you can use the following steps:
Test a Minor Change
With all of the potential problems around versioning of dependencies, it’s a good idea to take small steps. Let’s start with a small change…
In your editor (you are using VSCode, right?), edit srcwebparts<web-part-name>components<web-part-name>.tsx and make a simple change to the title text and save your changes. If your terminal is still running “gulp serve” as mentioned above, then you just need to wait a few seconds and refresh your web page from the previous section. There is no need to re-deploy the sppkg file for simple code changes.
Incorporate Office Fabric
The yeoman generator does not have Office Fabric as part of it. Here we add that and do a small test that uses it:
Test a Production (Ship) Build – First Time
So far the only tests we have done above are running from localhost and not running from SharePoint. To have them run from SharePoint, you need to create package that runs from SharePoint.
Since SharePoint 2016 can’t read the assets (manifest and JavaScript files) from with the package, we need to deploy the assets to another location. This can be any website, but I’ll cover two options: a SharePoint Library or an Azure storage account. Since you are already using SharePoint, that may be the best option for you.
Your asset deployment location is ready. Let’s build and package the solution. We use –ship to indicate that we are running from SharePoint and not localhost:
Subsequent Production (Ship) Build Tests
The section above described what to do the first time you deploy everything to SharePoint. Here are the steps for any other times you deploy to SharePoint:
Subsequent Dev Tests
For most dev changes, the process is simple. If you are already running gulp serve and didn’t do a production/ship build recently, the process is as simple as:
If you were just doing a production (ship) build, did an npm install, or otherwise changed package.json, you probably need to do these steps instead:
Check package-lock.json On Every npm install
Unfortunately, there is an issue with the SPFx TypeScript version which requires you to do something you aren’t supposed to do: manually update package-lock.json. The process is described here: Workaround for SPFx TypeScript Version.
I got in the habit of searching package-lock.json for “typescript” (with the quotes) every time I did an npm install to change 2.2.2 back to 2.4.2. You’ll be glad you did.
In addition, you don’t want to wait too long to test a production/ship version of your build after doing an npm install. Make sure you are using version control for your code and review your package-lock.json for changes every time you checkin changes.
Don’t Be Tempted to Use a Later Version of Microsoft or PnP
If you look at your package.json file, the dependencies section, might look like this:
"dependencies": {
    "@microsoft/sp-core-library": "~1.1.0",
    "@microsoft/sp-lodash-subset": "~1.1.0",
    "@microsoft/sp-office-ui-fabric-core": "~1.4.0-0",
    "@microsoft/sp-webpart-base": "~1.1.0",
    "@pnp/common": "^1.1.0",
    "@pnp/logging": "^1.1.0",
    "@pnp/odata": "^1.1.0",
    "@pnp/sp": "^1.1.0",
    "@types/es6-promise": "0.0.33",
    "@types/react": "0.14.46",
    "@types/react-addons-shallow-compare": "0.14.17",
    "@types/react-addons-test-utils": "0.14.15",
    "@types/react-addons-update": "0.14.14",
    "@types/react-dom": "0.14.18",
    "@types/webpack-env": "1.13.1",
    "office-ui-fabric-react": "^2.34.2",
    "react": "15.4.2",
    "react-dom": "15.4.2"
},
You might be tempted, as I was, to maybe bump those @microsoft/sp-* and @pnp/* packages to 1.4.1 or some other version by doing an npm install of them to a specific version. I highly recommend against this. If you do, make sure you are prepared to revert both package.json and package-lock.json. Also test with a production/ship build as you will likely find, as I did, that it works with a dev build, but not a production build.
More details can be found here: Duplicate of issue #985: deployed web part says “Manifest not found”, after updating from 1.1.0 to 1.3.4
Note that you might want to remove the “~” and “^” from some of those versions to make sure the version matches exactly (and doesn’t use an approximate equivalent version or compatible with version).
If you ever have to revert package.json and package-lock.json, the easiest way to get back where you were after you revert is to delete your node_modules folder, do an npm install, and then fix your package-lock.json as discussed in the previous section.
No SharePoint Server Access from Dev?
If this is the case for you, I’d like to say this is not really a problem, but it will be pretty painful. If possible, I recommend developing where your machine has access to the SharePoint server. Maybe even a Dev/Test SharePoint server, if there is one. Otherwise, you may want to use an Azure storage account / CDN to store your assets instead of a SharePoint library, as it may be quicker to transfer them for every minor change you make. You won’t be able to run gulp serve and run things from localhost.
I recommend you check out this blog post for generating a source map for the release build: Easily debug production version of your SharePoint Framework solution. If you put the source map with the rest of the source (in Azure blob or SharePoint Site Assets) you won’t need to manually add the source map to your browser.
TSLint Changes
As you start adding more of your own code, you may start seeing TSLint warnings. It can be quite annoying as you may miss real warnings, so you want a clean build. I had trouble configuring TSLint via tsling.json, so I used prettier within VS code and configured it by creating a prettier.config.js file at the root of my project. Its contents are the following. The trailingComma and singleQuote values are important to minimize prettier and TSLint from fighting each other.
module.exports = {
    trailingComma: 'es5',
    tabWidth: 4,
    singleQuote: true,
    printWidth: 120,
};
Even with the above, I was still getting a lot of TSLint errors, so I reviewed TSLint rule flags and had to enact several rules within my code including:
- Immediately before I exported something where the filename had more than one period in it:
/* tslint:disable-next-line:export-name */
- Immediately before I used the type “any” for a variable. This seemed necessary when I couldn’t find a type that PnP was using (maybe I didn’t look hard enough):
/* tslint:disable-next-line:no-any */
- Immediately before any line that just didn’t fit TSLint’s max line length (I think it is 120, but my configuration is ignored, so I am not sure what it is):
/* tslint:disable-next-line:max-line-length */
- This problem occurred when prettier insisted on ending an arrow function with a semicolon, but TSLint complained, so I put it right before the closing of the arrow function:
/* tslint:disable-next-line:semicolon */
Summary
Well, if you made it this far, I applaud you – and am a little surprised. I don’t tend to write blog posts that are this long, but I really needed to get this off of my chest.
Many companies are still on older versions of SharePoint and the effort to upgrade is sometimes daunting (but ThreeWill can help!) If you are working with SharePoint 2016 and want to build custom web parts with SPFx I hope the steps above (and the pain I went through) saves you some time.
by Scott Muniz | Jul 2, 2021 | Security, Technology
This article is contributed. See the original author and article here.
CISA is taking action to understand and address the recent supply-chain ransomware attack against Kaseya VSA and the multiple managed service providers (MSPs) that employ VSA software. CISA encourages organizations to review the Kaseya advisory and immediately follow their guidance to shutdown VSA servers.
by Contributed | Jul 2, 2021 | Technology
This article is contributed. See the original author and article here.
“Windows has always existed to be a stage for the world’s innovation. It’s been the backbone of global businesses and where scrappy startups became household names. The web was born and grew up on Windows. It’s the place where many of us wrote our first email, played our first PC game, and wrote our first line of code. Windows is the place people go to create, to connect, to learn, and to achieve – a platform over a billion people today rely on.” – Panos Panay
We want to use this blog to address questions and comments we have received over the past few days regarding Windows IoT and the commitment around the support lifecycle.
In February we announced that there will be release of Windows 10 Enterprise LTSC and Windows 10 IoT Enterprise LTSC in the second half (H2) of calendar year 2021. In that announcement we communicated that Windows 10 Client LTSC will change from a 10-year to a 5-year lifecycle, aligning with the changes to the next perpetual version of Office. We also stated that Windows 10 IoT Enterprise will maintain a 10-year support lifecycle. You can read more about their announcements here.
This has not changed with all the announcements around Windows 11, and we are still scheduled to release a LTSC version of Windows 10 IoT Enterprise in the timeframe specified in that announcement. We will also release IoT versions of Windows 11 and Windows Server 2022. The first release of Windows 11 IoT Enterprise will have a servicing timeline of 36 months from the month of release as described in our lifecycle documentation. We will announce more information around these releases in the future.
The needs of the IoT industry remain unique and for that reason Microsoft developed Windows 10 IoT Enterprise LTSC and the Long Term Servicing Channel of Windows Server, which today is Windows Server 2019. Each of these products will continue to have a 10-year support lifecycle, as documented on our Lifecycle datasheet.
We remain committed to the ongoing success of Windows IoT, which is deployed in millions of intelligent edge solutions around the world. Industries including manufacturing, retail, medical equipment and public safety choose Windows IoT to power their edge devices because it is a rich platform to create locked-down, interactive user experiences with natural input, provides world class security and enterprise grade device management, allowing customers and partners to build solutions that are designed to last.
by Contributed | Jul 2, 2021 | Technology
This article is contributed. See the original author and article here.
Hi all, Will Aftring here from Windows Networking Support.
I wanted to chat about how Network Isolation interacts with Universal Windows Platform (UWP) applications and how / why you may want to alter some of these settings in respect to the network and their usage within an Active Directory (AD) integrated domain.
What is this?
As of Windows 8.1+, modern UWP applications have more granularity with determining the scope of operating system (OS) resources they have access to.
These configurations are made in the application manifest and applied to the binary during compilation. There are tools available in the OS to help diagnose issues and make small configuration changes.
How it works
Network Isolation defines network access to the application.
This includes the following:
- Outbound client-initiated requests
- The application reaching out to another resource over the network
- Inbound unsolicited requests
- A client reaching out to the application unsolicited
These network connections are broken down into the following boundaries based on their destination:
- Home/Work: A local home or work network and other machines considered to be local. In a domain environment this is defined by AD Sites and Subnets.
- Internet: Any connection that is not a part of Home/Work is considered internet. This includes proxies that would provide access to the internet.
If any traffic generated by that application that is not defined in the manifest, will be dropped by the Windows Filtering Platform (WFP).
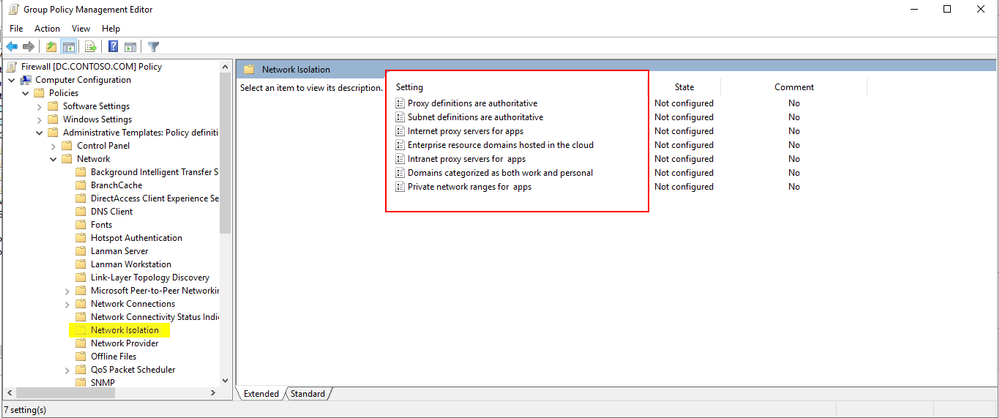
Network Isolation Group Policies
As mentioned above, any endpoint not defined in AD Sites and Subnets is considered to fall within the internet boundary.
However, there are a handful of group policies that allow for the boundaries to be tweaked.
These group polices are found here:
Computer Configuration -> Administrative Templates -> Network -> Network Isolation
For instance, through the group policy outlined below, users can explicitly add intranet proxies to the Home/Work boundry:

More details about each of the available group policies and examples of specific implementations can be found below.
Isolating Apps on Your Network: Define your Network
Benefits of redefining your AD subnets:
WFP defines its filters for sites within AD as concisely as possible. However, due to the nature of how WFP filters define their scope, having many AD subnets can create excessive numbers of WFP filters. As a result of excessive WFP filters, network transmissions may take longer. Additionally, the OS may experience high CPU utilization during the creation of these WFP filters.
A good rule of thumb is with more than 300 AD subnets defined; you may start seeing hits to performance.
A quick way to check the defined AD subnets is with the following PowerShell cmdlet:
PS C:> Get-ADReplicationSubnet -Filter "*" | Measure-Object | Select-Object Count
If the count of subnets exceeds 300, it is worth investigating redefining your AD subnets or supernetting some AD subnets in the available group policies. Configuring the supernets in group policy is an easy two-step process.
These are the two group policies that control this behavior.

First would be enabling the subnet definitions as authoritative.

Second, would be grouping the AD subnets into super-nets within Private network ranges for apps.

For example, if you have the AD subnets of 192.168.1.0/24 and 192.168.2.0/24, … 192.168.200.0/24 this could easily be included in a super-net of 192.168.0.0/16 reducing the number of filters into a single range that is defined by a single WFP filter.
This reduces the number of WFP filters allowing for a more efficient:
- Creation of WFP filters
- Processing of inbound and outbound network traffic
Windows Firewall Rules per UWP Capability
Another feature of UWP applications is that IT administrators have additional options for how they configure the Windows Firewall around these applications.
UWP specific Windows Firewall settings are made available through the local principals option for a firewall rule. Firewall settings for UWP applications can be applied based on a permission basis (Authorized Users) or on an exclusion basis (Exceptions).
Example: Allowing traffic for specific capabilities on a block rule

These settings can also be configured via group policy as seen in the following document.
Isolating Apps on Your Network: Create Custom Firewall Rules
Loopback traffic
Network communications using the loopback address cannot be used for application-to-application communication for UWP apps because it is restricted by network isolation.
As a consequence of network isolation, Windows disallows establishing a socket connection (Sockets or WinSock) between two UWP apps running on the same machine; whether that’s via the local loopback address (127.0.0.0), or by explicitly specifying the local IP address. For details about mechanisms by which UWP apps can communicate with one another, see App-to-app communication.
Source: https://docs.microsoft.com/en-us/windows/uwp/networking/sockets
However, if the application-to-application communication is occurring within the same process then the communication is permitted.
Security Products
Some security applications will adjust components of the OS to leverage the loopback adapter.
Setting any network component, (DNS server, WinHttp proxy / WinInet proxy, etc.…) to the loopback address will lead to the traffic from any UWP applications that leverage those network components to be dropped by WFP. This is by-design behavior; however, it can be worked around if necessary.
Checking for loopback drops
The easiest way to check if there are packet drops due to network isolation is through WFP auditing.
Here is an example of how to check if a UWP applications traffic is being dropped by network isolation due to loopback communication.
First, enable WFP auditing with the following command:
auditpol /set /subcategory:"Filtering Platform Packet Drop" /success:enable /failure:enable
In my scenario, the Windows Store was unable to reach the internet. I reproduced this issue and reviewed the security event log for Event ID 5152:
Log Name: Security
Source: Microsoft-Windows-Security-Auditing
Date: 6/1/2021 7:09:39 AM
Event ID: 5152
Task Category: Filtering Platform Packet Drop
Level: Information
Keywords: Audit Failure
User: N/A
Computer: W2.contoso.com
Description:
The Windows Filtering Platform has blocked a packet.
Application Information:
Process ID: 5884
Application Name: deviceharddiskvolume1windowssystem32windowspowershellv1.0powershell.exe
Network Information:
Direction: Inbound
Source Address: 127.0.0.1
Source Port: 50961
Destination Address: 127.0.0.1
Destination Port: 9000
Protocol: 6
Filter Information:
Filter Run-Time ID: 67901
Layer Name: Receive/Accept
Layer Run-Time ID: 44
From this information we can see that our packet was dropped with filter ID 67901. Let’s proceed to reviewing the filters we have in place to determine the reason for the drop. A dump of the current WFP filters can be generated by running the following command from an Admin Command Prompt:
netsh wfp show state file=wfpstate.xml
Within my wfpstate.xml the filter ID 67901 matches the following item. Based on the name of the filter responsible (AppContainerLoopback) for dropping the packet, I know that the packet is being dropped due to UWP loopback communication.
<item>
        <filterKey>{2d336b0c-dcb6-451c-bd3c-e5b22641c539}</filterKey>
        <displayData>
                 <name>AppContainerLoopback</name>
                 <description>AppContainerLoopback</description>
        </displayData>
        <flags/>
        <providerKey>{decc16ca-3f33-4346-be1e-8fb4ae0f3d62}</providerKey>
        <providerData>
                 <data>ffffffffffffffff</data>
                 <asString>........</asString>
        </providerData>
        <layerKey>FWPM_LAYER_ALE_AUTH_RECV_ACCEPT_V4</layerKey>
        <subLayerKey>{b3cdd441-af90-41ba-a745-7c6008ff2300}</subLayerKey>
        <weight>
                 <type>FWP_UINT64</type>
                 <uint64>18446744073709551614</uint64>
        </weight>
        <filterCondition numItems="2">
                 <item>
                         <fieldKey>FWPM_CONDITION_FLAGS</fieldKey>
                         <matchType>FWP_MATCH_FLAGS_ALL_SET</matchType>
                         <conditionValue>
                                  <type>FWP_UINT32</type>
                                  <uint32>1</uint32>
                         </conditionValue>
                 </item>
                 <item>
                         <fieldKey>FWPM_CONDITION_ALE_USER_ID</fieldKey>
                         <matchType>FWP_MATCH_EQUAL</matchType>
                         <conditionValue>
                                  <type>FWP_SECURITY_DESCRIPTOR_TYPE</type>
                                  <sd>O:LSD:(A;;CC;;;AC)(A;;CC;;;S-1-15-3-1)(A;;CC;;;S-1-15-3-2)(A;;CC;;;S-1-15-3-3)(A;;CC;;;S-1-15-3-4214768333-1334025770-122408079-3919188833)(A;;CC;;;WD)(A;;CC;;;AN)</sd>
                         </conditionValue>
                 </item>
        </filterCondition>
        <action>
                 <type>FWP_ACTION_BLOCK</type>
                 <filterType/>
        </action>
        <rawContext>0</rawContext>
        <reserved/>
        <filterId>67901</filterId>
        <effectiveWeight>
                 <type>FWP_UINT64</type>
                 <uint64>18446744073709551614</uint64>
        </effectiveWeight>
</item>
Working around UWP loopback communication
Note, this is intended for debugging purposes only.
In the example below, I will be adding an exemption for the Windows Store.
Let’s start by checking the current configuration of loopback communications using the CheckNetIsolation tool. The syntax, and example output is seen below.
PS C:> CheckNetIsolation.exe LoopbackExempt -s

List Loopback Exempted AppContainers

OK.
This is the output we would expect to see with no loopback exempt applications.
With that in mind, lets add my exemption for the Windows Store. First thing we need to do is find the AppID of the Windows Store. To do this we can run the PowerShell cmdlet Get-StartApps with one of the following syntaxes.
PS C:> Get-StartApps # For all applications
Name            AppID
----            -----
Blend 2019                         Blend.28500c9f
Python 3.9 (64-bit)                C:Python39python.exe
Microsoft Store                    Microsoft.WindowsStore_8wekyb3d8bbwe!App

PS C:> Get-StartApps -Name "Microsoft Store" # Or for a specific application

Name            AppID
----            -----
Microsoft Store Microsoft.WindowsStore_8wekyb3d8bbwe!App
The resulting AppID can be trimmed:
- from Microsoft.WindowsStore_8wekyb3d8bbwe!App
- to Microsoft.WindowsStore_8wekyb3d8bbwe
Now adding the exemption for the rule will can be done using CheckNetIsolation with the syntax below.
PS C:> CheckNetIsolation.exe LoopbackExempt -a -n="Microsoft.WindowsStore_8wekyb3d8bbwe"
OK.
Confirm the loopback exemption rule has been added to the exemption list, with the syntax below.
PS C:> CheckNetIsolation.exe LoopbackExempt -s

List Loopback Exempted AppContainers

[1] -----------------------------------------------------------------
    Name: microsoft.windowsstore_8wekyb3d8bbwe
    SID:  S-1-15-2-1609473798-1231923017-684268153-4268514328-882773646-2760585773-1760938157

OK.
And now there is an exemption added for the Windows Store!
If you wanted to add all current UWP applications to the loopback exemption list, you could use a PowerShell script like this. Note, this may vary depending on AppID format and use at your own risk.
(Get-StartApps).AppID | ForEach-Object {
       $UWPApp = $_.Split("!")[0]
       CheckNetIsolation.exe LoopbackExempt -a -n="$UWPApp"
}
UWP listening on the loopback for traffic
Currently, it is not supported for UWP application to listen on the loopback adapter outside of Visual Studio.
This behavior is outlined in our documentation.
Note Loopback is permitted only for development purposes. Usage by a Windows Runtime app installed outside of Visual Studio is not permitted. Further, a Windows Runtime app can use an IP loopback only as the target address for a client network request. So, a Windows Runtime app that uses a DatagramSocket or StreamSocketListener to listen on an IP loopback address is prevented from receiving any incoming packets.
Source: Windows 8 Development: How to enable loopback for network access
Determining what traffic an application is using
If the traffic an application is using is unknown, CheckNetIsolation can be used to determine how the OS is detecting the network traffic of a UWP application.
In our example, I will be investigating the Windows Store which will only be accessing resources out on the open internet and will not be receiving any unsolicited connections.
As seen in the loopback example we can pull the AppID with Get-StartApps using the syntax below.
PS C:> Get-StartApps -Name "Microsoft Store"

Name            AppID
----            -----
Microsoft Store Microsoft.WindowsStore_8wekyb3d8bbwe!App
As a reminder be sure to trim the trailing !App from the AppID.
Now using the CheckNetIsolation syntax below I can start a debug session to determine how the OS is detect the network boundary of traffic for the Windows Store.
PS C:> CheckNetIsolation.exe Debug -n="Microsoft.WindowsStore_8wekyb3d8bbwe"

Network Isolation Debug Session started.

Reproduce your scenario, then press Ctrl-C when done.
Once I’ve reproduced my issue, I can input Ctrl+C to stop the data collection and a report similar to the one below will be generated.
PS C:> CheckNetIsolation.exe Debug -n="Microsoft.WindowsStore_8wekyb3d8bbwe"

Network Isolation Debug Session started.

Reproduce your scenario, then press Ctrl-C when done.

Collecting Logs.....

Summary Report
Network Capabilities Status
----------------------------------------------------------------------
    InternetClient                Used and Declared
    InternetClientServer          Not Used and Insecure

Detailed Traffic Report
----------------------------------------------------------------------
    InternetClient                Used and Declared
 ------------------------------------------------------------------
      23.196.35.33     23.196.35.33     23.196.35.33     104.87.85.147
      104.87.85.147    23.218.218.171   104.87.85.147    104.87.85.147
      104.87.85.147    104.87.85.147    104.87.85.147    104.87.85.147
      23.220.124.10

    InternetClientServer          Not Used and Insecure
 ------------------------------------------------------------------

OK.
In my scenario, only InternetClient traffic (meaning outbound traffic to endpoints outside my work boundary) was detected by the debug scenario.
Closing Notes:
I know I covered lots of in-depth information here, I appreciate if you have made it this far. Network isolation can be tricky, but with the information above you should be able to get started diagnosing issues in your environment. For additional information please see the section below.
Additional Reading

Recent Comments