by Contributed | Aug 20, 2021 | Technology
This article is contributed. See the original author and article here.
What is Page cannot be displayed?
There are certain scenarios in which when we try to browse a site hosted on IIS server, we end up getting Page cannot be displayed (PCBD) . There are several reasons for which we will eventually get PCBD , some of the reasons are :
- Network related problems
- Improper bindings on IIS
- Improper certificates on IIS
- Incorrect settings on Http.Sys
In most of the scenarios the request doesn’t even reach to the IIS layer and fails before that . Here is a nice article explaining about layers of service that a request has to travel: https://techcommunity.microsoft.com/t5/iis-support-blog/iis-services-http-sys-w3svc-was-w3wp-oh-my/ba-p/287856
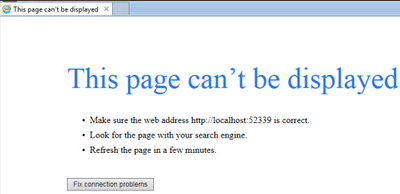
Generally, a PCBD error looks like below:

This blog will focus on list of steps which are going to be useful for troubleshooting these kinds of scenarios .Here, I have created a Flow chart:
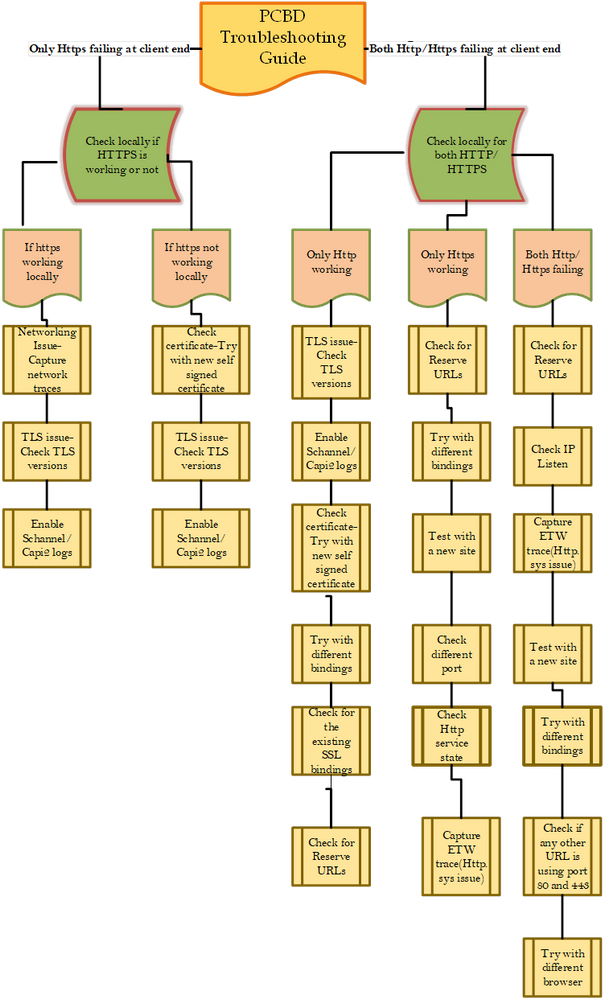
There are several steps in the flow chart which require data collection , just listing a few of them here:
Steps for capturing Schnannel logs and Capi2 logs :
Schannel Logs:
- Start Registry Editor. To do this, click Start, click Run, type regedt32, and then click OK.
- Locate the following key in the registry:
- HKEY_LOCAL_MACHINESystemCurrentControlSetControlSecurityProvidersSCHANNEL
- On the Edit menu, click Add Value, and then add the following registry value:
- Value Name: EventLogging
- Data Type: REG_DWORD
- Note After you add this property, you must give it a value. See the table in the “Logging options” section to obtain the appropriate value for the kind of events that you want to log.
- Exit Registry Editor.
- Click Start, click Shut Down, click to select Restart, and then click OK to restart the computer. (Logging does not take effect until after you restart the computer).
Logging options:
The default value for Schannel event logging is 0x0000 in Windows NT Server 4.0, which means that no Schannel events are logged. In Windows 2000 Server and Windows XP Professional, this value is set to 0x0001, which means that error messages are logged. Additionally, you can log multiple events by specifying the hexadecimal value that equates to the logging options that you want. For example, to log error messages (0x0001) and warnings (0x0002), set the value to 0x0003.
Value Description
0x0000 Do not log
0x0001 Log error messages
0x0002 Log warnings
0x0004 Log informational and success events
From https://support.microsoft.com/en-in/help/260729/how-to-enable-schannel-event-logging-in-iis
Capi2 Logs :
The CryptoAPI 2.0 Diagnostics is a feature available on Windows Server 2008+ that supports the trouble shooting of issues concerned with, for example: Certificate Chain Validation Certificate Store Operations Signature Verification
This article describes how to enable the CAPI2 Diagnostic, but for an in depth review of the capability, check here.
Enable CAPI2 logging by opening the Event Viewer and navigating to the Event Viewer (Local)Applications and Services LogsMicrosoftWindowsCAPI2 directory and expand it. You should see a view named Operational as illustrated in Figure 1.
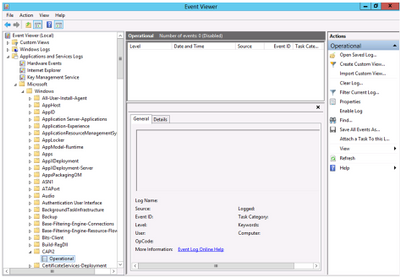
Figure 1, CAPI2 Diagnostics in Event Viewer
Next, right-click on the Operational view and click the Enable Log menu item as shown in Figure 2.
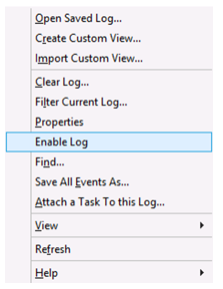
Figure 2, Enable CAPI2 Event Logging
Once enabled, any warnings or errors are logged into the viewer. Reproduce the problem you are experiencing and check if the issue is logged.
Command for checking Reserved URLs:
netsh http show urlacl
The above command lists DACLs (discretionary access control list ) for the specified reserved URL or all reserved URLs.
Command for checking Http.sys Service State:
netsh http show ServiceState
The above command shows snapshot of Http service .
Command for checking the IP Listen:
netsh http show iplisten
The above command lists all IP addresses in the IP listen list. The IP listen list is used to scope the list of addresses to which the HTTP service binds. “0.0.0.0” means any IPv4 address and “::” means any IPv6 address
Capturing Network trace –
To capture Network trace using Netmon tool…please check out this link : https://docs.microsoft.com/en-us/windows/client-management/troubleshoot-tcpip-netmon
Steps for capturing Http.sys ETW trace:
Capture a Perfview trace with IIS ETW providers. You can download Perfview from : https://github.com/microsoft/perfview/releases/tag/P2.0.71
Before starting the Pervfiew trace just run this command in admin command prompt (this captures http.sys traces), also start the other traces:
netsh trace start capture=yes overwrite=yes maxsize=2048 tracefile=c:minio_http.etl provider={DD5EF90A-6398-47A4-AD34-4DCECDEF795F} keywords=0xffffffffffffffff level=0xff provider={20F61733-57F1-4127-9F48-4AB7A9308AE2} keywords=0xffffffffffffffff level=0xff provider="Microsoft-Windows-HttpLog" keywords=0xffffffffffffffff level=0xff provider="Microsoft-Windows-HttpService" keywords=0xffffffffffffffff level=0xff provider="Microsoft-Windows-HttpEvent" keywords=0xffffffffffffffff level=0xff provider="Microsoft-Windows-Http-SQM-Provider" keywords=0xffffffffffffffff level=0xff
Make some 5-6 requests from client (http requests not https).. Once they fail, stop all of them, then run the below command to stop the command
netsh trace stop
This netsh trace will be saved on C drive with the name “minio_http.etl”..
Hope this one helps you.
Happy troubleshooting !!! :smiling_face_with_smiling_eyes:

by Scott Muniz | Aug 20, 2021 | Security
This article was originally posted by the FTC. See the original article here.
More and more places are requiring proof that you’ve had a COVID-19 vaccine or have recently tested negative before giving you access. Scammers see this as an opportunity to profit by selling fake verification tools or products, like fake vaccination cards, certificates, and test results.
Our advice:
- Know that buying fake vaccine cards, making your own, or filling in blank cards with false information is illegal and could get you fined, or even land you in jail.
- Don’t share personal information with people you don’t know. Scammers will turn the tables and sell your data or use it to commit identity theft.
- The only legitimate way to get proof that you’re vaccinated — or that you test negative — is to GET vaccinated or to TEST negative. If you lose that proof, check with your state health department or the place you got vaccinated to find out how you might be able to get a replacement.
If you spot a fake vaccine card, report it to the Office of the Inspector General of the Department of Health and Human Services at 1-800-HHS-TIPS or oig.hhs.gov, or file a complaint with the FBI’s Internet Crime Complaint Center.
You can also file a report with the FTC at ReportFraud.ftc.gov. Your report can make a difference. We use reports like yours to investigate, bring law enforcement cases, and alert people about what frauds to be on the lookout for so they can protect themselves, their friends, and family.
To learn more about COVID-related scams, visit ftc.gov.coronavirus/scams and subscribe to consumer alerts from the FTC to get updates delivered right to your email inbox.
Brought to you by Dr. Ware, Microsoft Office 365 Silver Partner, Charleston SC.

by Contributed | Aug 20, 2021 | Technology
This article is contributed. See the original author and article here.

A first look at Azure AD Conditional Access authentication context
Kenneth van Surksum is an Enterprise Mobility MVP from The Netherlands. Kenneth a works as a modern workplace consultant at Insight24 and is specialized in building modern workplace solutions on top of Microsoft 365. Kenneth is co-founder of the Windows Management User Group Netherlands (WMUG_NL), which was recently rebranded to the Workplace Ninja User Group Netherlands, and organizes (virtual) community meetings on a regular basis. Kenneth loves to speak about technical topics related to his daily work. Kenneth is Microsoft Certified Trainer (MCT) and has multiple certifications, he has received the MVP and VMware vExpert award multiple times. For more, check out Kenneth’s Twitter @kennethvs

Set up organizational Teams meeting backgrounds
Vesku Nopanen is a Principal Consultant in Office 365 and Modern Work and passionate about Microsoft Teams. He helps and coaches customers to find benefits and value when adopting new tools, methods, ways or working and practices into daily work-life equation. He focuses especially on Microsoft Teams and how it can change organizations’ work. He lives in Turku, Finland. Follow him on Twitter: @Vesanopanen

UNO PACKAGE: A NEW WAY TO UPDATE WINDOWS 10 AND WINDOWS SERVER 2019
Silvio Di Benedetto is founder and CEO at Inside Technologies. He is a Digital Transformation helper, and Microsoft MVP for Cloud Datacenter Management. Silvio is a speaker and author, and collaborates side-by-side with some of the most important IT companies including Microsoft, Veeam, Parallels, and 5nine to provide technical sessions. Follow him on Twitter @s_net.

Azure VM: Log in with RDP using Azure AD
George Chrysovalantis Grammatikos is based in Greece and is working for Tisski ltd. as an Azure Cloud Architect. He has more than 10 years’ experience in different technologies like BI & SQL Server Professional level solutions, Azure technologies, networking, security etc. He writes technical blogs for his blog “cloudopszone.com“, Wiki TechNet articles and also participates in discussions on TechNet and other technical blogs. Follow him on Twitter @gxgrammatikos.

Teams Real Simple with Pictures: Using Generic Links in Approvals for SPO Docs, Sites, Videos and Lists
Chris Hoard is a Microsoft Certified Trainer Regional Lead (MCT RL), Educator (MCEd) and Teams MVP. With over 10 years of cloud computing experience, he is currently building an education practice for Vuzion (Tier 2 UK CSP). His focus areas are Microsoft Teams, Microsoft 365 and entry-level Azure. Follow Chris on Twitter at @Microsoft365Pro and check out his blog here.

by Grace Finlay | Aug 19, 2021 | Marketing
Utilizing Google Analytics for your website is crucial if you want to know where your audience is coming from, what keywords they used to arrive at your website, and what they are looking for when they arrive. Google Analytics is an invaluable marketing tool. It is essential for your blog posts, videos, podcasts, and other social media content that rely on website traffic. But how do you use Google Analytics?
One of my favorite analytics features is Google Analytics Event Tracking. This tool shows who is clicking ads, how many times, when and where they click, and what pages they view. If you are unfamiliar with this capability, then you should get to know it quickly. Businesses can use event tracking because it allows them to get in front of their prospects, identify problems, and act.
Another crucial analytical tracking technology is Google Analytics Conversion Tracking. This function enables users to identify their visitors and determine whether they converted. This information is priceless because it gives insight into what potential customers are looking for online. By pinpointing what customers are looking for, business owners can improve sales and business results. Utilizing this tracking code and Google Analytics, businesses also identify their biggest obstacles, track down customers who have left comments, and find innovative ideas for content creation that will bring in more engagement.
Google Analytics helps its users analyze all aspects of their website traffic, including their most active keywords, their most visited pages, their average time per page, and overall website traffic. With these tools, businesses can determine where they are performing and if they need to make changes to their website traffic generation strategy. With Google Analytics, individuals can develop innovative ideas for their SEO campaigns. In addition, companies can see what content is bringing in the most traffic and how to increase their conversion rates.
If you are currently in the market for an SEO company, there is no doubt you have done a lot of research. However, before a company can improve its online presence and SEO, it must first collect data. Google Analytics makes it easy to track everything associated with your website, including all visitors that come to your site. By analyzing the data provided by Google Analytics, you will tailor your campaigns to suit your needs better. While this may take some time, if you focus on understanding how Google’s tracking tools work and how to interpret the information, it can save you time and money for your online marketing campaigns.
The more you focus on creating quality content and attracting quality traffic, the more likely you will make sales. However, suppose you are not getting much website traffic. In that case, it can get challenging to figure out where all the traffic is originating. If you are not taking advantage of some of the free resources like Google Analytics, you can miss potential customers. The more information you gather about your visitors, the better decisions you can make to improve your online marketing efforts.

by Contributed | Aug 19, 2021 | Technology
This article is contributed. See the original author and article here.

Disclaimer
This document is not meant to replace any official documentation, including those found at docs.microsoft.com. Those documents are continually updated and maintained by Microsoft Corporation. If there is a discrepancy between this document and what you find in the Compliance User Interface (UI) or inside of a reference in docs.microsoft.com, you should always defer to that official documentation and contact your Microsoft Account team as needed. Links to the docs.microsoft.com data will be referenced both in the document steps as well as in the appendix.
All of the following steps should be done with test data, and where possible, testing should be performed in a test environment. Testing should never be performed against production data.
Target Audience
The Advanced eDiscovery (Aed) section of this blog series is aimed at legal and HR officers who need to understand how to perform a basic investigation.
Document Scope
This document is meant to guide an administrator who is “net new” to Microsoft E5 Compliance through the use of Advanced eDiscovery.
It is presumed that you already data to search inside your tenant.
We will only step through a basic eDiscovery case (see the Use Case section).
Out-of-Scope
This document does not cover any other aspect of Microsoft E5 Compliance, including:
- Sensitive Information Types
- Exact Data Matching
- Data Protection Loss (DLP) for Exchange, OneDrive, Devices
- Microsoft Cloud App Security (MCAS)
- Records Management (retention and disposal)
- Overview of Advanced eDiscovery (AeD)
- Reports and Analytics available in of Advanced eDiscovery (AeD)
It is presumed that you have a pre-existing of understanding of what Microsoft E5 Compliance does and how to navigate the User Interface (UI).
It is also presumed you are using an existing Information Types (SIT) or a SIT you have created for your testing.
Use Case
There are many use cases for Advanced eDiscovery. For the sake of simplicity, we will use the following: Your organization has a Human Resources investigation against a specific user.
Overview of Document
- Use Case
- Definitions
- Notes
- Pre-requisites
- Create a Case
- Run an investigation
- Export a subset of data
- Appendix and Links
Definitions
- Data Sources – These are the locations (EXO, SPO, OneDrive) where searches will be performed. These are all the custodians (users) being investigated. This is not the users performing the investigation.
- Collections – This is the actual search being performed. Collections include user, keyword, data, etc.
- Review Sets – Once a collection/search has been performed, the data most be reviewed. This tab is where secondary searches can be done and a review of the data.
- Communications – If the HR or legal team wishes, they can notify the user that they are under investigation. You can also set up reminder notifications in this section of the UI.
- Note – This task is optional.
- Hold – Once the data has been collected/searched or reviewed, either all or part of the data can be placed on legal hold. This means that the data cannot be deleted by the end user and if they do, then only their reference to the data is deleted. If the user deletes their reference, then the data is placed into a hidden hold directory.
- Processing – This tab is related to the indexing of data in your production environment. You would use this if you are not finding data that you expect and you need to re-run indexing activities.
- Note – This task is optional.
- Exports #1 – When referring to the tab, this provides the data from the case to be exported to a laptop or desktop.
- Export #2 – This is also the term used to export a .CSV report.
- Jobs – This provides a list of every job run in eDiscovery and is useful when trying to see the current status of your jobs (example – Collection, Review, Processing, Export, etc). This is useful if you launch an activity and want to monitor its status in real-time.
- Setting – High level analytics and settings and reports, etc.
- Custodian – This is the individual being investigated.
Notes
- Core vs Advanced eDiscovery (high level overview)
- Core eDiscovery – This allows for searching and export of data only. It is perfect for basic “search and export” needs of data. It is not the best tool for data migration or HR and/or Legal case management and workflows.
- Advanced eDiscovery – This tool is best used as a first and second pass tool to cull the data before handing that same data to outside council or legal entity. This tool provides a truer work flow for discovery, review, and export of data along with reporting and redacting of data.
- If you are not familiar with the Electronic Discovery Reference Model (EDRM), I recommend you learn more about it as it is a universal workflow for eDiscoveries in the United States. The link is in the appendix.
- For my test, I am using a file named “1-MB-Test-SSN-1-AeD” with the phrase “Friedrich Conrad Rontgen invented the X-Ray” inside it. This file name stands for 1MB file with SSN information for Advanced eDiscovery testing.
- We will not be using all of the tabs in available in a AeD case.
- How do user deletes of data work with AeD?
- If the end user deletes the data on their end and there IS NO Hold, then the data will be placed into the recycle bin on the corresponding applications.
- If the end user deletes the data on their end and there IS a Hold, then the data will NOT be placed into the recycle bin on the corresponding applications. However, the user reference to the data will be deleted so they will believe that the data is deleted.
Pre-requisites
If you have performed Part 1 of this blog series (creating a Sensitive Information Type), then you have everything you need. If you have not done that part of the blog, you will need to populate your test environment with test data for the steps to follow.
Create a Case
- Click Create Case

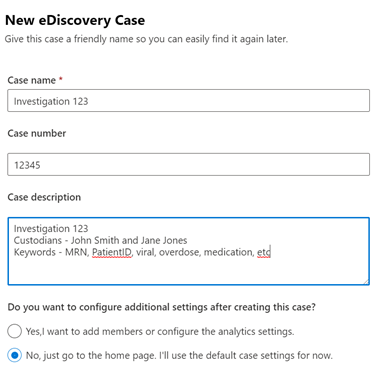
- Give the case a Name, Case Number (if applicable), and Case Description, and then click No, just go to the home page.
a. Note – the more you put in the description, the better for reporting later on. So, if you have received an email from HR, Legal, outside council, etc., you can cut and paste that information into the Case Description.
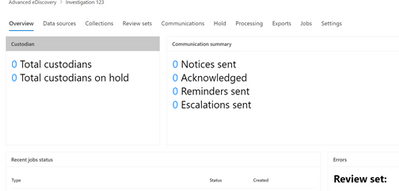
- You will now find yourself in the Case Overview.
- With the case created, we will now run an investigation
Run an investigation
In this section, we will walk through the steps and flow to run a basic eDiscovery case:
- Configure data sources
- Run a collection
- Working with data into a review set
- Export a subset of data
Configure Data Sources
There are 2 ways to indicate what data sources will be searched, custodian or location.
Custodians
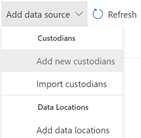
- Select the Data Sources tab and then click Add Data Source. You will have several options. We will choose Add new custodians. This allows you to search across multiple Office 365 applications for a user.
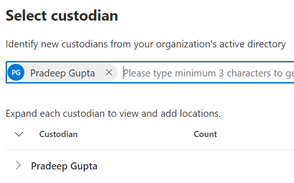
- Type the name of the custodian you want to search. I will only selecting one user at this time, Pradeep.
- Select your Hold Setting. The Hold Setting indicates which users’ data set to place on automatic hold when searched. If you do not select Hold for a user, the user’s data will be searched but not placed automatically on legal hold.
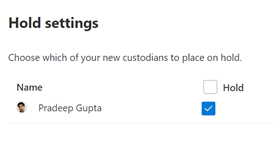
- In the Review section of the wizard, you will see what data locations are being searched and which are placed on automatic hold.
a . Note #1 – Any data location associated with that user will have a number 1 associated with it. If there is no number associated with the data location, then, the user is not determined to have any data in that location. Automatic Hold will be placed on locations where the user has data, per the 2nd step of the wizard.
b. Note #2 – When you edit a custodian, you can change or clear the setting in this screen.
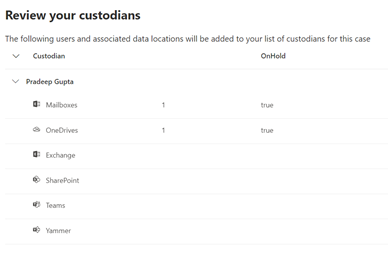
- If you are content with what you see, click Submit. Then click Done on the next screen.
Locations
- If wish to search specific locations, and not just users and their associated data locations, you can select Add data locations. Asdf
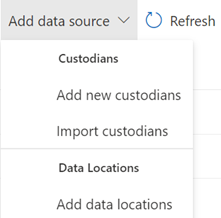
- You can add SharePoint or Exchange locations. I will add the default SharePoint location of the “The Landing” which is one of my pre-populated SharePoint sites. I will not be adding an Exchange location.
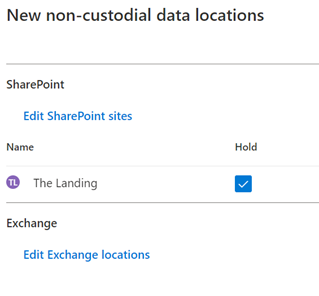
- Then click Add.
Run a Collections
- Now we will run a collection (ie. search) of data. Select the Collections tab and click Add Collection and chose Standard collection.

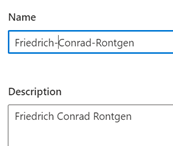
- Give the collection a name and description and click Next.
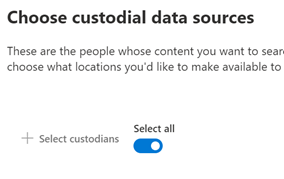
- For the custodians being searched (Custodial Data Sources), you can search either a) specific custodians assigned to this case or b) all users associated with your case. I will choose All users. Click Next.
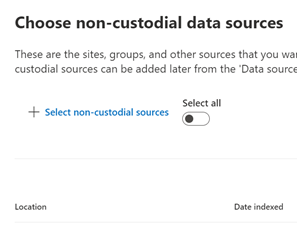
- Next are Non-custodial data sources. These are sites, groups and other sources that are not associated with the custodians that you might want to add to your search. For now, accept the default and select Next.
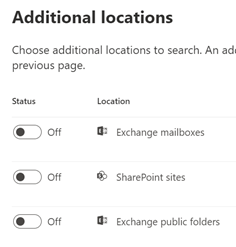
- If you want to add other locations, other than those associated with the user via their Identity, then you can add them in the Additional Locations part of the wizard. For example, you can search Sarah Smith’s email in addition to Pradeep’s by adding her mailbox in this section. Accept the default and click Next.
- We have come at long last to the search criteria itself. In this section labeled Conditions, you can run searches based on keyword or other conditions.
- For my test I am using a file named “1-MB-Test-SSN-1-AeD” with the phrase “Friedrich Conrad Rontgen invented the X-Ray” inside it. This stands for 1MB file with SSN information for Advanced eDiscovery testing. I will search against the three names of this inventor.
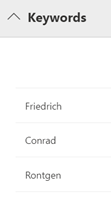
- Here is a list of those other conditions you can choose from.

- Select the criteria that you want to search. When you are ready, click Next.
a. Note – A common initial search is to search a user or set of users and a date range. Then run a secondary search against a secondary search on a narrower data range, keywords, a subset of users, etc. In Advanced eDiscovery, we will do those sorts of searches in the Review Sets tab which is next.
10. Next is Save Draft or Collection. Here you have the option to save this collection as a draft (meaning the data set is not officially placed on hold) or you can collect items into a review set. We will choose the latter (Collect items and add to review set), and I will add it to a new Review set.
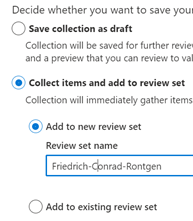
- Note #1 – If you have a case with multiple collections, you might decide to add a collection to a pre-existing Review Set. I do not have one here and so will use a new review set.
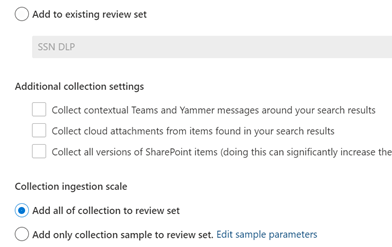
- Note #2 – If adding to an existing Review Set, you can select Additional collection settings. Again, we will not do those here as those options are also found in the Review Set section of the eDiscovery too.
- Note #3– placing data in a Review Set does not place that data on hold. That is a done in the Hold tab which will allow you to place a “hold in place” action on data. We will not be performing that in this blog
- Under Collection ingestion scale, I will choose the first option, Add all collection to review set.
- Note – you can chose to add only part of the collection to a review set, if you wish.
- Now review your collection and select Submit and then Done.
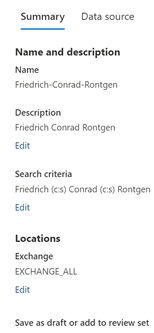
- Click Done and move to the Review Sets tab.
Working with data in a Review Set
- Go to the Review Sets tab. Select the review set you just created click Open Review Set.
- Note – You, can also click Add Review Set to create a new review set. The reason to do this is so that you can better organize your future collections.

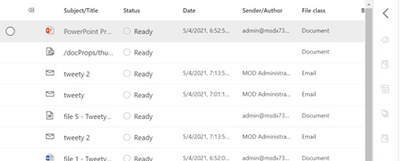
2. Let us take a tour of this interface. A ribbon across the top will show several options. Let us take a tour of this interface
a. The first ribbon across the top will show several options to narrow your results by Keyword, Date, Sender/Author, Subject/Title, and/or Tags

b. The second ribbon allows for actions against the data in the Review Set: Overview (Summary), Analytics, Actions (download, report, redaction, etc), Tags (legal), and Manage (the collected data).

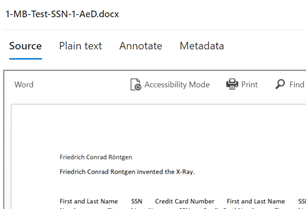
- If you select a file or email a preview panel will appear on the right. I will select a file. Atop the preview pane you can find options to view the Source file, look at the file in plain text, Annotate the file for redaction, or look at the metadata. I will not be making any annotations to this file at this time.
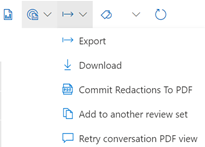
- I will now export data for review by an external legal team. I am going to highlight some files, and then go to the top toolbar and select Actions->Export. I will give the export a name and fill in the other details as needed.
- Again, I am going to highlight some files, and then go to the top toolbar and select Actions->Export. I will give the export a name and fill in the other details as needed.
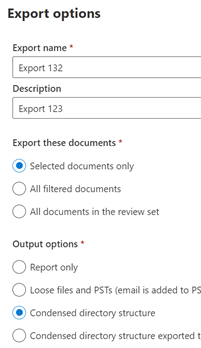
- Give the export a name and a description and click leave the rest of the settings at their defaults. Then click Export.
- A job will be created. Click OK. This set of exported data will appear in the Exports tab.
Export a subset of data
- On the Exports tab, click on your export. A window will appear on the right which will tell you if your export was successful. If so, you can now download it along with a summary report to your local machine and then hand it over to outside council as needed.
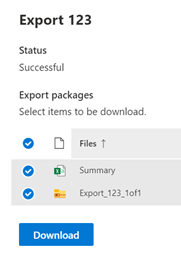
- Congratulations! You have now have now completed a basic Advanced eDiscovery case and have finished this blog series.
Appendix and Links
Note: This solution is a sample and may be used with Microsoft Compliance tools for dissemination of reference information only. This solution is not intended or made available for use as a replacement for professional and individualized technical advice from Microsoft or a Microsoft certified partner when it comes to the implementation of a compliance and/or advanced eDiscovery solution and no license or right is granted by Microsoft to use this solution for such purposes. This solution is not designed or intended to be a substitute for professional technical advice from Microsoft or a Microsoft certified partner when it comes to the design or implementation of a compliance and/or advanced eDiscovery solution and should not be used as such. Customer bears the sole risk and responsibility for any use. Microsoft does not warrant that the solution or any materials provided in connection therewith will be sufficient for any business purposes or meet the business requirements of any person or organization.


Recent Comments